When heat sealing TPU coated fabrics together, it’s important to apply pressure to the fabric as it cools, otherwise it tends to buckle and lift before it forms a strong bond, so you end up with bubbles and weak or leaky areas.
I used to use a leather glove or a clean rag to press on the fabric after removing my heat sealing iron, but this was kind of annoying because covering the fabric with a good insulator like cloth or leather kept the heat from dispersing quickly, so I had to stand there pressing until it was cool enough to move on. Usually that was only about five seconds, but multiply that by several hundred times during the course of a packraft build and it becomes a significant amount of time.
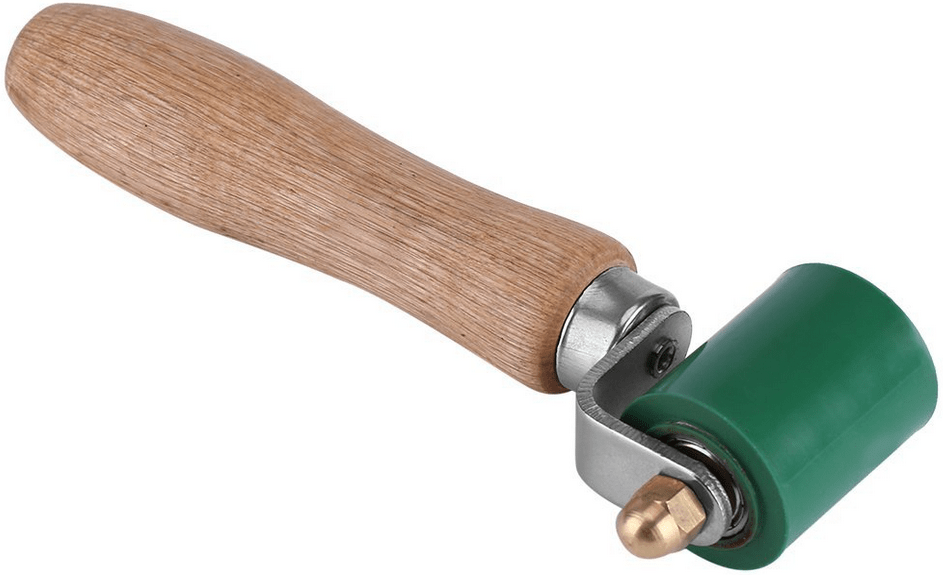
Recently I bought this silicone roller and I really prefer using it instead of a glove or cloth. After I heat an area with my iron, I set the iron aside, grab the roller, and roll it back and forth over the heated area, pressing hard and blowing on the fabric to speed its cooling. This only shaves a few seconds off the cooling time, but when you’re looking at 10+ hours of heat sealing during a packraft build, that cooling time adds up.
I couldn’t find a silicone roller locally, so I purchased the cheapest one I could find on Amazon and it is totally adequate for my purposes. The silicone resists high temperatures, the angle bracket is strong enough that it doesn’t feel flimsy when I press hard, and the 40 mm roller width is just about perfect.
If your budget is already stretched, you can stick with the old rag or glove method, but if you have a few dollars to spare, this tool makes a nice addition to your heat sealing kit.


14 Comments
sabien · April 17, 2019 at 7:31 am
Maybe some extra info with the video we’ve made. I’ve made almost 3 diy packrafts like this. On the first one i only had 3 small leaks in the corners. The second one was a dark green colored one and are much harder to see if the material is welded properly together. So the first time on the water some bad welded seams came open an i needed to weld some parts again because i just forgot them. So i can highly recommend to choose a light colored one independently wich technique you use to weld. The one now is not finished jet and is again a yellow one (like the first one i’ve made) (also the one in the youtube video).
For the technique you need to tape everything in the right place, step by step, because if you are to enthusiastic and have long distances without any taped parts the fabric will move and will be welded wrong. So when everything is taped in the right place (some parts will take some patience 😉 ) i have both hands free. In one hand i use the roller or the back my favorite spoon (it’s round and not to big). In my other hand i handle the blower. Make sure you use the right setting. To mutch blow power on the seams are to agressive so i put the intensity down but always use the same temp of 270°C. For the welding on the bottom part i turn up the blow power to 4,5. Also always blow on the non coated side of the fabric. The heat will go through the fabric and will melt the tpu. When the tpu is melted, takes about 2seconds to melt the tpu, use the roller or something else to apply pressure. When you just started it could take a few seconds more to heat up and melt the tpu. Then the part are stuck for ever. The nozle distance to the fabric is most of the time +-0,5cm. When you go closer it melts to fast and making the distance longer will take for ever to melt the tpu. I also never stay static with the nozle on the same spot. Just keep moving aroung with the blower (left, right, …). You can weld very precisely with this technique. For bigger parts i use the roller and for smaller parts i use the back of a spoon (it’s a little bit round so i don’t make wells, and than you can rub smoothly on the surface). It’s also easier to press harder then with the silicone roller. For the seam i first weld them on the black strip then i turn them and check if verything is welded properly (you can see this in the video).
Shoot (in comments in the youtube video) if you have some more questions about this technique.
CHRIS L JUANES · May 8, 2019 at 9:54 am
Where can we get more information on these Hot Air machines for welding TPU material together, and where can they be purchased?
Matt (Admin) · May 8, 2019 at 9:57 am
See the link in the first comment above.
naas · March 17, 2019 at 4:14 am
YES, this works even better in combination with a hot air soldering station:
https://www.banggood.com/858D-220V-Hot-Air-Soldering-Rework-Station-Handle-Handle-Stand3-Nozzles-p-1129100.html?rmmds=buy&cur_warehouse=CN
Matt (Admin) · March 21, 2019 at 9:48 am
That’s the same one I bought! It does a good job of sealing the fabrics together quickly, but so far I haven’t figured out how to use it without melting too much TPU, so I haven’t incorporated it into my workflow. Do you have any advice on which settings to use?
Lyn St George · April 3, 2019 at 7:17 am
I also have an 858D – squeeze a nozzle down to make a slot around 24mm wide. The air flow is quite low, so if it’s used at 220C or so the heat will spread out too much. Wind the temp up to 300 or more (even 400) and roll at a speed to suit and it will melt only the target you want. A bit like quickly searing a steak, rather than slowly cooking it right through.
naas · April 14, 2019 at 7:59 am
we made a video about it:
https://www.youtube.com/watch?v=mQS_veP1V0A&feature=youtu.be
Matt (Admin) · April 15, 2019 at 8:28 am
Thanks for making the video! I have been trying to direct the air between the fabric layers (the way an industrial hot air welder does), but I don’t have enough hands to hold everything. Your method is much simpler – I will try it!
NAAS · April 15, 2019 at 8:50 am
yes, you still need both hands to do it, so everything mustbe fixed in place by tape before you begin welding
Jacob · May 6, 2019 at 4:04 pm
Hey Naas,
What’s the strategy for the middle of the tubes? I imagine it’s tough getting the roller and the air gun to the center of the tube portions. Also, did you start sealing from the middle out, or did you start from one end with the pieces taped. How are you protecting the TPU in the middle on the floor and on the pieces adjacent to the seams or have you found it’s not much of a problem?
Jacob Rosenthal · May 6, 2019 at 9:40 pm
Also, I’ve been trying your method on some scraps, and found (at least according to the what sealing methods page) that my welds when pulled apart have the tpu all come off in one sheet on one side of the fabric. I also can’t seem to tell the difference between a strong weld and a weak weld until I pull them apart (they all look properly sealed until I rip them apart and the tpu all sheds off on one side). What do you guys think? Is the blower too hot? I’m wondering if the table beneath the blower is making the tpu on the bottom side not heat up enough and it’s therefor not welding properly. Thoughts? Matt have you dabbled with this method yet?
Matt (Admin) · May 7, 2019 at 8:52 am
I’ve played with it a bit, but not to the point where I’m comfortable using it. I think the keys are to apply heat equally and evenly to both pieces of fabric and to not overheat them, and I find all of those things challenging.
Jacob Rosenthal · May 7, 2019 at 4:47 pm
Yeah, after a few hours of using it, that seemed to be my impression. In addition to welding irregularly (I think 1/8 worked properly), my iron shit the proverbial bed and wouldn’t get hot the second time I fired it up, so maybe an additional demerit. It’s being returned (which was fairly easy thanks to Amazon).
I ordered a coverite black baron (the last one I could find on ebay) and they shipped it to my address from 7 years ago (that was my fault) so I’m without a backup for the time being. I will now probably try the leather iron you recommended, but they still take a few weeks. I’d say the hardest part of this process thus far is finding a proper tool to use… Anyway, back to tool shopping…
Oskar · March 27, 2019 at 5:35 am
Any tips for how to use a hot air soldering station without melting everything?