Approximate time: 3 hours
These instructions are for assembling the spray deck kit, available to fit the newer single-person DIY Packrafts. The spray deck is added after the packraft is otherwise complete.
Spray Deck Kit Parts Checklist:
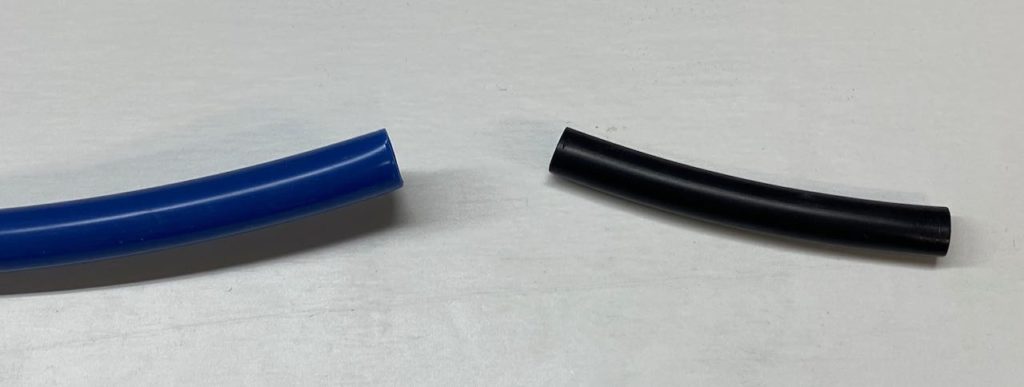
- One long piece of colored plastic tubing, about 2.5 meters (~98″) long (for stiffening the cockpit coaming)
- Fabric – a single piece of black fabric with shapes scored into it. One corner of the fabric is labelled with “SD” (Spray Deck) and the abbreviation for the packraft model and size:
- “SD-A-120” is a spray deck for an Atlin, 120 cm (47″) size
- “SD-A-133” is a spray deck for an Atlin, 133 cm (52″) size
- “SD-A-145” is a spray deck for an Atlin, 145 cm (57″) size
- “SD-S-120” is a spray deck for a Skeena, 120 cm (47″) size
- “SD-S-130” is a spray deck for a Skeena, 130 cm (51″) size
- “SD-S-140” is a spray deck for a Skeena, 140 cm (55″) size
- “SD-T-120” is a spray deck for a Telkwa, 120 cm (47″) size
- “SD-T-130” is a spray deck for a Telkwa, 130 cm (51″) size
- “SD-T-140” is a spray deck for a Telkwa, 140 cm (55″) size
- “SD-Other” has only the coaming components scored into the fabric and the remaining fabric can be sized to fit other packrafts
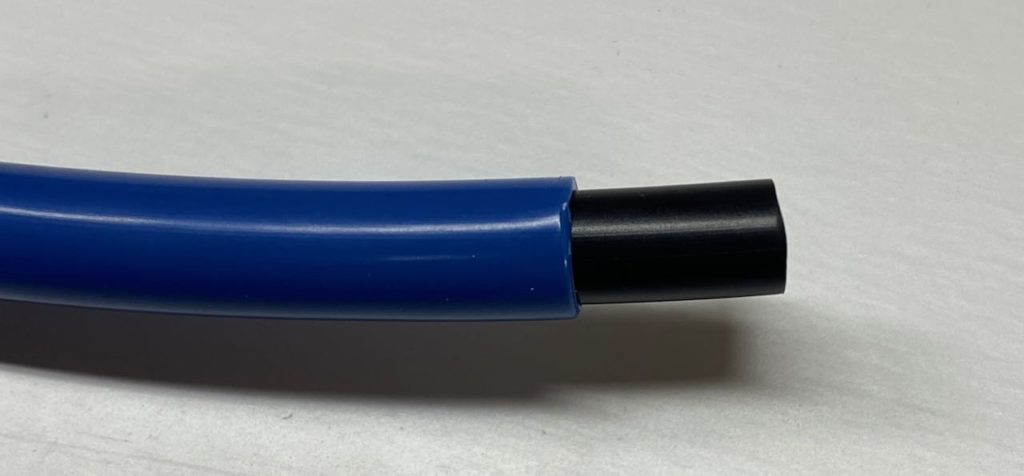
- One short piece of black plastic tubing, roughly 4-5 cm (~2″) long, sized to fit inside the long plastic tube (to act as a connector). This was added to the kit in early 2021 – if your kit does not include a connector, you can make one out of 8 mm plastic tubing, wooden dowel, or something similar (or if you’re ordering something else from DIY Packraft in the future, ask me to include a connector in your shipment for free).
- Note: spray skirt kits are sold separately
Note: The “coaming” is the rim around the spray deck’s cockpit hole, and it’s basically a fabric tube stiffened by a semi-rigid plastic tube inside it. The coaming keeps water from flowing into the cockpit and it’s what the spray skirt fits over.
Assembly Instructions:
Note: If you want to make a removable spray deck, visit this page after you’ve familiarized yourself with the instructions here.
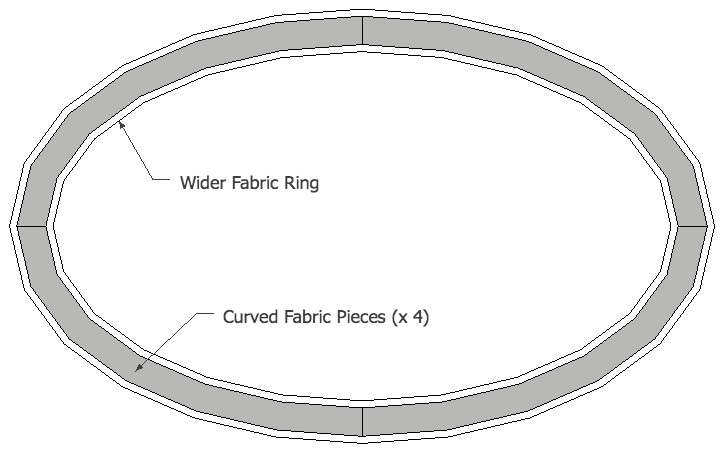
Start by separating the fabric pieces, using scissors to follow the scored lines.
Lay out the oval-shaped fabric rings and mark the center line on the TPU side of each one.

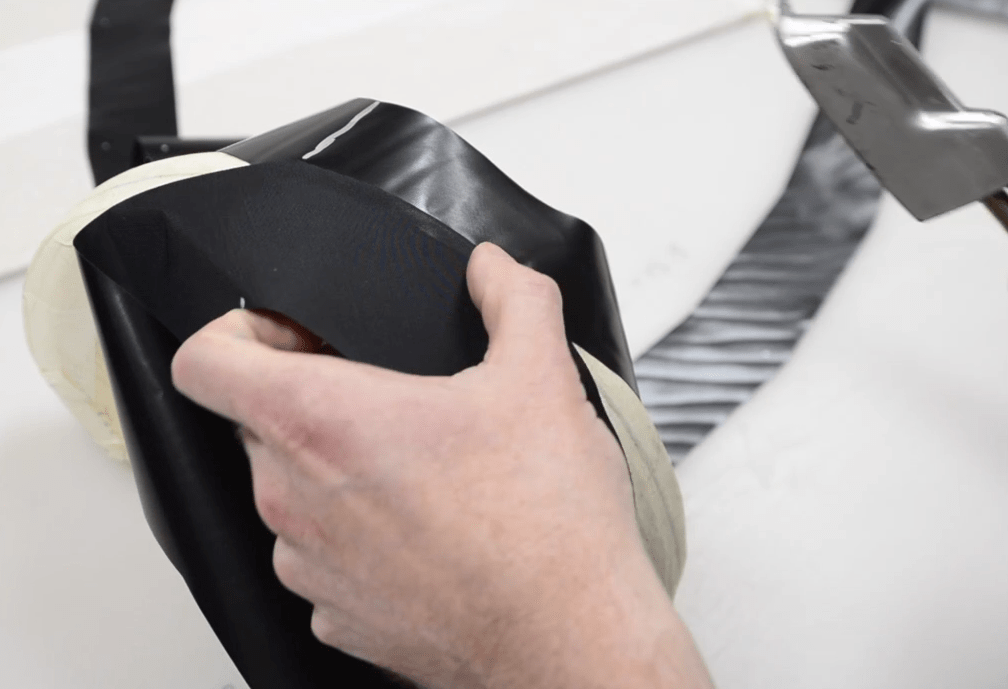
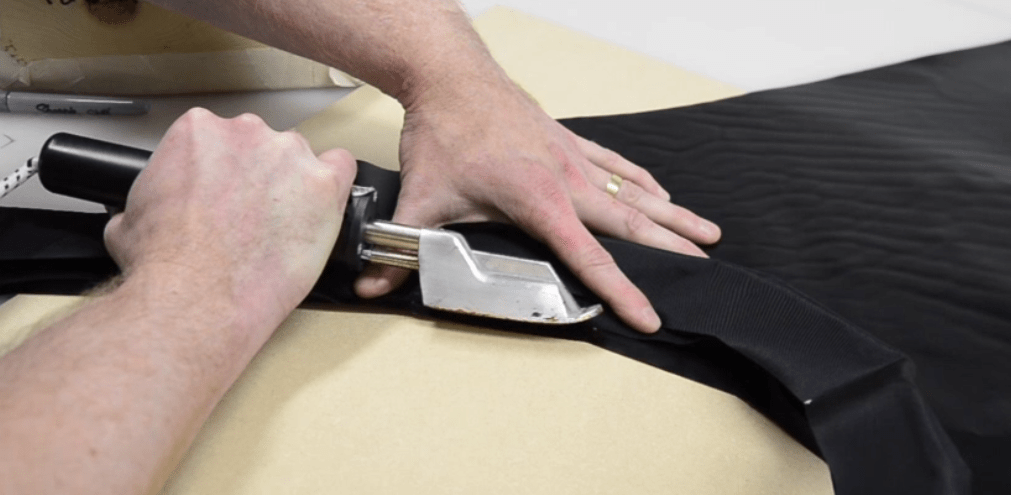
Lay out the wider ring with the TPU (shiny) side up. Arrange the four curved (j-shaped) fabric pieces over the wider ring, TPU side down, so there’s 1 cm of TPU exposed on each side of the curved pieces. Use your iron to tack each piece in place and then heat seal the four curved pieces to the ring, being careful to keep them centered as you go. (Note: These welds don’t have to be perfect – these pieces aren’t structural, they just provide a slipperier surface inside the coaming tunnel so the stiffener tube will slide in and out more easily.)
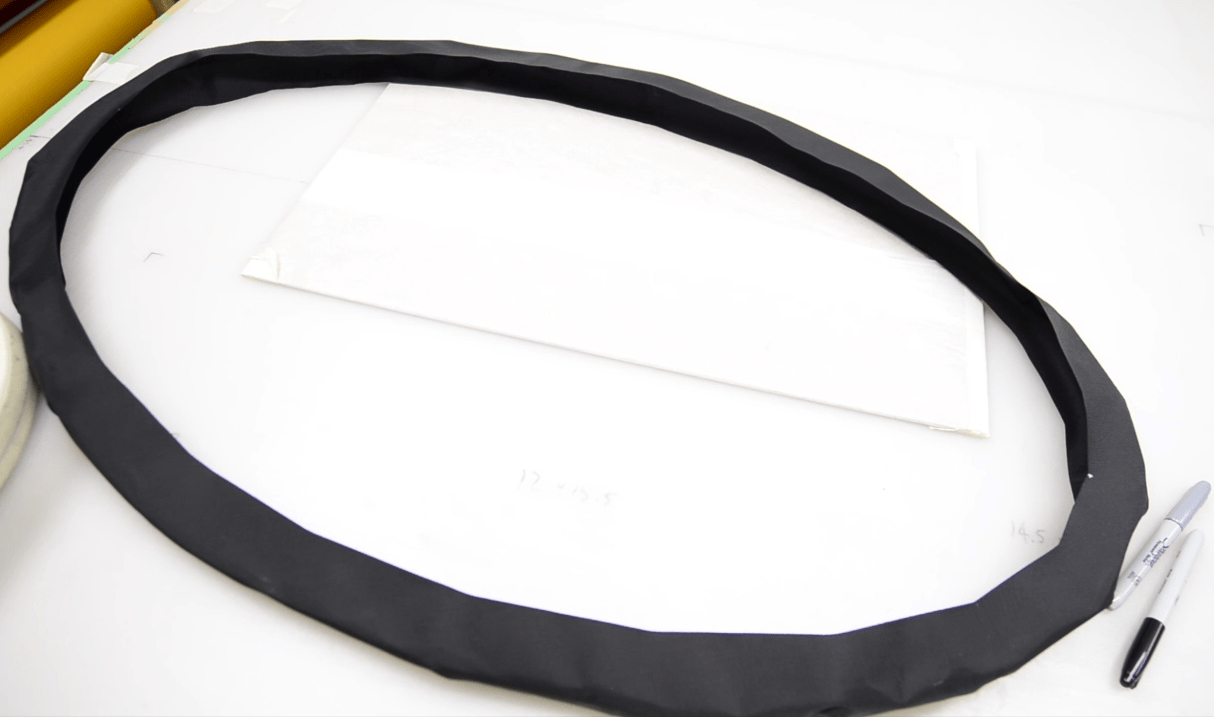
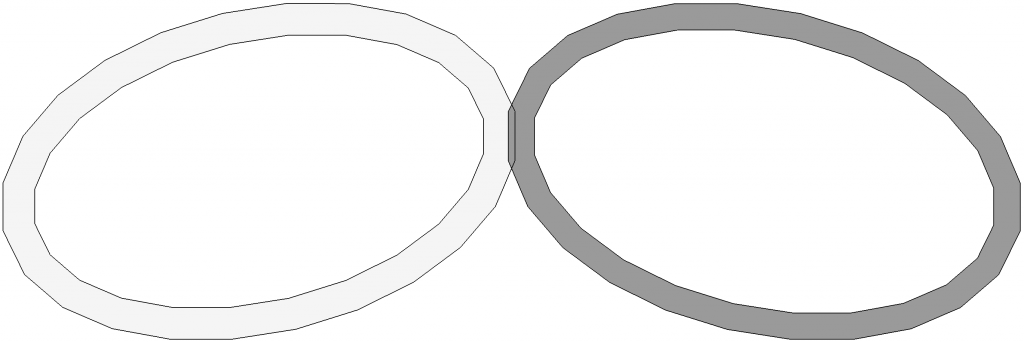
Next we’re going to seal the edges of the two coaming rings together so they form a single ring with a C-shaped cross-section – shaped sort of like a bicycle tire.
We want the TPU sides of the two rings to face in the same direction, so we’ll have to overlap the edges like this in order to make a TPU to TPU bond, shown below in red:
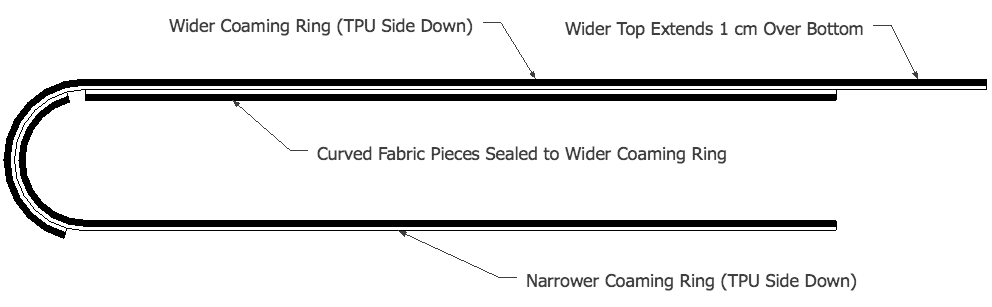
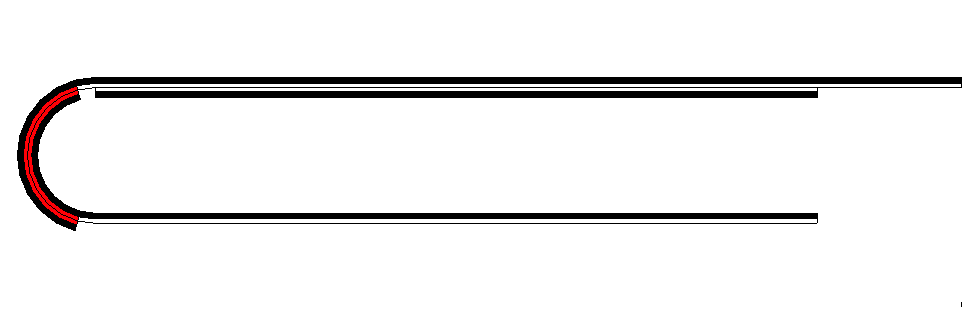
Start by lining up the centerline of each of the two coaming rings, overlapping the outer edges by 1 cm, TPU to TPU, and then seal a short straight section together:
Continue sealing the two rings together as shown in the video, doing your best to match up the corners. This is the most challenging part of this project, so take your time, and don’t worry if you have to iron in a small wrinkle now and then to force the corners to line up.
To make things easier, you may find it worthwhile to create a 1 cm wide form to drape the fabric over, but I didn’t bother.
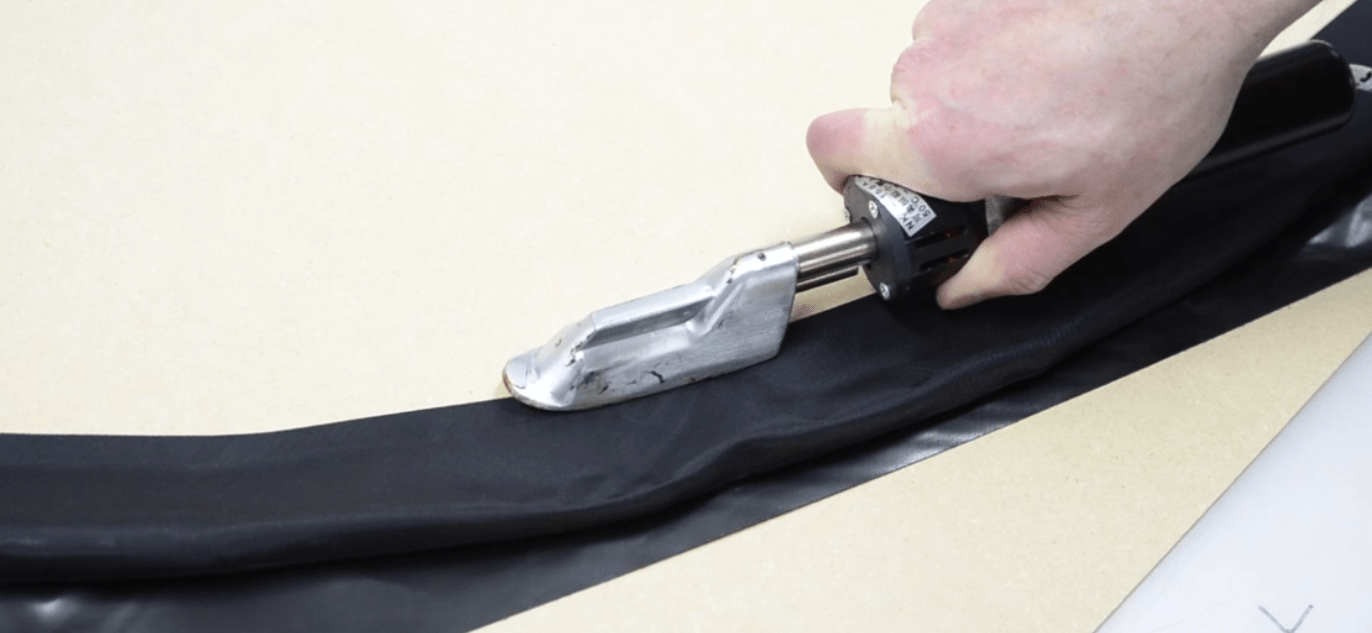
Continue sealing all the way around until you have a single ring with a C-shaped cross-section, as in the “bicycle tire” picture above. Check the weld and revisit any areas that need more ironing.
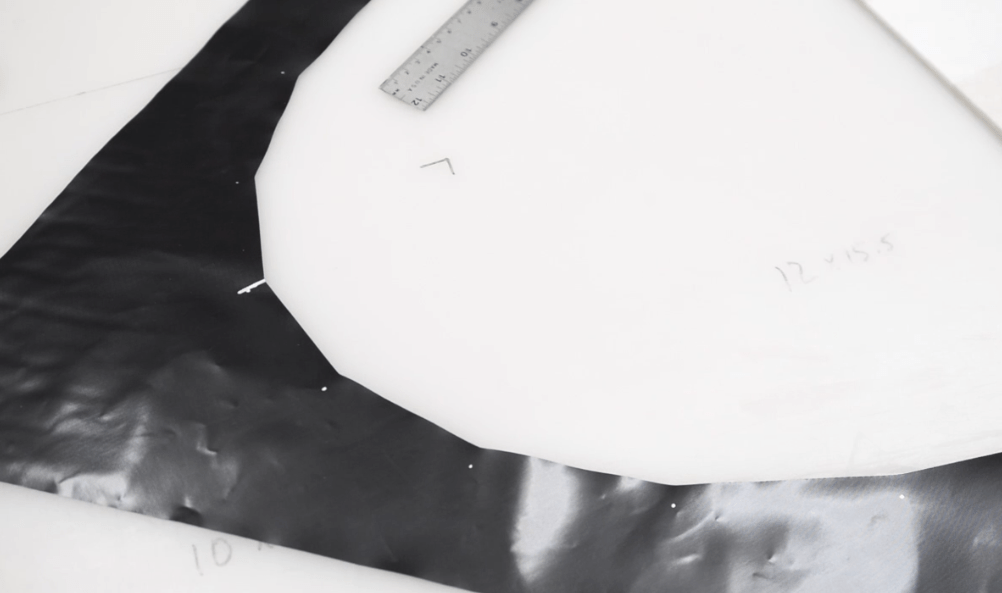
Set the coaming ring aside for now. Measure and mark 1 cm out from each corner of the cockpit hole on the TPU (shiny) side of the spray deck fabric, as in the picture below. A silver permanent marker works well on the black fabric (these areas will not be visible on the finished deck).
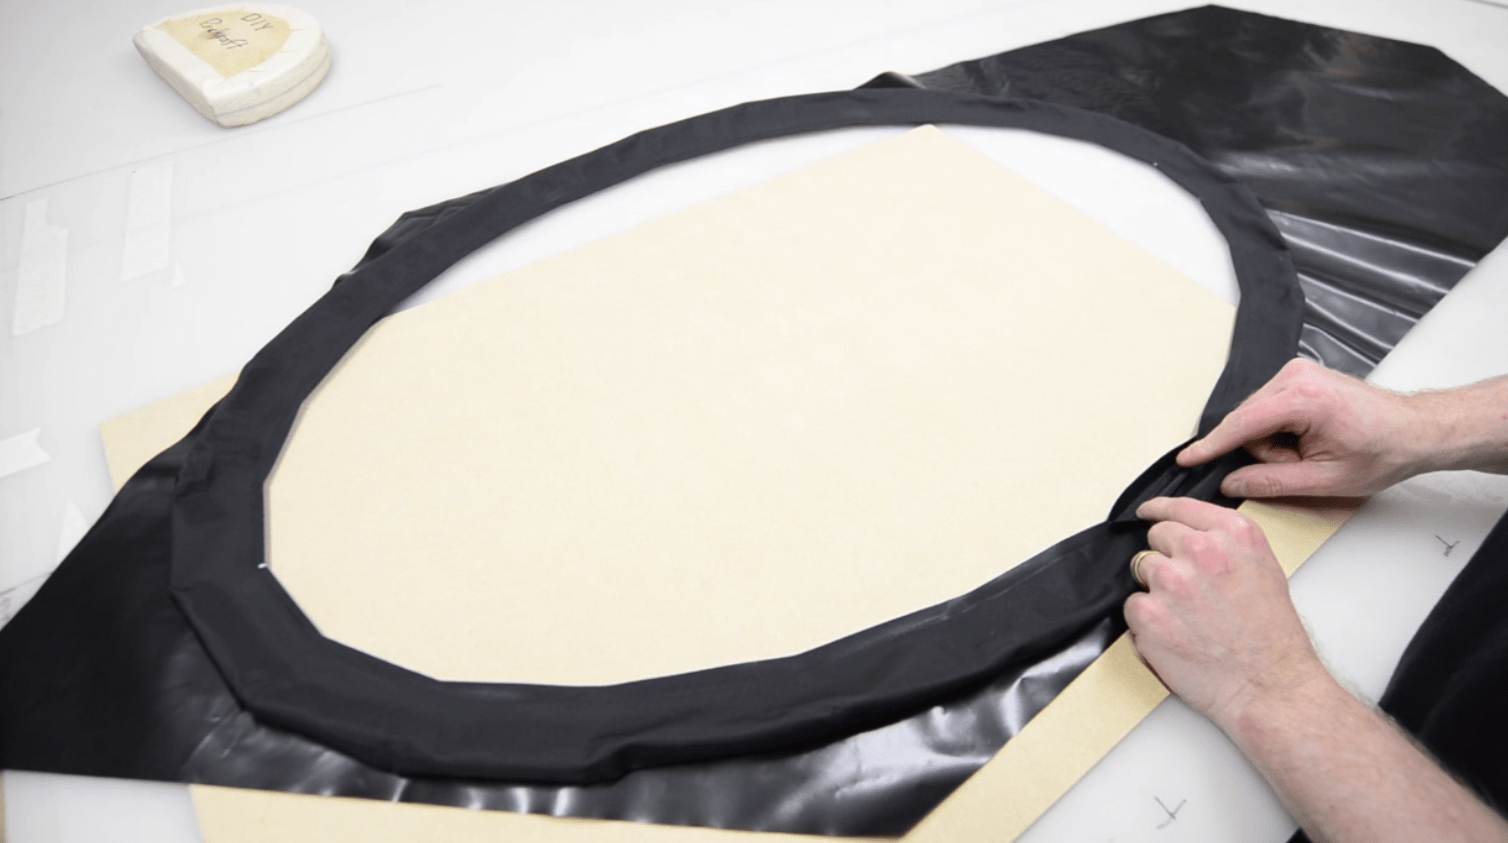
Align the coaming over the cockpit hole with the wider ring on top and the exposed TPU facing down. Your coaming ring “bicycle tire” shape may be inside out after sealing the two rings together, so turn it right side out if necessary.
The bottom ring should line up easily with the marks you made on the deck fabric, 1 cm from the cockpit opening.
Tack the bottom of the coaming ring to the spray deck in a band about 1 cm or half an inch wide, all the way around the cockpit opening. You don’t have to get a perfect seal here yet, because we’ll iron it from the bottom later.
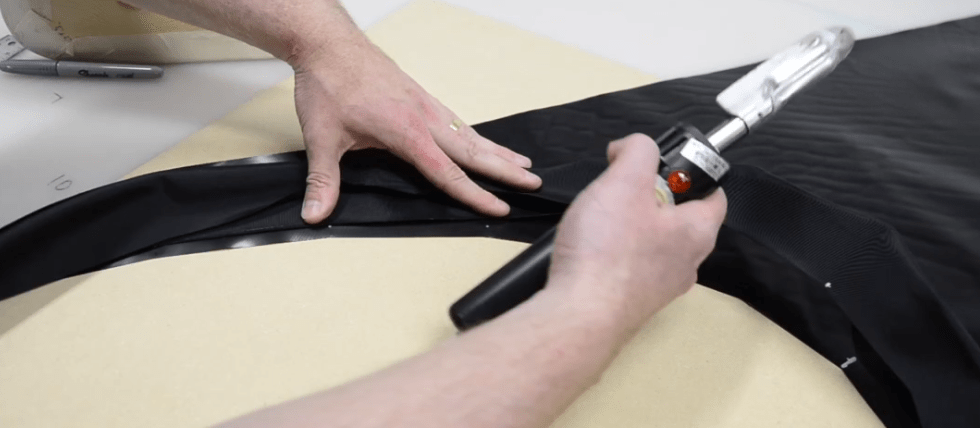
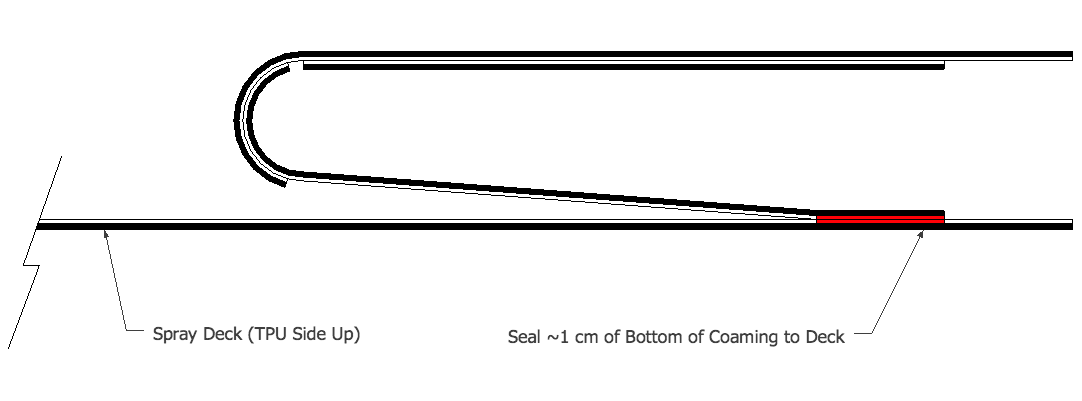
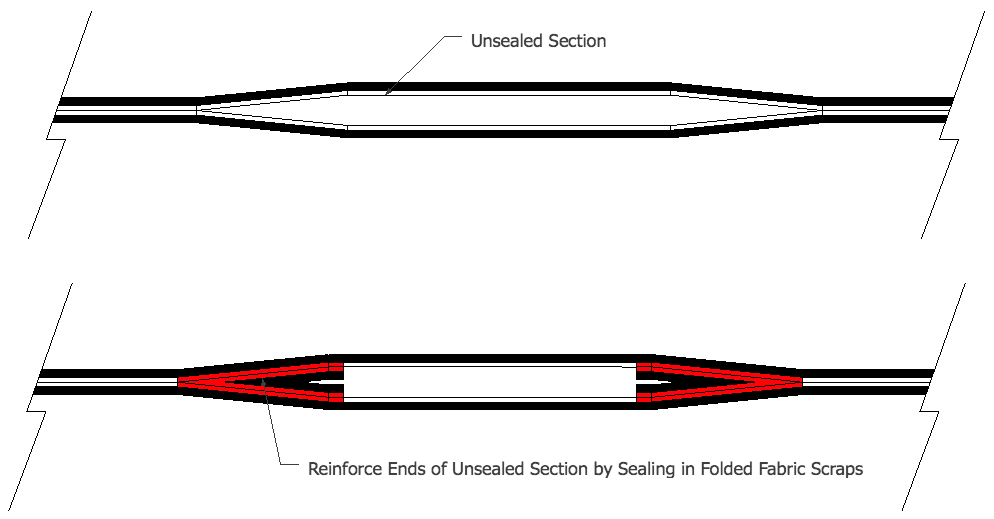
Then seal the top of the coaming to the deck fabric. Leave one of the straight sections un-sealed on either the left or right side of the cockpit to create an opening through which you’ll be able to insert and remove the plastic tubing later on.
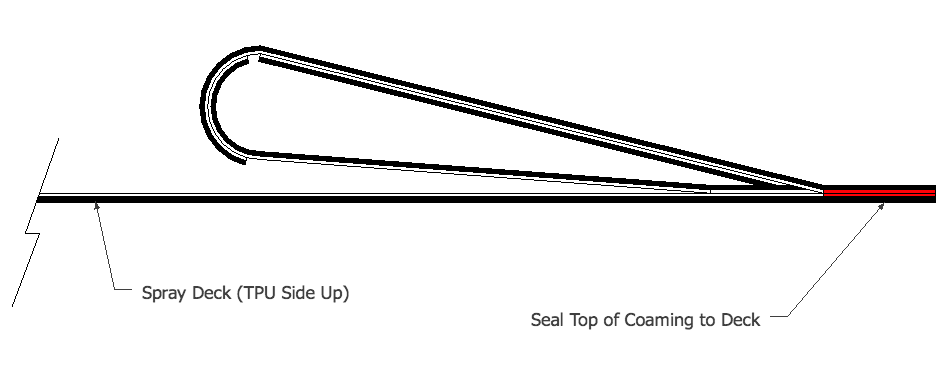
Once you’ve ironed all the way around the cockpit, flip the deck over so you can iron it from the bottom as well. Use the full width of your iron so you can seal the deck fabric to both coaming rings. Just remember not to seal over that one section of the top ring we want to leave open. You could slide some parchment paper in there to prevent the layers from being welded together, or mark it with your pen.
Reinforce each end of the short opening you left for the reinforcing tube by ironing in a small fold of scrap fabric. Fold it in half with the TPU on the outside of the fold, so it seals to both the deck fabric below and the coaming ring above.
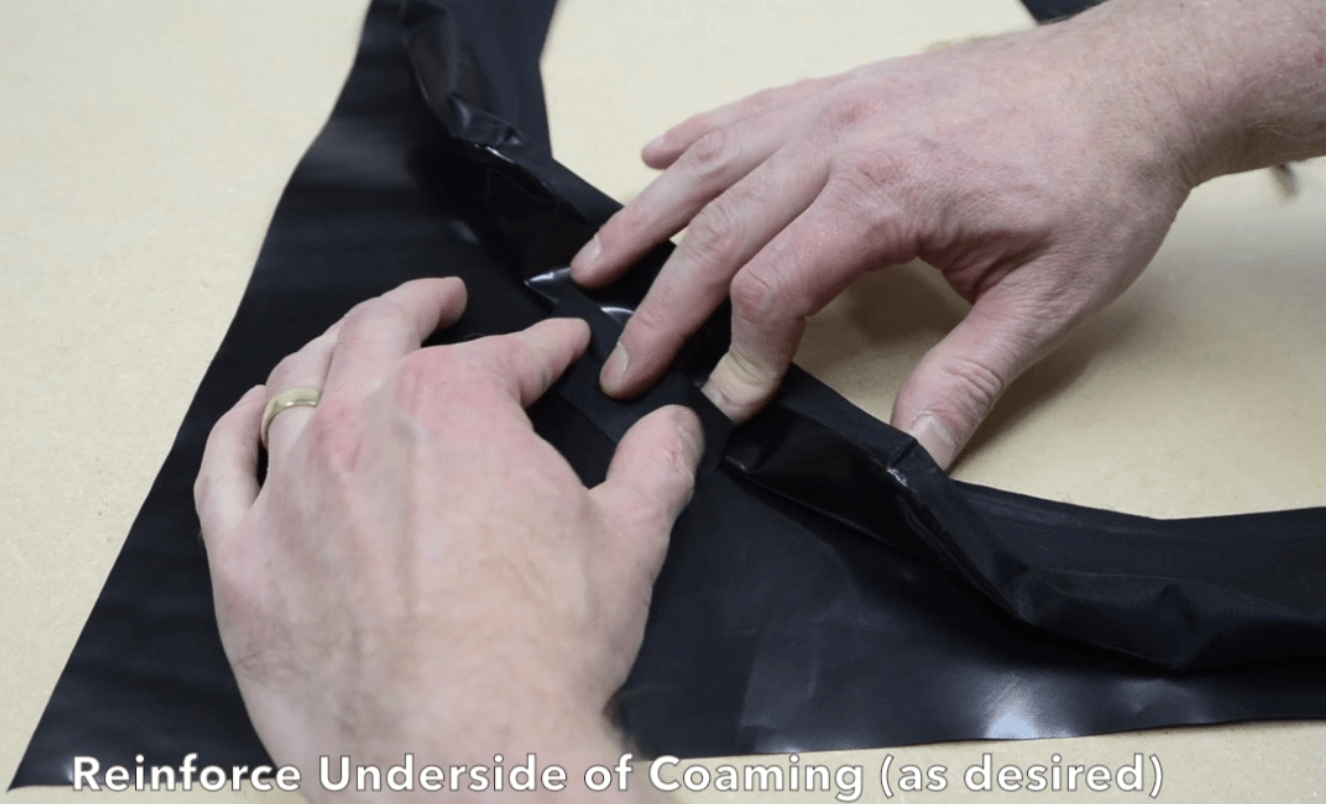
You can insert similar reinforcing pieces between the deck fabric and the underside of the coaming ring as well. The more whitewater you expect to encounter in your adventures, the more reinforcing you should add here.
Now you’re ready to attach the deck to your packraft.
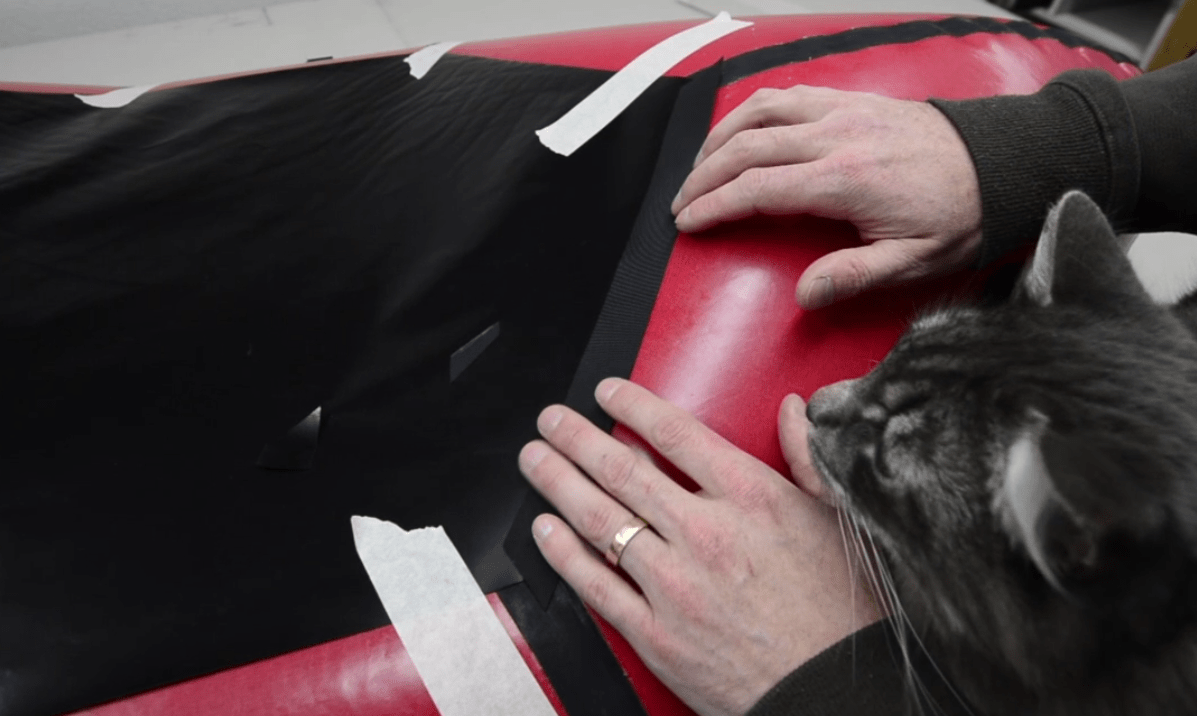
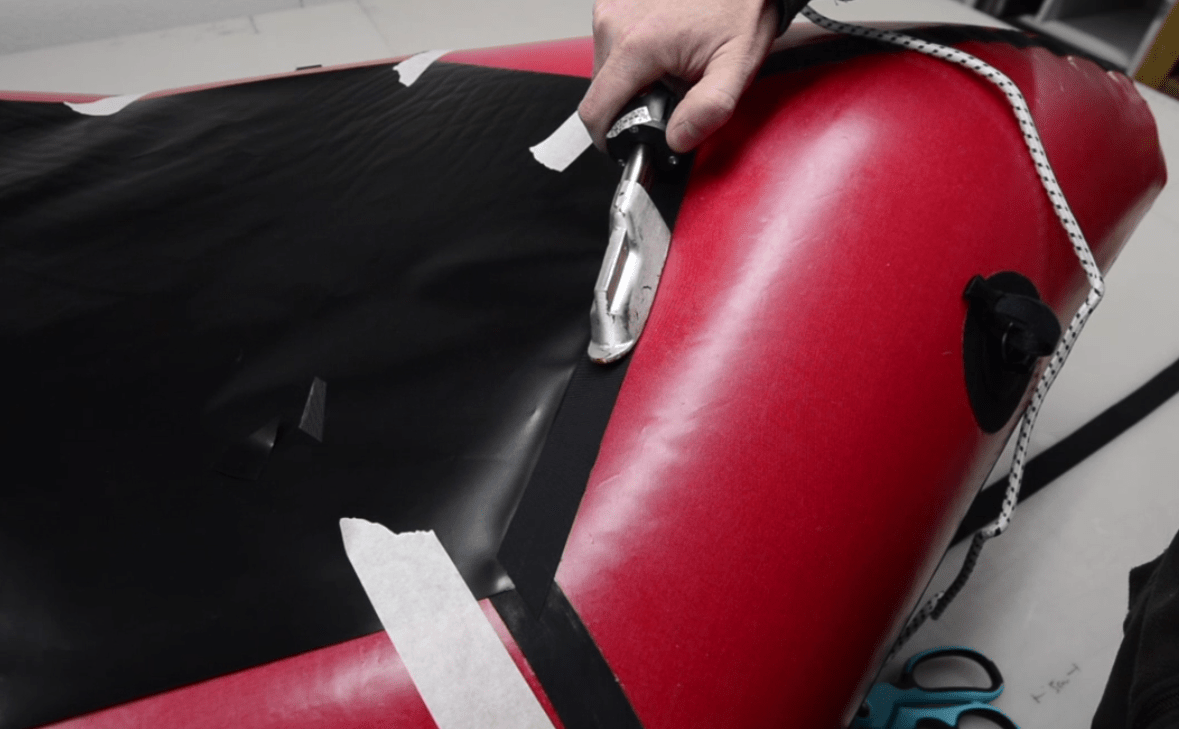
Inflate the packraft and align the corners of the deck fabric over the seam strips. Use masking tape to hold the deck in place, and adjust it until you’ve eliminated as many wrinkles as possible.
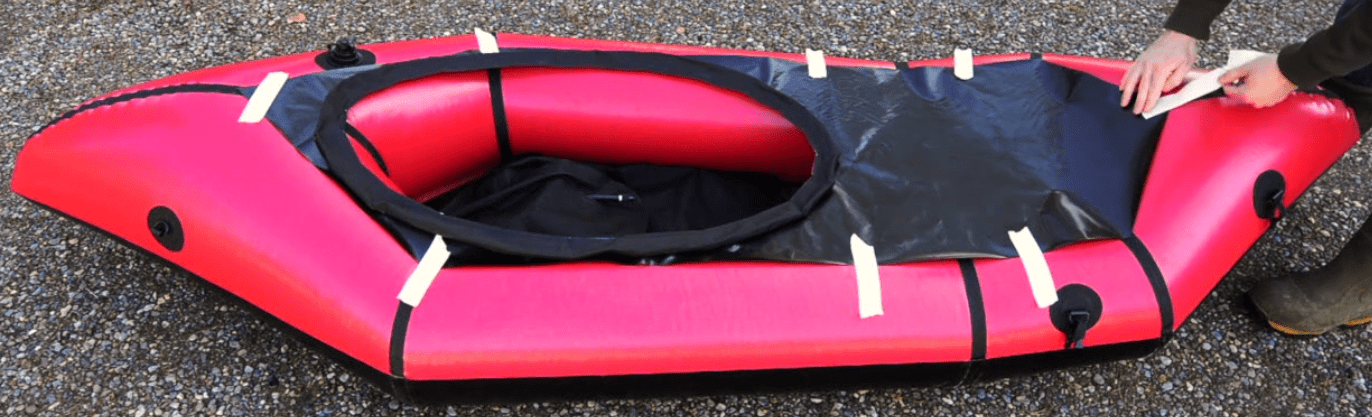
Cut seam strips to fit the edges of the deck, and use them to join the deck to the inflated tube fabric. The strips should be centered over the perimeter of the deck, so half of each strip seals to the deck fabric, and half seals to the tube fabric.
Caution: Avoid holding your iron in one place for so long that the heat transfers through the seam strip and the spray deck fabric to melt the TPU on the packraft’s tubes below the deck fabric (see images below) – this may cause the tubes to leak. If in doubt, practice getting the timing right on some scraps of fabric before beginning to iron the seam strips in place. You can also slide a folded piece of parchment paper between the deck and tube fabric while you are ironing – this will insulate the tube from the heat of the iron. If you do end up with a leak in an area of damaged TPU below the deck fabric, apply some Seam Grip+WP there to stop the leak.
Work your way from one end of the packraft to the other, removing and adjusting the masking tape as necessary, to create a nice smooth deck.
Note: In the demonstration video, the ring around the inflation valve interferes with the spray deck, but I’ve updated the recommended valve location to prevent this from happening, so it shouldn’t be a problem for you.
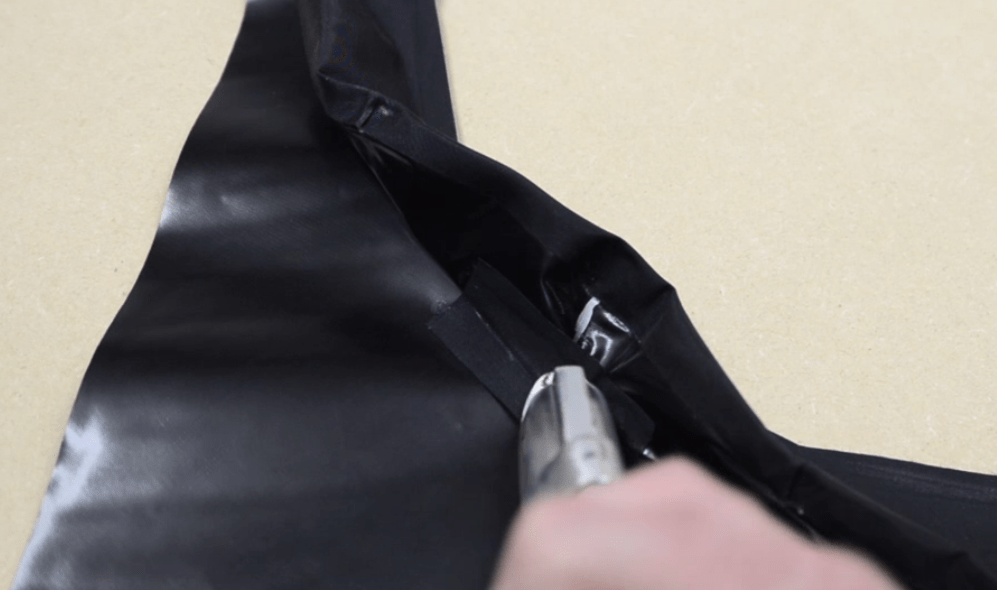
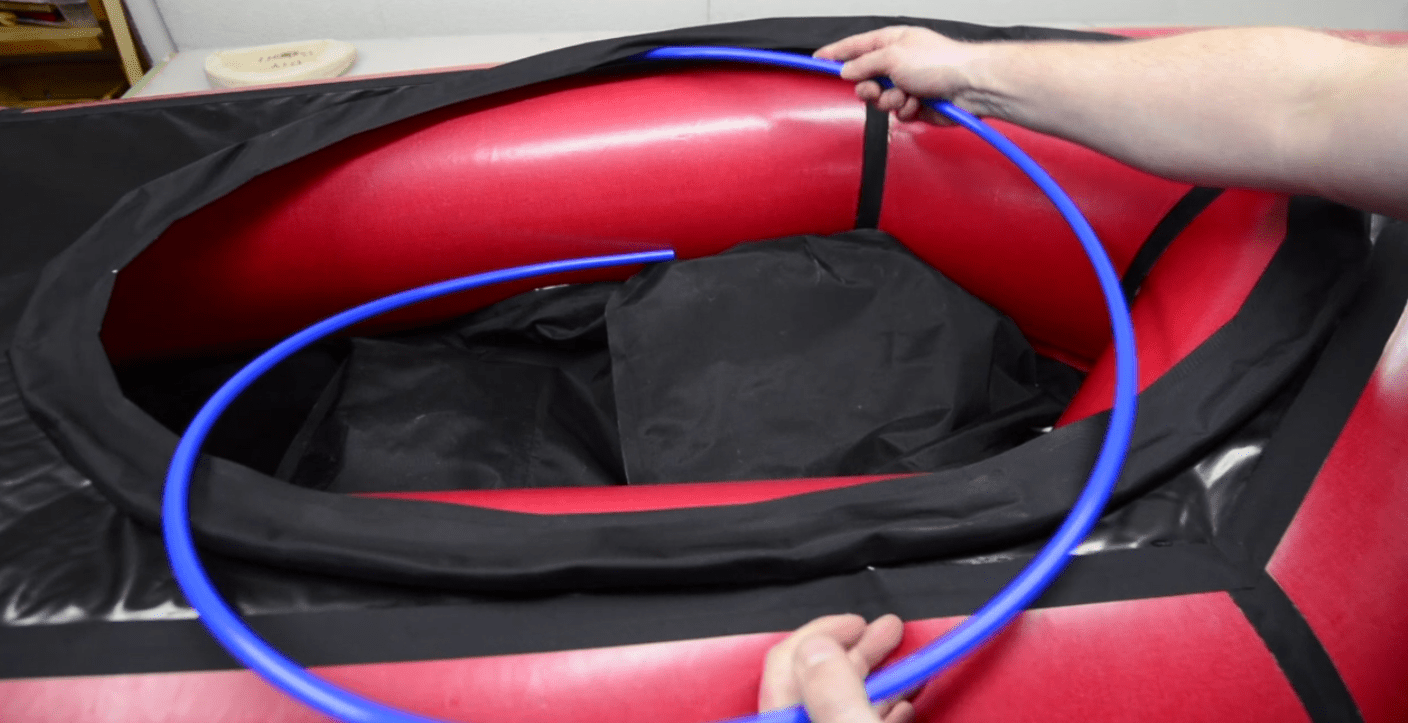
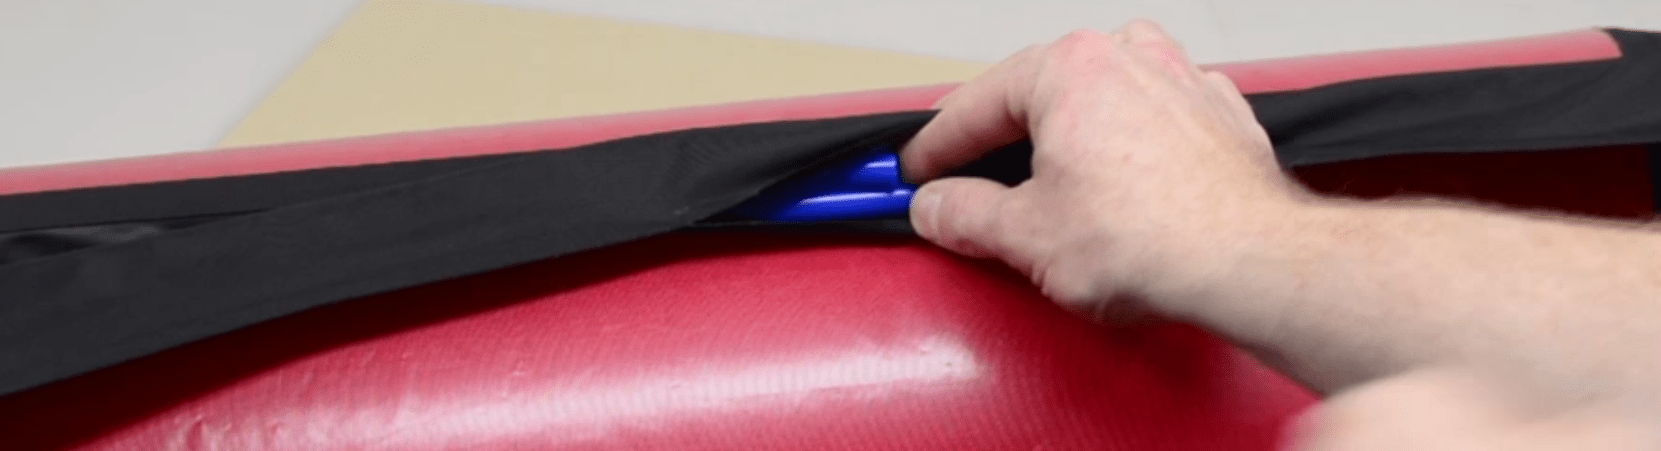
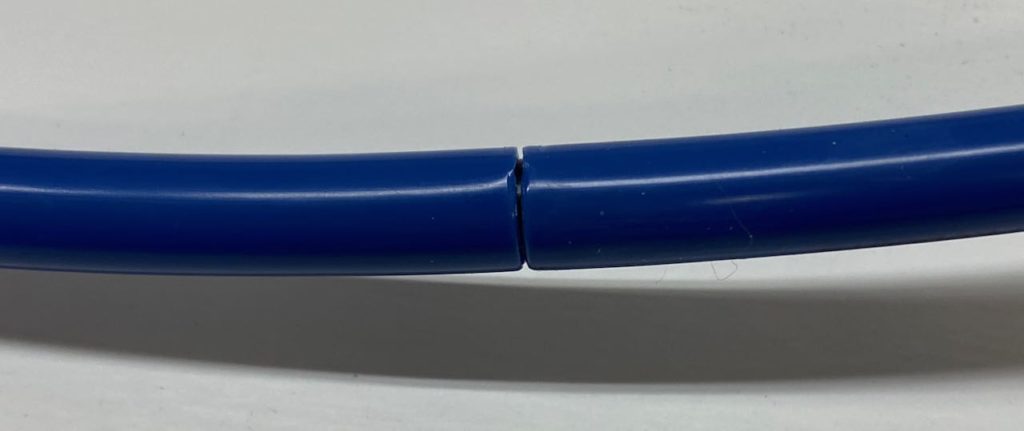
Slide the plastic tubing into the coaming through the slot you left un-sealed, and trim the tubing by cutting off one short piece at a time until it fits tightly in the sleeve when the ends are butted together, without being too difficult to insert and remove.
Note: Newer kits have different coaming stiffener tubing and a different connector than the ones shown in the video/pictures.
Note: Avoid storing the coaming stiffener tube tightly coiled for long periods of time.
Note: You will want the stiffener tubing to fit tightly inside the coaming sleeve, so only remove a very small amount at a time and then test the fit before removing more.
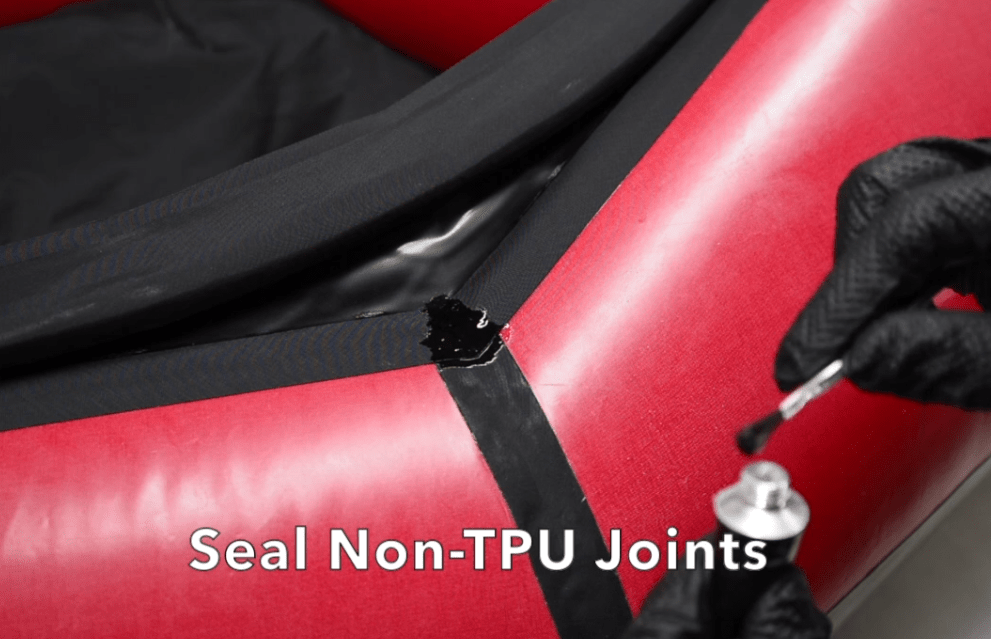
To create a watertight seal at the corners of the deck where TPU-to-TPU welds aren’t possible, you’ll need to use an adhesive such as Seam Grip+WP, Aquaseal, or Aquasure. Tape the corners down while the glue cures.
Now your spray deck is finished! If you haven’t done so already, assemble the spray skirt next.
Spray decks for “Other” packrafts (not DIY Packrafts)
If you ordered an “Other” spray deck kit, you’ll see that I didn’t score the deck shape into the fabric (because I don’t know the shape of your packraft), and nor have I scored the cockpit hole in the deck fabric (because I don’t know where your seat will be). I’ve only scored the cockpit coaming shapes and I’ve left the rest of the fabric unscored so you can cut it into a shape that fits your specific packraft.
To avoid potentially ruining the deck fabric by cutting it too small, I recommend making a pattern for your spray deck out of paper or plastic sheeting first. Inflate your packraft and lay the paper over it, taping it into position and trimming it until it fits nicely. It should attach at the highest point of the side tubes, and wherever is convenient toward the bow and stern. After you’re satisfied with the shape, trace the paper onto the fabric and cut it out.
After cutting the deck fabric to shape, tape it to your packraft and use the smaller of the two pre-scored cockpit coaming rings to trace the cockpit hole onto the fabric above your seat (one of the two coaming rings has a smaller inside diameter than the other – trace around the inside of the smaller one). Don’t center the hole above your seat – remember that you’ll sit toward the rear of the hole.
Questions? Leave a comment below!
24 Comments
iovodeverett · January 29, 2026 at 9:00 am
What material is the plastic coaming? Considering switching just the coaming on my Alpacka for remote trips to save weight.
Matt (Admin) · January 29, 2026 at 9:19 am
I now use PEX tubing in the kits (same as Alpacka) instead of what is shown in the video above, because some batches of that other tubing were not stiff enough. It was nylon tubing.
Kenneth · April 9, 2025 at 11:53 am
Hi
Is it possible to order a spraydeck modified for the new backrest, the coaming more forward?
Matt (Admin) · April 9, 2025 at 1:05 pm
Hi Kenneth,
Yes, I’ve been trying to figure out if it’s better to have the coaming moved forward or to have a different spray skirt that allows you to sit farther forward within the existing coaming design (so you can still relax against the rear tubes sometimes). Do you have an opinion about this?
Kenneth · April 10, 2025 at 12:20 am
Im planning to build a Telkwa WW only, so for me it would be god to have to options to chose from, one laidback ond one forward.
Matt (Admin) · April 10, 2025 at 9:25 am
Okay, I will make two different options. If you place an order before they’re listed on the product page, please add a note to your order telling me you want the whitewater version. Thanks!
Nic Reed · September 6, 2024 at 4:05 pm
I’ve got an Alpacka Caribou that I’m using for whitewater, but I need to convert it to make it more suitable for whitewater. Would your spray deck fit my Caribou? I noticed you have the Atlin which is similar to the Caribou in form/function, so perhaps your spray deck might work for me?
Matt (Admin) · September 9, 2024 at 10:00 am
I haven’t tried it, but take a look at the dimensions of the “Other” packraft spraydeck kit and measure your Caribou to see if it’ll work: https://www.diypackraft.com/shop/merchandise/kits/spray-deck/
Nic Reed · September 19, 2024 at 10:18 pm
@Matt I measured my Caribou and it measures about 47 inches inside of the boat, but I’m not sure if I’m measuring from the same place that you measure for your Atlin.
Can you give me some ideas about reference points for where you start/end your measurements? For example, are you measuring from the height just above the inflatable seat? Or higher up towards where the deck might actually sit?
Matt (Admin) · September 20, 2024 at 8:18 am
You’ll want the deck to attach to the highest point on the tubes (at least the side tubes) so water will run off of it instead of pooling, so I would measure from the highest points side to side. Front and back, I would look at it from the side to see where it makes sense for a spray deck to attach, and then measure from those points.
Matt · November 7, 2023 at 9:37 pm
Is it possible to install a telkwa deck on a Skeena? What
Matt (Admin) · November 8, 2023 at 9:31 am
If the Telkwa deck is for the same size or larger cockpit length than the Skeena, then I think so… I’ve never tried it, but the shapes are similar, especially towards the rear. You can test the fit by taping it in place, then trim it if necessary.
Matt · July 23, 2023 at 9:24 am
While attaching narrower combing ring to the larger, I wound up with extra material at one of the centerlines (I worked from one centerline evenly around in both directions and have an extra 3-4cm of facric). could I just cut that material out so the edges match and seal the open piece either to the deck or put in a small piece of material on the backside (TPU to TPU) and leave a 1cm strip to seal to the deck?
Matt (Admin) · July 23, 2023 at 10:34 am
Yes, I think that should work out.
Larry · February 3, 2023 at 7:13 am
Instead of ironing wrinkles in the coaming, wouldn’t it be better if there were little darts cut into the edge? The fabric seems as though it would have enough integrity for that.
Matt (Admin) · February 3, 2023 at 9:28 am
That works too. It’s a bit more complicated and time consuming, so whether or not it’s better will depend on your priorities (my goal was to make this project as simple as possible). I can’t think of any reason why you shouldn’t do it though.
Hannu · April 17, 2021 at 10:22 pm
Is there a checklist for spraydeck? To check I’ve received everything in the package.
Matt (Admin) · April 18, 2021 at 12:29 pm
Hi Hannu – in response to your questions I added a checklist above. Thanks!
Layla · September 6, 2020 at 5:49 pm
Hey there!
On another page you mention possibly making the spray deck detachable with tape or adding a zipper. Have you seen any builds by people who have used either method? Or thoughts on what tape would work best or how to attach the zipper? I like the idea of the zipper, it would just need seam strips on both sides to attach to the deck and the boat?
I don’t think I saw any posts on the forum but I could totally be wrong, thanks for any advice you can give. And I hope your trip was awesome!!!
Matt (Admin) · September 7, 2020 at 9:43 am
Hi Layla, I used the Outdoor Repair Tape in the shop to temporarily attach a deck for testing and it worked surprisingly well (but it is difficult to remove all the tape and residue if you leave it on for a long time). I was corresponding with YKK about getting appropriate zippers for the shop, but gave up after a while… typical large-company stuff. Dom Adcock made his own deck with zippers for partial removal: https://www.diypackraft.com/doms-convertible-spray-deck/
yoshi · June 23, 2021 at 6:28 pm
My friend has an Alpacka about the same size as as these and it uses velcro on one side to be able to put it aside
Hannu · April 26, 2021 at 10:16 pm
Hi,
Do you think a water repellent zipper would suffice on the spray deck? Waterproof ones seem to cost way more. This ( https://www.ykkfastening.com/products/search/detail.html?pdid1=VISLON(R)+AquaGuard(R) ) for example seems to have a polyurethane coating, so it might even be possible to heat seal it in place. I’ll, of course, have to ask that from the manufacturer before purchase.
Matt (Admin) · April 27, 2021 at 9:39 am
It would probably shed most of the water, but I expect it would let some in, especially if it was in a place where water pools. If you try it, please tell us how it goes!
Alex · August 22, 2021 at 5:14 am
Hi Hannu,
Did you manage to try out the zipper sprey deck method? Really tempted to try something similar. That or use velcro with adhesive backing.