Assembly time: approximately 1 hour.
Note: This page is shared between different instructions sets; use the back button to return to your kit’s instructions. The fabric shown in the video and pictures below may be different from the fabric in your kit, but the assembly procedures are the same.
Important: cut reinforcing strips for the baffle from the colored scrap fabric that surrounds the packraft’s tube pieces – don’t use the black seam strips or the black zipper rectangle (unless you’re not adding a zipper) or any of the pre-scored pieces in the sheet of tube fabric!
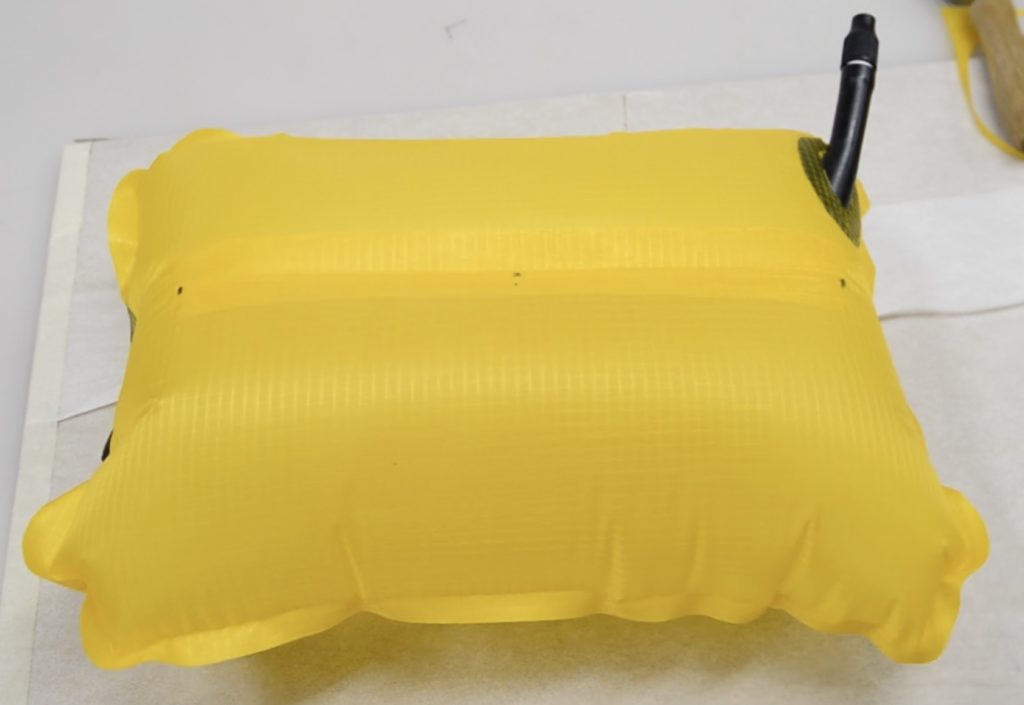
Note: If you intend to use this backrest as a camping pillow, I recommend adding velcro stickers to the finished backrest and to your camping mattress so the pillow won’t slide around at night. Also note that the backrest is more comfortable (both as a backrest and as a pillow) when it’s only partially inflated.
Gather Fabric Pieces:
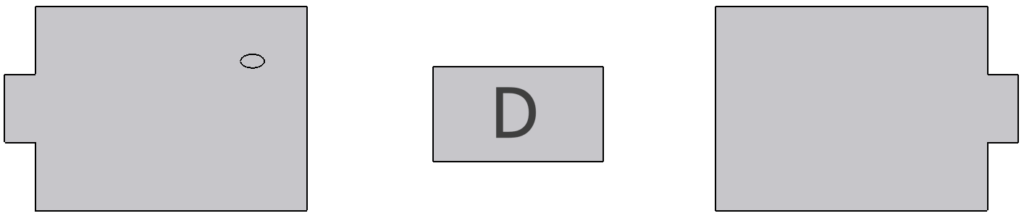
The backrest is composed of three fabric pieces:
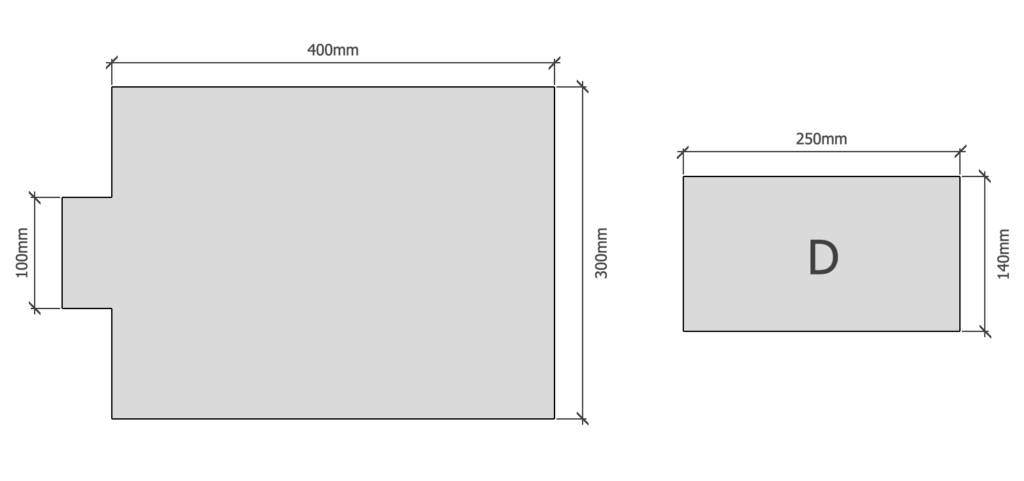
Important: In newer kits baffle D is 180 mm (7″) tall instead of 140 mm (5.5″) to allow you to use the full width of your iron to weld it to the backrest front and back.
Assemble:
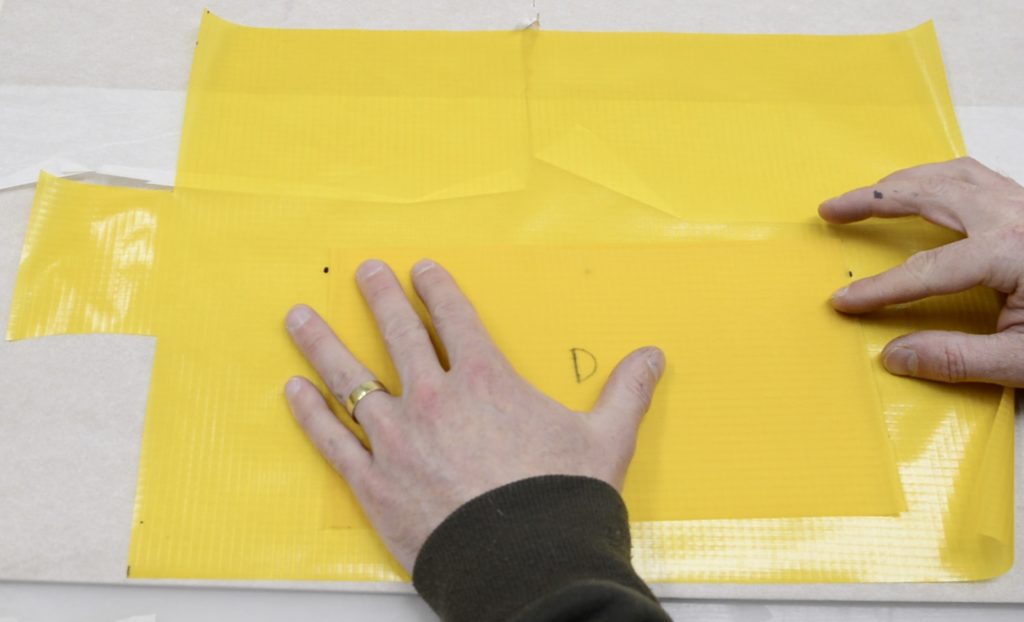
After you’ve separated and identified the fabric parts, set aside all but the three backrest parts.
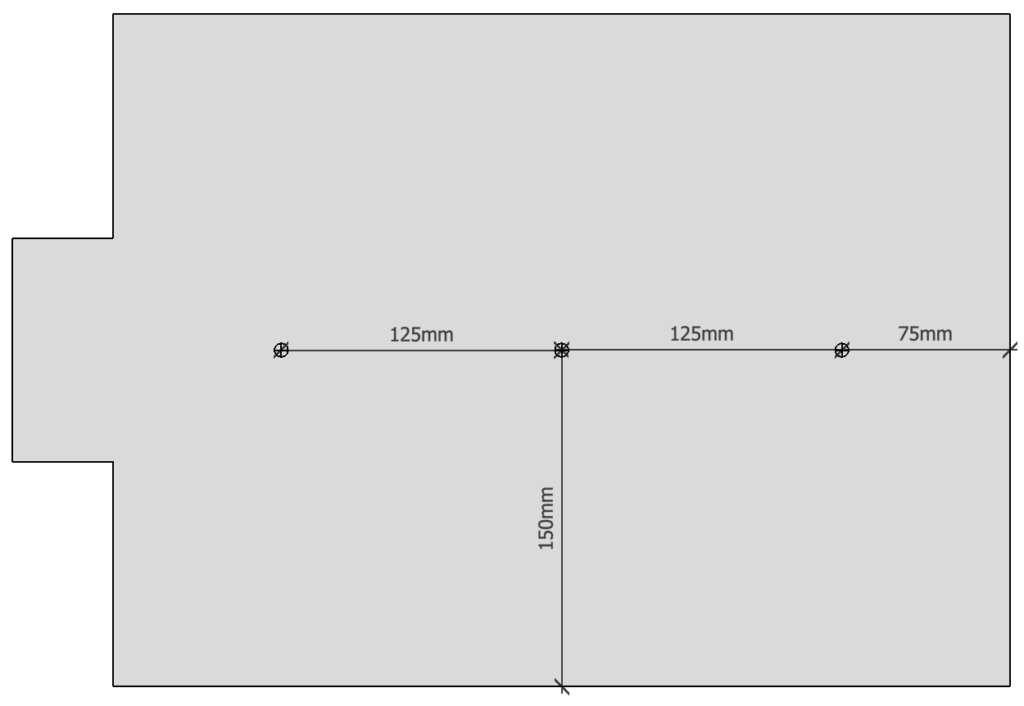
Lay out the two larger pieces with the shiny TPU sides facing up, and then use a ruler to mark three dots on each piece as shown in the diagrams below:

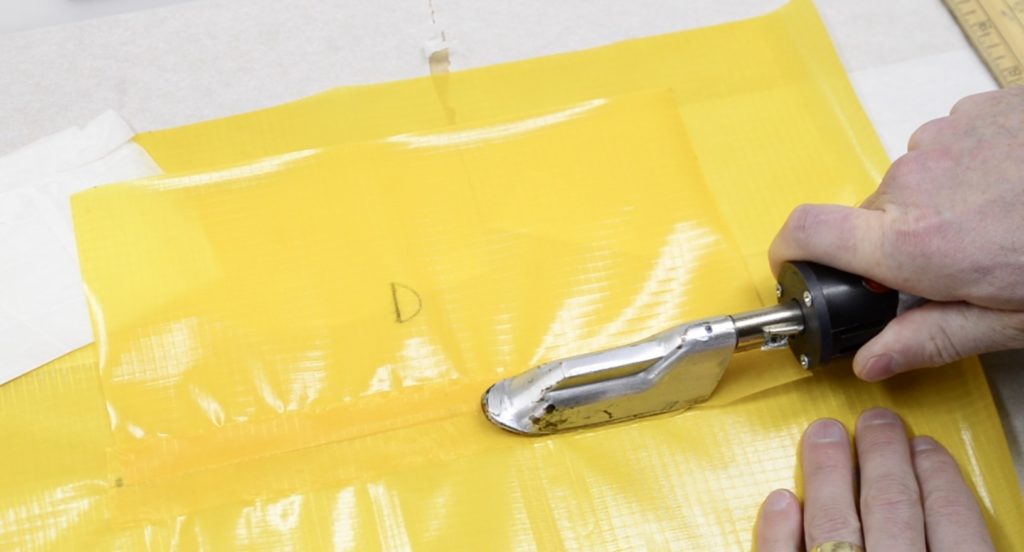
Align Baffle D with the three dots on one of the fabric pieces, with the TPU side of the baffle facing the TPU side of the larger piece. Slide the edge of Baffle D about 1.5 cm or ¾” over the dots:
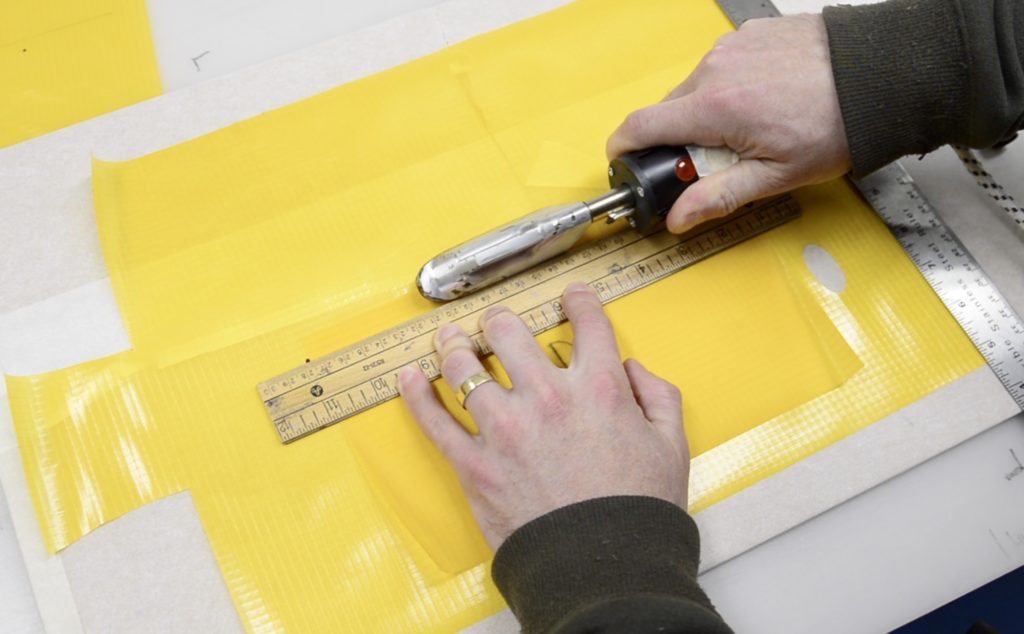
Use the edge of your iron to tack the baffle to the seat fabric in a straight line between the dots. Use a ruler here to make sure the line is straight:
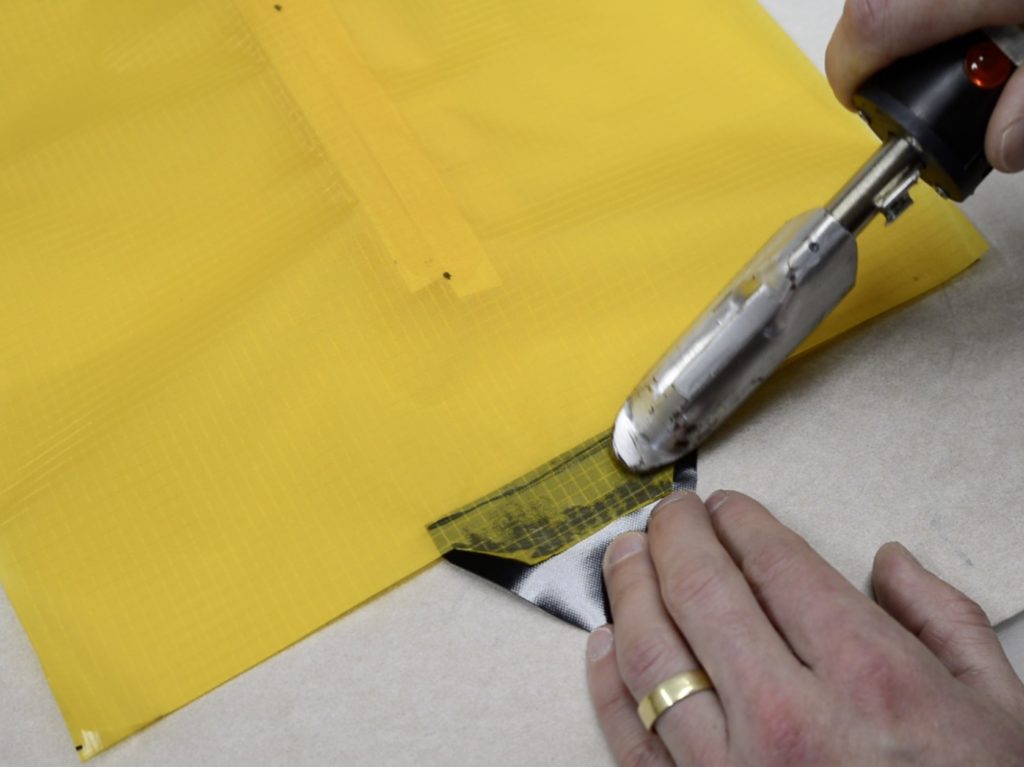
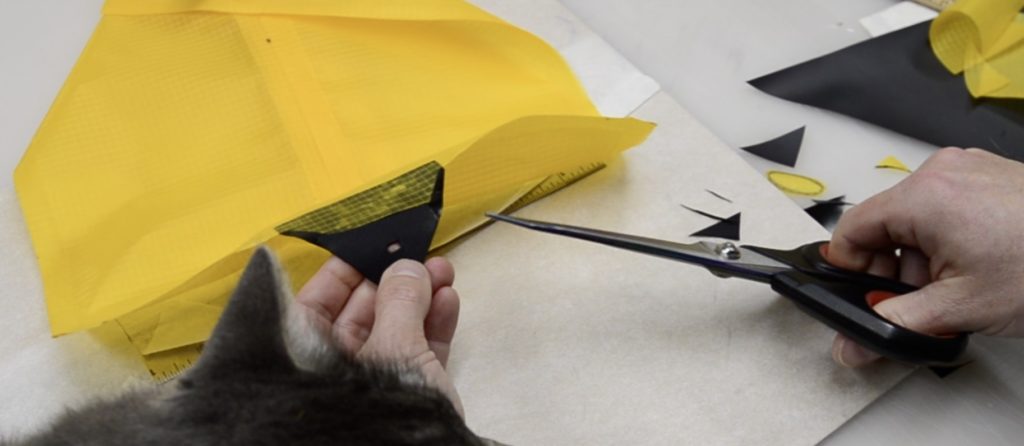
Then fold the baffle back over itself and cut a reinforcing strip slightly longer than the baffle and about the width of your iron (note: cut reinforcing strips from the colored scrap fabric around the scored packraft tube pieces – don’t use the black seam strips!):
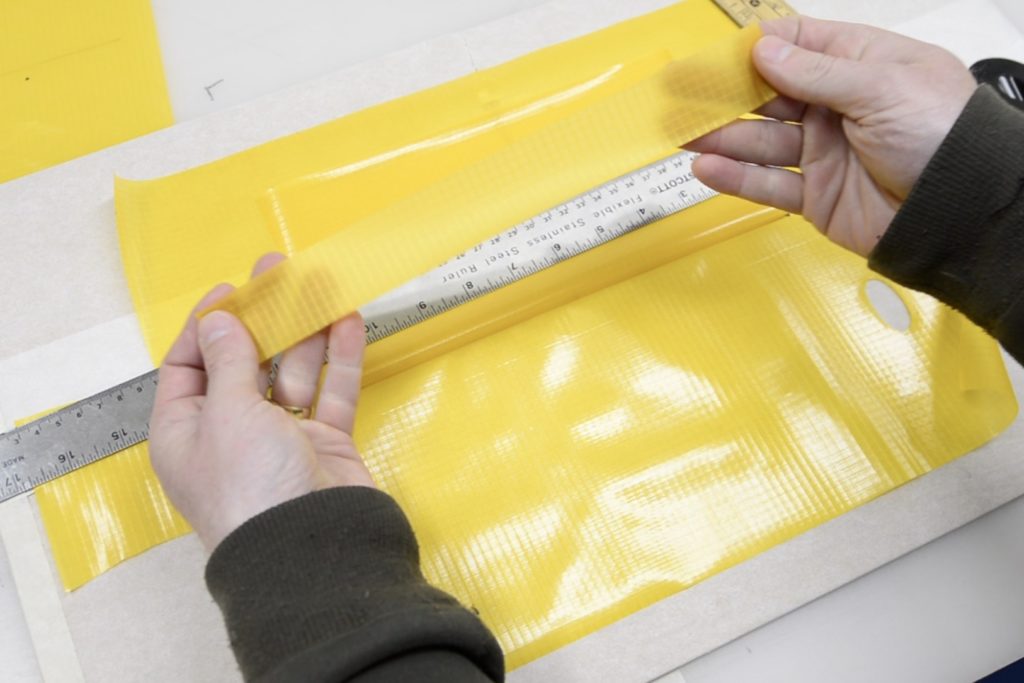
Center the reinforcing strip over the folded edge of the baffle and seal it in place. Force the edge of your iron into the fold to make sure it’s sealed very well there:
Note that the reinforcing strips and baffle edges don’t necessarily need to be welded all the way to their edges; it’s the part along the fold line that holds the fabric in place, so that’s where you should concentrate your efforts.
Flip the baffle over and iron it from this side too, welding the baffle to both the reinforcing strip and the larger fabric piece. You can slide some parchment paper under the baffle if you’re concerned about accidentally sealing the free end to the larger piece:
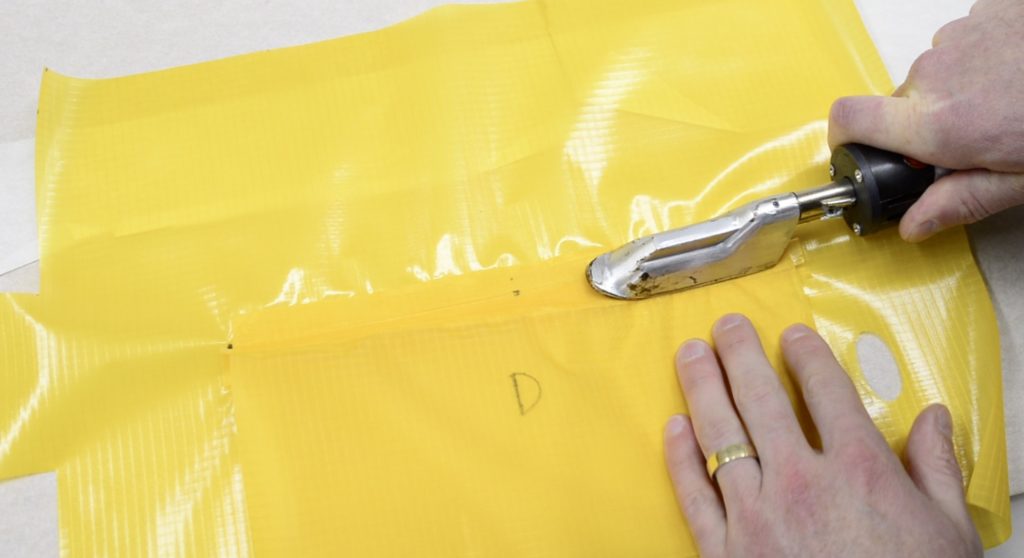
Next, seal Baffle D to the other larger piece following the same procedure, making sure the tabs on the ends of the two larger rectangles both point in the same direction:
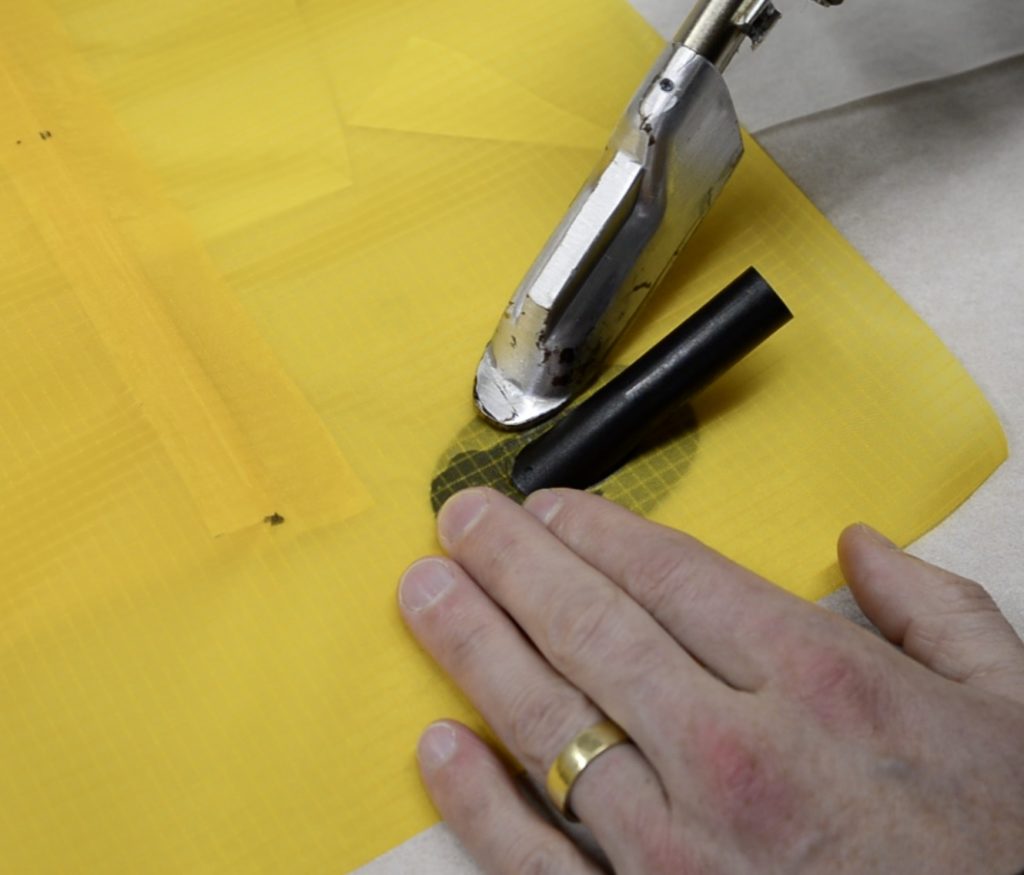
Examine your welds to make sure the TPU layers are fused together between the fabric layers, and the TPU isn’t damaged beyond the ends of the welds. The TPU is what makes the fabric airtight, so if there’s an area that looks like it could have been damaged by an accidental iron touch, seal a small scrap of fabric over it.
When you’re satisfied that the baffle is securely attached to both of the larger pieces, insert a top-up valve stem through the oval hole, oriented so the stem points toward the corner of the fabric piece. Use your iron to heat seal the fabric to the valve stem. Bend the stem out of your way, and try not to touch it with your iron or it will melt. You can wrap it in masking tape to prevent this from happening:
Avoid ironing beyond the edge of the flange or you might damage the airtight TPU layer there. If that happens, you can seal a ring of scrap fabric to the bottom of the flange as well, as shown in the seat bottom assembly video.
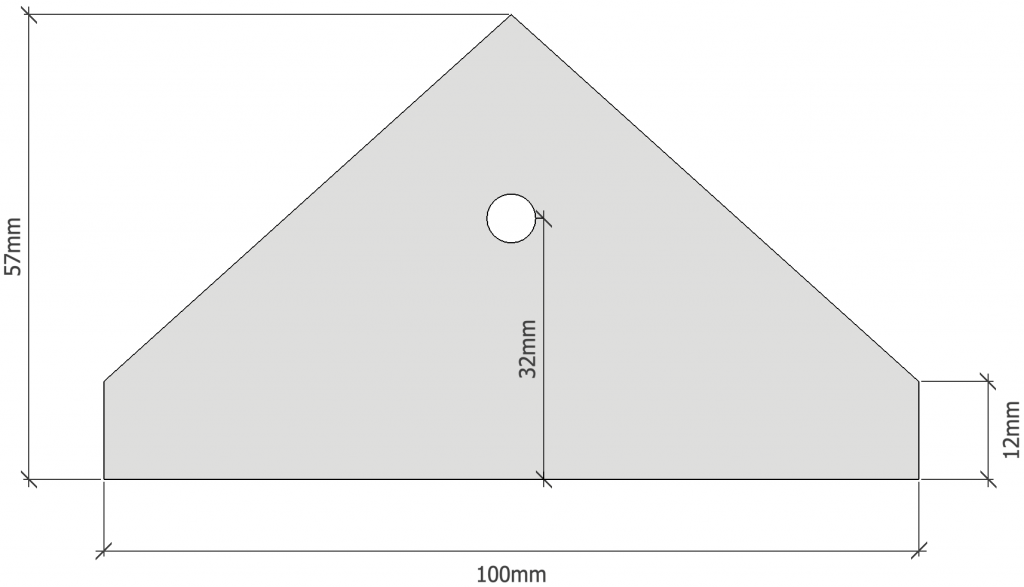
Cut out a scrap of packraft floor fabric, as shown, to make an attachment point for tying the backrest to the packraft. The exact dimensions aren’t critical, but here are the approximate measurements I use:
Trim the tabs on the larger fabric rectangles to fit over the attachment point, and then sandwich the attachment point between the tabs and seal the two tabs to it:
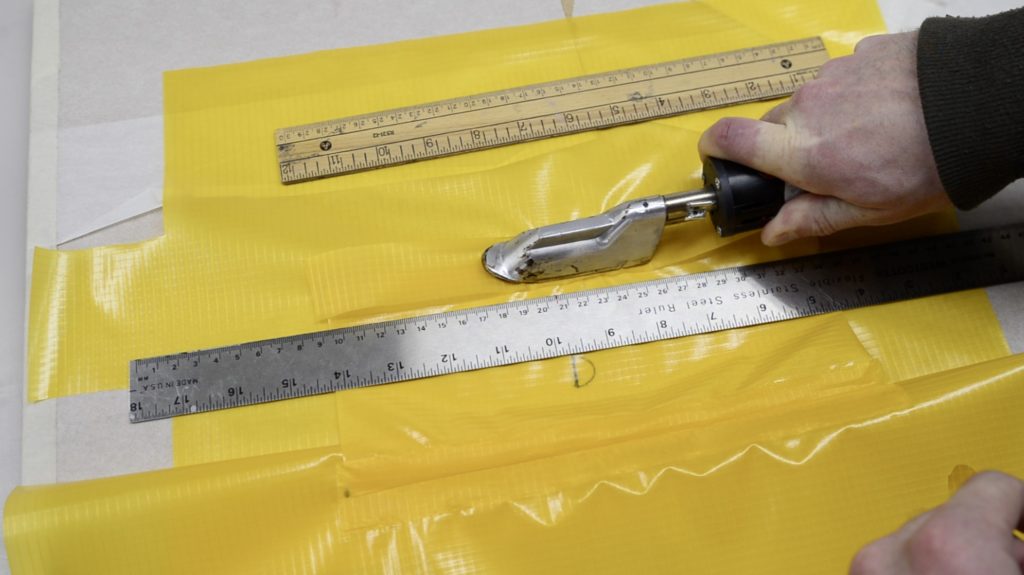
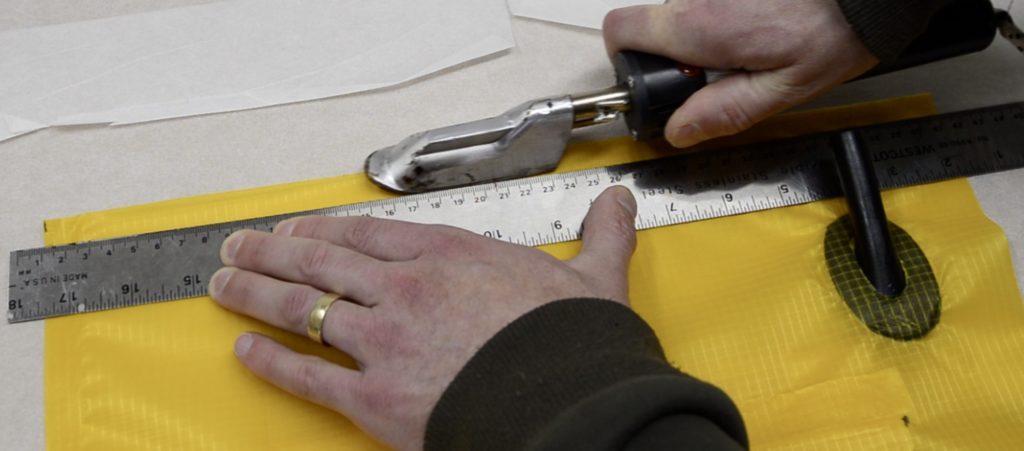
Line up the edges of the larger rectangles and iron them together in a weld approximately 15 mm or ¾ of an inch wide. The actual width of the weld is not as important as keeping the lines straight; anything wider than about 1 cm or half an inch will be strong enough. Seal all the way around the perimeter, being careful to keep the edges and corners aligned so no wrinkles or folds are sealed into the fabric:
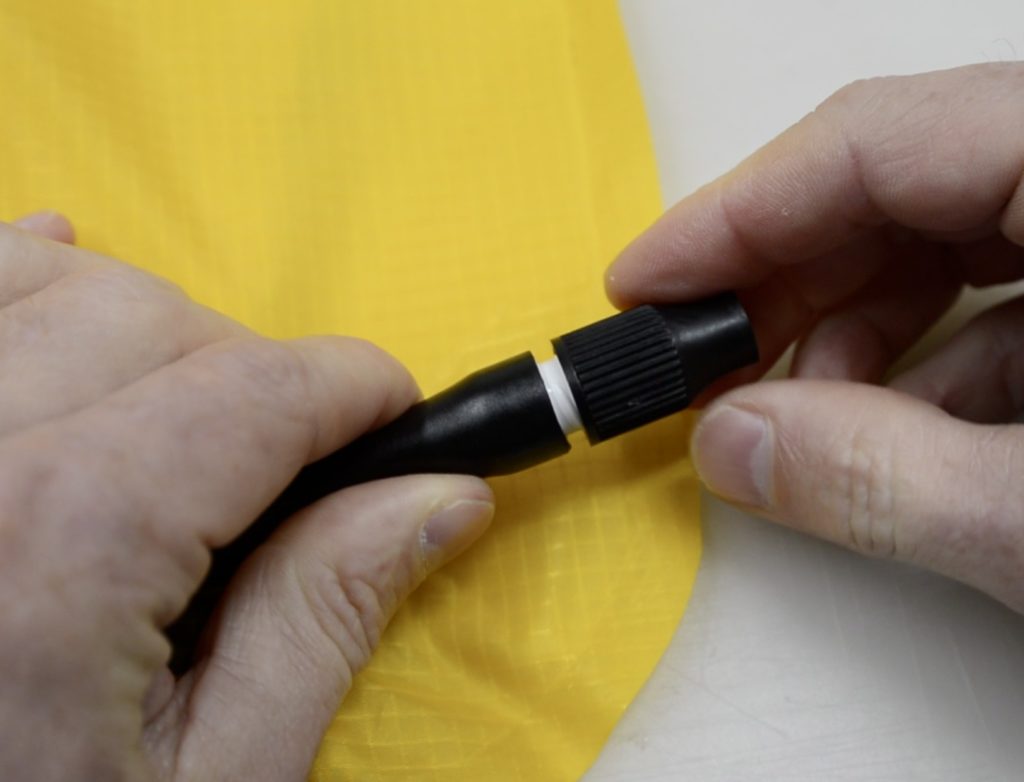
Roughen the inside of the valve stem and the white part of the inflation valve, coat the white part with a small amount of Seam Grip+WP or Aquaseal, and push it into the valve stem. Allow it to cure for at least eight hours:
If you haven’t already, cut a hole in the attachment point. It’s also a good idea to reinforce both sides of the attachment point by sealing scraps of tube fabric to it. Alternatively, you could add a plastic grommet here:
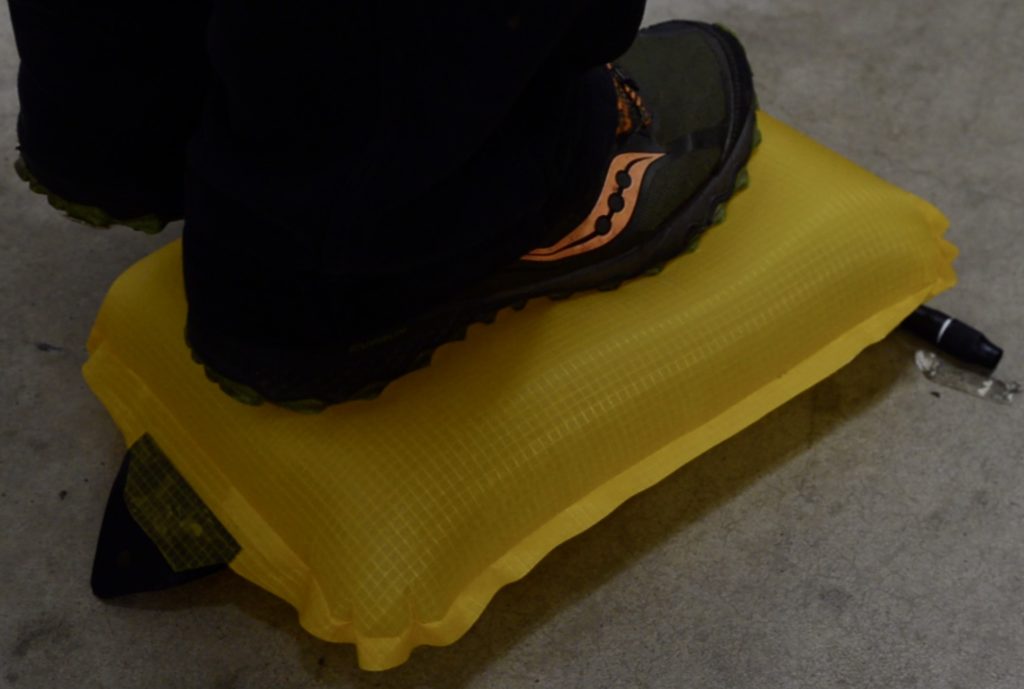
Inflate the backrest and test for leaks (don’t stand on it – I only did that to show how strong a well-constructed backrest can be):
Common types of leaks:
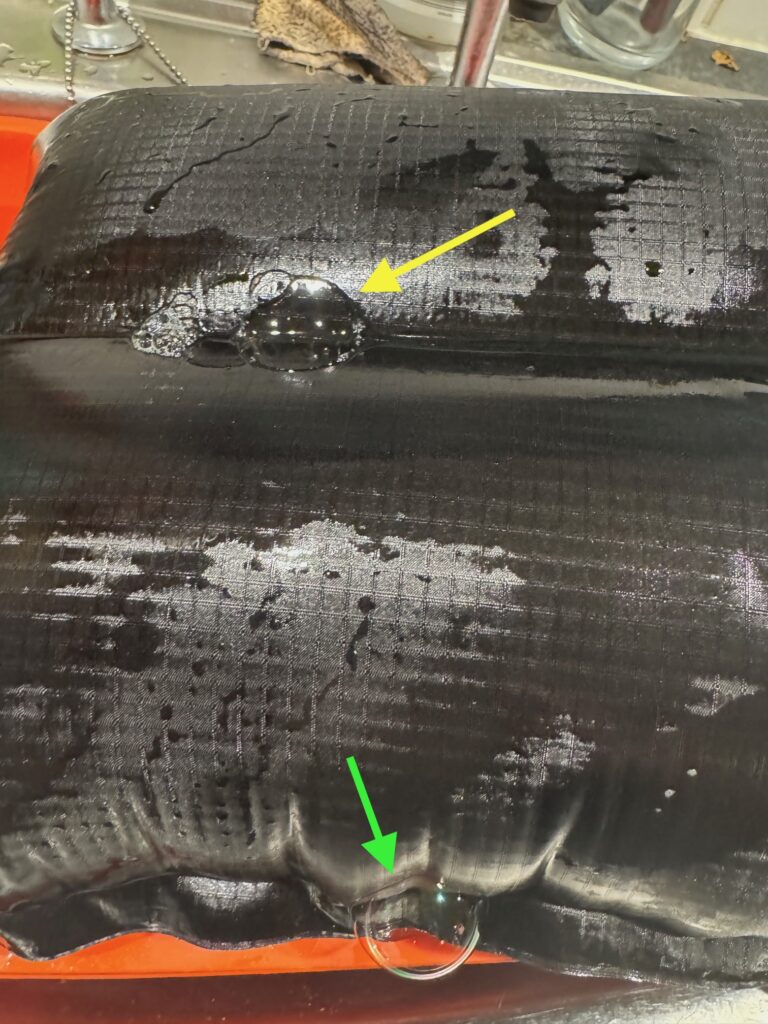
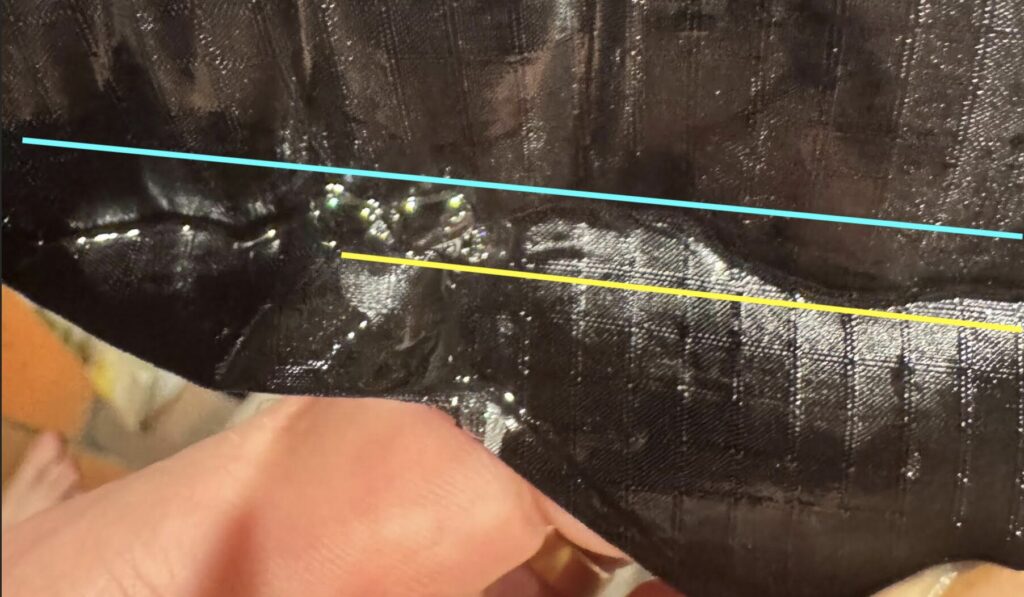
Leaks around the perimeter can be caused by several different factors. In the image above, you can see that the interior edge of the weld isn’t totally straight – ideally the weld would be parallel to the grid lines in the fabric, like the yellow line drawn above. (Note that even when the edge of the weld is straight, the act of inflating the backrest will cause the edges to buckle and curve – that is not the waviness I am referring to here – I’m talking about the way the weld itself isn’t straight.) A wavy weld line is a sign of an incomplete weld, and could be caused by:
- using an iron that isn’t filed completely flat along the bottom and straight along the edge (so some areas are heated and pressed more than others)
- not using a straightedge to guide your iron
- not ironing evenly and consistently (so some areas aren’t quite welded)
- not pressing the fabric with a rag or roller immediately after moving the iron away from the heated area (so the fabric layers separate slightly and the TPU cools and sets before it’s pressed)
Any of the things listed above will allow the peeling force (inflation) to separate the TPU from the woven fabric as it’s inflated, which will cause small leaks, so check to see if any of the above could be a factor, then re-iron, moving the weld inward slightly to make sure the inner edge is a straight line (iron along the blue line in the image above).
If new leaks form after eliminating the above possibilities and re-welding, instead of going around and around to try to get the perimeter perfectly welded, I would just apply some sealant over the leaks and move on, because the packraft itself is constructed differently (you don’t have seams with a peeling force like this) and you don’t need to master this type of weld before starting on the packraft.
When you’re satisfied that the backrest does not leak, you can trim the edges with scissors for a more professional look. You can also round off the corners, if you like.
Details about how I attach the seat and backrest to the packraft are posted in Step 11.
Questions? Leave a comment below!
12 Comments
Steven · January 27, 2025 at 8:01 pm
Hi Matt, Since you score the tube reinforcing strips into the tube fabric it might be worth adding to not use those for the backrest or seat along with the black seam strips. I almost use them, but there wasn’t the correct number and they were slightly off for length. Looking forward a few steps is how I found out where they are actually used. Awesome instructions and videos!
Matt (Admin) · January 28, 2025 at 11:13 am
Ah, great catch, Steven! I’ve updated the warning above to make that explicit. Thanks!
JYP · April 16, 2023 at 8:02 pm
The UL floor fabric felt pretty thin for an attachment point, I was worried the hole might tear so I lined the triangle tab with a small scrap from one of the corners of the 1000D fabric square (provided for the reinforcements around the inflation bag tube) as reinforcement. Just welded a smaller triangle of the 1000D to the floor fabric tab and punched a hole through both.
Olle · October 13, 2022 at 10:35 am
What a pleasure to be making another DIY packraft! After having made a V2 about three years ago, yesterday my ultralight kit arrived.
I started working on the backrest today. The scored lines in the UL fabric are a bit harder to find than in the thicker material of the V2, but in the end it all worked out. I’m just not sure if there should be a scored line for the oval hole where the valve is going to be. I found one in the piece for the seat, but couldn’t find one in the parts for the backrest. I inspected the pieces throughly and am pretty sure there are no lines, but I feel a little hesitant to put my scissors into the fabric.
Should I look further or is it safe to make a hole myself?
Matt (Admin) · October 13, 2022 at 12:57 pm
That’s great!
I checked and you are right – there’s no hole scored there. I will update my pattern, but please go ahead and cut a hole. Thanks!
Phil · August 15, 2022 at 9:13 am
I’ve used my packraft about a half dozen times now and the seat and seatback have developed a few pinhole leaks on the outside seems on the edge of the heat sealing. Maybe the seems aren’t 100% straight but I think additional stress points are created from wrinkles in the fabric when the pieces are inflated. I easilly fixed the pinholes with seam grip but for my next packraft, could it help to put seam grip on the inside of the seems?
Matt (Admin) · August 15, 2022 at 9:32 am
Leaks in a perimeter seam can be fixed by going over the seam with your iron again and increasing the width of the weld by a few mm if necessary to make it straight (moving the edge of the weld towards the center of the seat/backrest). Applying Seam Grip+WP to the inside of the perimeter seams would make this impossible, so I wouldn’t recommend it. It wouldn’t be possible to apply it to all the edges anyway, since you can’t access the inside of the final edge after it’s welded.
pweissma · July 24, 2021 at 8:30 am
I made seat back as the second step after making the inflation bag. I definately see my technique improving but I still have a way to go. I deviated slightly from your directions in a way that seems to make sense and makes it a bit easier for a noob like me. Instead of trimming the tabs, I used them to completely cover the piece of floor fabric for the attachement point. After heat sealing the front and back to the attachement point, I trimmed it to the desired shape and size. This way the the tab itself serves as reinforcement and there is no need to worry about touching the exposed TPU of the attachement point.
Tuukka U · June 1, 2021 at 2:22 am
I cut the fabric pieces for the backrest without noticing the gaps in the scored lines and just cut them straight. The lines were pretty faint to begin with, so it didn’t occur to me that there might be intentional gaps… I guess I can just do the attachment similar to the seat, where you simply make a wider weld around the attachment?
Matt (Admin) · June 1, 2021 at 8:00 am
Yes, it’s no problem – the gaps are actually a later feature and not really necessary, so don’t worry about it. I will try to make them more noticeable 🙂
Garry · February 9, 2025 at 7:01 pm
I did the same thing, Matt. The tabs were clearly marked by for some reason I cut through thinking this was one of the places you intentionally didn’t score so it would roll better. Perhaps noting this in the Separate and Identify page would be helpful. I cut out all my pieces after carefully reading that section and watching the video but didn’t notice my mistake until now. You’re instructions are thorough and the build is a good time so far! Thanks!
Matt (Admin) · February 12, 2025 at 1:16 pm
Thanks for the feedback, Garry – I will do that!