These are preliminary plans, not yet tested on a V3 DIY Packraft. You might want to test the fit by cutting the shapes out of paper first before cutting your fabric.
This is a permanently-attached “whitewater” style deck that uses a separate spray skirt. You can make this deck removable by first installing it as if you were making it permanent, and then cutting it off and adding water-resistant zippers along the cuts (inexpensive water-resistant zippers are available on Amazon and elsewhere). See detailed pictures of Dom Adcock’s convertible spray deck here (some sewing required).
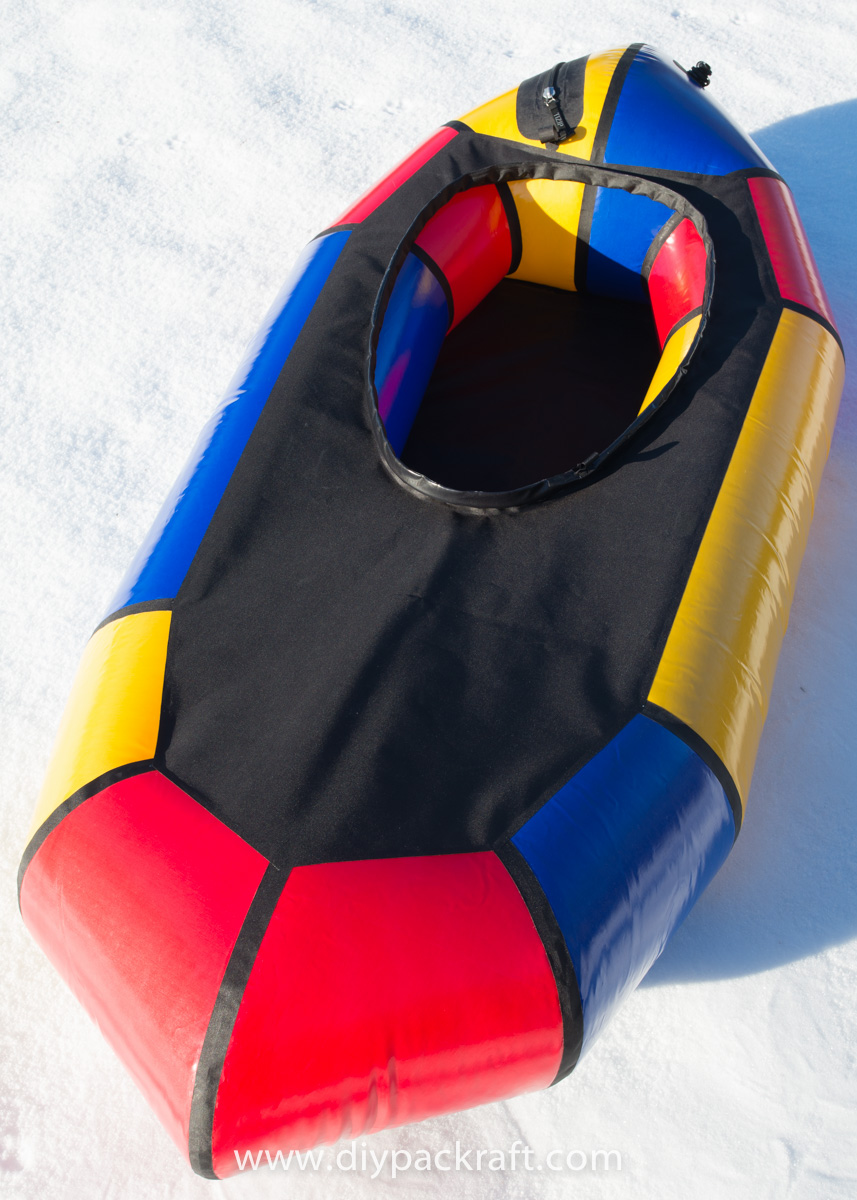
The cockpit opening (i.e. the hole where you sit) shown below is small compared to some kayak cockpit openings and, depending on your body size, you may prefer a larger opening… I suggest you experiment with a mock-up before deciding how big to make your opening.
You’ll need 2 m of fabric to make the spray deck. I recommend using 250 GSM fabric. You will also need one aluminum tent pole or a 10-foot length of PEX pipe or similar flexible plastic pipe to make the coaming. If you choose to use a tent pole, there are cheap, good quality aluminum poles available on Amazon and elsewhere online, and I recommend purchasing one about 3 m (10′) long – that way you will have spare segments in case you break some while bending them. (The tent pole’s diameter is not important.)
You can make the spray deck with the TPU side of the fabric facing down (easy because you can seal it directly to the tubes), or you can make it with the TPU facing up so you can heat-seal gear attachment points to the top of the deck – if you choose the latter, you will need to attach the deck to the packraft with additional strips of fabric around its perimeter instead of sealing it directly to the packraft’s tubes.
Here are preliminary plans for spray decks for the four sizes of V3 DIY Packraft. The shape is shown for one half of the deck because it is symmetrical.
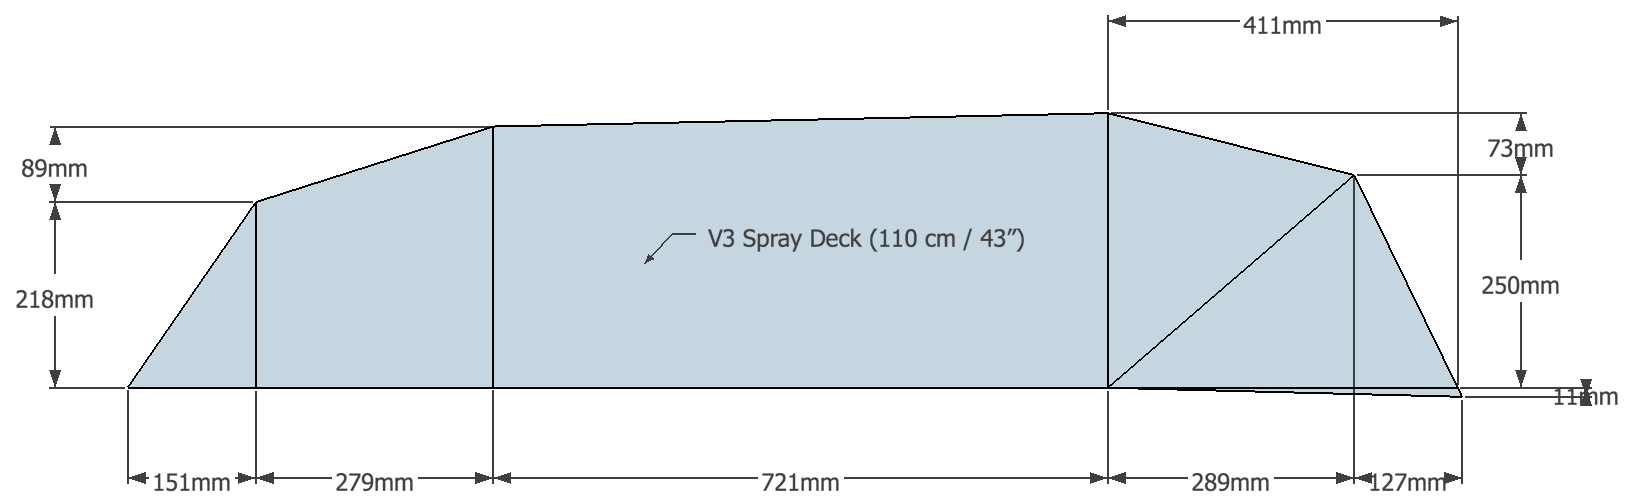
This is a pattern for a V3 110 cm / 43″ half spray deck (the left end is the front). Measurements are in millimeters.
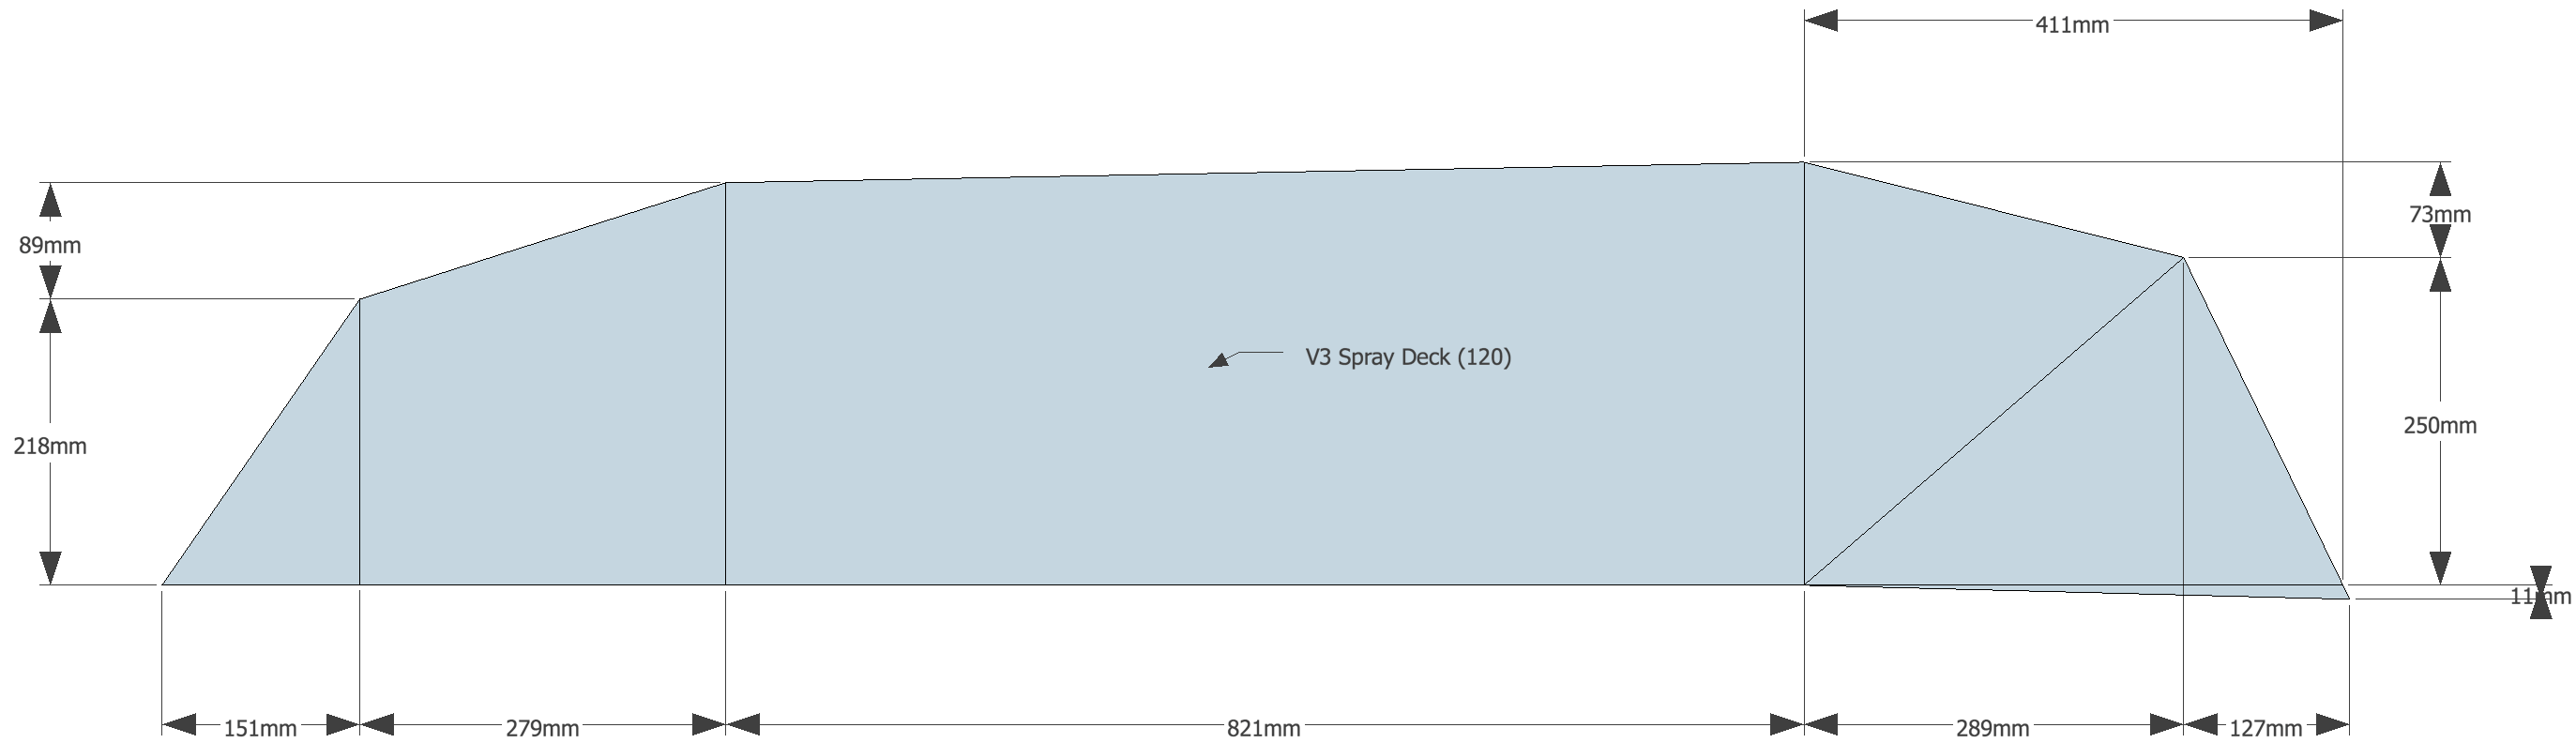
This is a pattern for a V3 120 cm / 47″ half spray deck (the left end is the front). Measurements are in millimeters.
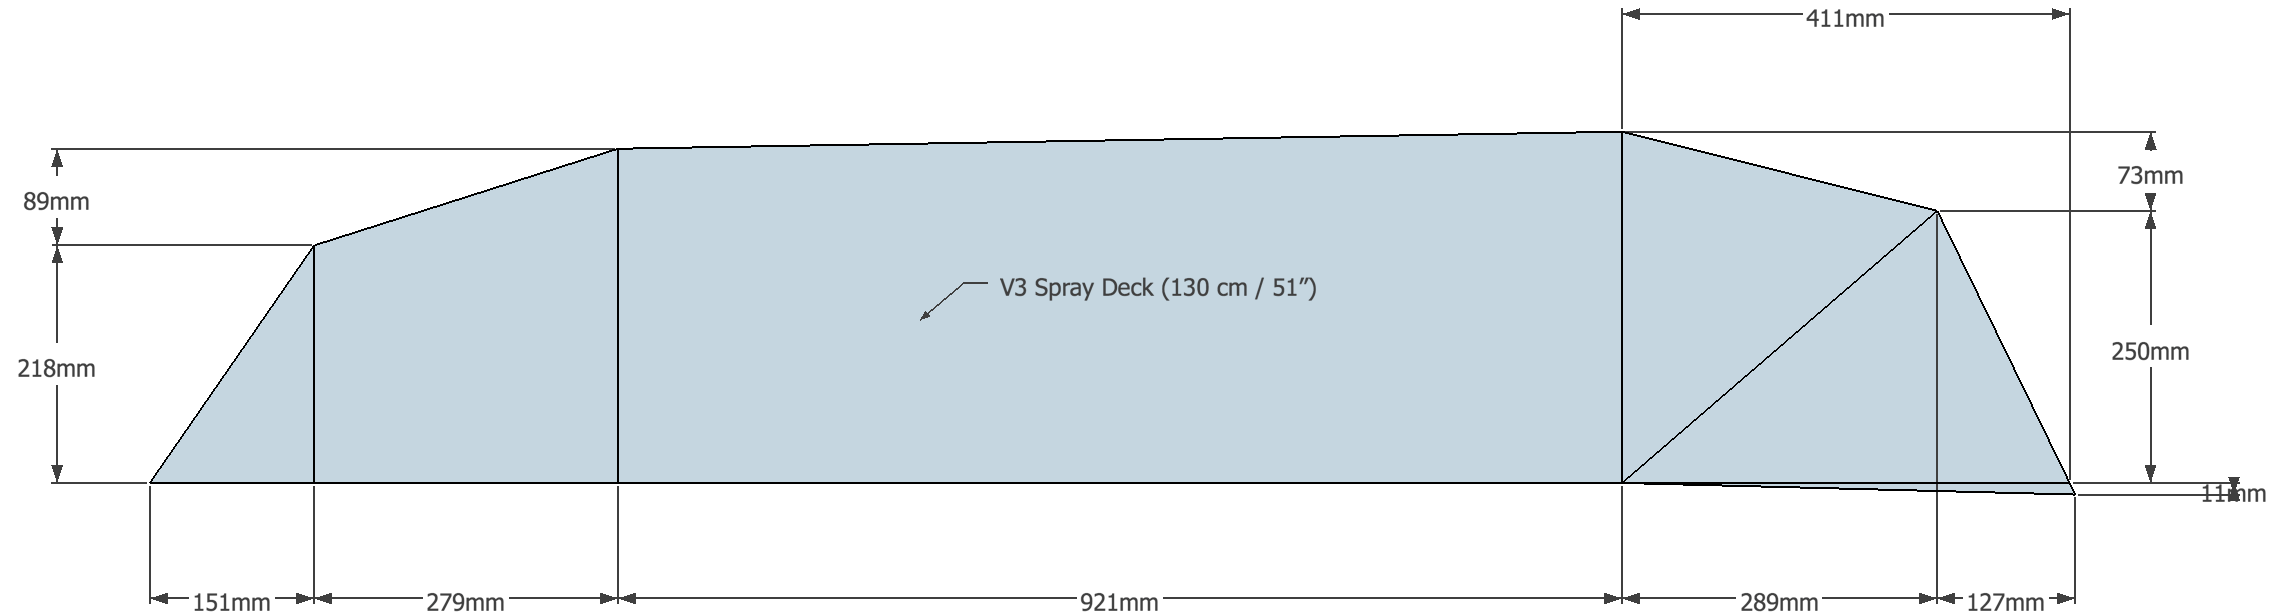
This is a pattern for a V3 130 cm / 51″ half spray deck (the left end is the front). Measurements are in millimeters.
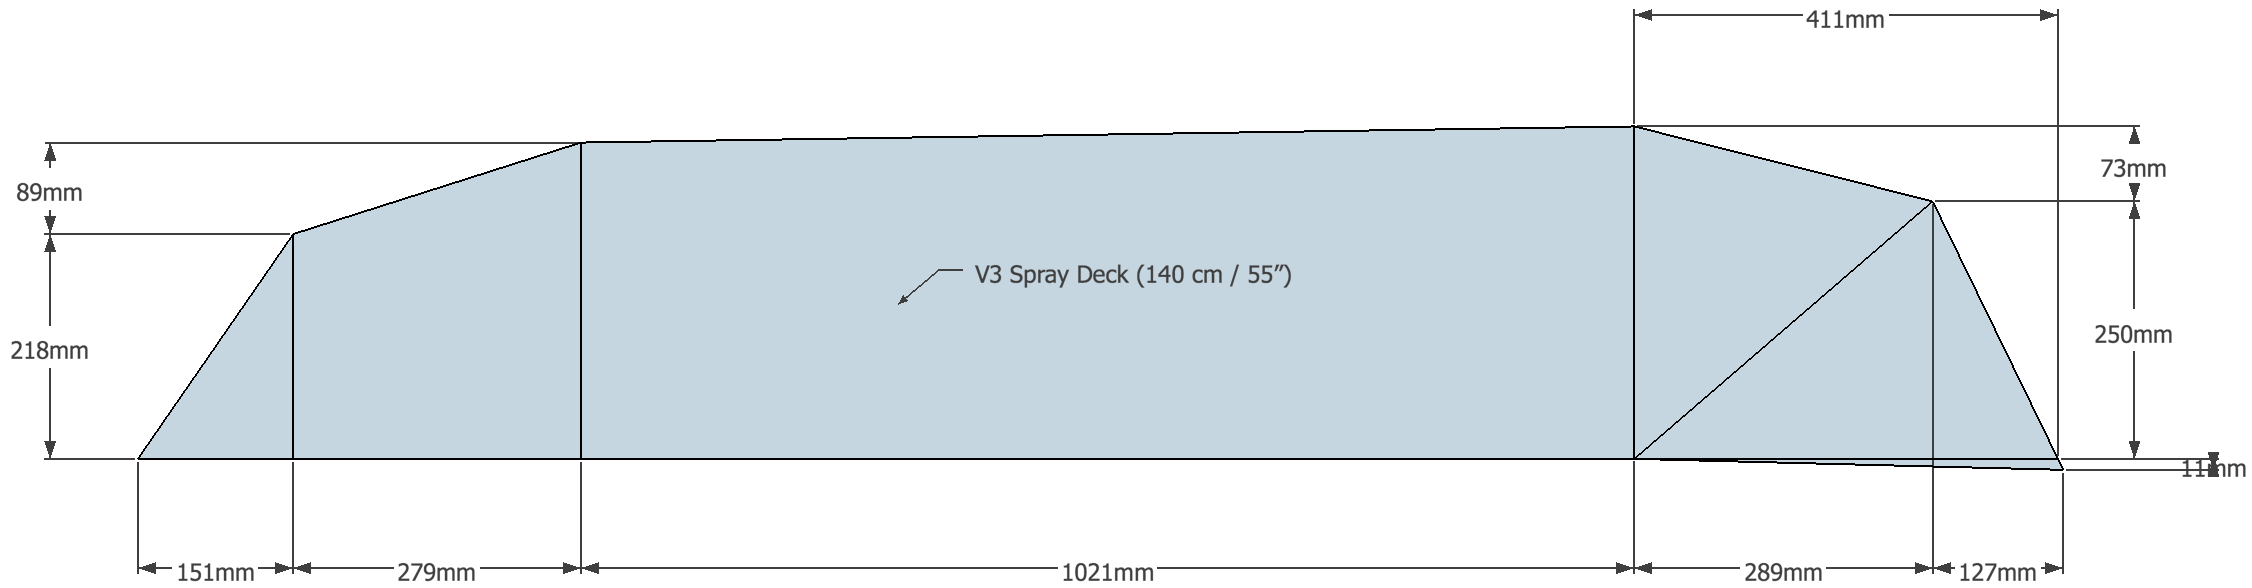
This is a pattern for a V3 140 cm / 55″ half spray deck (the left end is the front). Measurements are in millimeters.
Cockpit opening:
(Depending on your body size and paddling experience, you may prefer a larger opening.) 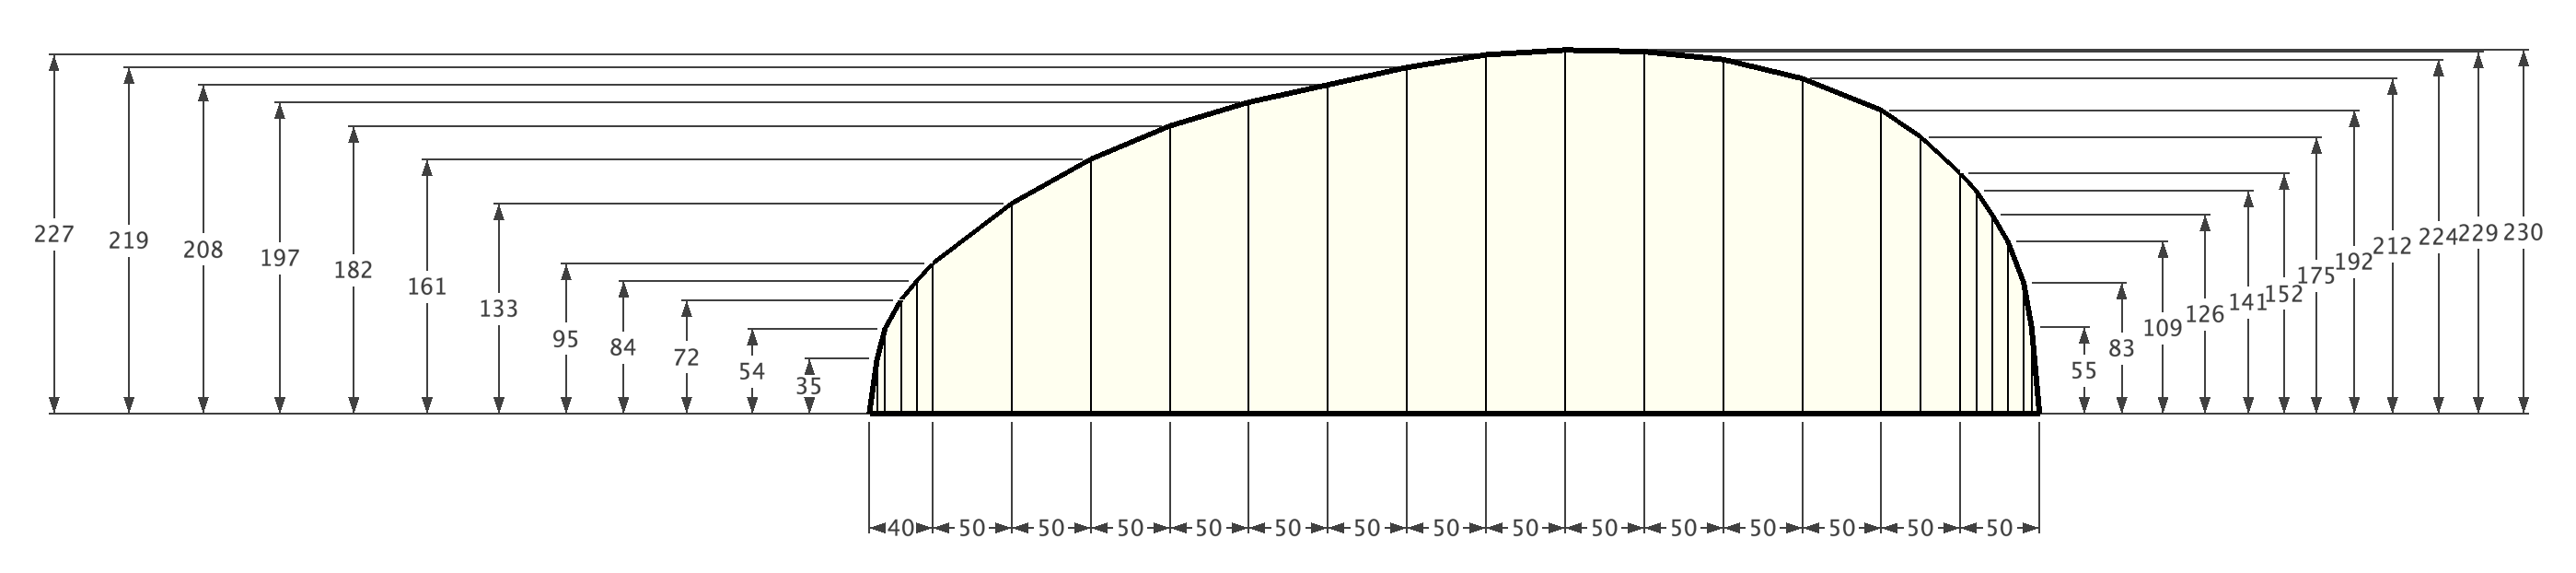
Coaming Detail:
This is a cross-section showing the detail of how the cockpit coaming sleeve is attached to the spray deck:
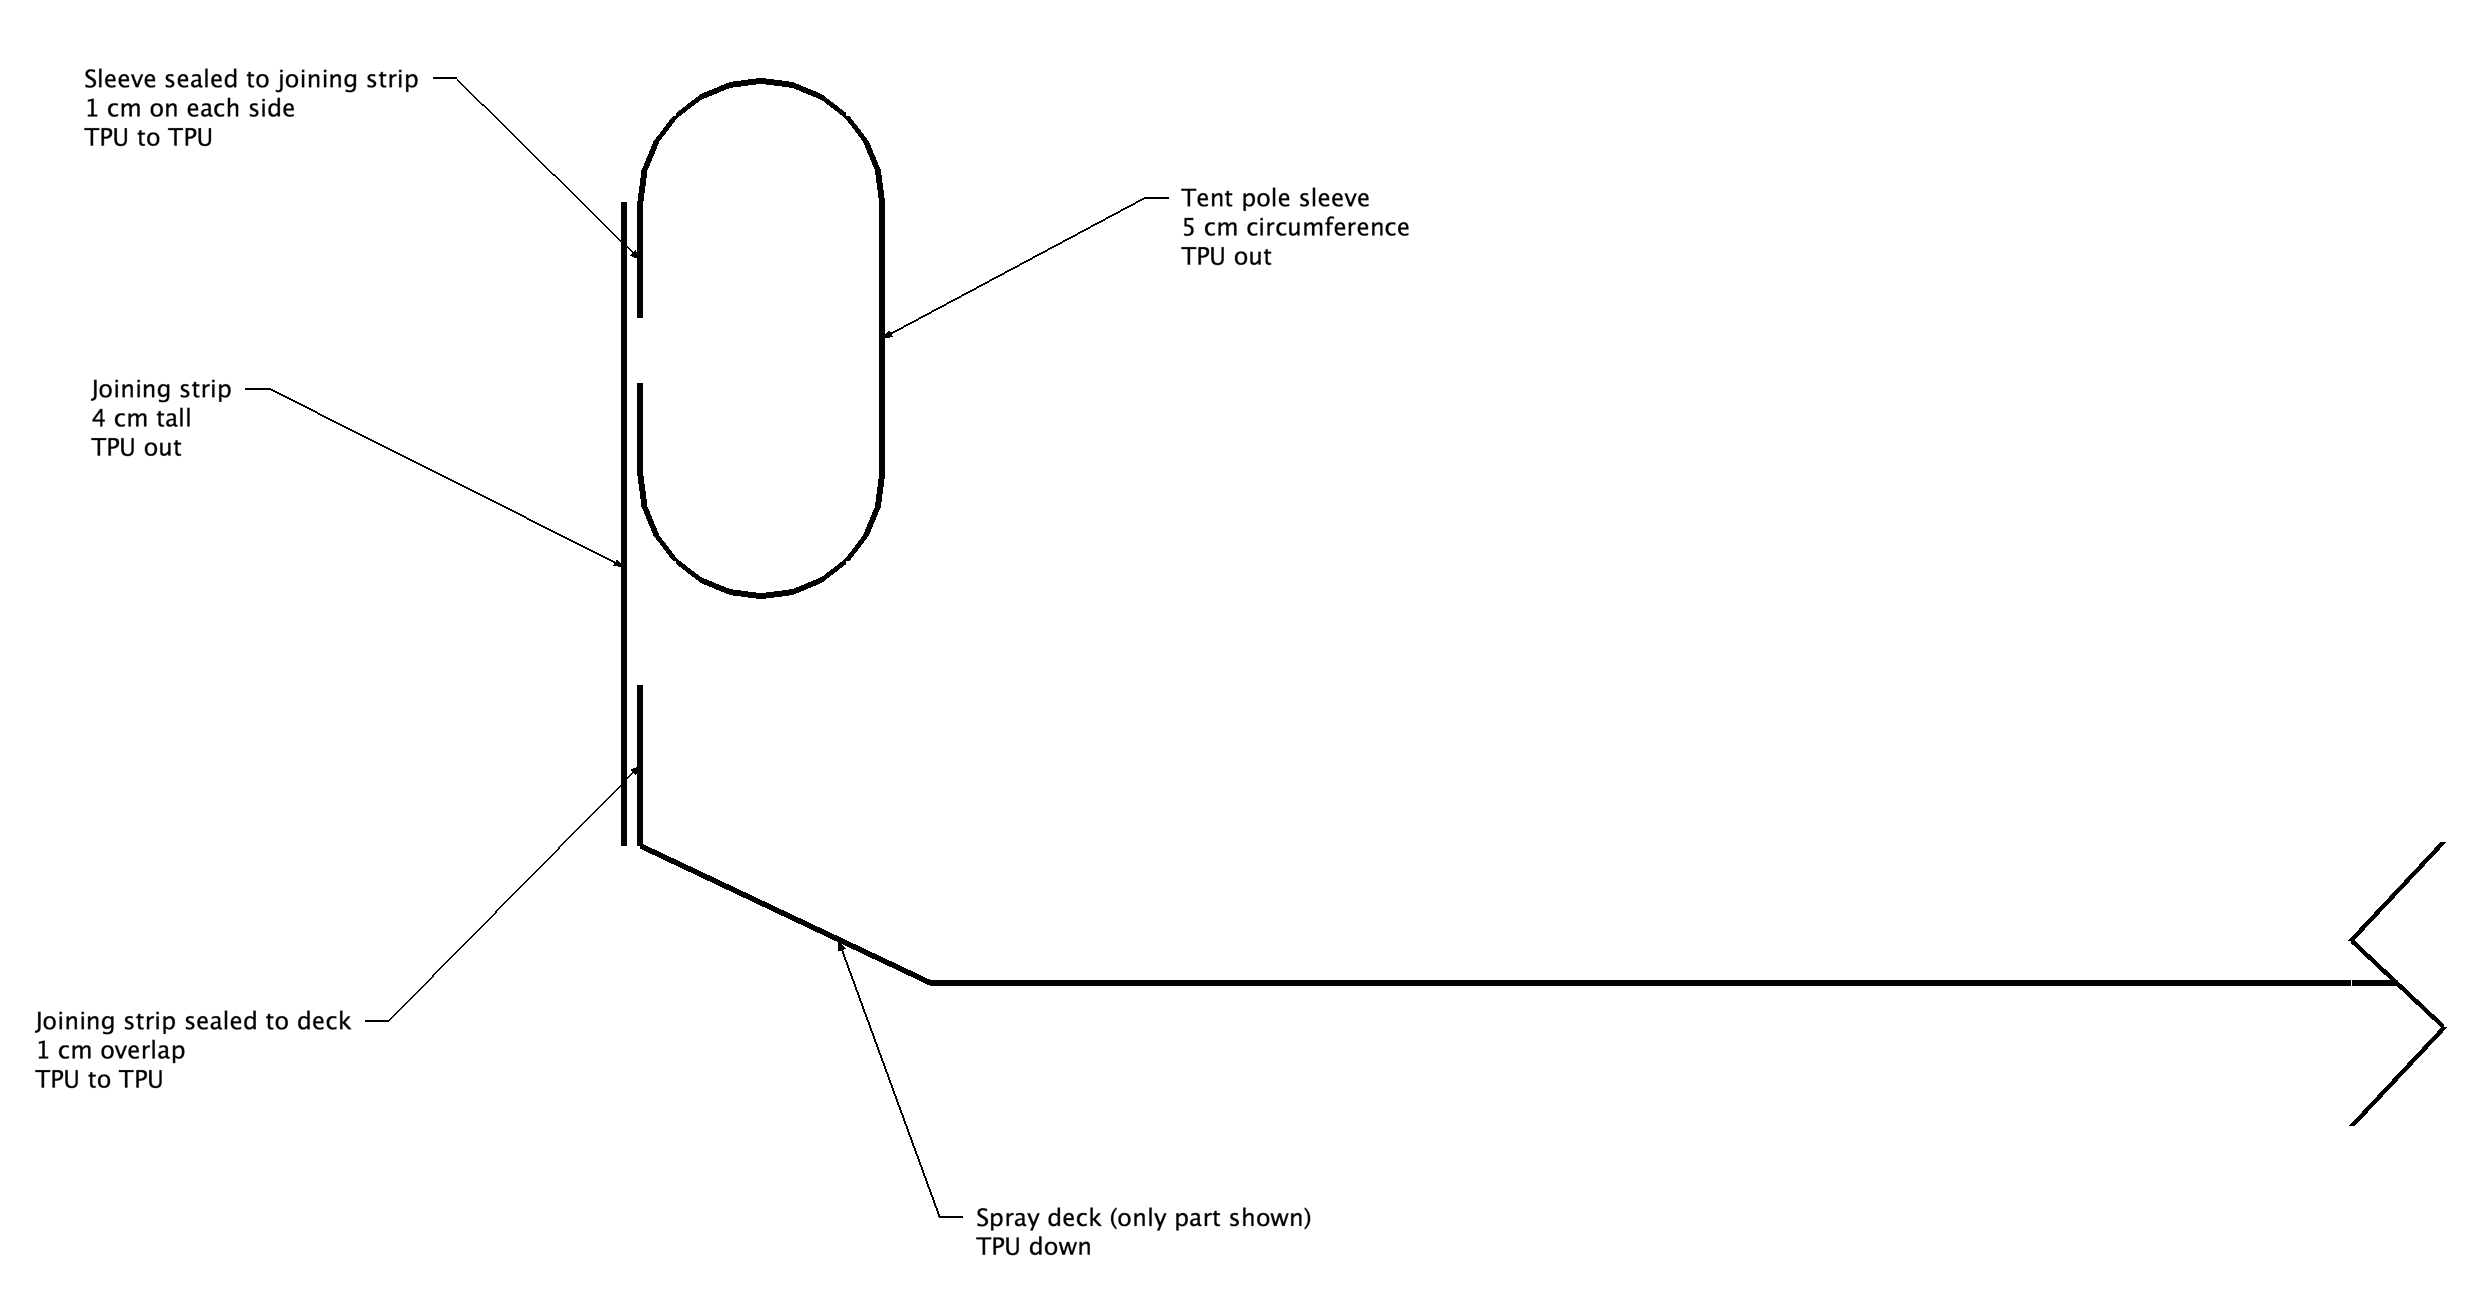 The tent pole sleeve is made from a strip of fabric 5 cm wide and long enough to wrap all the way around the cockpit opening. The joining sleeve is made from a strip of fabric 4 cm wide, the same length. Where the two ends of the coaming meet, they are spliced together with a small strip of fabric.
A hole is cut in the sleeve (in an area that will be covered by the spray skirt) for the tent pole or PEX tubing to slide in and out. The hole should be reinforced with a scrap of 560 GSM or 735 GSM fabric so it will not rip.
The following pictures show parts of the spray deck construction process (on a V2 DIY Packraft).
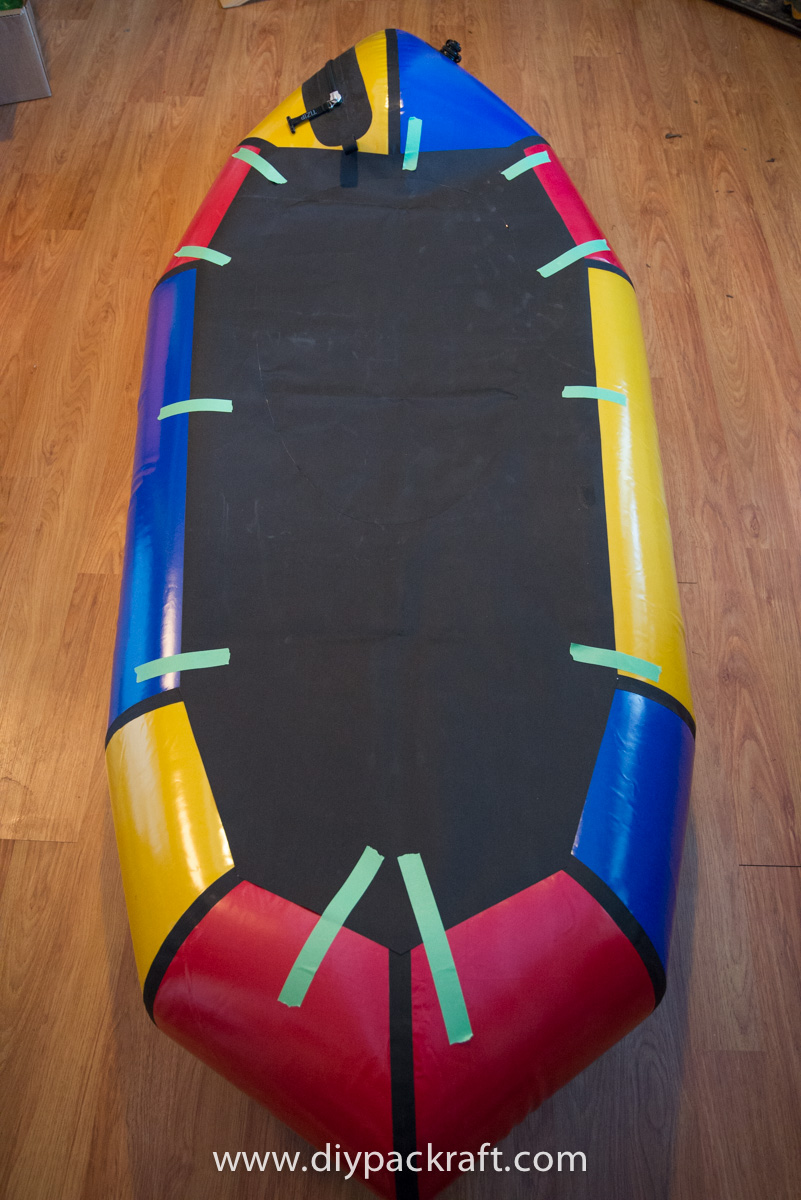
After cutting out the fabric, test the fit by taping it in place. Adjust as necessary.
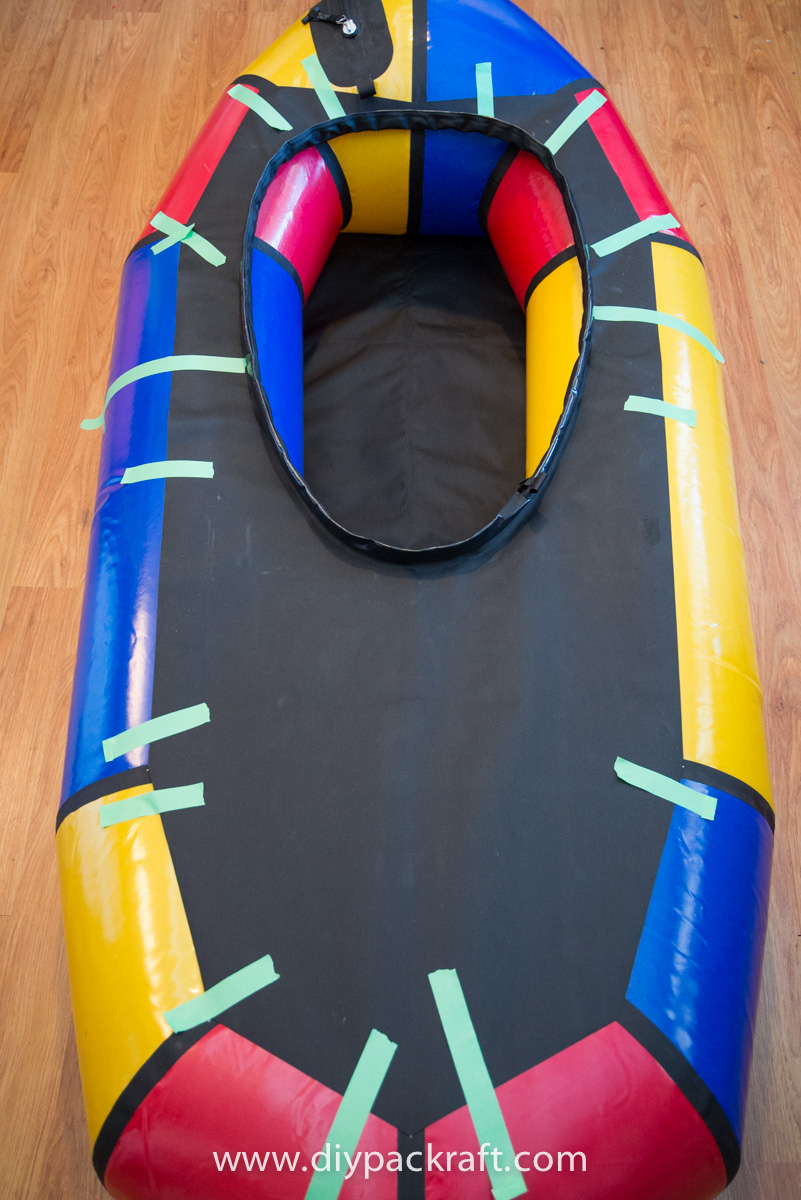
After cutting out the cockpit opening and adding the coaming, tape the deck in place again.

Deck taped in place, ready for heat sealing to tubes.
Completed deck heat sealed to tubes.
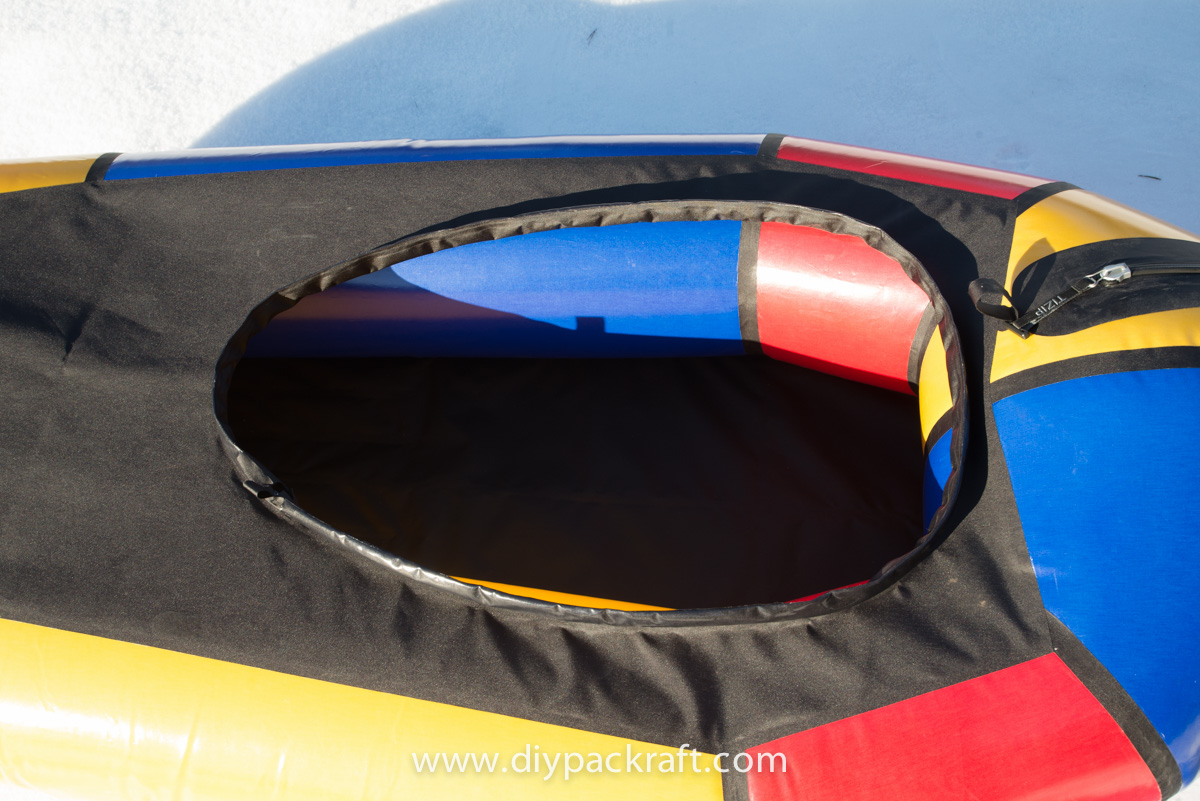
Cockpit opening and coaming.
10 Comments
Jacob Rosenthal · December 5, 2020 at 12:01 pm
I guess I was referring to the type 1 tie downs. But now that I’m thinking about it, you could make a sandwich of 210, 420/1000, and the 210 on the bottom like the type 3 tie downs. Maybe i’ll do something like that for thigh straps.
Jacob Rosenthal · December 4, 2020 at 6:24 pm
Hey Matt,
Any reason to do it TPU side down vs do it TPU side up like you do with the later models (skeena/telkwa)? Also, this is more of an attachments question, but in the attachments sections you guys talk about sealing the 1000D material to the tubes for the punched hole attachments. Are you guys sealing from the inside or using glue to seal that on? Or did I just misunderstand and you guys are using the 210D stuff…?
Cheers,
Jacob
Matt (Admin) · December 5, 2020 at 8:09 am
Hi Jacob – it’s easier to seal the deck to the tubes TPU down, but then the woven fabric is facing out and it will absorb some water. With the TPU facing out, the fabric will only absorb water if water gets in under the skirt and the boat flips upside down.
I’m not sure which attachment point you’re referring to, but either way can work.
Nick · September 30, 2019 at 3:28 pm
Do you have any measurements on where you situated the cockpit opening in the spray deck? As in how far from the rear of the deck to the rear of the opening? Thanks in advance!
Matt (Admin) · September 30, 2019 at 4:20 pm
Hi Nick, it depends on what kind of seat back you’re using – if it’s one that leans back against the rear tubes then I’d place the hold as close to the rear tubes as possible; if it’s a back band that’s mounted to the side tubes, you could move it farther forward. Cheers!
Doug D · May 22, 2019 at 8:38 pm
I’ve been looking at the pattern, do you make the V3 deck as two symmetrical halves and weld up the middle, or do you splice a V into the rear section? Or am I not understanding the pattern?
Matt (Admin) · May 23, 2019 at 8:16 am
Originally I had intended it to be two separate halves, but that extra part is small enough that most people just ignore it and they make the deck out of a single piece. Good question though!
Doug D · May 24, 2019 at 8:56 am
Thanks, as I lay out a preliminary shape, I think that it may actually be easy enough and worthwhile to splice in since the V is behind the cockpit opening.
Peter · July 13, 2018 at 6:33 am
Hey! I was wondering how you got the spraydeck attached to the black straps, since the TPU does not attach very well to the rough side of the strips? Was it with aquaseal? when did you do it, before or after heatsiealing?
Thanks!
Matt (Admin) · July 13, 2018 at 5:45 pm
Hi Peter, I just add a bit of Aquaseal under the corners after I’m finished heat sealing. Cheers!