Note: This page is shared between more than one set of packraft instructions. Use the back button to return to your kit’s instructions.
Important: cut reinforcing strips from the colored scrap fabric around the packraft tubes – don’t use the black seam strips or the zipper rectangle!
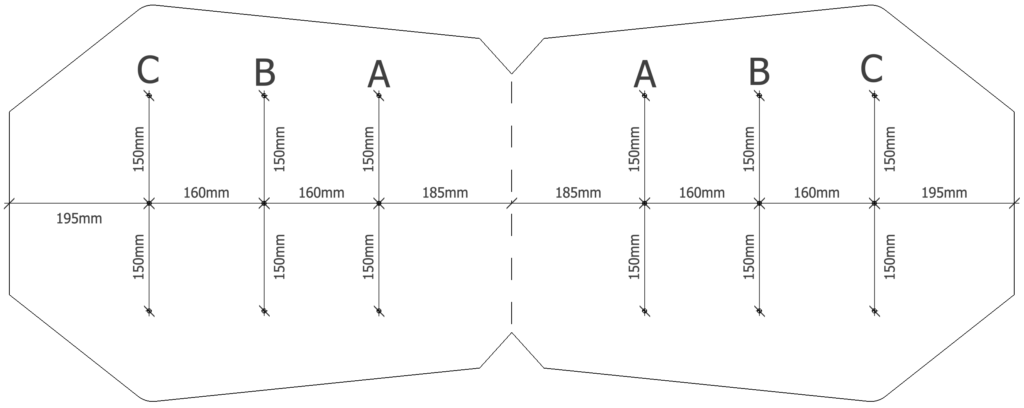
Important: Depending on when your kit was made, baffles A, B, and C might be taller than those shown in the video – this is to allow you to weld wider strips to the seat top and bottom using the full width of your iron instead of 15 mm strips as in the video above (e.g. at 2:00 in the video above).
| Baffle: | A | B | C |
| Old: | 15 cm (5.9″) | 18 cm (7.1″) | 16 (6.3″) |
| New: | 19 cm (7.5″) | 22 cm (8.7″) | 20 (7.9″) |

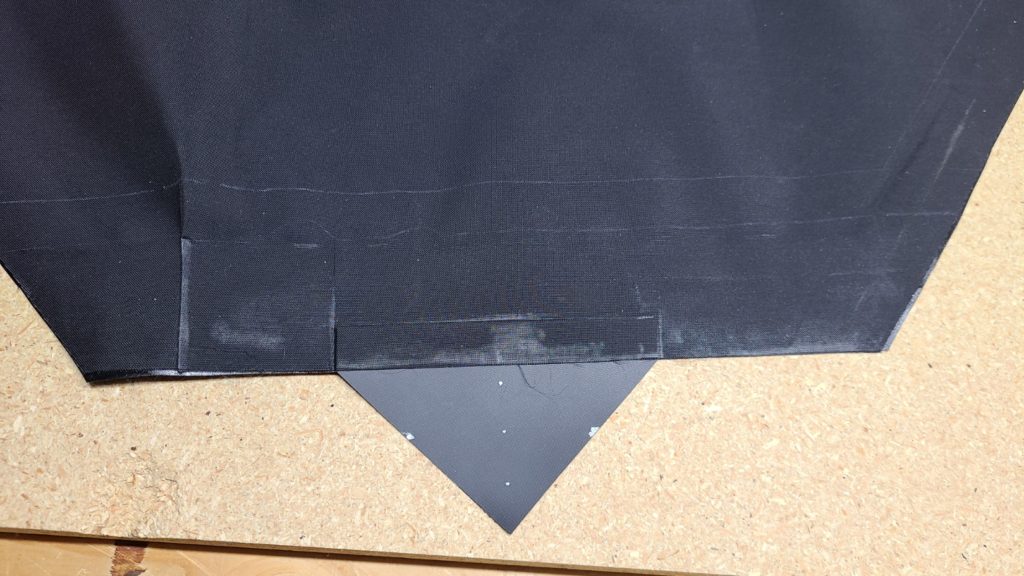
Note: The first video (above) mentions cutting the attachment point out of scrap floor fabric, but newer kits have the triangular attachment points for the seat and backrest pre-scored into the excess floor fabric. One of the smaller triangular attachment points (with a 20 mm wide rectangular slot at the apex) is for the seat bottom. The other similar pieces are for the backrest/back band.
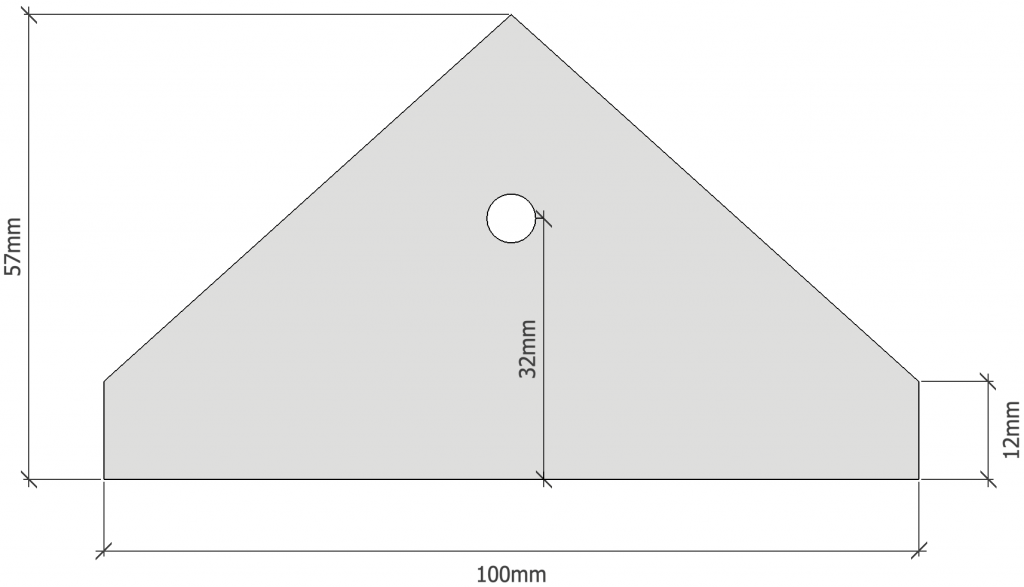
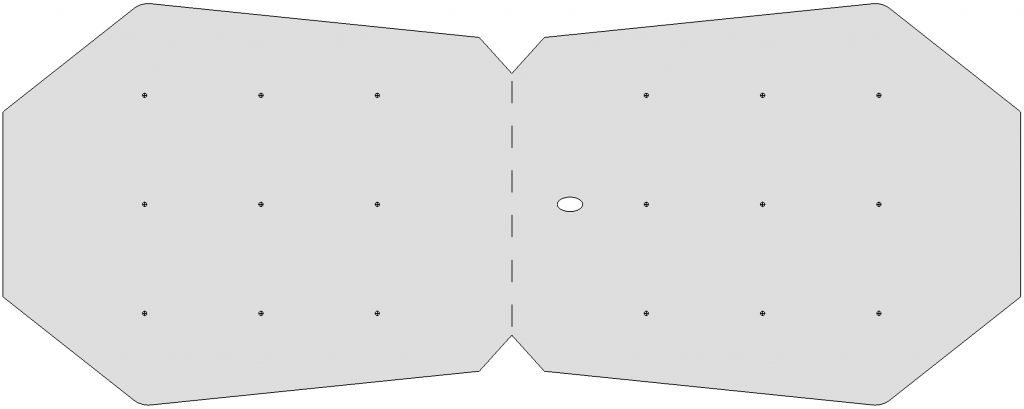
Note: Depending on when your kit was made, there may be a ~10 cm (4″) gap in the scored lines at the rear of the seat piece (in the diagrams above and below, the rear of the seat is represented by the vertical lines at the left and right edges of the drawings). This is to allow you to extend a tab of fabric outwards so more surface area can be welded to the attachment point.
Tip: Instead of ironing the last reinforcing strips from the outside of the seat with a parchment paper-covered block inside the seat (as at ~6:18 in the video above), you may find it easier to turn the seat inside out so you can iron the reinforcing strip directly. (You’ll have to turn each “cell” inside out, one after the other, by pulling the seat fabric through the tunnel formed between two adjacent baffles.) Thanks to Steven for this tip!
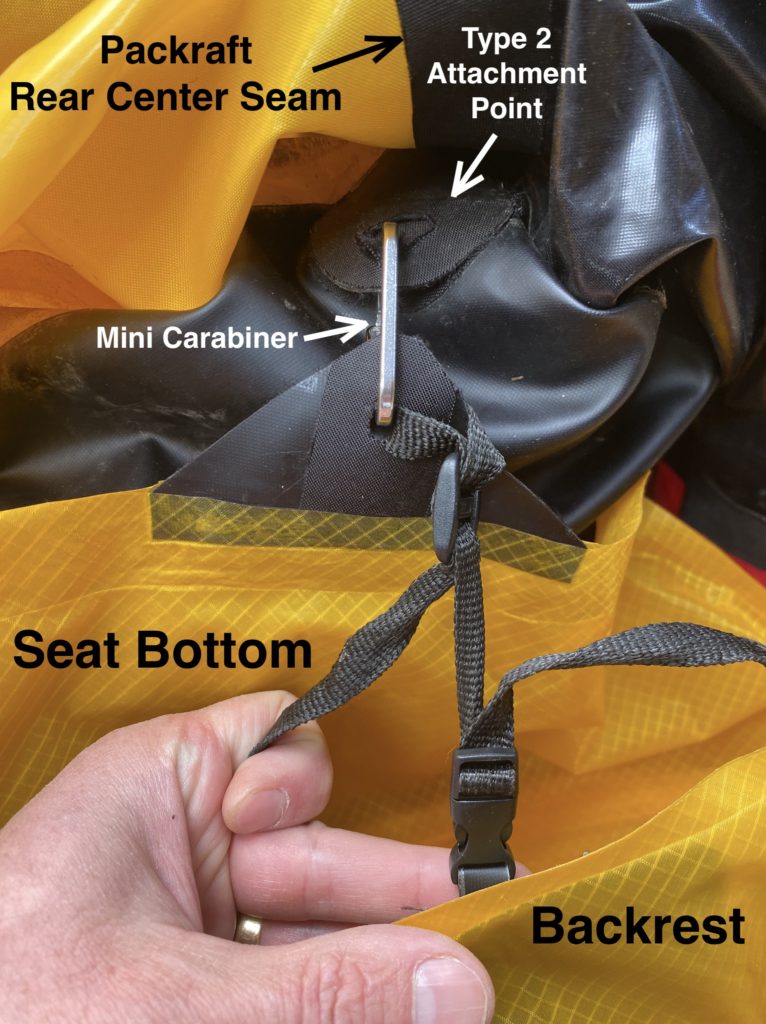
To attach the seat bottom and backrest to the packraft, I install a Type 2 attachment point at the back of the cockpit floor.

Old Style Seat Attachment:
The image below shows how I attach my seat and backrest to the packraft – this is just one possible method. I install a “Type 2” attachment point at the center-rear of the cockpit floor and use a mini carabiner to link the seat bottom to it. I then attach the backrest to the seat bottom with a piece of 1 cm (3/8″) webbing and a plastic buckle, to make it easily removable (because I also use the backrest as a camping pillow). You can see that the attachment point is frayed after a lot of use, so installing a plastic grommet in the hole might be a good idea.
Caution – Avoid “Extra” Fabric on the Seat Top or Bottom:

To avoid this outcome, do not iron both the left and right sides of the seat before ironing the rear.
Instead, you can either:
- Iron the rear seam first and then work your way forward from there on each side, ending at the front of the seat where the fabric is folded
or
- Copy what I did in the video above, which is to start at one front corner of the seat and then work your way back from there, then continue ironing across the rear seam, and then iron forward along the other side (i.e. make it one continuous seam).
Either way, by finishing the weld at the front of the seat where the fabric is folded, any excess length on the top or bottom can be compensated for by simply moving the fold.
Tacking the fabric in place with the edge of your iron can help keep things lined up, but don’t worry if the edges of the seat top and bottom don’t line up perfectly – after they’re welded together you can trim them to make a nice neat edge.

Tip: Avoid starting any seam at both ends and working towards the middle or you will likely end up in the above scenario.
Baffle facing the wrong direction?
If you mistakenly weld one of the baffles facing the wrong direction, it’s not a big deal – here’s how you can fix it:
Cut off half of the baffle, and then cut a rectangle of scrap fabric the same length as the baffle and 2-3 centimeters (~1 inch) wider than the part you cut off (the width of your iron). Then weld the new piece to the part of the baffle that is already attached to the seat fabric. Overlap the pieces with the TPU sides facing each other, and make the overlap wide enough so that the resulting baffle will be the same size as the original. That will effectively flip the TPU from one side of the baffle to the other and will allow you to carry on following the instructions without having to make any other changes.
Questions? Leave a comment below!
48 Comments
Regan · November 22, 2025 at 11:38 pm
Hi Matt, there’s a note on the page for the backrest which explains the pre-scored triangles in the floor fabric, their widths, and what they’re used for. It would be good to get it for this page, as the video says “use some scrap fabric”, but there actually isn’t enough spare fabric. The note:
Matt (Admin) · November 23, 2025 at 10:43 am
Thanks for pointing that out, Regan! I’ve added some notes above… let me know if it’s too confusing.
Sterling · May 23, 2025 at 6:58 am
What is the proper procedure to fix leaks on the edge? I have several and haven’t been able to fix them.
Matt (Admin) · May 23, 2025 at 11:41 am
It depends on whether the air is coming out between the fabric layers at the perimeter, which would suggest there’s an incomplete weld and air is escaping through the weld, or if it’s leaking at the inner edge of the weld where the inflated seat balloons outward, which would suggest that the edge of the weld wasn’t completely straight, so inflating the seat caused the airtight TPU to tear, as shown at 7:19 in the seat video. Based on your email, it sounds like it’s the latter problem, so I would move the perimeter weld inward slightly and make sure the inboard edge of the weld is completely straight all the way along.
If all else fails, Seam Grip+WP or Aquaseal or Aquasure makes for an easy fix.
Kenneth · March 21, 2025 at 12:58 am
I managed to weld the valve stem the wrong way, its pointing backwards and down. The only fix i can think of is to cut it out and weld on a new valve with som scrap fabric, and leave the parchmentpaper inside. Do you think that sounds ok?
Matt (Admin) · March 21, 2025 at 8:57 am
Hi Kenneth, you might be able to reheat the weld and peel off the valve and reuse it – that’s what I would try first – and if not then I would cut it out and weld on a new stem with scrap fabric, as you described. I think you’ll be able to unweld it, though.
Andrew Burrows · March 6, 2025 at 12:49 am
I’ve made the seat as per these instructions with a small round hole in the triangular attachement tab. I them moved on and made the back rest which has 3 attachment straps. I’m now looking at the video for the floor attachement point that has 2 buckles and I’m thinking that I should have welded a strap onto the seat instead of doing the small hole in the triangle thing.
Did I miss an instruction/step or does this page need updating?
I have reinforced the triangle on my seat by welding tube fabric on both sides so I figure the only way to fix my situation is turing the circular hole into a slot, feeding a strap through it and then welding it back onto itself. Unless you have any better ideas?
oldcanuck · March 6, 2025 at 8:52 am
Hi Andrew. I did exactly what you proposed, making the hole into a slot and welding a strap onto itself, and honestly I prefer it. I think that this strap could get warn from attaching/detaching often and will be super easy to replace if not welded into to seat.
Matt (Admin) · March 6, 2025 at 9:28 am
Thanks!
Matt (Admin) · March 6, 2025 at 9:27 am
Apologies for the lack of clarity – I’m currently making the transition between the old style and new style seat attachments and some people such as yourself are finding themselves in the middle… it’s totally my fault. Sorry!
You might also have two 20 mm wide ladder locks while the straps are 25 mm wide – if so, please narrow the strap to fit the floor attachment (the wider straps and ladder locks are for the back band).
Please proceed as you’ve outlined, Andrew. Good thinking!
Andrew Burrows · March 6, 2025 at 2:06 pm
Thanks Matt, I thought it was porobably just a transitional oversight. I do have 20mm ladder locks in the kit, although I have a stash of 25mm ladder locks from other projects. Do you recomend that I trim down my straps or use the wider hardware?
Matt (Admin) · March 6, 2025 at 2:34 pm
Go with whichever you prefer – I can’t think of a reason to prefer either. The strength shouldn’t be an issue either way.
Steven Sloat · May 7, 2022 at 10:11 am
Arrrrgh!! My DIY skills are killing me. I’m still working on my seat, and I’m at the rear of the seat now and about to put in the tethering tab. My issue is that my edges are not matching up. What options do I have? Is there a fix?
Matt (Admin) · May 8, 2022 at 11:15 am
Can you send me a picture? I will be able to help if I can see where the problem is. Thanks
Steven Sloat · May 8, 2022 at 3:58 pm
Matt, I couldn’t find anywhere on here to send a pic, so I’ve posted a couple on the facebook site.
Matt (Admin) · May 9, 2022 at 8:52 am
Thanks – I’ve replied there. If you reply to one of my emails I’ll probably respond faster, as I don’t check Facebook very often.
Steven Sloat · May 9, 2022 at 9:36 am
Unfortunately, I ordered the raft a year ago, so I was having issues finding an email.
I answered your question on the facebook site but, essentially, please do use the photos if it will help others. Also, I asked in the facebook site whether including the little cut out at the edge would improve the use of aquaseal if needed, or would it be better to carry the crease right to the edge with no cut-out?!
Steven Sloat · April 30, 2022 at 9:39 am
I’m wondering why we have to wait to finish the reinforcing tabs on the second side until all the baffles are installed and then fidget with the ironing from the outside or twist everything inside-out?! Why can we not completely install the reinforcing strips before welding the baffles on the second side? It seems that we could put a layer of parchment paper under half the length of the reinforcing strip to prevent welding the complete strip before installing the baffle? I’ve done two of the three baffles now in the way recommended, but I’m thinking of trying this for the third baffle? Thoughts before I launch?
Matt (Admin) · April 30, 2022 at 9:51 am
That will probably be okay. The parchment paper won’t prevent the TPU from melting, so make sure everything is cool before moving it.
Steven Sloat · April 30, 2022 at 9:55 am
Wow! Thanks for the extremely quick reply, Matt. Okay, I understand the TPU won’t be prevented from melting, but can you confirm that that won’t prevent it from being able to be welded later when I actually attach the baffle?
Matt (Admin) · April 30, 2022 at 10:33 am
The reason this isn’t the recommended method is that there are a few ways it can go wrong. Melting and then re-melting the TPU could weaken the bond between the TPU and the woven fabric, but as long as the TPU doesn’t separate from the fabric and the parchment paper doesn’t move while you’re doing it then it should be okay.
The procedures I recommend are not necessarily the best or only way of doing things, and sometimes a builder comes up with a better procedure that ends up being incorporated into the instructions, so I encourage people to experiment. It’s hard to foresee all the downstream effects of a new procedure though, so whenever you do something different from what’s in the instructions it’s a good idea to test it with scraps of fabric first. In this case, there’s little risk – the worst that could happen is a leaky seat – so it’s not a big deal.
Craig McHood · April 25, 2022 at 5:44 pm
Can you send me the size of A, B, C? I cut my fabric when this arrived months ago, but I’m missing those pieces. I plan to cut them out of some of the remaining fabric.
Matt (Admin) · April 26, 2022 at 9:06 am
A, B, C are 30 cm wide; A is 15 cm tall, B is 18 cm tall, C is 16 cm tall. D is 25×14 cm. When you’re looking for them, remember they are the tube fabric color, not black.
Philip Weissman · November 23, 2021 at 1:33 pm
Now that I’m done building I have two suggestions.
1) It’s much easier to attach the seat attachement point to the floor prior to step 9, the rear center seam, but for positioning, wait until after step 7, tube 4L & 4R.
2) Blowing up the seat takes a lot of breaths. I found that the inflation tube fits inside the tube of the inflation bag and can be inflated with one good fill of the inflation bag.
Thanks!
Donald Becker · September 29, 2021 at 9:16 pm
I followed this suggestion and it worked well.
If you plan on doing this, it might be faster to not iron the reinforcing strip down first when doing the second side. You’ll be inverting the structure anyway, and can weld the inforcing strip on both surfaces in a single step.
pweissma · July 24, 2021 at 9:46 am
Hi Matt,
I’m unclear on the direction of the valve stem. In the video the hole for the valve is centerered on the fabric. On my seat the hole is on the centerline but above the fold. Do you recommend having the valve stem pointing up or down? Thanks!
Matt (Admin) · July 24, 2021 at 9:49 am
It should point towards the center fold line. That way, when the seat is in the packraft and the valve is on the bottom of the seat, it points forward and up.
Aaron · July 23, 2021 at 7:58 am
Are you able to post a picture of how exactly you are attaching the seat/backrest to the tie down with a buckle and webbing? I’m having a hard time visualizing it.
Thanks!
Matt (Admin) · July 24, 2021 at 9:58 am
Hi Aaron, sorry I’m travelling at the moment, but I’ll do that when I’m home.
I tie a length of 1 cm (3/8″) webbing to the seat, and another length of webbing to the packraft, and I slide one half of a plastic buckle onto each piece of webbing (male on one, female on the other, so they can be clipped together). This makes the position of the seat easily adjustable because you can slide the buckle along the webbing. I do the same for the back rest. To make the whole thing removable, I actually tie the packraft ends of the webbing to a mini carabiner, not directly to the attachment point, so I can unclip it from the packraft. Hopefully that makes sense.
Aaron · July 24, 2021 at 2:31 pm
That definitely makes sense, thanks! Good idea with the carabiner on the attachment point.
Armstrong · June 22, 2021 at 9:11 pm
On the backrest assembly page, the description includes the note: “I have left gaps in the scored lines on the outer edges of the two larger rectangles”. I see a similar gap on the seat scoring (2021 Skeena). Is the intention to allow for the seat fabric to be extended onto tab to like the backrest? Any reason the backrest needs it more than the seat?
Matt (Admin) · June 23, 2021 at 10:45 am
You can do the same thing with the seat as with the backrest. I’ve been tinkering with the design since I made the video, and I guess I forgot to mention that above… I’ll add a note now.
Donald Becker · September 29, 2021 at 9:05 pm
With the new layout I simply ironed the seat material over the entire tie-down tab on both sides.
I carefully pre-cut the tab reinforcement to exactly the suggested dimensions. Which didn’t add much value. I ended up trimming the tab to get a clean edge. It would have been simpler to just make the reinforcement a 100mm x 100mm square of bottom fabric, and pre-cut the tabs to the same dimension. After the cushion is otherwise complete and tested, cut the tab to the triangular shape as the final step.
Tuukka · May 20, 2021 at 7:35 am
I started on my kit and managed to weld and reinforce piece A to the second line from the middle, not the first. What should I do?
Matt (Admin) · May 20, 2021 at 8:14 am
It’s not a big problem – if I understand correctly, you installed baffle A where baffle B should go. If so, you just need to increase the height of that baffle a bit, and then decrease the height of B so it fits where A should be. Simply cut baffle B to the size of A and install it in position A. Cut A in half and then use a rectangle of scrap fabric to seal the two halves back together with a gap between them to make it the proper height (the same height as the original B). Does that make sense? If not, tell me and I will try to draw a picture.
Tuukka · May 20, 2021 at 8:34 am
Yes, that makes plenty of sense. I guess I was mostly wondering if I really have to increase the height as the difference seems small (and I could cut down the other baffles accordingly), but it’s definitely not a big deal to fix it like you described
Matt (Admin) · May 20, 2021 at 8:46 am
It’s up to you… it won’t be a big difference, but personally I find it annoying to have a seat that is too short because then my elbows rub the side of the packraft when I paddle.
Steven · April 9, 2021 at 8:20 am
For ironing the last of interior reinforcing strips (~6:18 in video), an alternative to ironing from the outside is to turn each section inside out. Even with the valve installed, it’s way easier than turning packraft tubes inside out. I tried this on one section to fix some melted TPU and I liked being able to see what I was doing so I did it for the other sections as well.
Matt (Admin) · April 9, 2021 at 8:30 am
What a good idea! I’ll add this tip to the instructions above. Why didn’t I think of that? Haha – thanks!
Christian · March 24, 2021 at 1:53 pm
Hi Matt,
When bending the valve back to seal it onto the seat, a small split formed between the bottom of the tube and the base of the valve. I didn’t have this issue when I completed the backrest. The split appears to go through the rubber base – if I apply seam grip to the split will this effectively fill the hole? Or will it not bond to the tube material?
Matt (Admin) · March 24, 2021 at 2:13 pm
Interesting – I’ve never seen this happen before. I don’t know if Seam Grip will do the job… I might try melting it closed with your iron set to a high temperature (maybe scrounge a bit of extra material from the base/flange). If that doesn’t work, send me an email.
Christian · March 25, 2021 at 1:06 pm
Thanks, I’ll give that a try
Christian · March 28, 2021 at 8:16 am
If anyone has this issue, the solution Matt suggested worked out. Just be aware that when the iron is hot enough to melt rubber, it burns the fabric super easily too. I also took extra care to seal the reinforcing ring on the inside around the split, and sealed it all afterward with seam grip. No leaks
Matt (Admin) · March 28, 2021 at 9:29 am
That’s great to know – thanks, Christian!
Barbara · February 22, 2021 at 10:57 pm
It’s nice to see this improved seat and back rest in the 2021 version. I have the attachment points on both and thought I looked everywhere, but where/how do I attach the seat and back rest? Or are they intended to just attached to one another?
Matt (Admin) · February 23, 2021 at 7:47 am
Ah yes, I forgot to mention that I install an attachment point at the rear of the cockpit floor to attach both the seat bottom and seat back (a “Type 2” attachment point – see the Tie-Downs & Attachment Points how-to page). I’ll update the above.
SD · February 18, 2021 at 5:14 am
Aren’t the reinforcing strips as in the seat shipped before 2021 no longer needed? Would be grate, saves some effort.
Matt (Admin) · February 18, 2021 at 8:27 am
That’s right – in this new design, no reinforcing strips are needed around the seat’s perimeter.