Home Forums DIY Packrafts Single Sided TPU Issues, Fabric to TPU Failures

  • Creator
    Topic
  • #14626
    pnwdavis
    Participant

    Hi Everyone,

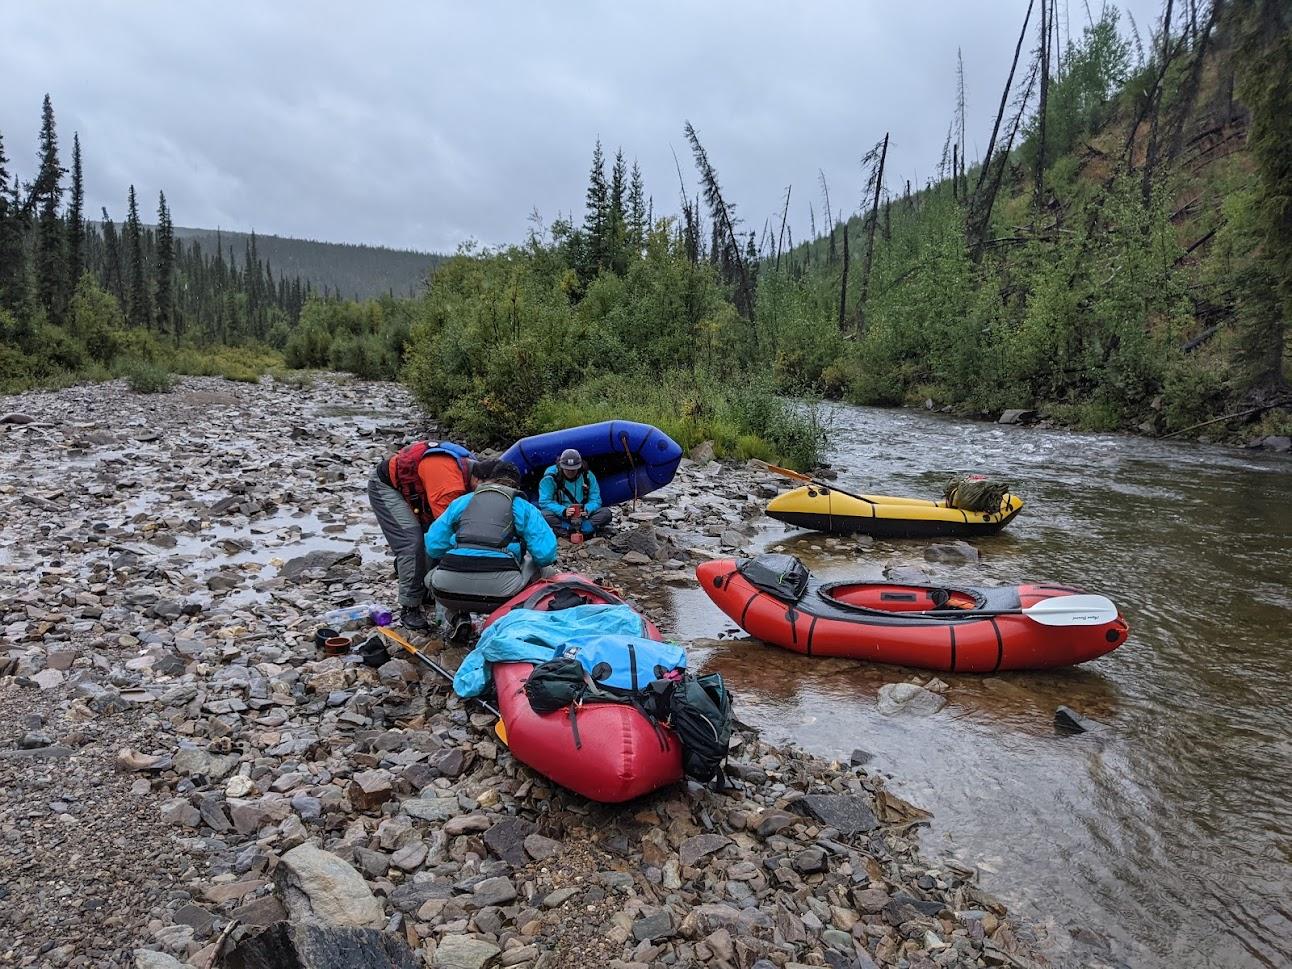
    I just wanted to check in with the forum here and see if anyone is having any similar issues, and if anyone has found a potential fix.  The issue only seems to present itself in areas where the non-TPU side of fabric is exposed, allowing for pretty constant wetting out of the fabric (seat, seam strips, tie downs)

    For backstory, before assembling the rafts, we did quite a bit of testing to dial in our heat sealing methods, and high stress seams were tested with a bit of force before moving on.  All these seams and such held well, and I was confident they wouldn’t tear apart.  Now after about 21 days or so on the water in the last year, I’m having TPU to fabric bond failure on seats and attachment points.

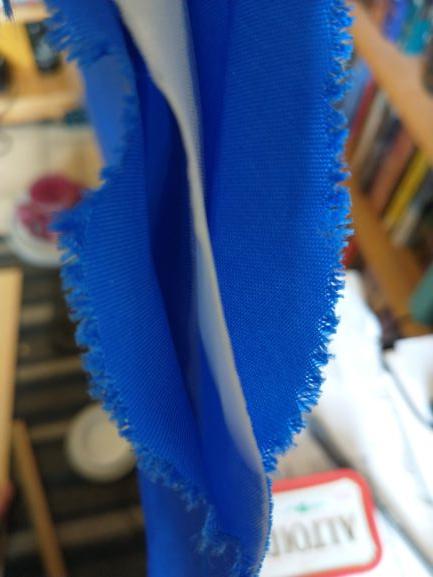
    The first photo is of the original seat bottom.  It takes about 3-5 lbs of force to peel the fabric (which is also fraying) away from the TPU, but I am unable to separate the welded TPU.  I feel like I could peel away all the fabric and have a nearly intact mega ultralight seat made of only TPU.


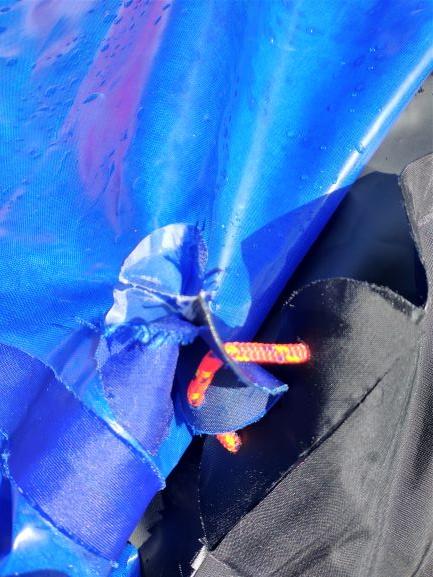
    The next one of failing tie-in points.  Note I didn’t get the best sealing on the edges as I didn’t want to risk overcooking the actual boat, but this is what the tie-ins look like after 10-12 II-III rapids:


    I am guessing the constant water and sunlight exposure is deteriorating the nylon, which then ends up separating from the TPU.  For the seat, I have a new kit, and am considering sewing it together, sealing, then sealing the sewn seams– that would essentially just make the TPU an airtight bladder within, which might hopefully last a bit longer.  Not sure what to do about the tie-ins, though.


    EDIT:

    Unfortunately, I’m on a bit of a time crunch– I have an Alaska expedition coming up, and up until the last couple trips our rafts have been relatively bombproof, and what wasn’t bombproof was predictable.  Even if I had the cash for new Alpackas, the availability is so thin that getting new rafts before the trip seems to be an impossibility.

    • This topic was modified 2 years, 11 months ago by pnwdavis.
Viewing 4 reply threads
  • Author
    Replies
    • #15231
      pnwdavis
      Participant

      Hey everyone!

      Sorry about the long delay on an update on this.  I emailed back an forth with Matt, sent him some fabric samples from the affected areas, and it seemed to be a one off fabric issue.  The supplier isn’t used anymore so it should 100% be a non-issue anymore.


      I still wholeheartedly recommend the DIY’s to anyone that has decent spatial cognition and space to make them.  The process is fun and rewarding, and the designs are top notch.  On anything below consistent Class III or harder whitewater, I’ll be bringing my Skeena along in the future, (once I make it again this winter)

      SI just got back from Alaska where we did 7.5 days of bushwhacking to a creek that, to our knowledge has only been run once before, eventually down to the Fortymile river system.  All the DIYs on the trip did great!  One Telkwa, one Skeena, and one V3.  I wouldn’t hesitate to take these boats on another similar trip, and I’m looking forward to making our next expedition and all DIY trip.

      Here’s a quick snap that really caught the vibe of the trip… stopping for coffee after a cold, rainy day of butt scraping down the upper creek:


      • #15238
        Aaron
        Participant

        I’m having the same issue with blue fabric from a packraft that I ordered on June of last year. The fabric is delaminating from the TPU at the seam strips, and the exposed fabric is fraying badly. I’ve gone over the outsides of the seam strips with Seam Grip, and it appears to have halted the fraying. It looks pretty messy but is still holding air.

    • #14634
      pnwdavis
      Participant

      OK, so I pulled attachment points and will redo them in the correct orientation.  I cut the old seat up to inspect, and found about 2 dozen points that the TPU and Nylon bond has given up– they feel like little blisters.  They are all over the fabric, on the inside of the top and bottom of the seat, and a few of them correspond to small leaks that developed through the fabric.  They seem to be near the wear points (the big long one is in the front center of the seat– looks like from folding, but I never folded the seat up like that), but I feel like it shouldn’t be separating this much with this little time on the water.


      Short of painting the entire inside of the boat with aquaseal, is there anything I can do to help ensure that I don’t start having similar delamination on the actual boat?

      • This reply was modified 2 years, 10 months ago by pnwdavis.
      • #14642
        Matt (Admin)
        Keymaster

        Hi pnwdavis,

        I’m not sure why that’s happened – would you mind sending me a sample of fabric from that old seat? I’ll email you with the shipping info.

        The packraft itself is made with the TPU on the outside, so it will be easy to see if the same thing happens there. If water is somehow part of the cause, that won’t happen to the tube fabric, as water doesn’t get inside the packraft. As a precaution, please do coat all the seam strips and reinforcing strips the Seam Grip+WP on the outside.

        For unrelated reasons I no longer purchase fabric from the supplier who made that particular one, so all the new tube fabric is different (you may have noticed that on your new seats), so this shouldn’t be an issue going forward, but if there was a problem with that blue batch, I’ll have to warn others about it and figure out a fix. As I mentioned before, I used that same fabric in one of my boats and haven’t had any trouble with it, but in the packraft the TPU is on the outside, unlike your old seat, so it might not behave the same in that setting (and I used black fabric for the seams etc.).

    • #14631
      pnwdavis
      Participant

      Matt, I’m sorry, you’re right on the forces.

      Looking at the photos again, I tied the loops backwards from my original plan, which definitely put all the ‘pinching’ force on the tie in points as opposed to the seat back as I originally intended, and that explains the delamination perpendicular to the direction of pull– the tie down is getting forced into itself as the cord slides thought he holes. In testing with the sliding loop on the seat back as I intended, the seat back took those forces just fine with no indication of future failure, but I never tested the tie down in the same manner. I wanted rotational stability, easy on/off, and minimal material… I probably shouldn’t try for all 3.


      I’m doing some troubleshooting on some fabric scraps now. My wife’s boat is red fabric, and hasn’t had delamination issues… It seems to be just the blue fabric that is problematic. I’ll let you know if my test pieces behave differently after soaking for a while to replicate the repeated wet-outs. So far her perimeter line tie downs are solid, and two of mine are starting to delaminate slightly, but there’s way too many variables for that to be a good comparison.

    • #14630
      pnwdavis
      Participant

      Thanks for the reply, Matt. The the photo of the old seat is along the bottom, back right edge. It peeled back about halfway to the reinforcing strips on its own. The fraying didn’t start happening until the fabric pulled away from the TPU.


      As for the attachment points along the side they too peel with little force.  The ones shownare just for the new backrest. I copied Alpacka’s design a bit on this one. The multiple attachment points prevent twisting and should equalize load with how they’re currently rigged, not multiply– I took the photo with the boat deflated, I’ll get a photo of the system with air in the boat. (I studied physics and have a lot of experience with rope rigging and forces on those systems) Additionally, I keep my drybag behind the seat back– the main load is held by the stuff behind it. I’ll get better photos of the rigging and usage tomorrow. Most thigh strap tie-in points will see way more force at the end points due to the shallow angles involved, and those seem to be holding up fine with similar surface area tie-ins.

      How would you rig the seat back further forward without tying the back in on the tubes? I am pretty darn short, and I’m in the smallest Skeena– even pushing myself forward several inches isn’t quite enough, even with something


      <p style=”text-align: center;”></p>

    • #14628
      Matt (Admin)
      Keymaster

      Hmm, I have a lot more than 21 days on one of my boats made from that same batch of fabric, but I haven’t seen anything that bad – just a tiny bit of fraying along the edges.

      I can’t really tell what part of your old blue seat that is in the picture – is that where you peeled it by hand, or did it actually come apart that much from normal use? That would be very odd.

      I would cut off that seat attachment point and use a different design… having the cord run through two holes like that will multiply the amount of stress on the fabric, which might be why it peeled so much there. It’s too complicated to describe why without a vector diagram, and I know it’s counter-intuitive, but you’d be better off with just one hole there (or two holes with the same spacing as the holes in the seat, with two separate cords connecting the seat to the packraft, both pulling in the same direction independently of each other).

      As an aside, if you attach the seat to the floor instead of to the tube, then if the attachment point fails there’s no chance of it causing a leak in the tube.

      I think I should add a video showing my seat attachment point.

      I’ll also add a step to the instructions suggesting people apply Aquaseal or Seam Grip+WP over the seam strips and any exposed edges with to prevent fraying and peeling over time.

      I think if you coat your seam strips and any other areas of concern with Seam Grip+WP they should hold up fine going forward, but please continue to monitor things and let me know if you see anything else coming apart.


      • #14802
        Aaron
        Participant

        Hey Matt,

        I would love to see a video or just pictures of how you attach your seat. I just finished up the new 2 piece seat and I’m having a hard time visualizing how to attach both parts to one point in the back. I saw in the directions that you’ve used webbing and buckles and was looking to go in that direction.

        Thanks!


Viewing 4 reply threads
  • You must be logged in to reply to this topic.