Home Forums DIY Packrafts Trouble Joining Bow Seam

  • Creator
    Topic
  • #14766
    mttgilbert
    Participant

    I’ve watched the videos and damn do you make it look easy on that Telkwa! I have a Skeena and I’m having a lot of trouble with the center seam in front. I did just fine up until where the nose really starts to point. I just can’t seem to get the two edges lined up without creating wrinkles between the tube fabric and reinforcing strip. I’m using the form per the pattern provided. I’m thinking about just making a smaller version with a tighter radius, but I’m not sure that will work either.

    Any pointers or additional tips would be really helpful! Thanks in advance

Viewing 4 reply threads
  • Author
    Replies
    • #15328
      Kyle in AK
      Participant

      I am having an issue with the bow seam, I have about 4 inches left before sealing the reinforcing strip to the floor of the Packraft, but the length of each piece, before sealing to the floor do not match up as shown by the picture. The difference in length marked in red. Recommendations for what to do here?

      Image of the misalignment of pieces

      • This reply was modified 2 years, 6 months ago by Kyle in AK.
      • This reply was modified 2 years, 6 months ago by Kyle in AK.
      • #15331
        Matt (Admin)
        Keymaster

        Hi Kyle, I usually have a bit of misalignment there too and it’s not a problem (and being on the bottom of the packraft, it’s not noticeable). As long as the combined length of each edge (floor + tube) is the same, you can iron the strip on without any wrinkles in one tube or the other.

    • #14795
      mttgilbert
      Participant

      I made a couple forms that are basically the point on your form pattern isolated into a little handheld piece. This ended up working really well for me and I managed to get the whole bow sealed without any wrinkles to speak of. Thanks for the encouragement and feedback!

      Dimensions are in inches, but they’re just estimates, I took a block of wood to the sander and kept going until I thought it looked right.

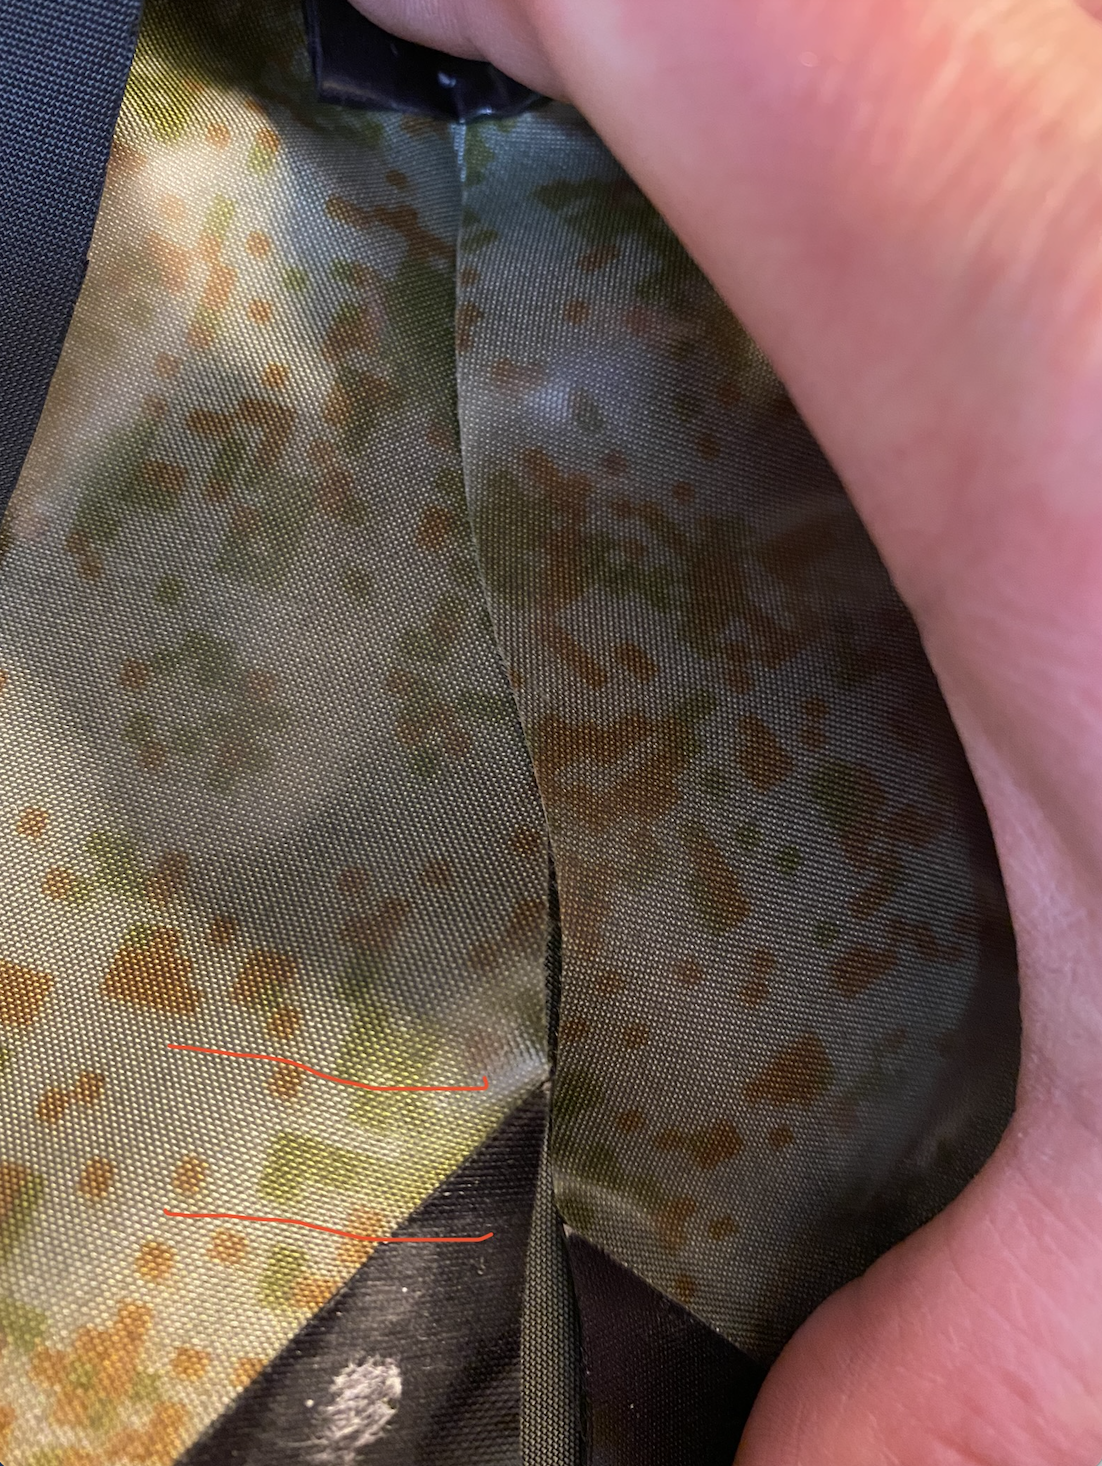
      I’m leaving this here in case someone else has a similar issue


      Small Form Dimensions (inches)

      • #14801
        Matt (Admin)
        Keymaster

        This is great – thanks! If it’s okay with you, I’ll copy these pictures to the instructions page and give you a shoutout there so more people will see it.

        • #14809
          mttgilbert
          Participant

          That’s all good with me! I hope it helps


          Thanks!

    • #14774
      mttgilbert
      Participant

      Matt, I watched that video over and over. I tried every bowl I had in my house and a couple I picked up from the thrift store. I’ve been really impressed with your instructions (honestly, this one too, I think this is more of a “me” problem), this time I just couldn’t get it right. I’m going to make some smaller forms and play around on some scraps and see what I come up with. If I find something that works for me I will post it up here.


      Robert, Thanks for the words of encouragement!  I make a lot of my own gear and it seems like the first draft of every big project has *something* that I get stuck on. It’s always the same.. keep plugging away and eventually it works.

      • #14775
        Matt (Admin)
        Keymaster

        I meant, did you read the section below the video with the heading “Ironing around the pointy bow”?

        • #14792
          mttgilbert
          Participant

          Ah, clearly reading isn’t my strong suit, but yes. I didn’t want to change the shape of the bow, and while the nose of the form was about the right shape,  I just couldn’t get the fabric on there in a way that it didn’t want to wrinkle where the seam tape was already attached to the tube material.

          I’m certain the way you describe works, I think there’s just a technique that my fat little fingers couldn’t figure out.

    • #14769
      Matt (Admin)
      Keymaster

      Just to make sure, did you see the “Ironing around the pointy bow” section on the instructions page?

      It’s okay to have a few small wrinkles towards the edges of the seam strip there, so don’t stress about it.

    • #14767
      Robert P
      Participant

      I know your pain! LOL I built a Telkwa and the nose and stern are equally difficult. I ended up with 8 different wooden forms and used a 3 inch diameter hard rubber ball with tape with the sticky side out to do the nose and worked well.  It takes time and I ended up with a tiny wrinkle but was able to iron it out to almost nothing. So don’t give hope, it’s possible. When you finish ironing the nose you can turn the boat inside out to get a closer look on what areas you didn’t iron enough too.

Viewing 4 reply threads
  • You must be logged in to reply to this topic.