-

Matt (Admin) commented on the post, First Look: Updated 2-Person DIY Packraft 6 years, 2 months ago
Hi Ryan, it’s actually already posted on page two of the shop as a sort of soft launch because I haven’t written and recorded the instructions yet or had a chance to paddle it to be sure it performs as expected (everything is still frozen here). I’m pretty confident in the design and I’m working on the instructions, but I don’t have a firm…[Read more]
-
Matt (Admin) wrote a new post 6 years, 2 months ago
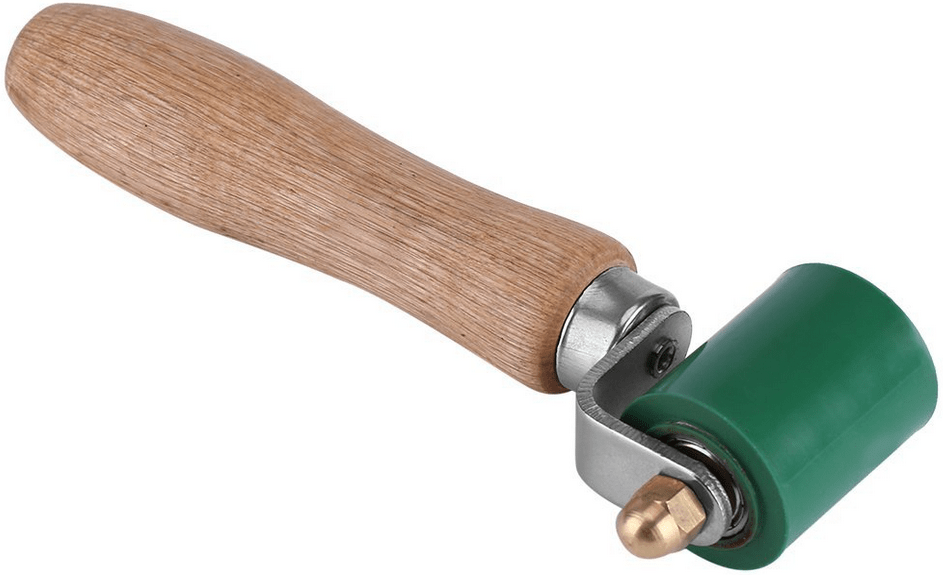
For about $10 you can have a shiny new roller like this one.
When heat sealing TPU coated fabrics together, it’s important to apply pressure to the fabric as it cools, otherwise it tends to buckle and lift […]
-
Matt (Admin) replied to the topic Snow, sun, water packraft and some swimming in the forum DIY Packrafts 6 years, 2 months ago
Thanks for the great story of your maiden voyage!
How do you like the red press-fit valve and Schnozzle combination? Does it take too long to deflate with the single valve?
In the newer kits I’ve replaced the beach ball-style seat valve with a top-up valve, and that fixes the unexpected deflation issue. If you switch to a red valve, please tell…[Read more]
-
Matt (Admin) commented on the post, First Look: Updated 2-Person DIY Packraft 6 years, 2 months ago
Thanks, Bruce! The design changes are largely based on your feedback from the previous version, so thanks for that!
-
Matt (Admin) replied to the topic First test, whitewater in the forum DIY Packrafts 6 years, 2 months ago
Very nice! 🙂
-
Matt (Admin) wrote a new post 6 years, 2 months ago
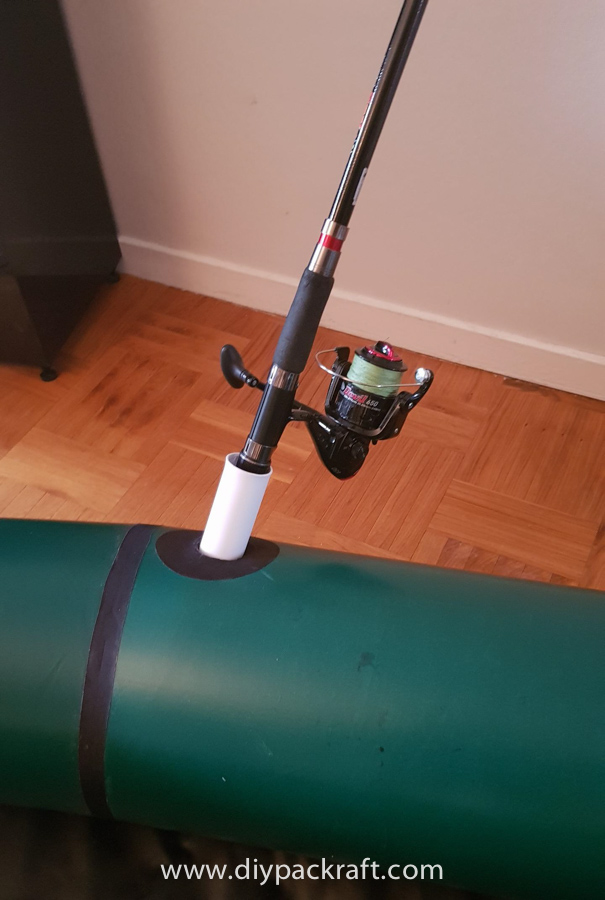
Update: Gustav’s detailed fabrication instructions are posted here!
If you’ve ever tried fishing from a packraft, you know that it’s nearly impossible to hold a fishing rod and paddle at the same time. Gustav […]
-
Very creative, i like it!
-
-
Matt (Admin) replied to the topic Rod holder insert in the forum DIY Packrafts 6 years, 2 months ago
Fantastic! Well done, Gustav, and thanks for sharing! I’ll post this on the blog (with credit to you, of course), as I’m sure other people will be interested and they might not see it here.
-
Matt (Admin) wrote a new post 6 years, 2 months ago
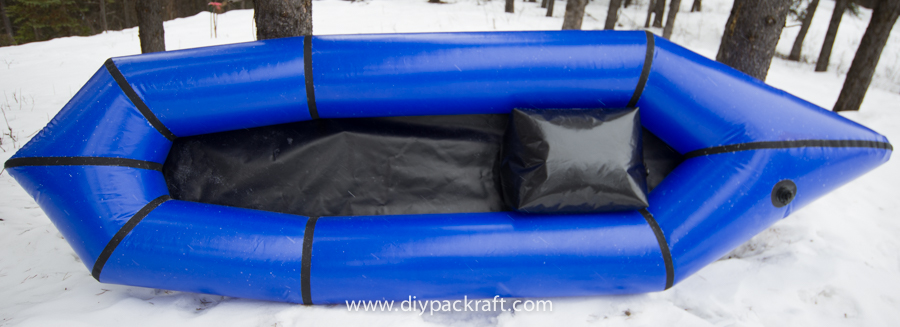
Here in the north we’re deep in winter, so I haven’t had a chance to paddle the new 2-person DIY Packraft yet, but here are a few more pictures that show the new seat design (just one of them, because I’ve only […]
-
Matt (Admin) commented on the post, The Online Review Economy 6 years, 3 months ago
Thanks for the idea, Dan – I’ll give it some thought. And cool tents!
-
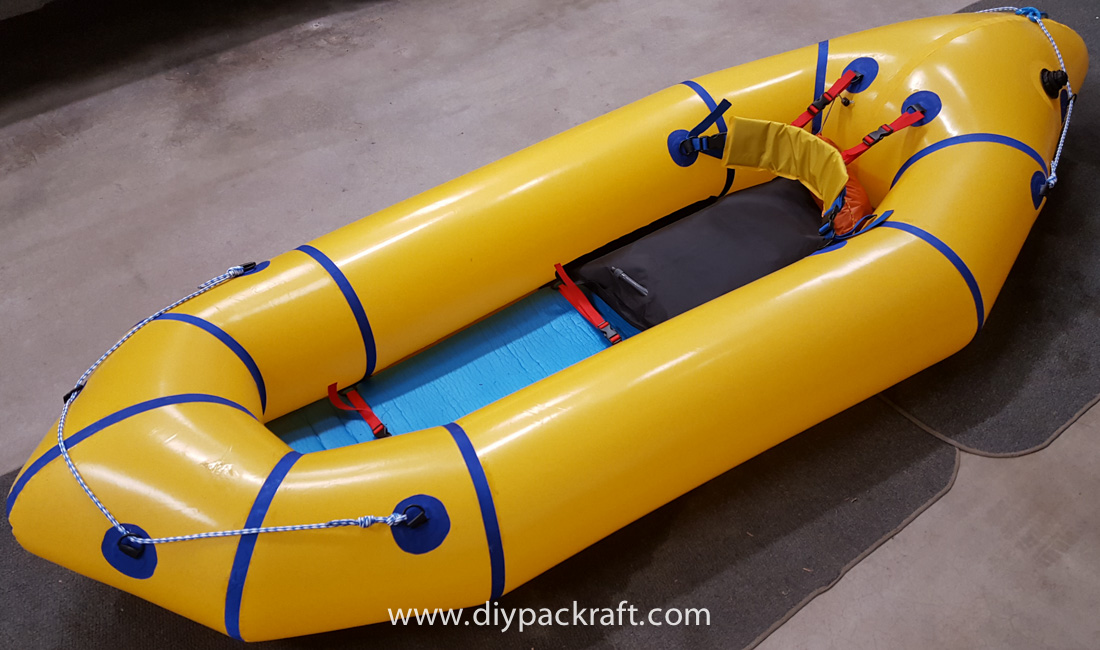
Matt (Admin) wrote a new post 6 years, 3 months ago
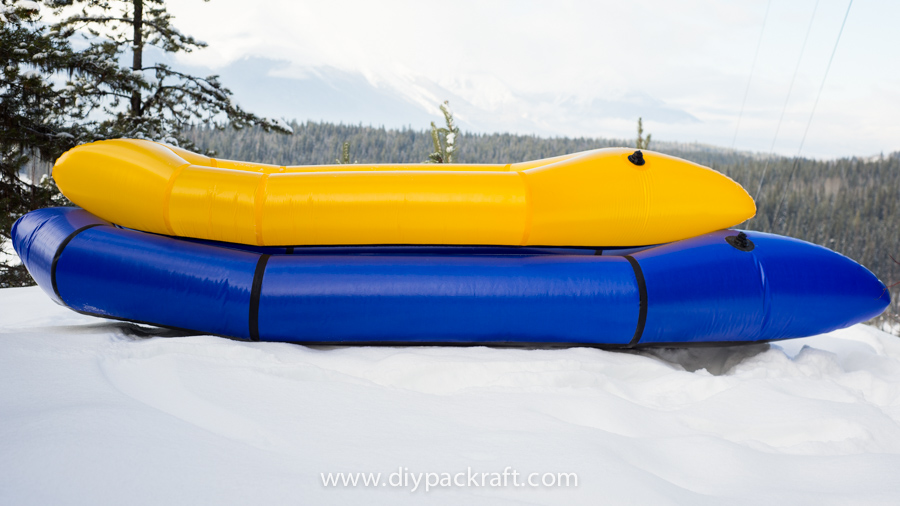
The new two-person DIY Packraft (blue) with the new Ultralight DIY Packraft (yellow) for comparison.
Packed size: 25 x 25 x 50 cm, or 10 x 10 x 20 inches
Weight: 3.0 kg / 6.6 lbs (with 560 GSM floor, no […]
-
Wow, Matt you’ve advanced the field immensely. This is the best tandem packraft design available. Congratulations. I clearly have to buy one for next winters project!
Bruce
Fairbanks-
Thanks, Bruce! The design changes are largely based on your feedback from the previous version, so thanks for that!
-
-
Hi Ryan, it’s actually already posted on page two of the shop as a sort of soft launch because I haven’t written and recorded the instructions yet or had a chance to paddle it to be sure it performs as expected (everything is still frozen here). I’m pretty confident in the design and I’m working on the instructions, but I don’t have a firm timeline for when they’ll be done. Regarding the price, it’s significantly higher than the previous 2-person kit because it includes way more stuff (not just the bare bones boat pieces).
-
Hi Paddy, the best way to get a sense of the size would be to grab a tape measure and lay out the dimensions (given above) on your floor with tape or furniture and then sit within the lines. I’m sure the seat could be made into a pack – it would require some trial and error to make it comfortable for load carrying. I’ve never made a backpack, myself, so I’m not sure how difficult that would be. Cheers!
-
Matt,
Great job, I’m waiting on my sample pack & your testing of the new 2 person model. Is there a possibility of the wrap around floor on the new 2 person model, lots of rough creeks & rivers in central Texas?-
That might be a possibility in the future, but in general I’d recommend a smaller packraft for shallow creeks, as it’ll be much more maneuverable. Cheers!
-
-
-
Matt (Admin) commented on the post, Improved Top-Up Valves in Stock 6 years, 3 months ago
No, they aren’t heat sealable and I’m no longer selling them.
-
Matt (Admin) wrote a new post 6 years, 3 months ago
Ken’s completed V3 DIY Packraft kit with custom blue seams, floor insulation, and back rest.
Ken S. sent me a build report with excellent photos and detailed descriptions of his V3 DIY Packraft build, […]
-
Matt (Admin) commented on the post, Improved Top-Up Valves in Stock 6 years, 3 months ago
Please click on the link in the text above or click on the Shop link in the main menu.
-
Matt (Admin) replied to the topic DIY Packraft Photos in the forum DIY Packrafts 6 years, 3 months ago
Congratulations! If you run out of room in your freezer, I might have room for a crab or two 😉
-
Matt (Admin) replied to the topic Entry Assist Handles? in the forum DIY Packrafts 6 years, 3 months ago
I haven’t tried this but I find it relatively easy to re-enter a packraft by draping my arms over the side, placing my hands flat on the floor, and then boosting myself up with one big dolphin kick while I push down with my hands – then I sort of flop into the packraft.
Because the air pressure in a packraft is low compared to an inflatable…[Read more]
-
Matt (Admin) commented on the post, The Online Review Economy 6 years, 4 months ago
Hi Peter – thanks for your thoughtful comments; those are all good points. I haven’t sold so many kits that it’s likely there’s someone in your area who has one, but it is possible – feel free to send me an email, and please put a feeler out on the forum as well.
There actually is a guy in the UK who copied my website and has been selling…[Read more]
-
Matt (Admin) commented on the post, The Online Review Economy 6 years, 4 months ago
Hi Zach, that’s a great idea. Thanks!
-
Matt (Admin) commented on the post, The Online Review Economy 6 years, 4 months ago
Thanks for the insight, Arnold, and the encouragement. I certainly do love working on DIY Packraft stuff. Like anything, there are aspects that aren’t so enjoyable… it would be nice to be able to hire someone to help out so I could accommodate more orders and put more effort into growing a “real business”, but there are zoning and insurance and…[Read more]
-
Matt (Admin) commented on the post, The Online Review Economy 6 years, 4 months ago
Thanks, Steve – those are the same thoughts I’ve been mulling over plus some things I hadn’t really considered, so I appreciate your input. Cheers!
-
Matt (Admin) commented on the post, The Online Review Economy 6 years, 4 months ago
Thanks for your perspective, Daniel – I think you might be right. Cheers!
- Load More
YES, this works even better in combination with a hot air soldering station:
https://www.banggood.com/858D-220V-Hot-Air-Soldering-Rework-Station-Handle-Handle-Stand3-Nozzles-p-1129100.html?rmmds=buy&cur_warehouse=CN
That’s the same one I bought! It does a good job of sealing the fabrics together quickly, but so far I haven’t figured out how to use it without melting too much TPU, so I haven’t incorporated it into my workflow. Do you have any advice on which settings to use?
I also have an 858D – squeeze a nozzle down to make a slot around 24mm wide. The air flow is quite low, so if it’s used at 220C or so the heat will spread out too much. Wind the temp up to 300 or more (even 400) and roll at a speed to suit and it will melt only the target you want. A bit like quickly searing a steak, rather than slowly cooking it right through.
we made a video about it:
Thanks for making the video! I have been trying to direct the air between the fabric layers (the way an industrial hot air welder does), but I don’t have enough hands to hold everything. Your method is much simpler – I will try it!
yes, you still need both hands to do it, so everything mustbe fixed in place by tape before you begin welding
Hey Naas,
What’s the strategy for the middle of the tubes? I imagine it’s tough getting the roller and the air gun to the center of the tube portions. Also, did you start sealing from the middle out, or did you start from one end with the pieces taped. How are you protecting the TPU in the middle on the floor and on the pieces adjacent to the seams or have you found it’s not much of a problem?
Also, I’ve been trying your method on some scraps, and found (at least according to the what sealing methods page) that my welds when pulled apart have the tpu all come off in one sheet on one side of the fabric. I also can’t seem to tell the difference between a strong weld and a weak weld until I pull them apart (they all look properly sealed until I rip them apart and the tpu all sheds off on one side). What do you guys think? Is the blower too hot? I’m wondering if the table beneath the blower is making the tpu on the bottom side not heat up enough and it’s therefor not welding properly. Thoughts? Matt have you dabbled with this method yet?
I’ve played with it a bit, but not to the point where I’m comfortable using it. I think the keys are to apply heat equally and evenly to both pieces of fabric and to not overheat them, and I find all of those things challenging.
Yeah, after a few hours of using it, that seemed to be my impression. In addition to welding irregularly (I think 1/8 worked properly), my iron shit the proverbial bed and wouldn’t get hot the second time I fired it up, so maybe an additional demerit. It’s being returned (which was fairly easy thanks to Amazon).
I ordered a coverite black baron (the last one I could find on ebay) and they shipped it to my address from 7 years ago (that was my fault) so I’m without a backup for the time being. I will now probably try the leather iron you recommended, but they still take a few weeks. I’d say the hardest part of this process thus far is finding a proper tool to use… Anyway, back to tool shopping…
YES, this works even better in combination with a hot air soldering station:
https://www.banggood.com/858D-220V-Hot-Air-Soldering-Rework-Station-Handle-Handle-Stand3-Nozzles-p-1129100.html?rmmds=buy&cur_warehouse=CN
See the link in the first comment above.