When I started the DIY Packraft forum, I figured it would help DIY Packrafters to meet new paddling partners and share tips, but I wasn’t prepared for the number of great ideas that would be posted there.
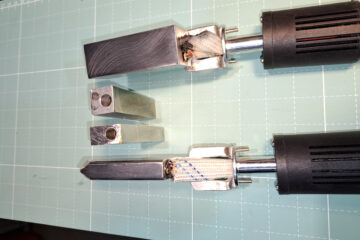
In my last blog entry I featured Eliot’s back band and thigh straps, and now I want to show you Bruce’s modified model airplane iron. It’s one of those things I wish I had thought of myself – like most of my favorite ideas, it’s simple, and I think it’ll make your model airplane heat sealing iron much easier to use for constructing a DIY Packraft. I’ve made a permanent iron modification page under the How-To menu so it’ll remain easy to find. Check it out!


4 Comments
sabien claeys · March 28, 2018 at 9:29 am
I can’t manage to create a new toppic or reply the topic ‘heat sealing tools’ even when i’m logged in. I’ve tried different browsers.
Matt (Admin) · March 28, 2018 at 12:15 pm
I can’t see a problem from my end – please send me a message through the contact page and we’ll get it sorted. Thanks!
sabien claeys · March 28, 2018 at 8:24 am
I wanted to add a new toppic in your forum but i didn’t found how. I found an other way to iron the pieces together. I use a mini heat gun that is normally used for soldering. Then i lay the pieces on each other, blow on top of the pieces and then i rub on it (with smal spoon or a small roller) . And tada its stuck together. It worked realy well. You can locate your heat very specific and you can see realy good when its stuck together. I had only 3 small leaks on the inner corners. I never used the iron. I think it was way easyer then the iron. If i’m able to find how to create a toppic then i wil post some pictures and will make a video of ‘the new technique’. it maybe can help a lot of frustration for other diypackrafters 😉 (btw the blower isn’t expensive)
Matt (Admin) · March 28, 2018 at 9:00 am
Hi Sabien, please click the Register link under the Forum menu above to create an account, then you can make a post under the Heat Sealing Tools topic here: https://www.diypackraft.com/forums/topic/heat-sealing-tools/
Thanks!
Comments are closed.