Home › Forums › DIY Packrafts › Heat-sealing tools
Tagged: heat sealing, hot air gun, iron, mini iron, soldering iron, tools
- This topic has 117 replies, 41 voices, and was last updated 3 months, 4 weeks ago by
 Christian001.
-
CreatorTopic
-
December 15, 2016 at 1:28 pm #1984Matt (Admin)Keymaster
Share your experiences with heat-sealing tools (mini irons, modified soldering irons, heat guns, sealing irons, trim sealing irons, etc.).
Note: If you wish to reply to a specific comment below, please click the grey “Reply” link above the specific comment you are responding to – then your comment will appear nested below that comment. If you don’t first click the “Reply” link, your comment will appear at the top of the list, out of context!
-
This topic was modified 9 years, 7 months ago by Matt (Admin).
-
This topic was modified 9 years, 7 months ago by Matt (Admin).
-
This topic was modified 9 years, 7 months ago by Matt (Admin).
-
This topic was modified 9 years, 4 months ago by Matt (Admin).
-
This topic was modified 9 years, 7 months ago by
-
CreatorTopic
-
AuthorReplies
-
-
March 9, 2026 at 9:54 am #21403CalimaParticipant
Hi!
I would like to make a packraft and I also have some old vinyl banners for other projects, so my question is if you could use this too for the packraft.
I already checked the forums and the mini iron as far I understand wont work really well with 110v, but if it is the best tool for the job then I will buy that one, I can always make it work in 220v with an external battery.
Apart from that I will need a pressure roller and that is it more or less. Any idea or suggestion is welcomed 🙂
-
March 9, 2026 at 10:28 pm #21404Matt (Admin)Keymaster
Hi, some people have used hot air welders successfully, but I tried it and couldn’t get it to work well myself. I found that I needed three hands, and it was difficult to direct the heat only on the areas I wanted to weld.
I’m not sure if an iron will work on the banner vinyl material you have.
-
March 10, 2026 at 9:17 am #21405CalimaParticipant
Thanks, then I will stick with the iron and I will test the iron on the banner since I will be reusing it I can make tests there.
-
March 31, 2026 at 1:54 am #21520Christian001Participant
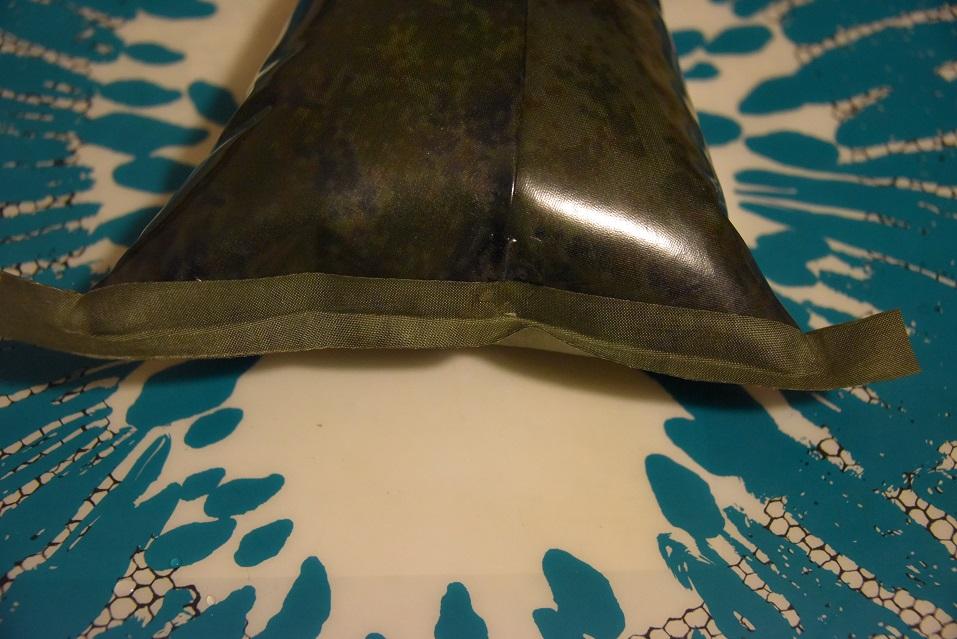
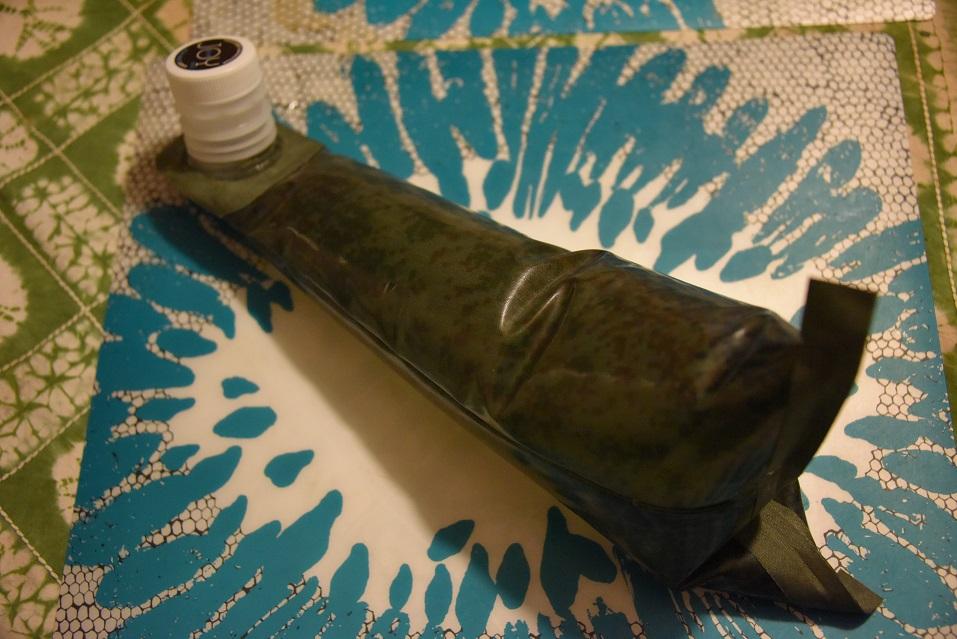
I used a heat gun to do some tricky spots on my packrafts. I used the “858D Heat Gun” (search for it on AliExpress). I flattened the smallest nozzle slightly with pliers. This allowed me to direct the airflow much more precisely onto the seams. I don’t recall the exact settings (temperature and airflow) right now, but if you need me to look them up, let me know and I’ll check. Oh and we have 220v here in germany. Therefore for 110v, the settings may need to be adjusted slightly.
-
-
-
-
February 27, 2026 at 6:56 am #21380AndriyParticipant
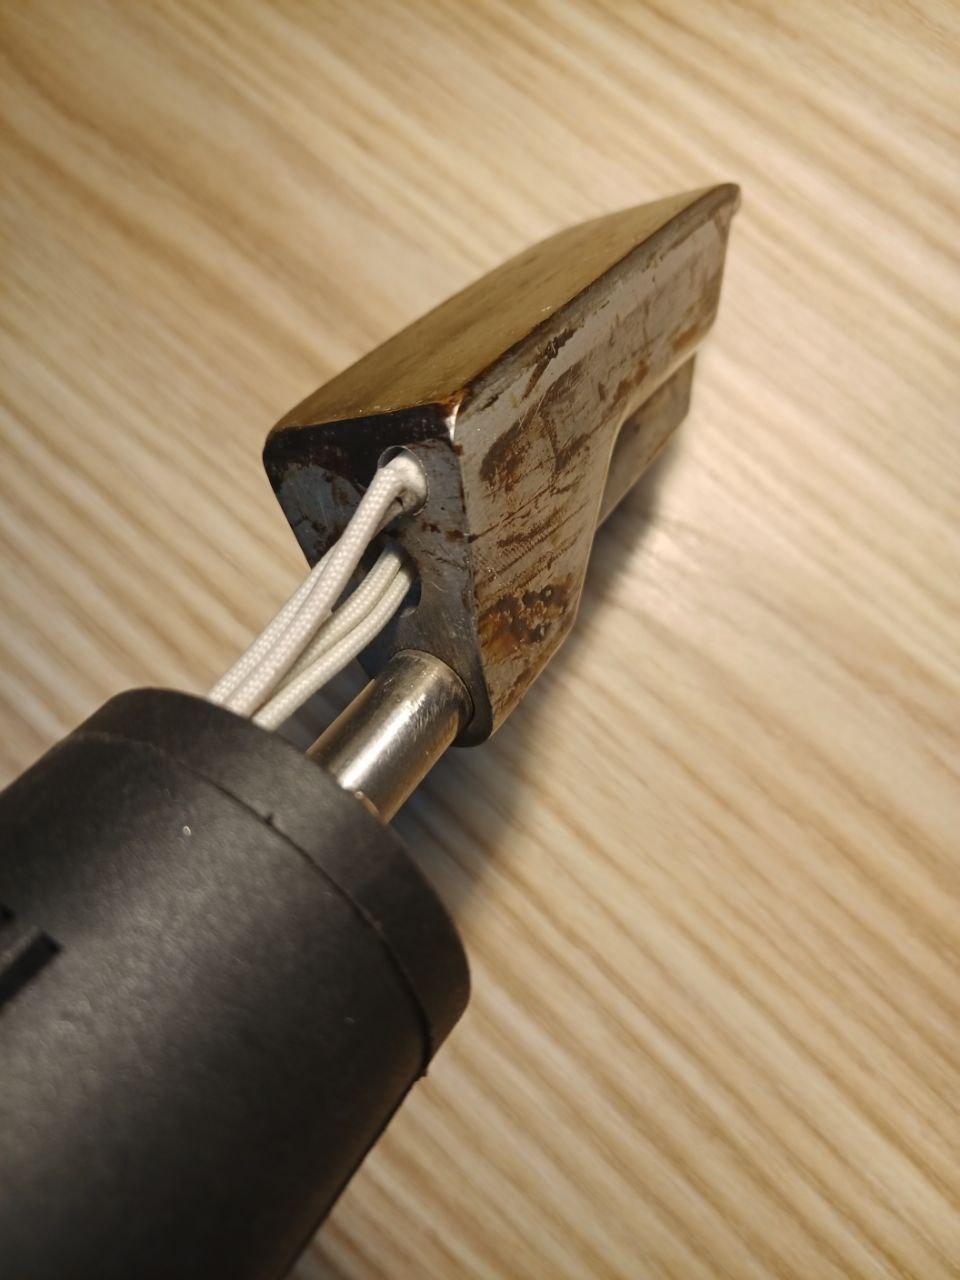
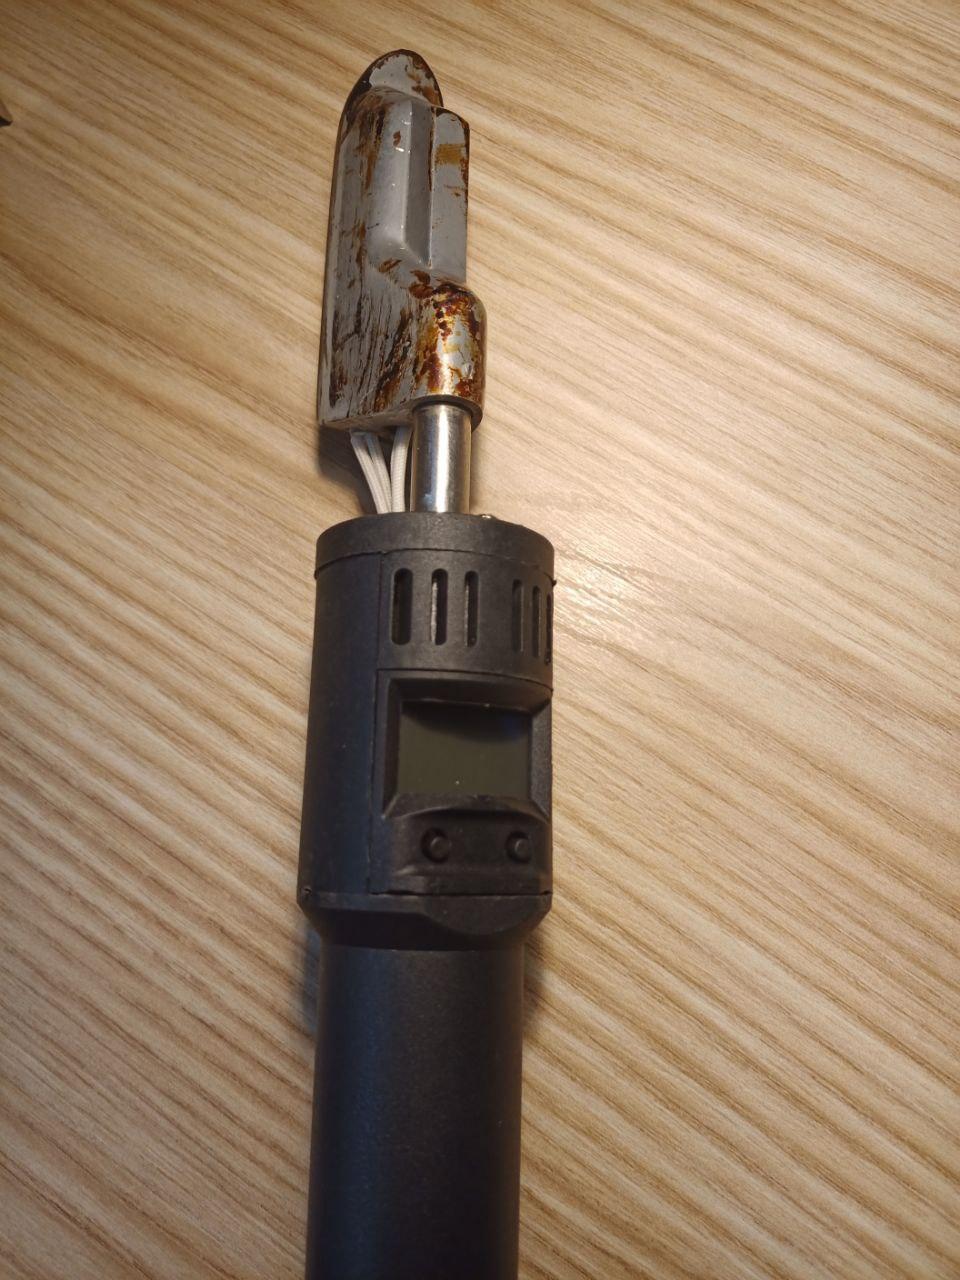
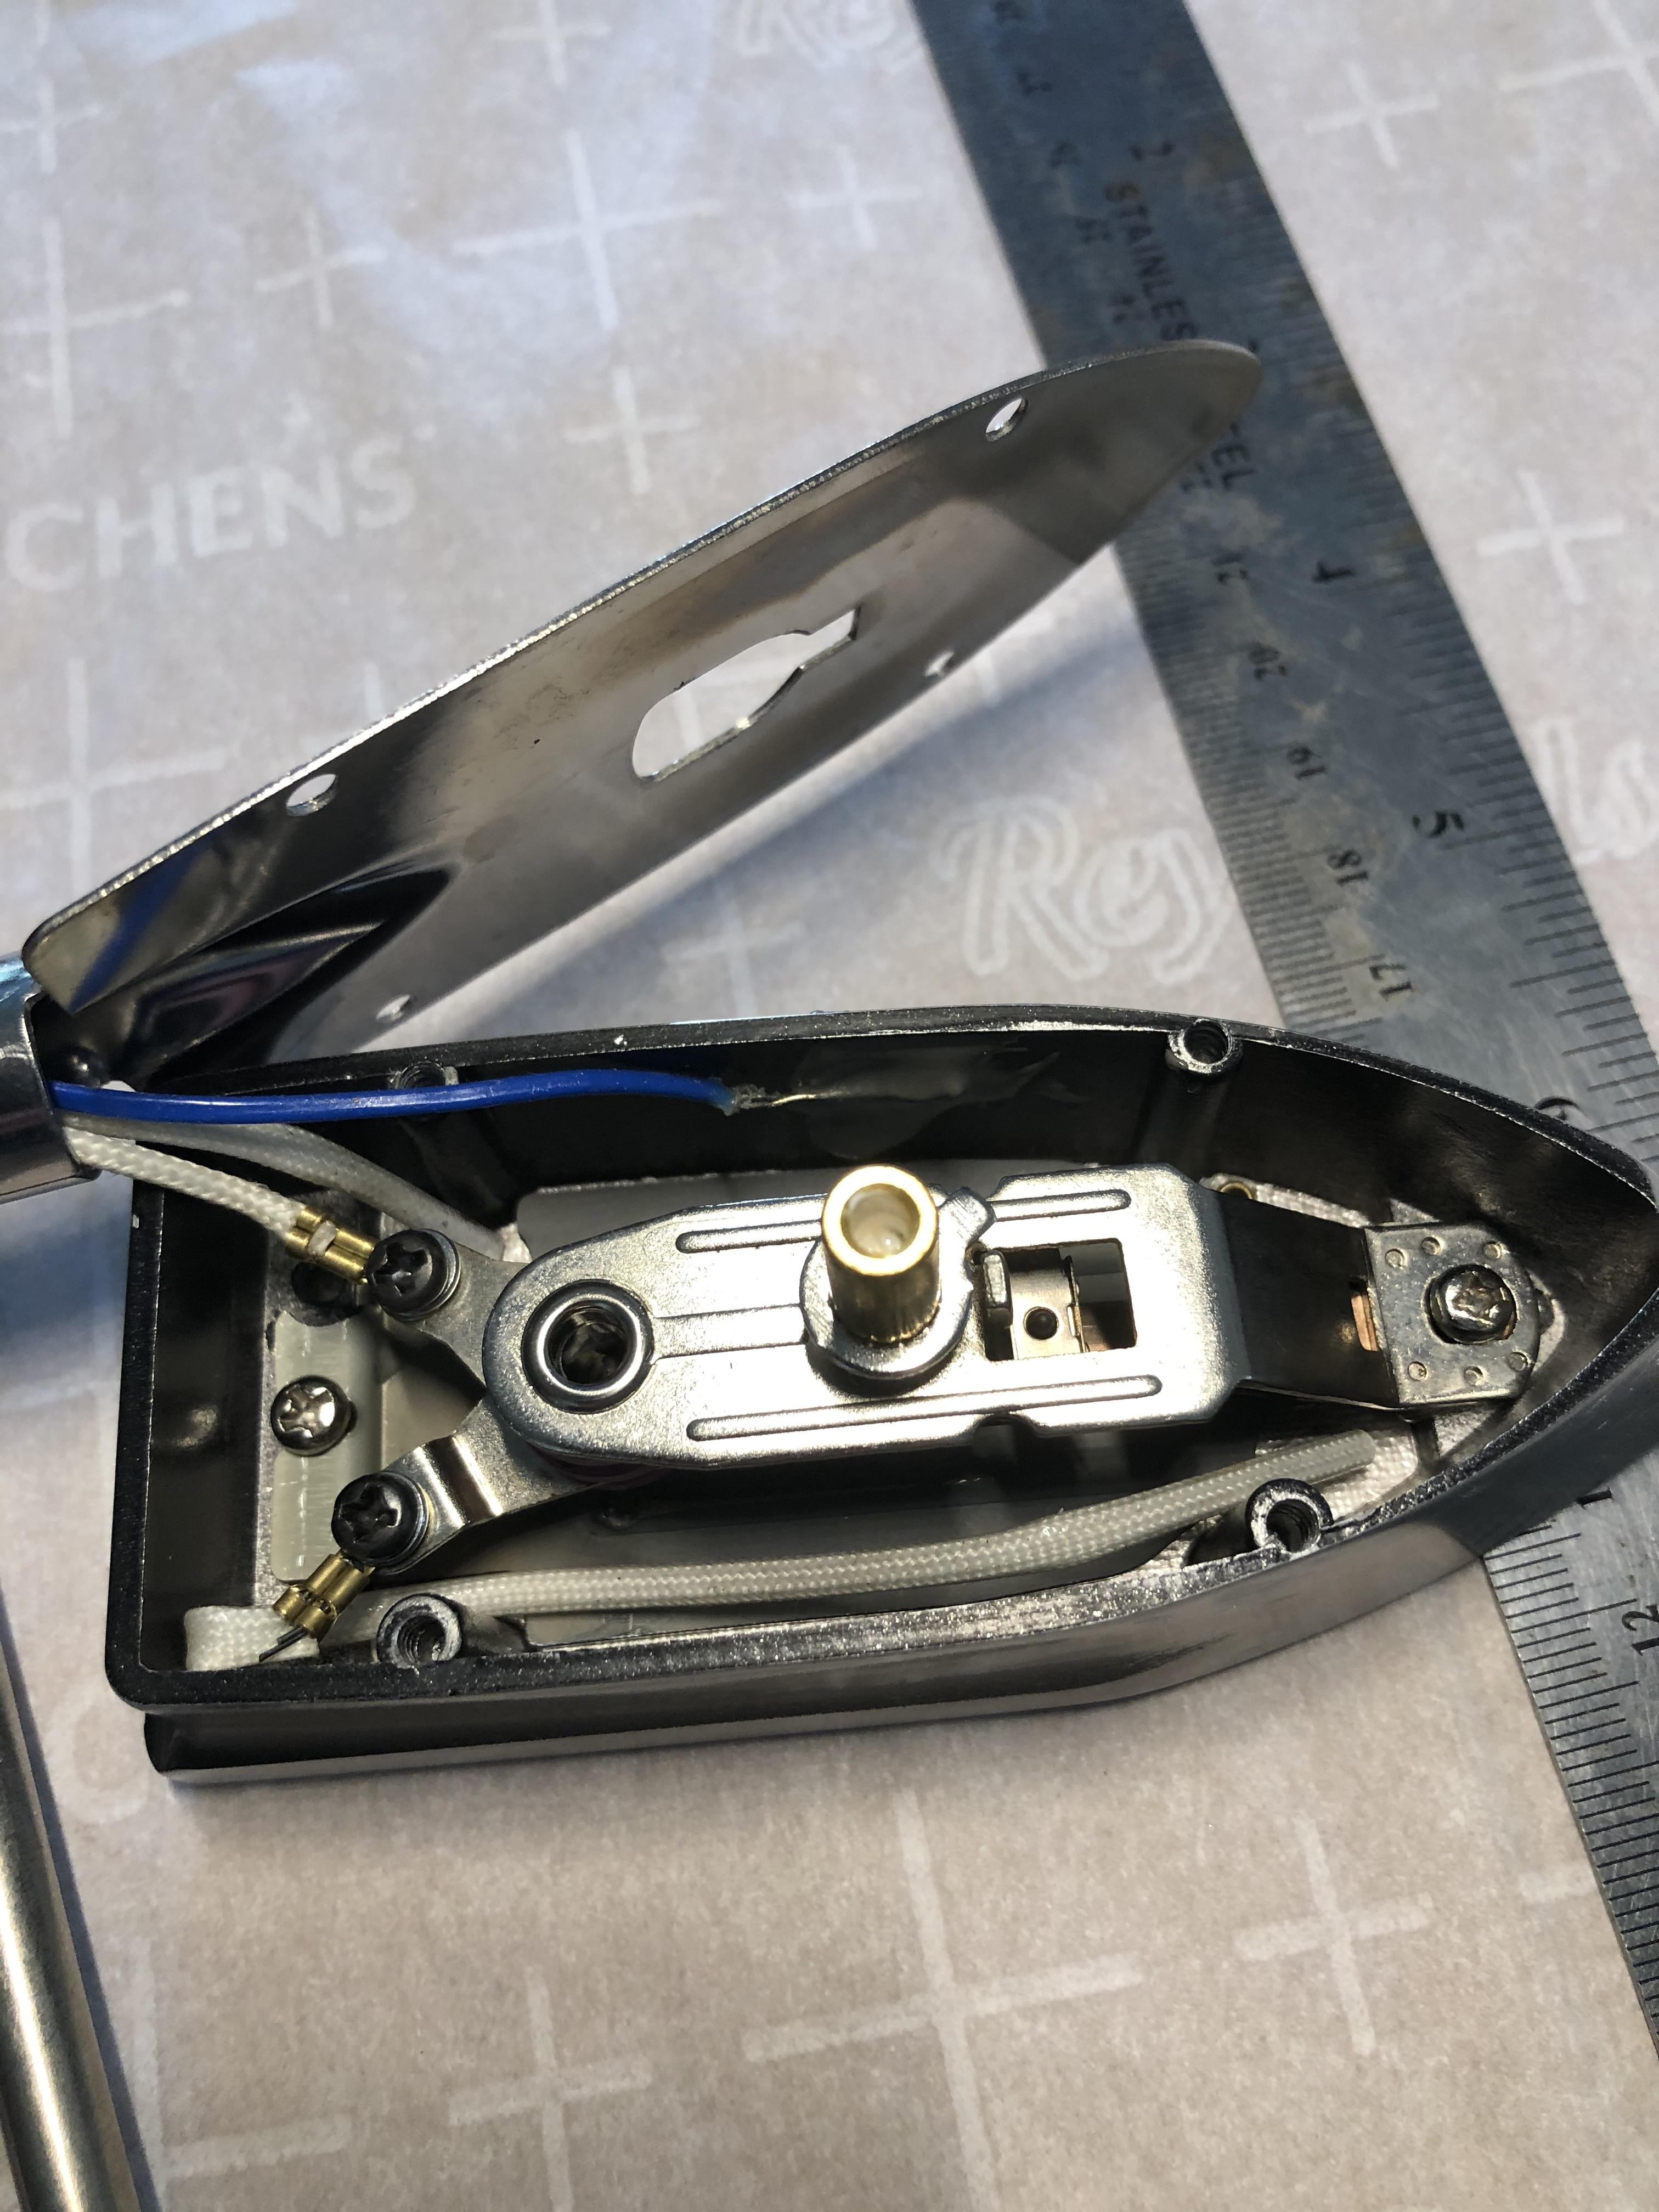
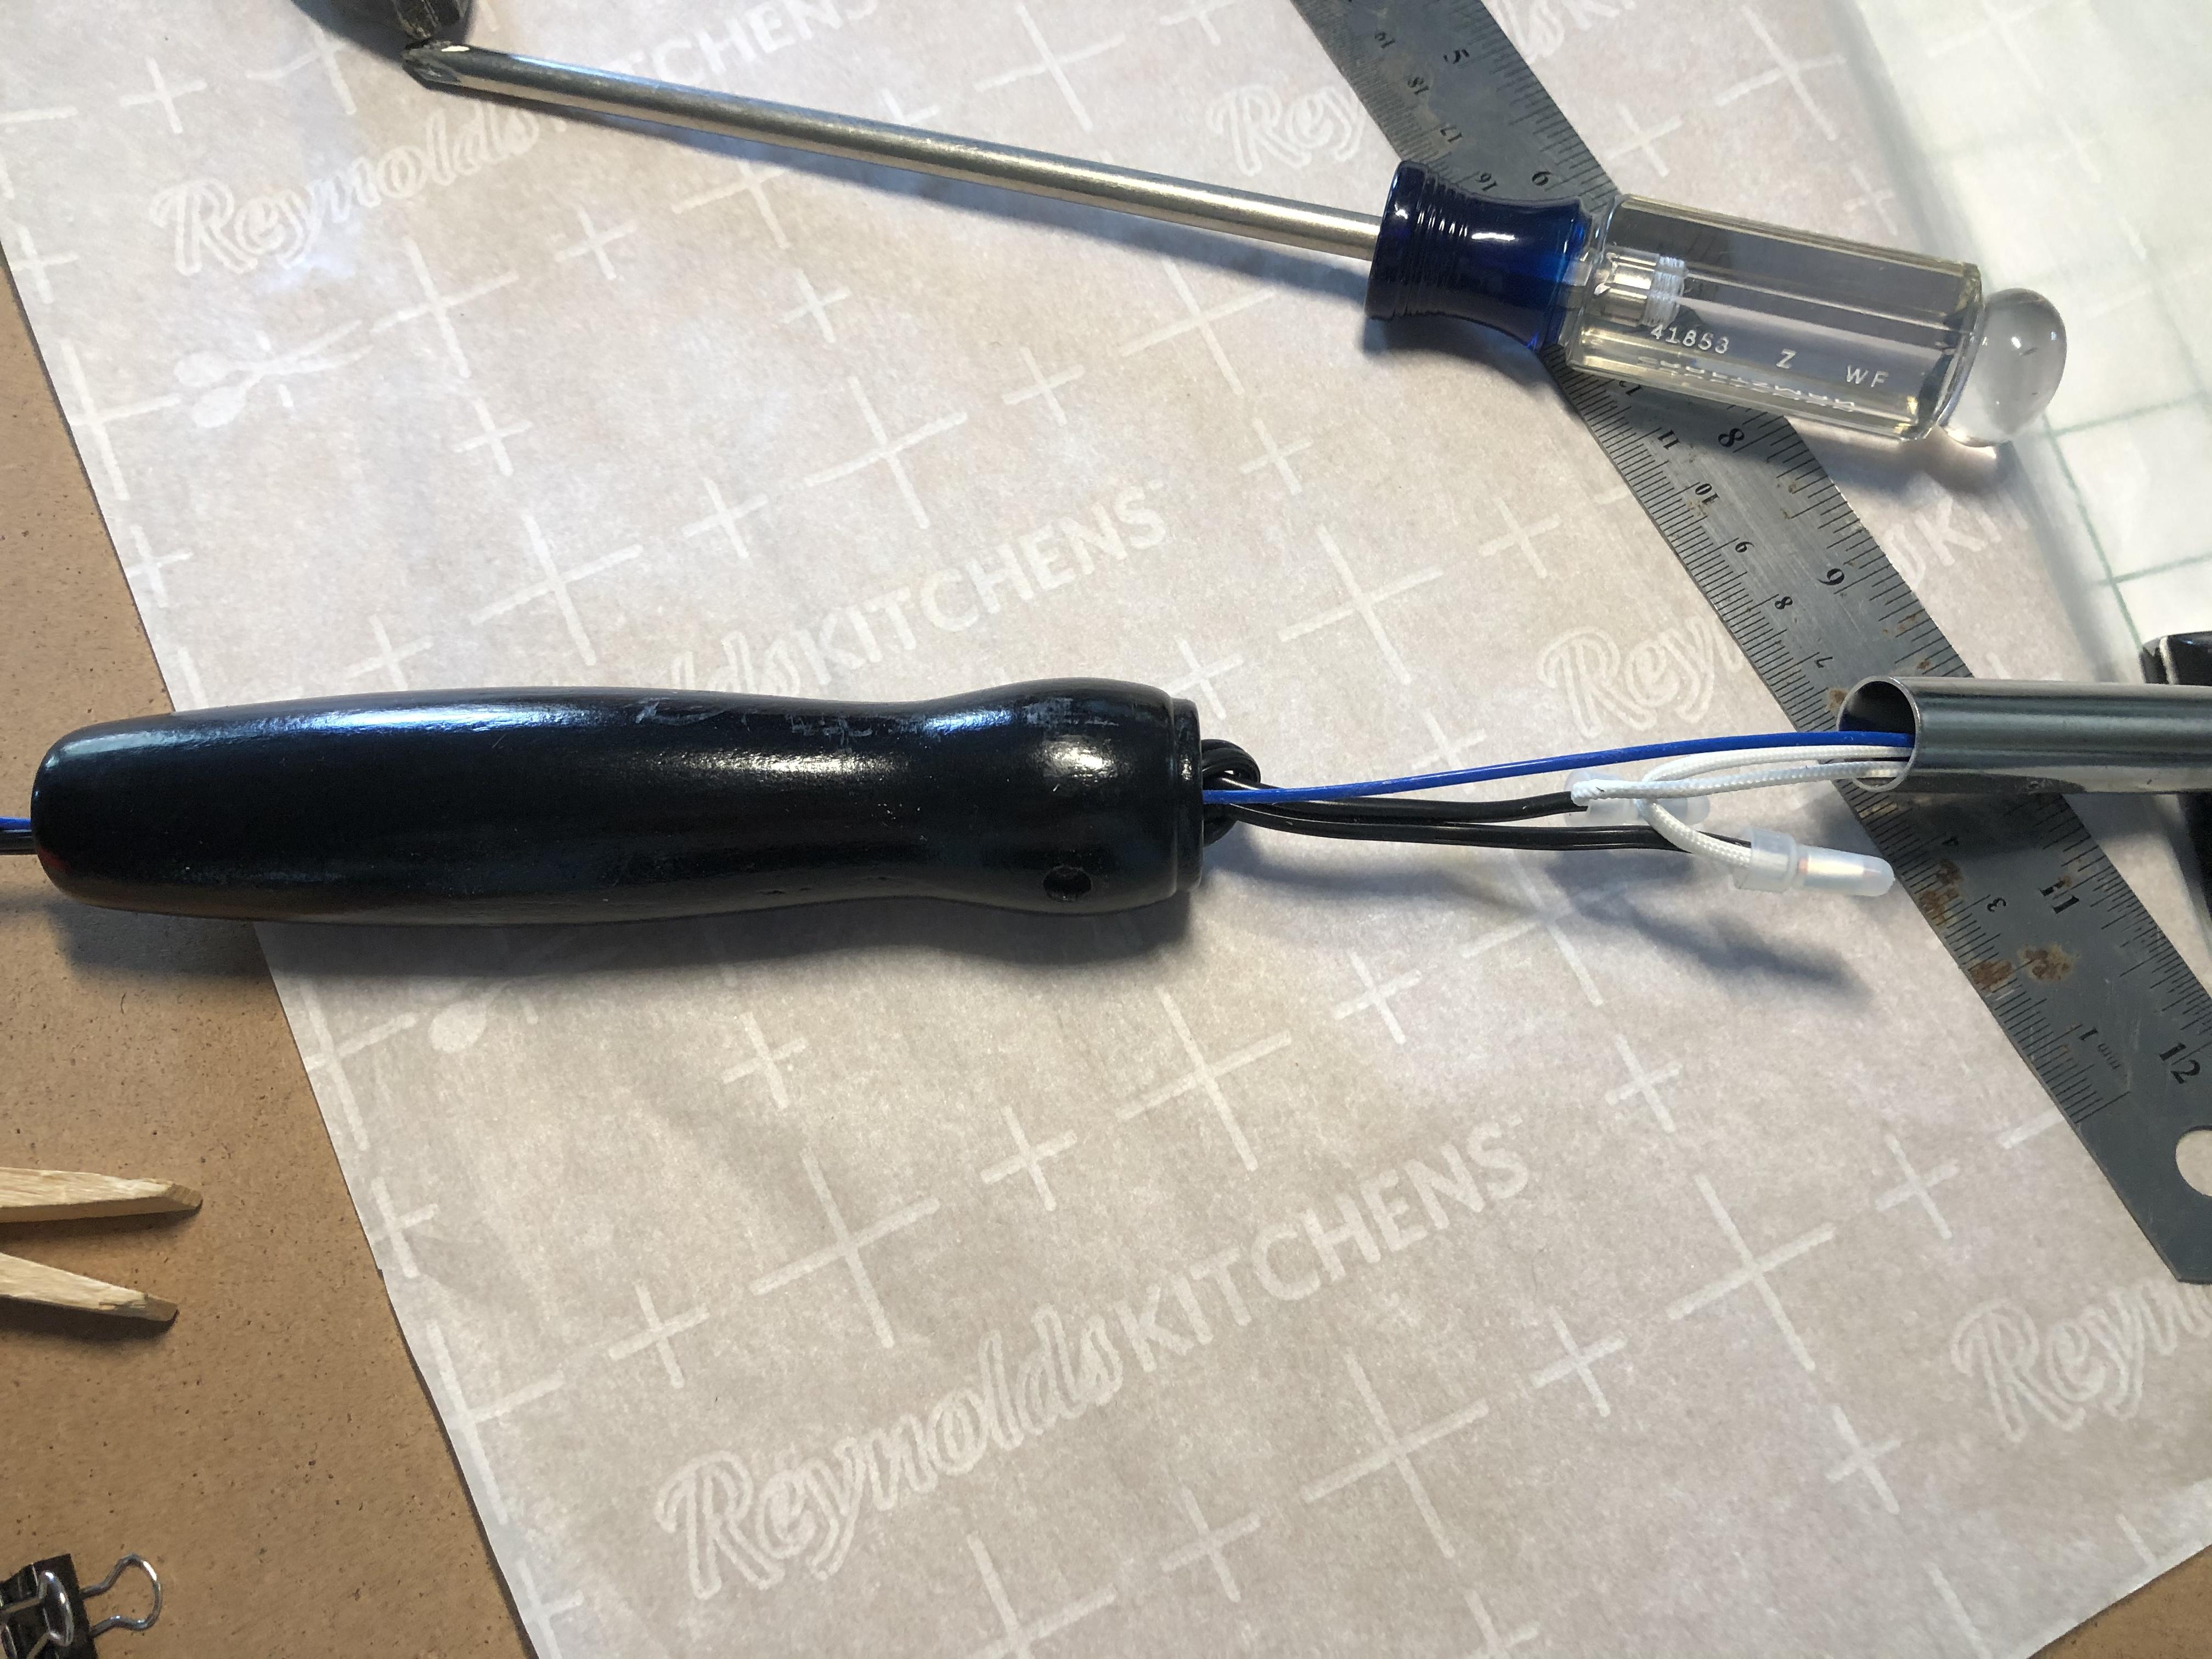
I use a translator, so please excuse any mistakes. I want to share my soldering iron modification. I combined two soldering irons. I took the base from a mechanical one and the handle from an electronic one. I drilled an additional hole in the base for the temperature sensor and also made a hole in the handle (in the plastic) for the wires. Everything else fits and does not need to be modified.
-
February 15, 2024 at 9:09 am #18730zachschiadaParticipant
I’m thinking about buying a Telkwa in the future once I get one of my 3 WW boats sold. I’m wondering if a cheap iron like this one on Amazon will work. I’m looking for one that can double up for plastic kayak repairs. If anyone thinks this wouldn’t work, I’ll just get one of the already recommended ones, but I was hoping for double duty.
-
This reply was modified 2 years, 5 months ago by zachschiada.
-
February 15, 2024 at 9:27 am #18733Matt (Admin)Keymaster
That looks like it would work if the temperature specifications are accurate. With its small foot it would be slower than a leather iron. If you try it and it does work, please let us know!
-
April 6, 2024 at 8:29 pm #18909zachschiadaParticipant
I used this one and it has been great for small sections and I suspect it’s easier for things like the attachments, but after having completed the bulk of my telkwa (still diagnosing and fixing some leaks), I wouldn’t recommend it. The obvious reason is like you mentioned that it takes longer, but also, I found myself rewelding sections more than what I’m guessing is normal since the small shape just doesn’t cover enough area. Temperature wise though it was great. The only time I didn’t get a good weld due to temperature was when it got turned way down by I’m guessing my kids when it wasn’t in use. It heats up really fast, maybe 2-3 minutes.
-
April 7, 2024 at 8:06 am #18911Matt (Admin)Keymaster
Thanks for the report, Zach. It sounds like it would be good to have one of those as a secondary iron for little finicky things and hard to reach places. I might pick one up. Cheers
-
-
-
This reply was modified 2 years, 5 months ago by
-
September 13, 2021 at 8:05 pm #15220Donald BeckerParticipant
I bought one of the Jingda ‘XL-150A’ leather irons from Aliexpress and did an examination.
Before even powering it on, I took it apart.
The first thing I noticed was the power cable was bogus. It had a 3 prong ‘Y’ grounded Chinese Type I plug molded to the cable. The plug was marked “JS-03 10A 250V”. The cable was embossed with “3×0.75mm2” along with safety ratings. That should be a three conductor earthed 6 amp cable. But coming out of the cable end was only two conductors, and they appeared to be 0.50mm or less. Any impression of grounded safety was only an deliberately mismarked illusion.
The control circuit is a basic thermistor feedback type based on a LM358 dual opamp controlling a BTA06 triac. I measured a heating element resistance of 337 ohms. This type of heating element isn’t likely to change much with temperature, so applying 100% power gives 150 watts at 240V, but less than 40W at 120V. You really want to run it at 240V, preferably using an isolation transformer if you keep the original ungrounded power cord.
I measured the warm-up cycle with the iron set to the highest dial temperature. At 237V the iron took 1:15 from 30C to 100C, and 2:54 from 30C to 200C. Even discounting heat loss from convection, which is going to be significant, it would take about 12 minutes to heat up at 120V.
I didn’t do enough measurements to check the overshoot, or how long it the iron takes to stabilize. When I marked the time for the target temperature, the face temperature was rapidly rising. That suggests the interior might have been considerably hotter. I might do some additional runs to check the time constant.
I’m otherwise pretty confident in the accuracy of my measurements. I was measuring using four probes, two sensors (thermistors) with multimeters, and two K-type thermocouples. They were taped at different points on the hot face using a single layer of Kapton tape. They all had very close readings, so the measurement point was not much of a variable. Future tests will likely just use a single thermocouple.
Bottom line: this iron is really only suitable for 240V.
-
September 14, 2021 at 10:07 am #15222Matt (Admin)Keymaster
Interesting! Thanks for posting this… it is a bit worrying that the safety features aren’t as advertised, but we should never leave these irons plugged in unattended anyway, so maybe it’s not such a concern.
I didn’t quite follow the steps to the conclusion that it’s only suitable for 240V – can you explain your reasoning?
-
September 17, 2021 at 1:45 pm #15236Donald BeckerParticipant
I say 240V only solely because it has so little heating power at 120V. It will take a long time to heat up, and the iron won’t be able to maintain a stable temperature in use. The temptation will be to run it hot (or at least as hot as it gets) and rely on thermal mass, rather than feedback temperature regulation.
Even at 240V the iron has a pretty slow regulation loop. It was frustrating trying to calibrate the dial which is *way* off on the slope — setting the position so that 150C is correct results in a setting of 200C being around 185-190C.
-
September 21, 2021 at 4:36 pm #15253Matt (Admin)Keymaster
Interesting – yeah, the ones I have are different brands than yours, but they do take a long time to heat up using 120V (at least ten minutes), and one of them has a bogus ground like yours. I haven’t noticed the temperature varying too much in either of them though.
-
-
-
-
July 11, 2021 at 6:07 am #14878terryjayeParticipant
Hello,
My first post here. I just received my Telkwa kit and am acquiring the tools needed to start assembly. I purchased the Jingda iron and am waiting for a roller to arrive. In the meantime, I tested the iron for temperature with a stand I made up from aluminum bar stock and other workshop scraps. I riveted 2 pieces together and drilled a hole between them for a snug fit for the thermometer. This doubles as a storage stand as well.
The flattened iron sits flush on the aluminum rest.
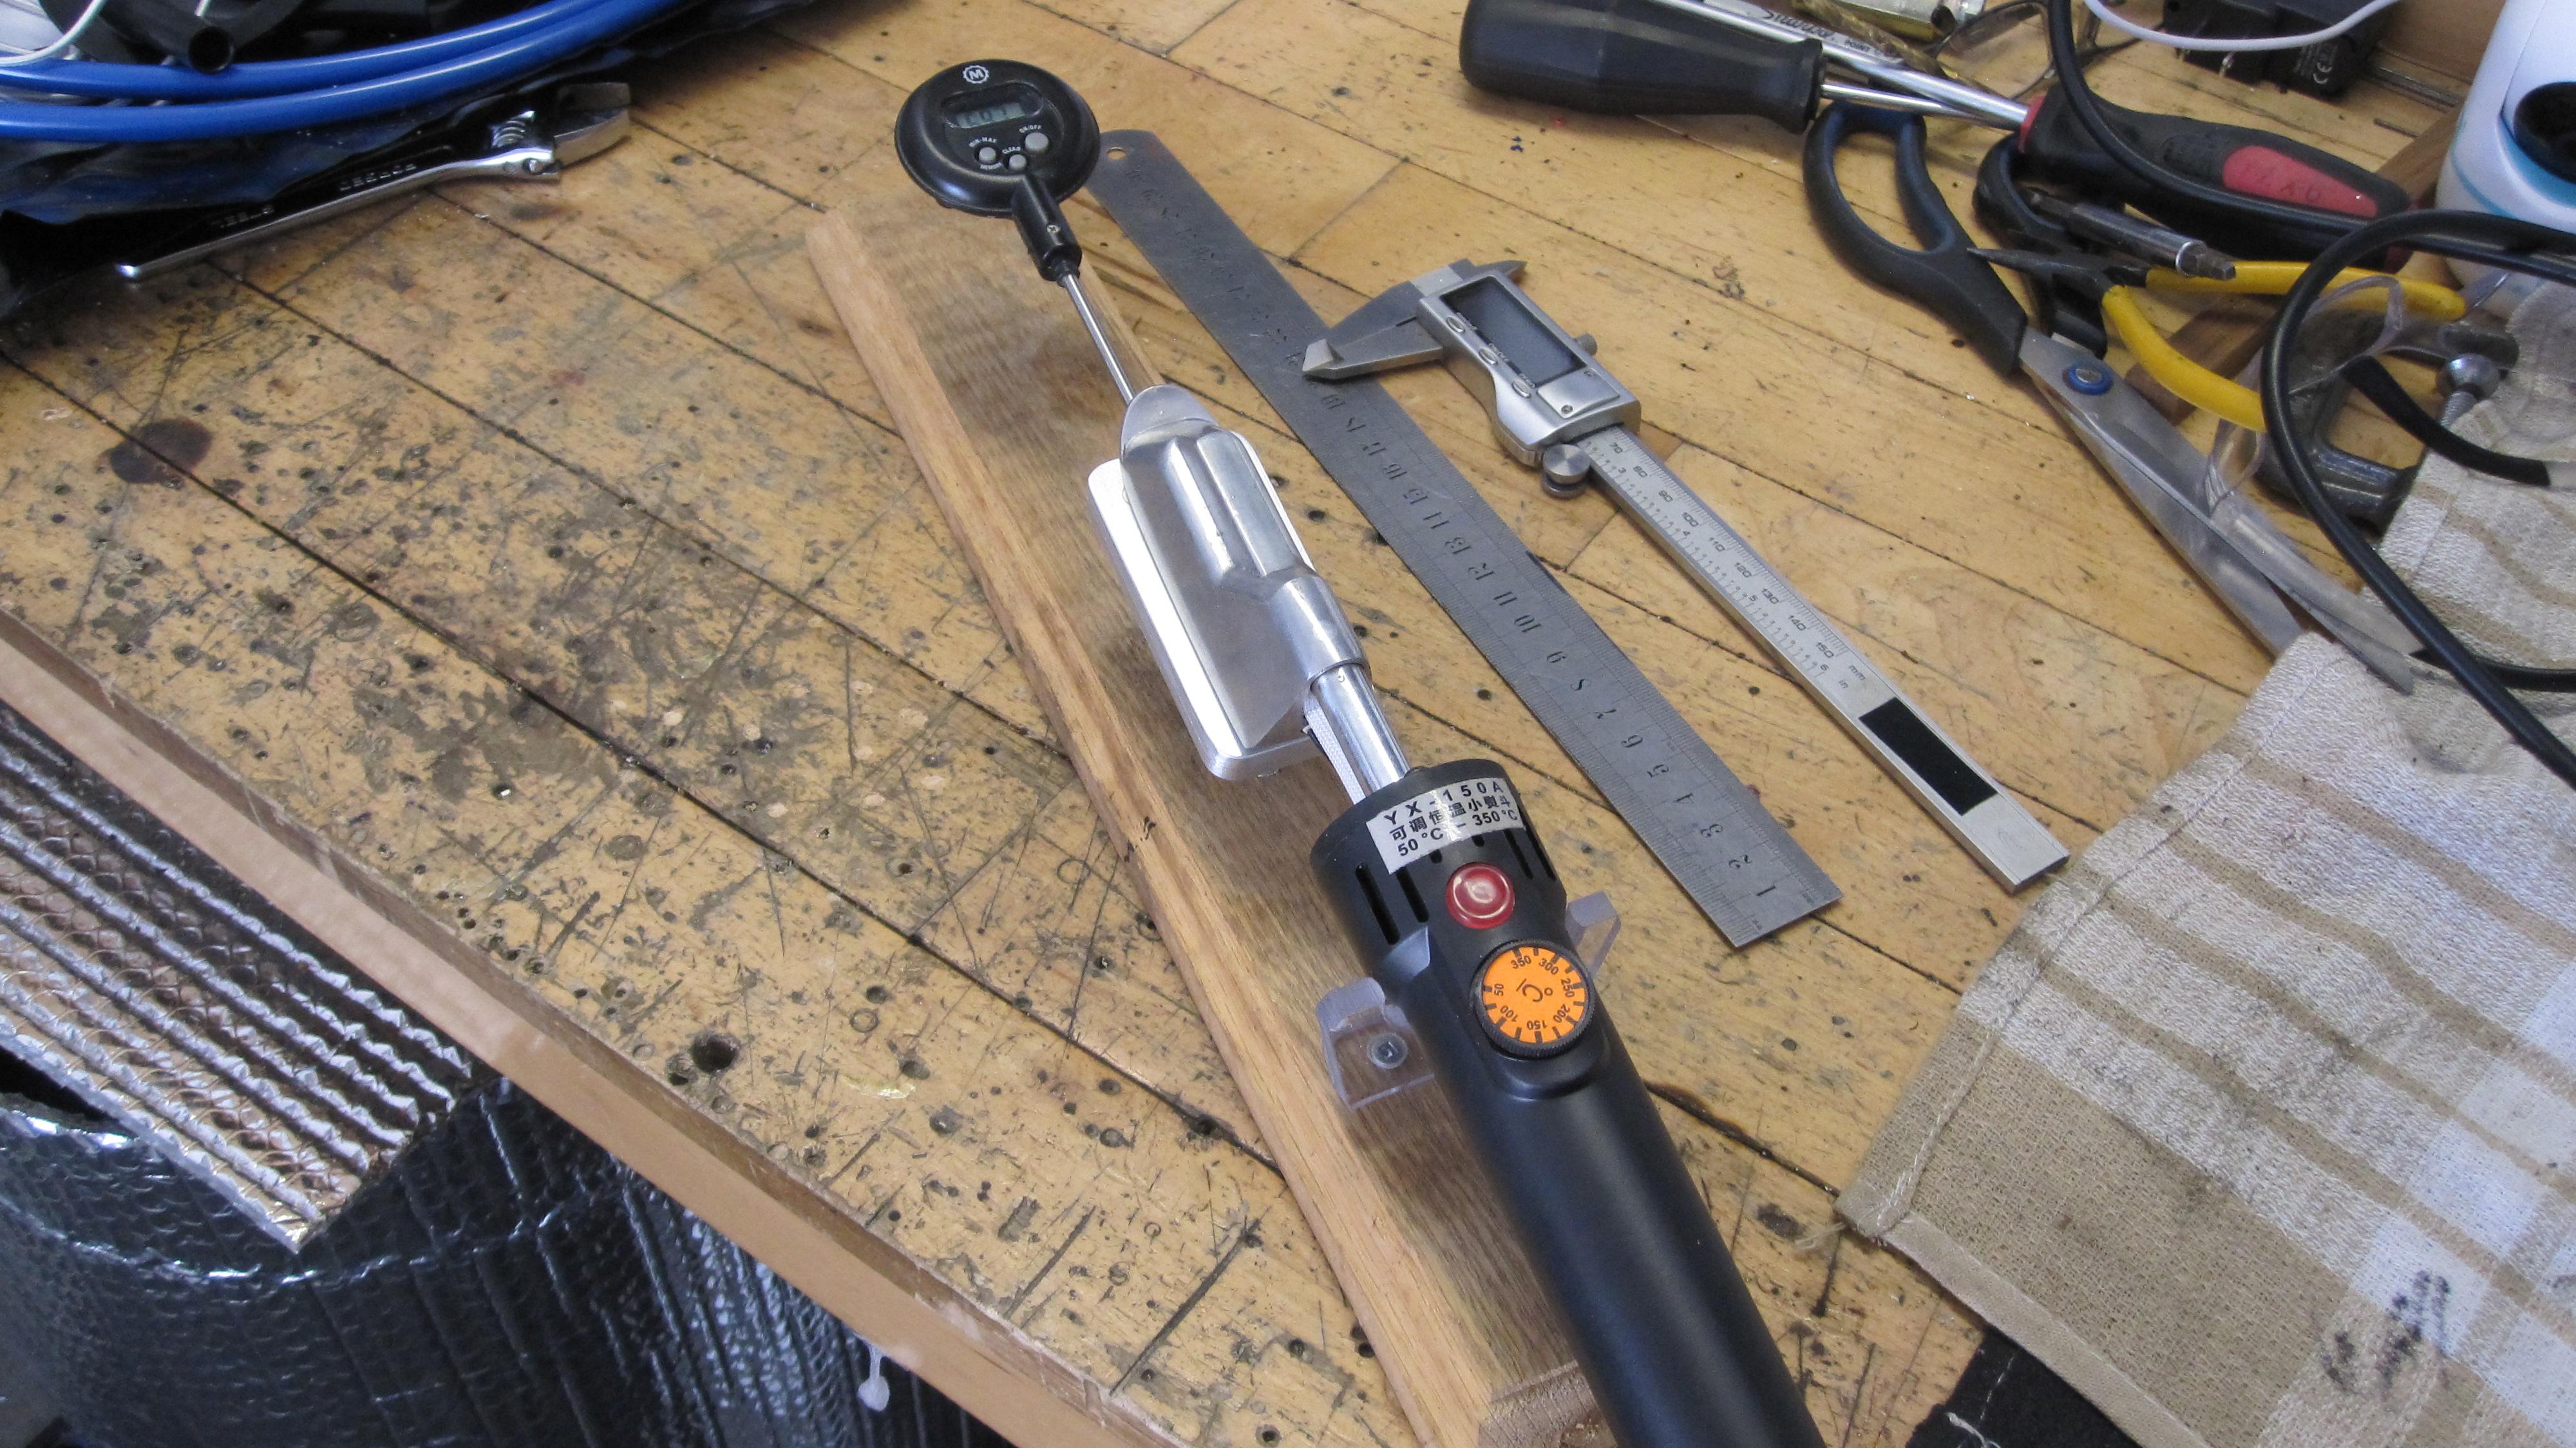
The increased mass delays the heating somewhat, and it never reached over 140C. This is a 250V iron plugged into a 120V source. I do have 240V available in the workshop, but of course split phase and not useful in this case. I purchased the iron not realizing that it’s a 250V L1 and a common. Oh well, Amazon is on the way with a step up transformer.

-
This reply was modified 5 years ago by terryjaye.
-
July 12, 2021 at 1:32 pm #14888Matt (Admin)Keymaster
It seems like you’re spending a significant amount of time and money trying to get the measured temperature to match some value, but from your posts I can’t tell if you’ve tried welding any scraps of fabric to see if there’s actually a problem there that needs solving.
If so, carry on – I just don’t want to leave other readers with the impression that they need to be measuring temperatures and fiddling with transformers and such when the vast majority of people can simply plug in their irons and find the correct temperature by welding scraps of fabric together and then pulling them apart, as shown in the instructions.
-
July 13, 2021 at 4:42 am #14889terryjayeParticipant
Yes, I did try welding some scraps with the iron. It was a frustrating experience requiring a long exposure to make it work. I wasn’t happy with the final weld. Possibly my technique, or the cold iron or a combination of both. If I didn’t have another use for the step up transformer, I would’ve purchased a 120V aircraft iron from Aircraft Spruce.
In any event, the leather iron seems to be working well and now actually cycles on and off.
-
July 14, 2021 at 9:15 am #14891Matt (Admin)Keymaster
Ah, okay 🙂
It sounds like you’ve already got it solved, but one thing I noticed with mine is that the heating element can slide outwards, and if it’s not pushed all the way into its hole then it doesn’t transfer heat as well as when it’s fully inserted. Also, if the element is a bit loose in the hole, maybe adding some thermal paste (a heat transfer compound) would improve the heat transfer into the surrounding aluminum.
-
-
-
July 11, 2021 at 11:11 am #14881BruceParticipant
Terry,
You have a great kit awaiting, I will offer a few thoughts regarding your iron.
From the pictures it looks just like the leather irons I have. Mine just plug in and work. Eventually. It does take 20 minutes for them to reach temperature on 120v power. And they will go well beyond 220 degrees C.
Yes, I painted the sides flat black to use my infrared thermometer. Your stand looks superb.
Is it possible you have a poor ceramic heating element and need to order another iron?
Is it possible that the temperature control knob is maladjusted?
Before setting the tool aside for spare parts, you might consider full disassembly and a look at the knob to see if it got put in wrong. If that’s even possible.
Not having taken one apart I am not sure how the knob could be put in wrong, but it would be on the top of my trouble shooting list.
Its digital circuit is generally beyond my input, and I think might be responsible for smaller temperature swing than my model aircraft irons, which could vary given the price range these are sold at.
Those two points aside, I am very interested in knowing how your step up transformer works. Your observations on the use of the transformer will likely have value to many others. So I’m hoping you post your results.
Great topic. Best of luck.
Bruce
-
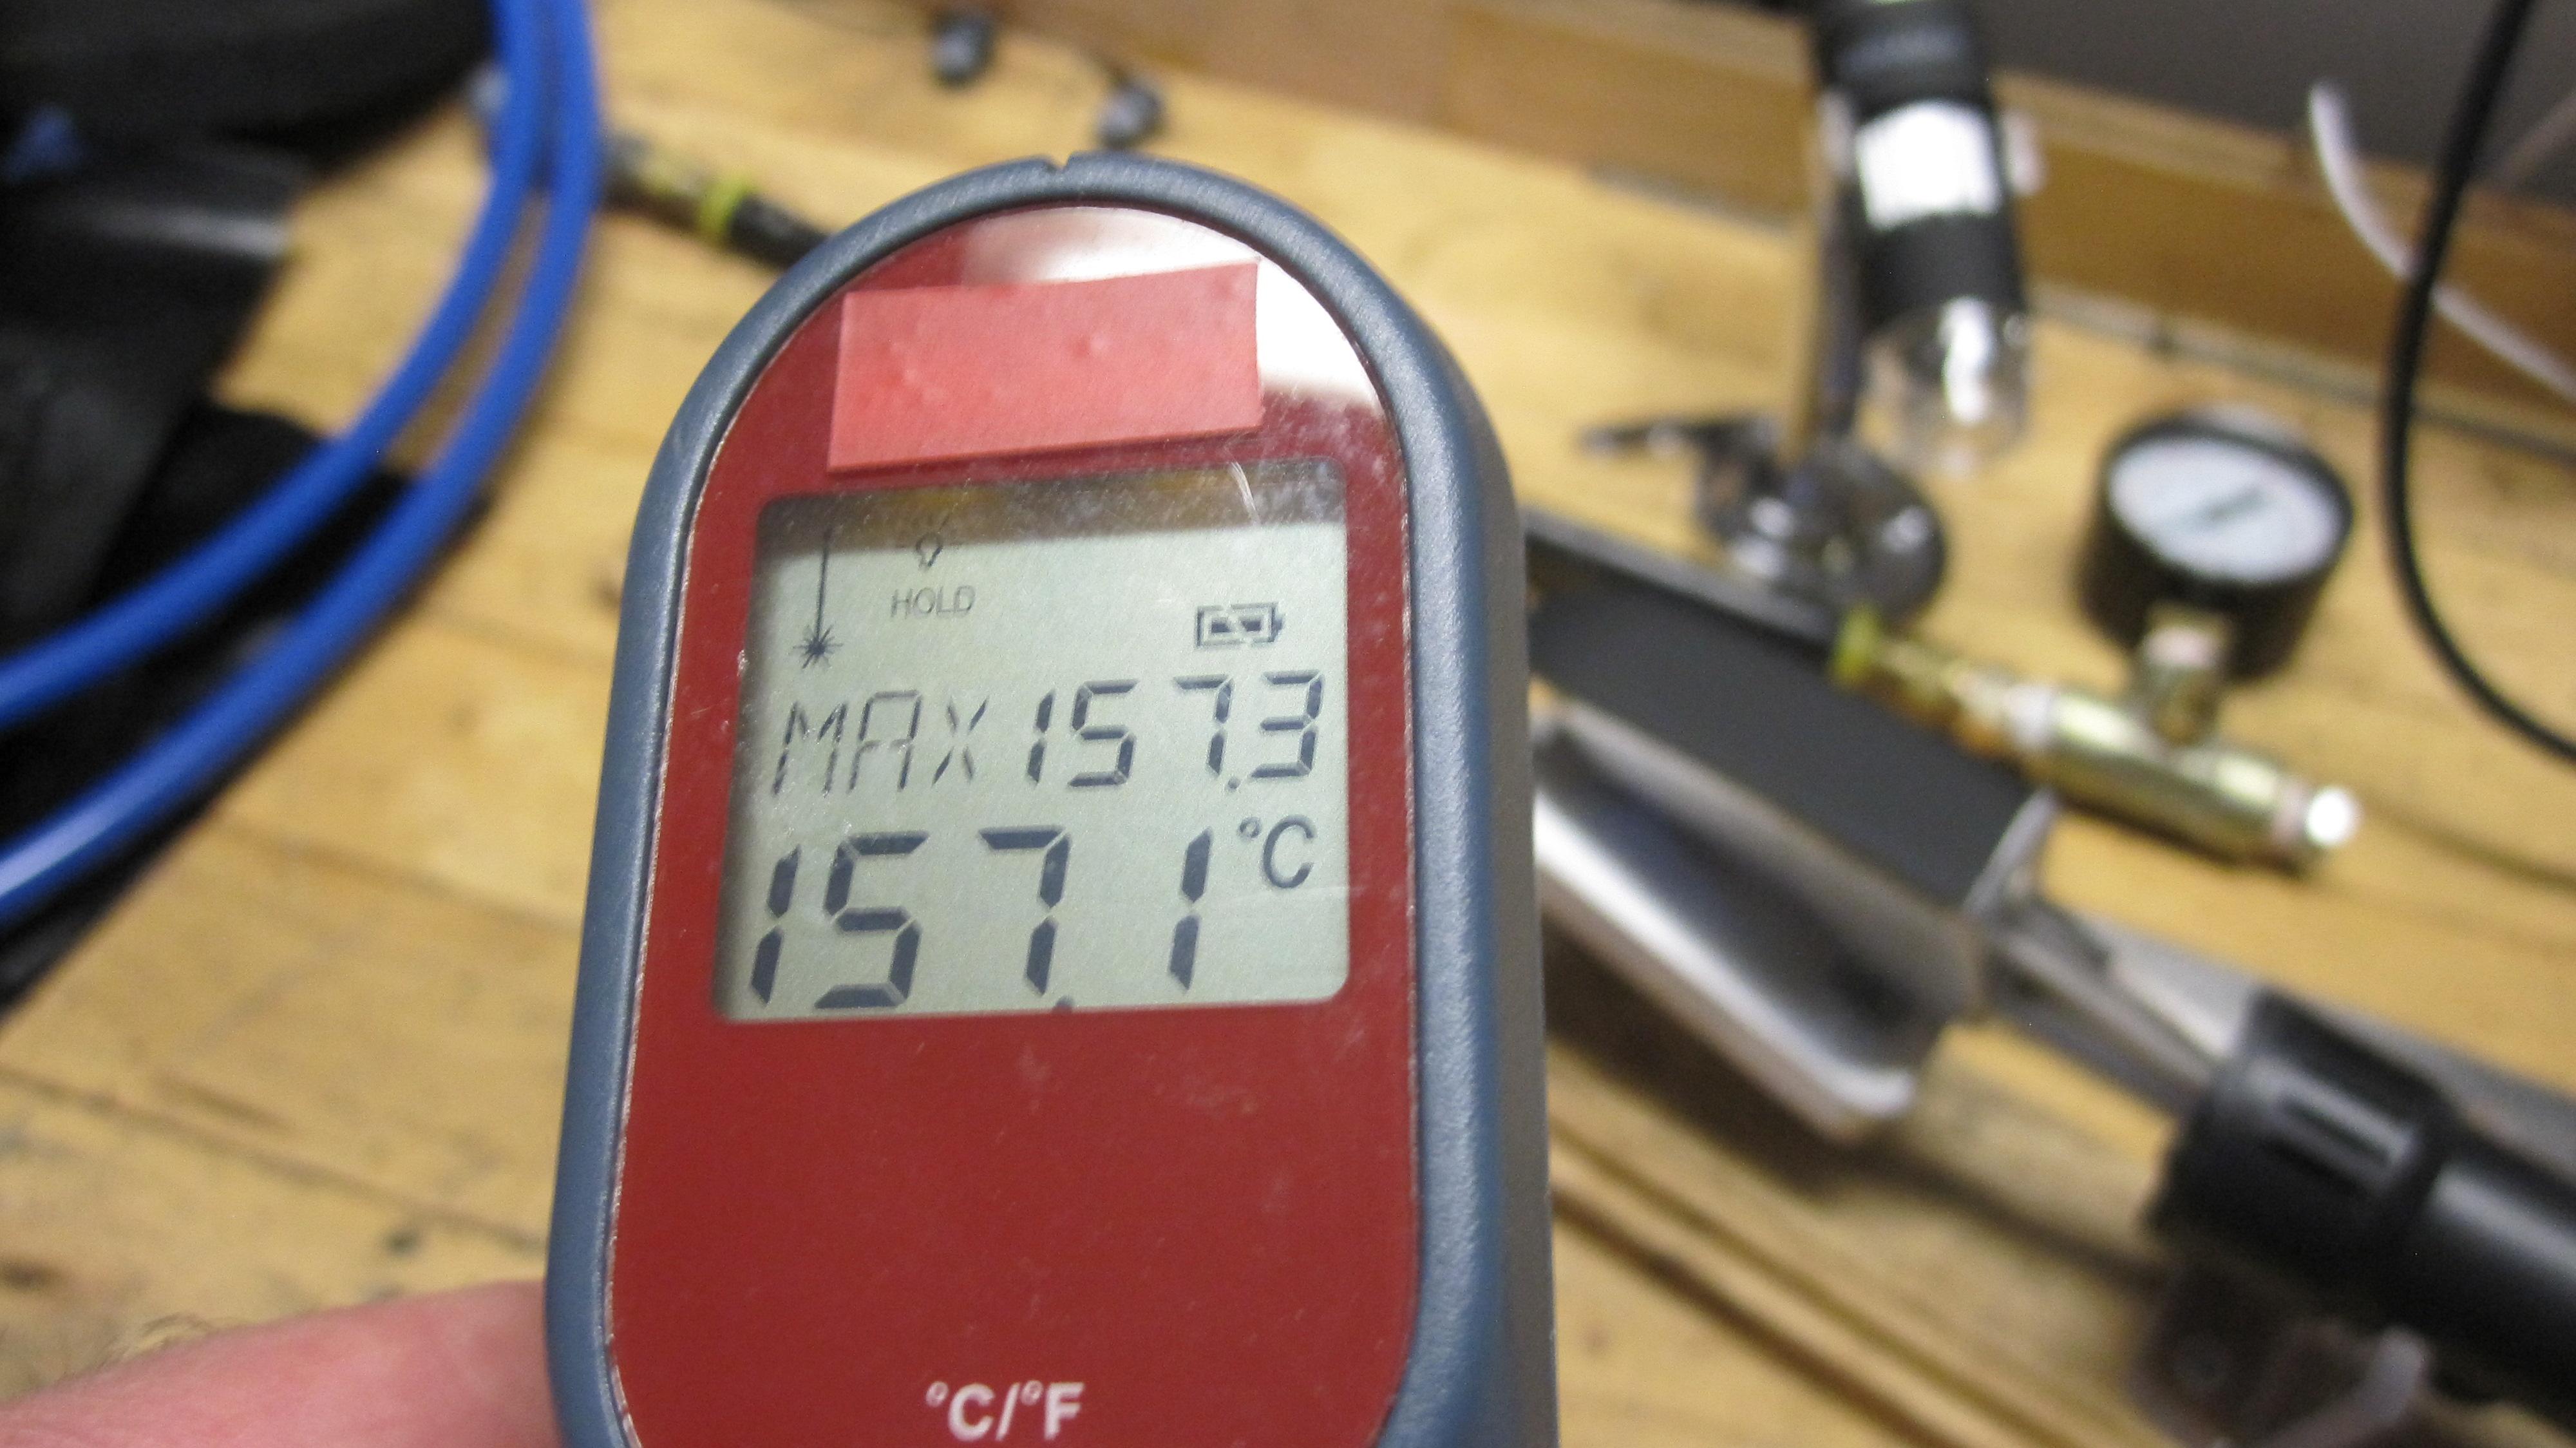
July 11, 2021 at 7:53 am #14880terryjayeParticipant
I wanted to remove any variability in my thermo stand and actual temperatures. So, I painted the iron’s surface flat black and used my infrared toy. Spot checks revealed a variety of temperatures with the hottest about 1 cm away from where the wires enter the body.
a
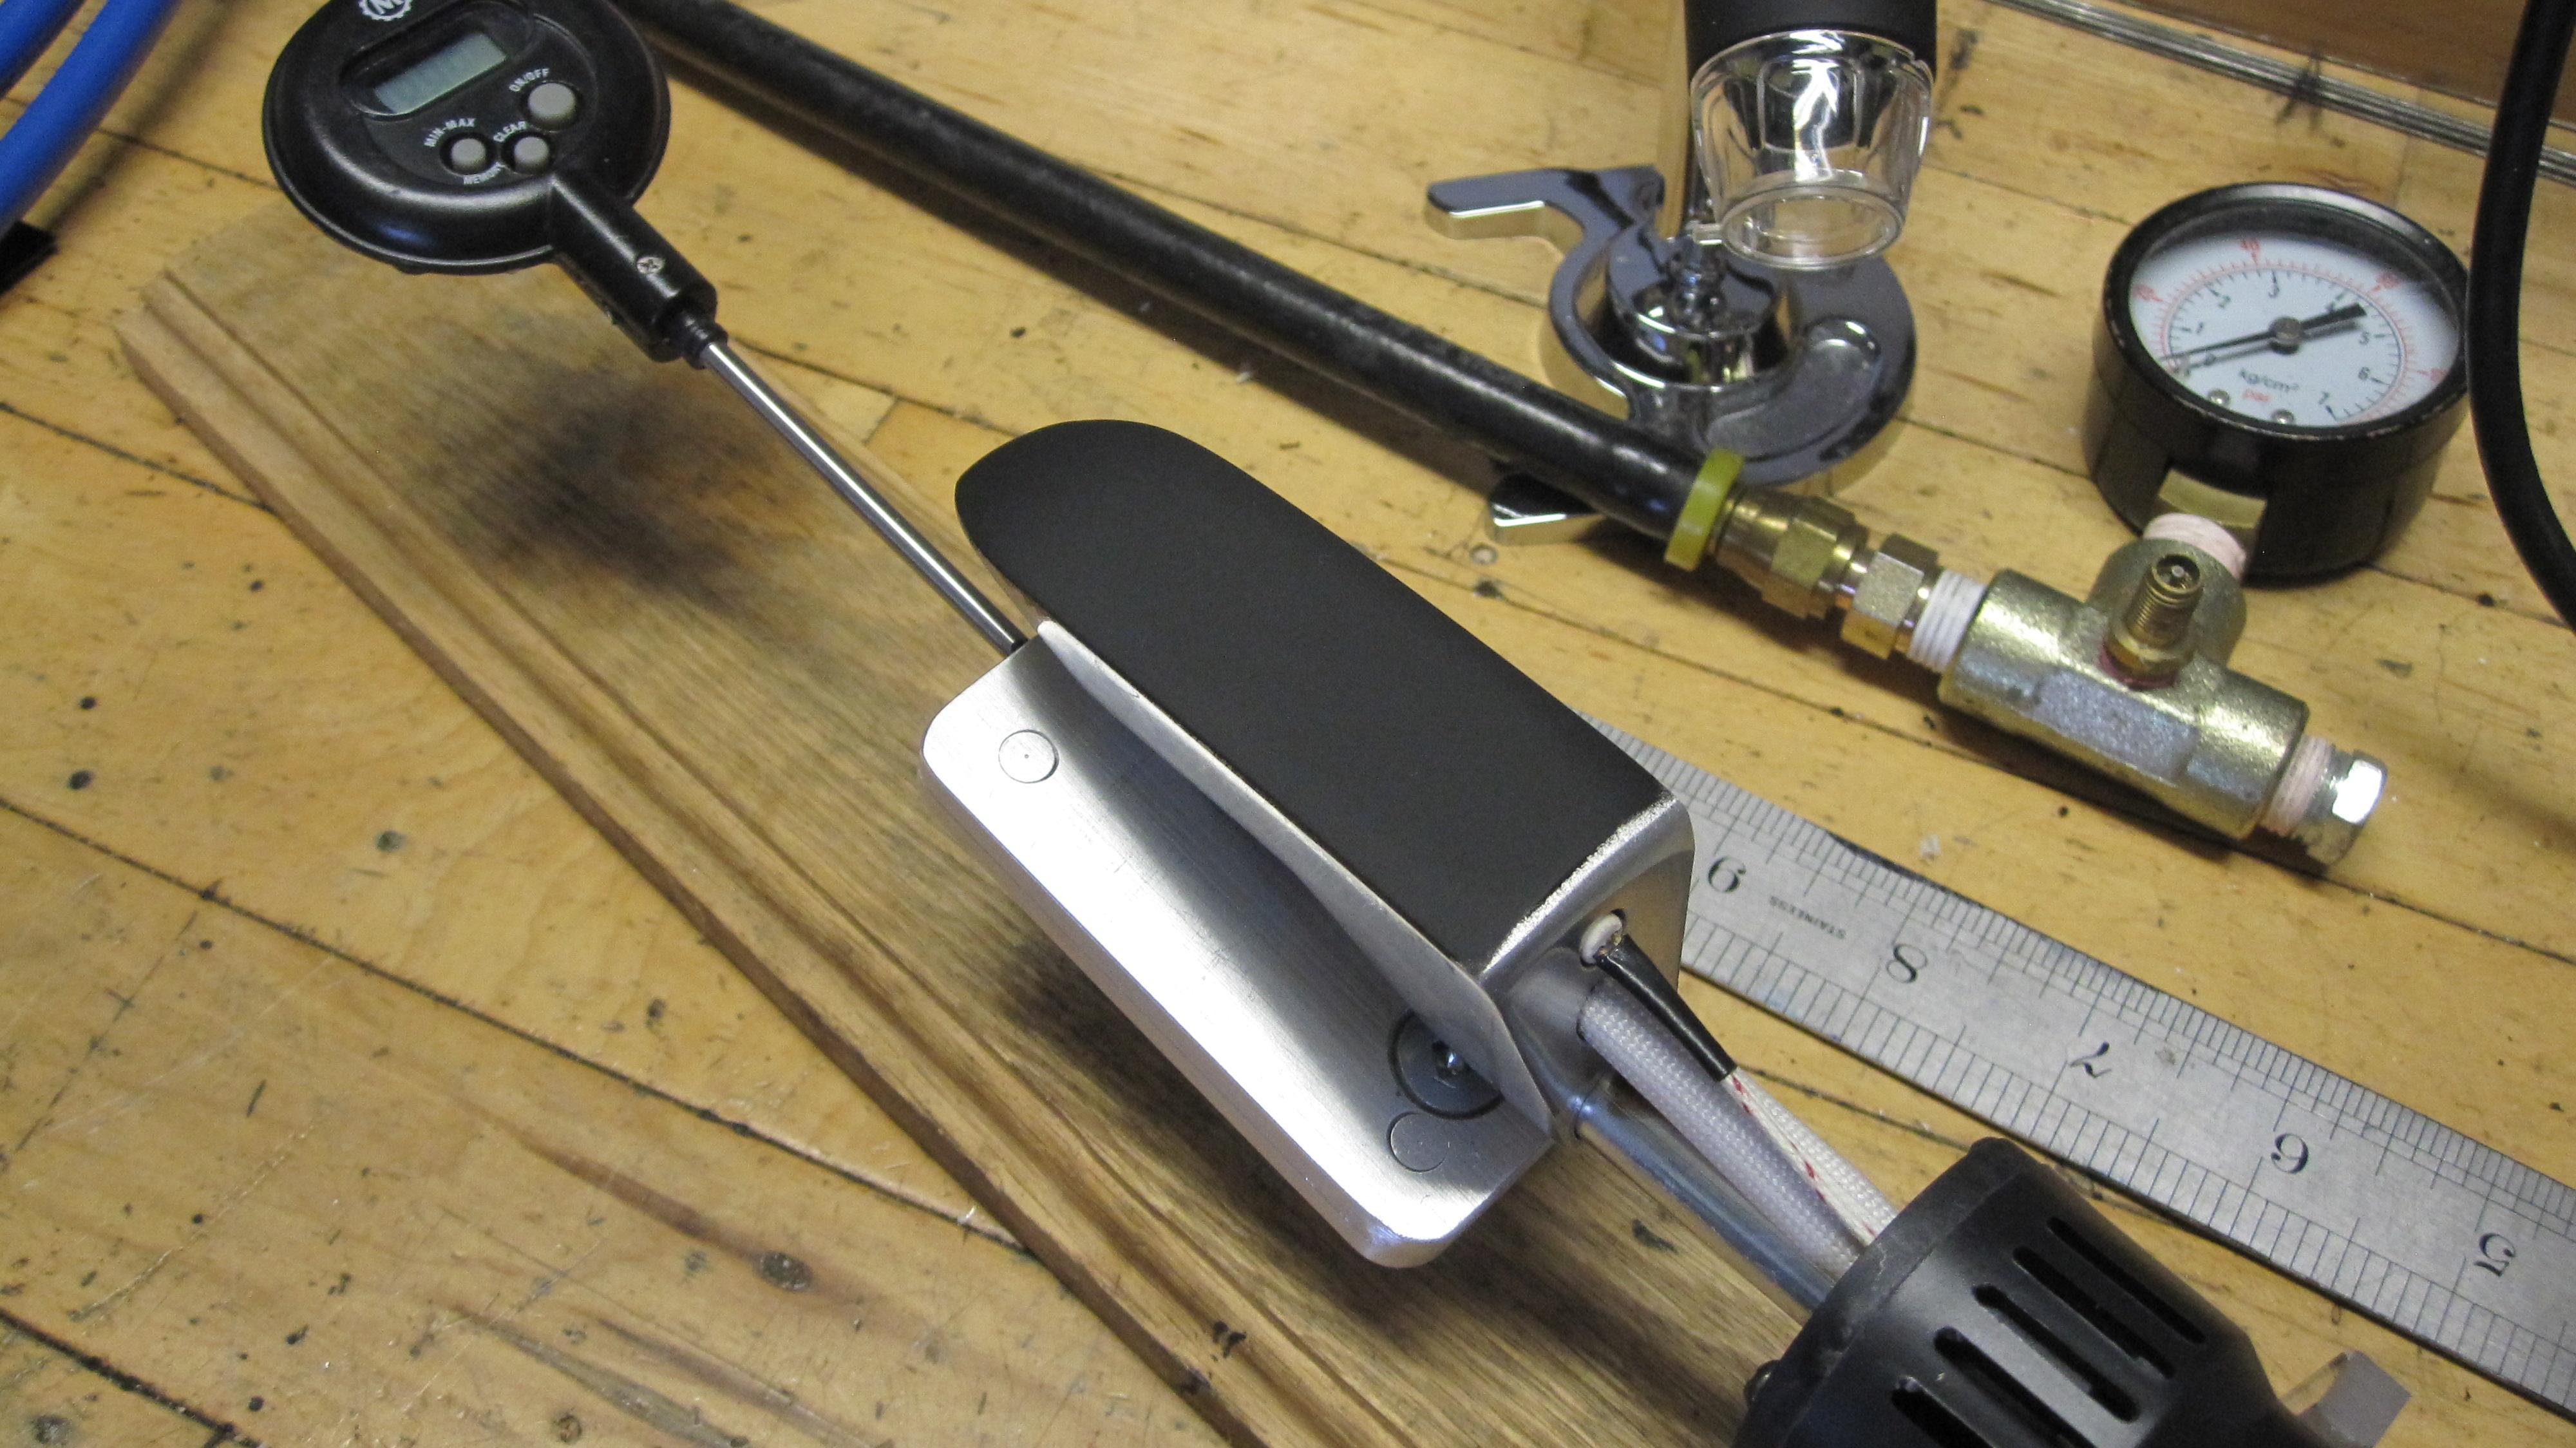
With this technique, maximum temperatures reached were 157C. Yeah, waiting for the Amazon guy to show with the step up box, to try this again.
-
July 12, 2021 at 5:36 am #14885terryjayeParticipant
A 120V-250V step up transformer was delivered late yesterday. 26 hours after ordering. There is some advantages to living within an hour of Toronto. Appears to be a quality build and it turned on and produced 236V from my 120V residential line . $87.99CAD delivered. Wow!
I left the iron on the same full throttle setting and in 5 minutes, it was registering 220C. Five more minutes and the paint was smoking and measuring 336C as I unplugged it. The workshop stinks. I left for work without airing it out and my wife is displeased:(
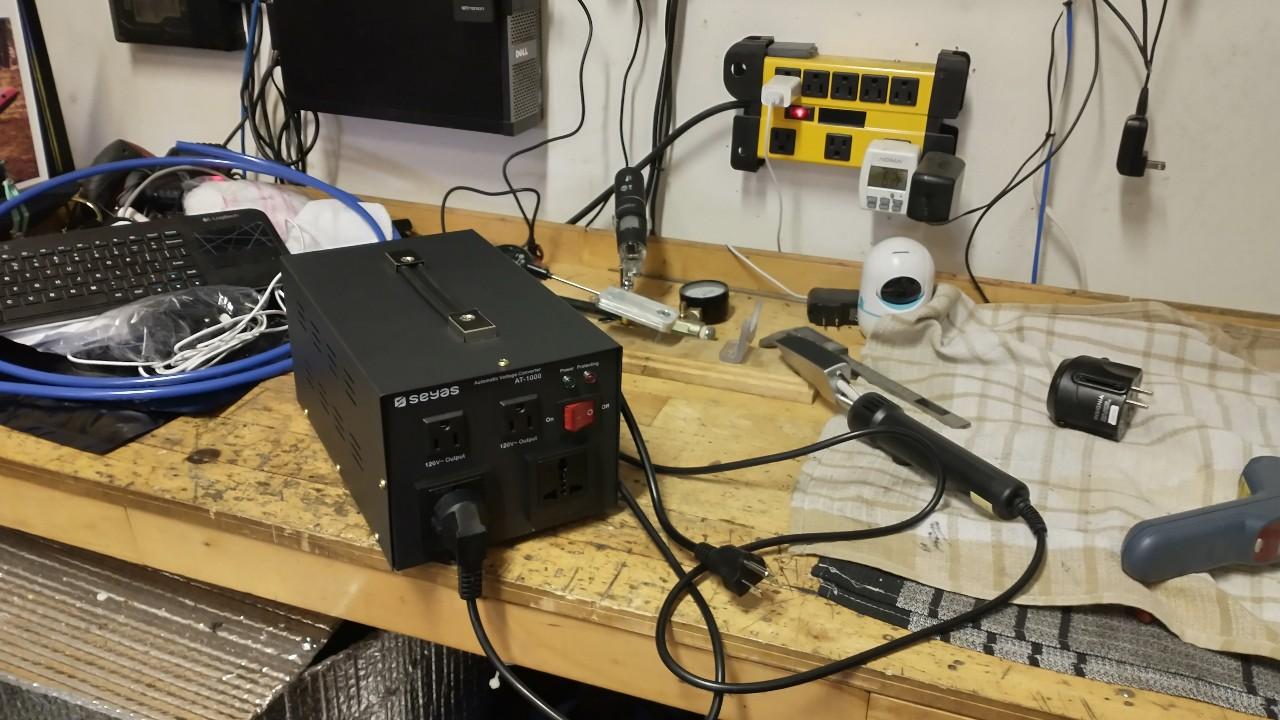
I’m thinking that with the additional horsepower going into this iron that it might maintain tighter temperatures during use.
-
-
This reply was modified 5 years ago by
-
May 14, 2021 at 8:32 am #14447craig1185Participant
And apparently my tablet is schizophrenic when it comes to posting in a forum and I apologize.
-
May 14, 2021 at 8:25 am #14441craig1185Participant
 Thank you Bruce, I appreciate your advice. The iron came with the V3 kit I recently purchased on eBay and I’m guessing it’s, at least, unused if not new. TBH I find infrared temp sensors to be iffy at best and I couldn’t get a consistent temperature trend to save my life. I find contact thermocouplings to be considerably more accurate and consistent. So here’s 4000 words worth. I think my iron is fracked.
 -
May 12, 2021 at 7:25 pm #14422craig1185Participant
Is anyone else using the hangar 9 iron having problems with inconsistent temperatures? Thanks.
-
May 14, 2021 at 12:56 am #14435BruceParticipant
-
<li style=”text-align: left;”>Craig,I have several Hangar #9 irons. Short answer: they are all slightly different. Most have a 10 to 20 degree temperature swing to activate the thermostat. When activated the thermostat connects the current increasing heat. Heat rises 10 to 20 degrees.
- Fairbanks
Do buy a thermal infrared thermometer and watch the iron cycle. If it is rising more than 20 degrees during the top heat cycle, the bimetallic thermostat control may be worn out and you need a new iron.
My preference is a temperature cycle between 200 and 220 degrees C. I sometimes need to make tiny adjustments in the thermostat knob to achieve the desired top temperature. It is common for model aircraft irons to have a top temperature just under 200 degrees, necessitating an adjustment. See how below.
Bruce Campbell
-
-
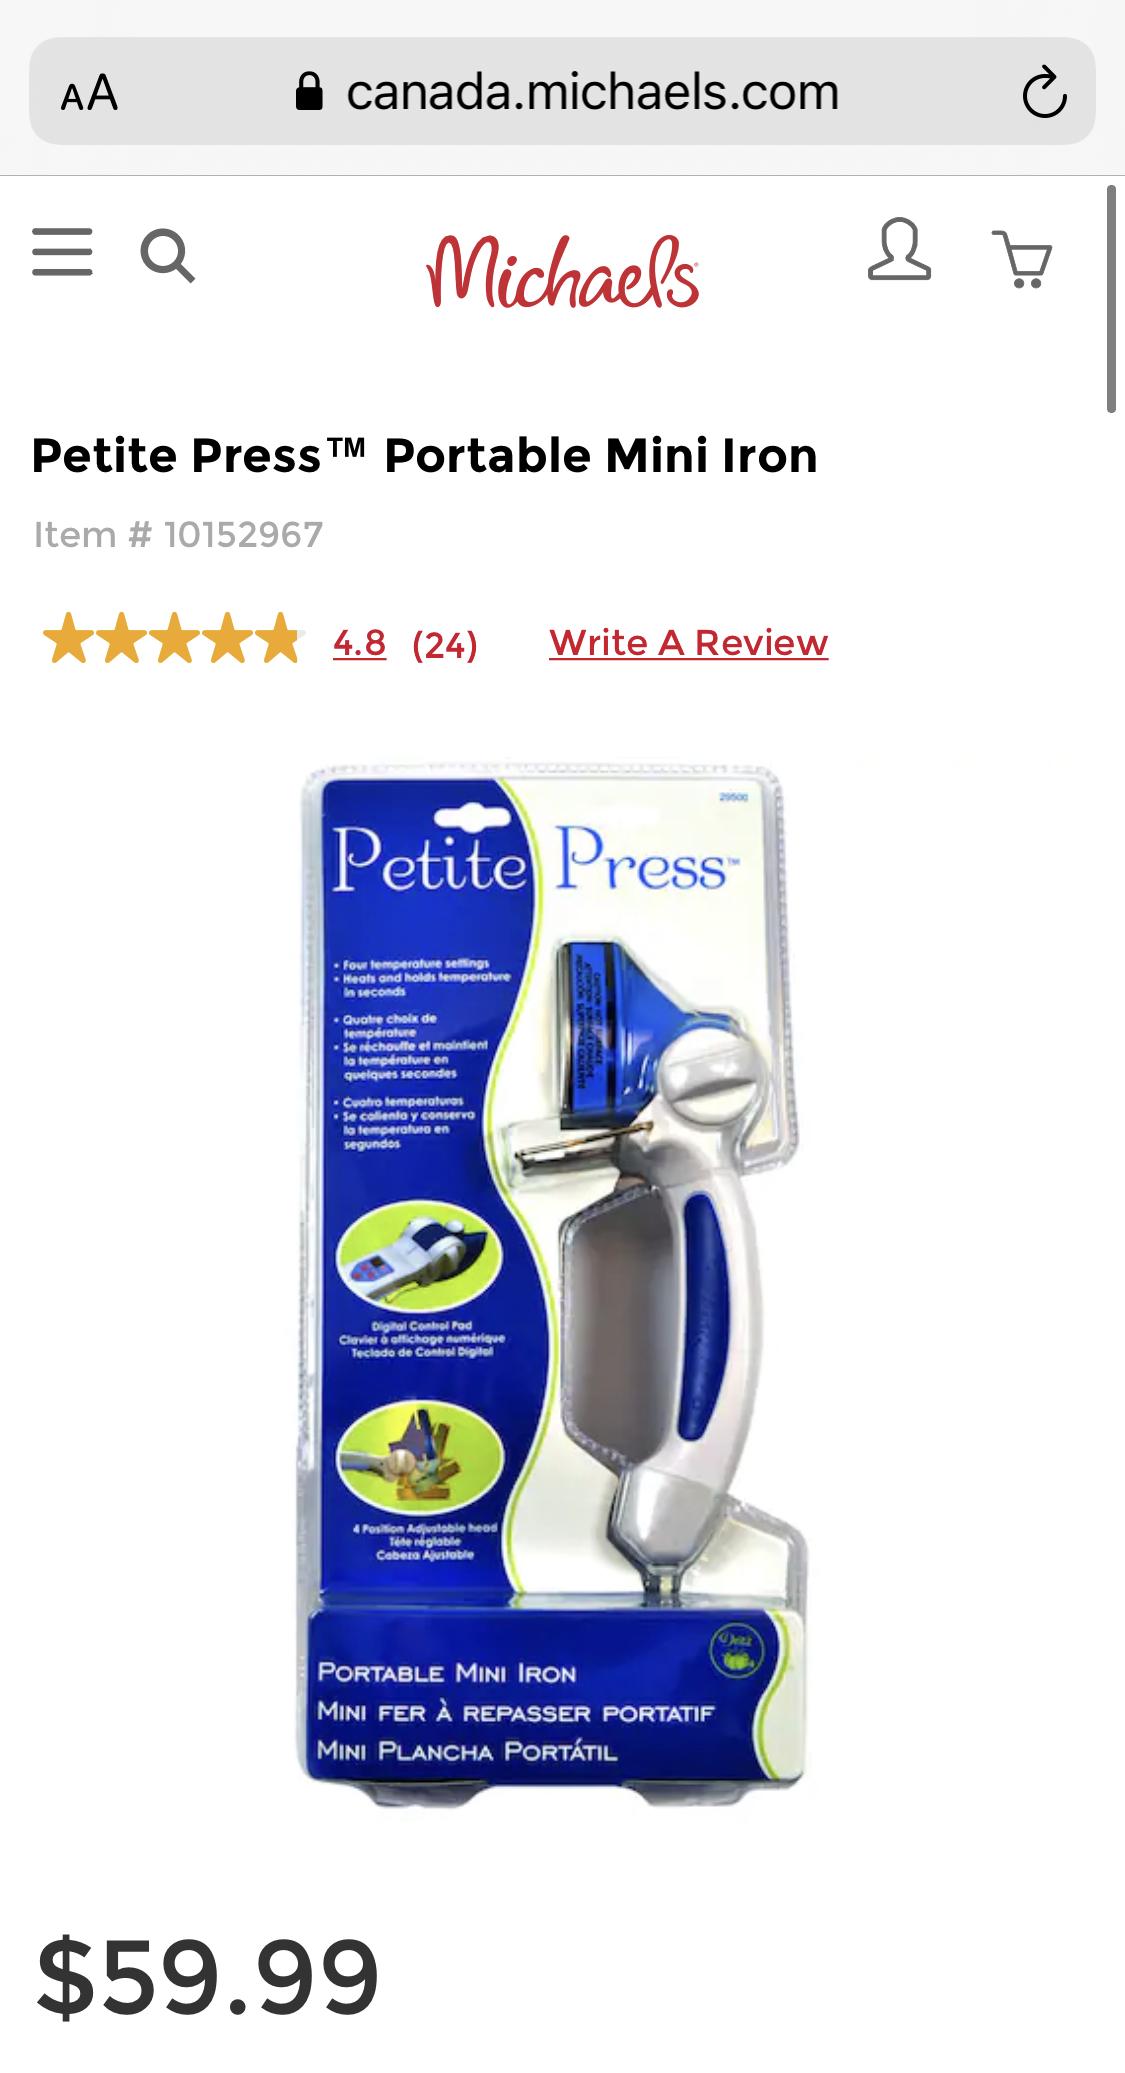
April 10, 2021 at 4:40 pm #14157BarbaraParticipant
I was at Fabricland the other day and did a double take when I saw a mini iron – looked like the widths of the packraft seams, already had the bottom perfectly flat, and is available in Canada. Kinda wish I had this when I did my Skeena (I used an Aliexpress iron that I sanded down). I have no idea if it works, but reports on it look pretty good. Available at Fabricland (over $140 CDN), Michaels ($59 CDN), and Amazon (currently $54 CDN). Search for “Petite Press Portable Iron”.
-
April 10, 2021 at 6:13 pm #14160BruceParticipant
Barbara,
I have used one of the Petite Press irons. They have a pretty weak handle that prevents using much pressure to seal the seam, and they are low wattage, if I recall it is a 40 watt iron. It’s owner found it very slow to bring a seam up to temperature and seal. He gave up and got a model aircraft iron.
As others have noted, the 165 watt model aircraft irons have been in very short supply. Perhaps R/C enthusiasts are all building drones, and no one heat seals light fabric onto model aircraft?? Who knows. At this instant, RC Planet has the Hangar 9 for $19.99. The Hangar 9 irons I have did not require internal adjustment of the thermocouple. They just need to have the sides ground to a nice 1 cm flat usable surface, and I like to grind a clipped nose I can tip upside down and get into folded or overlapping seams. Grinder, file, and/or sandpaper is all you need. I really like the amount of heat, and the ability to flip it from side to side and have a fresh hot surface. Use your infrared digital thermometer to make sure it stays between 205 and 225 degrees.
I agree with Matt that the Ali express adjustable, 150 watt, leather irons are the best and most available. The hard part is finding the key search words. I googled “Ali express leather iron” a couple minutes ago and was given several choices, including one for under $10 with free shipping. They are normally $21 to 35. I bought simple white plastic plug adapters. Matt opens them up and simply rewires them to a 120 plug, I’ll do the same – one of these days. I then paint the sides with High Temperature Flat Black Stove paint. This allows me to check the temperature with an infrared thermometer. Alas IR thermometers can’t read bright shiny reflective surfaces. I tape the temperature dial to keep it from getting bumped. And I recheck the iron temp frequently. These can get way to hot! The upturned tip is really nice for tight corners and seams.
Hope this helps.
Bruce
-
-
June 11, 2020 at 8:09 am #12435invincibleParticipant
I just had to place a second order from AliExpress for my iron. The first one I ordered two months ago never arrived and was presumably tossed overboard somewhere in the Pacific. Disappointing, as I was hoping to use the rainy spring to assemble my raft. Hopefully the next one arrives in a ‘timely’ fashion ~1 month from now so I can get out at some point this summer!
-
June 11, 2020 at 4:09 am #12432Cedric FParticipant
Hello, posting here because I’m a bit frustrated in my search for heat sealing tool.
I’m in germany and I can’t find any of the solution recommended:
- I can’t find the black baron and it seams out of stock everywhere in US as well
- I can only find the european version of the clover mini (no adjustable heat)
- The only option I found are the jamara’s (but it seems it’s not hot enough) et the prolux (https://www.amazon.de/Prolux-Digital-Thermal-Sealing-stand/dp/B00A24ZDX8/) which only goes to 205c° (I’m afraid it’s a bit low)
- I did order on aliexpress but they cancel my shipping and don’t answer messages
I guess I could try the DIY heat sealing tool or try the air blowing technique but as it is my first raft I would prefer to use a more established method.
Any recommendation from guys in Germany or around who managed to aquire their sealing tool? Sorry if I sound desperate, I’m just impatient to try it out.
-
June 11, 2020 at 8:40 am #12436Matt (Admin)Keymaster
Since the start of the pandemic, I have noticed it is taking much longer for Aliexpress parcels to arrive from China… hopefully this will improve as countries recover.
I’m not sure if this ships from the UK or China, but this appears to be the same type of leather iron, here on Amazon UK: https://www.amazon.co.uk/Aeroplane-Electric-Temperature-Balsawood-LS-YD-01-004/dp/B01IQL41B8/ref=pd_lpo_21_t_1/260-3554036-9543362?_encoding=UTF8&pd_rd_i=B01IQL41B8&pd_rd_r=1af90f39-b92c-4762-a253-169ea47e59eb&pd_rd_w=HG0QT&pd_rd_wg=41tBJ&pf_rd_p=7b8e3b03-1439-4489-abd4-4a138cf4eca6&pf_rd_r=K5J3PYN3S3VY3D011TVH&psc=1&refRID=K5J3PYN3S3VY3D011TVH
-
March 28, 2020 at 3:21 pm #11859rookienewbieParticipant
Is there a difference between finding a china to us travel adapter vs modifying it as Matt has shown for the aliexpress leather iron? It seems easier to just plug to an adapter vs taking it apart. I do not understand electricity well.
Thanks!
-
March 30, 2020 at 8:22 am #11864Matt (Admin)Keymaster
It’s the same – just a bit cheaper to change the plug. Cheers!
-
-
March 13, 2020 at 9:36 am #11790adelorenzoParticipant
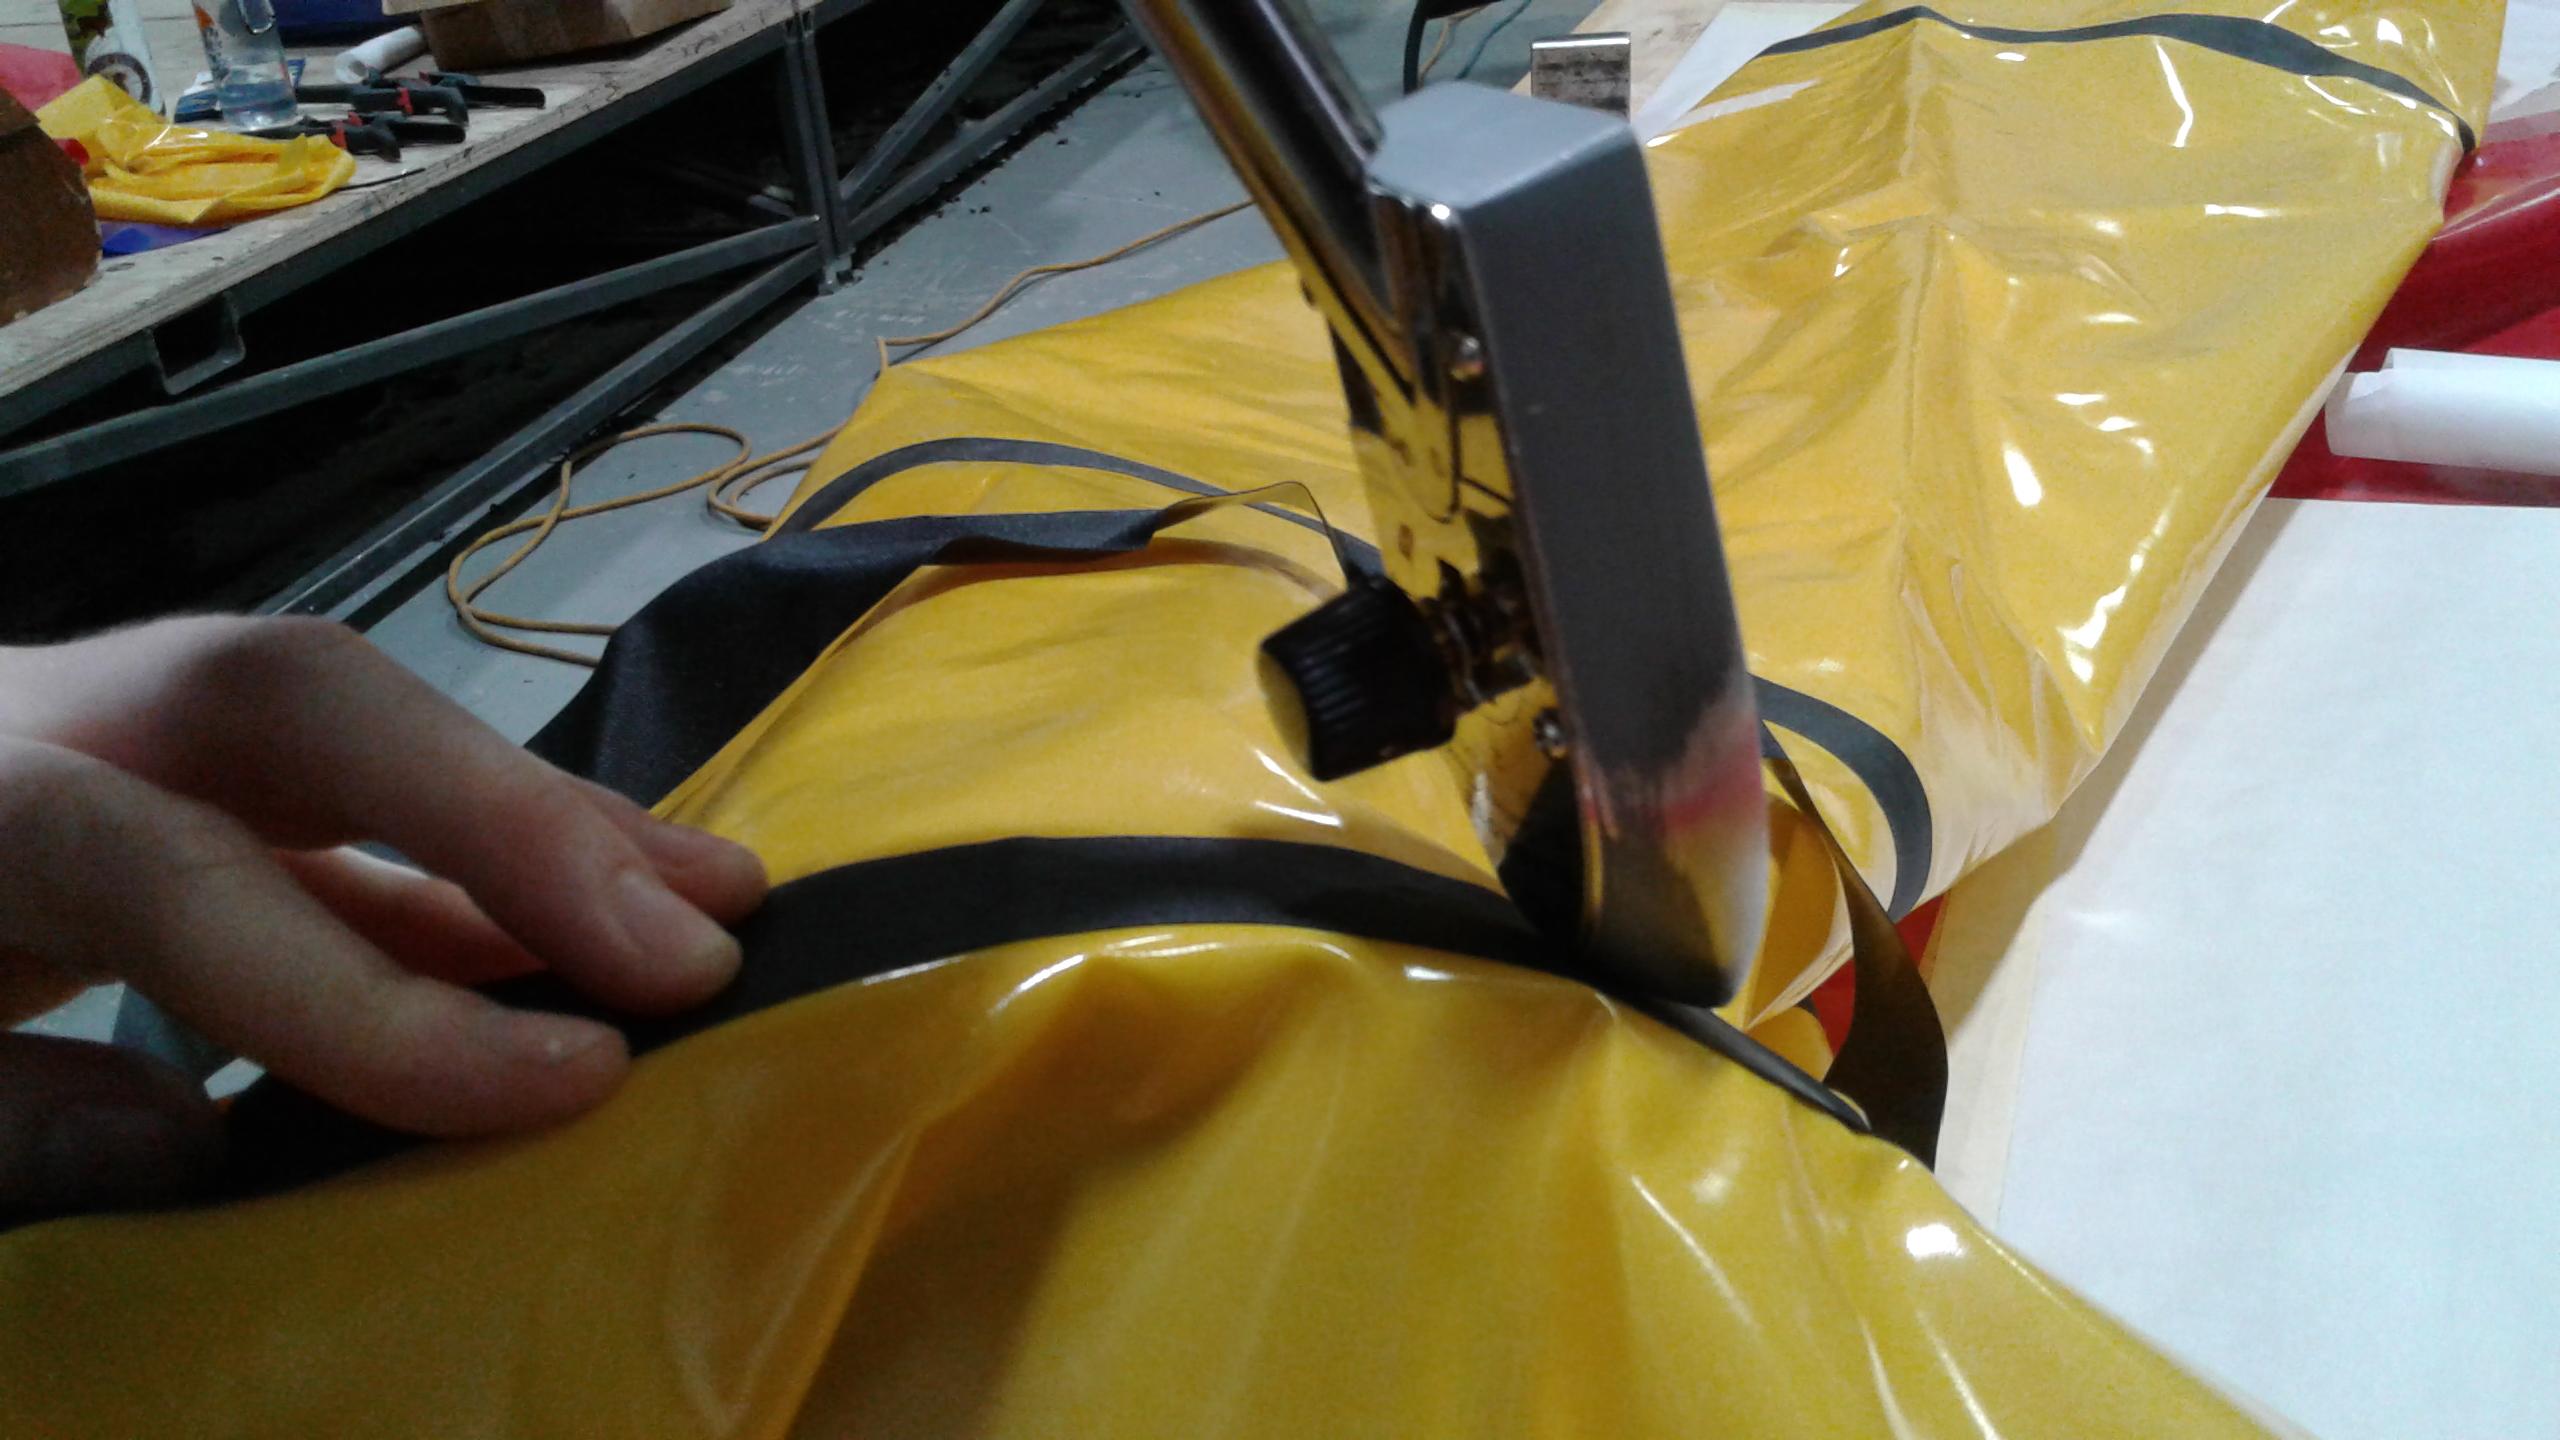
In my photo darkroom I have a Seal tacking iron I use for dry mounting prints. It’s 145W and when it’s set on high it’s working really well for doing the floor welds. The bottom is teflon coated which is nice.
It is a bit too wide for the tube strips. I may be able to make it work but I have an aliexpress iron showing up any day just in case.
I also have a big roll of silicone-coated release paper that works really well for putting underneath when welding.

-
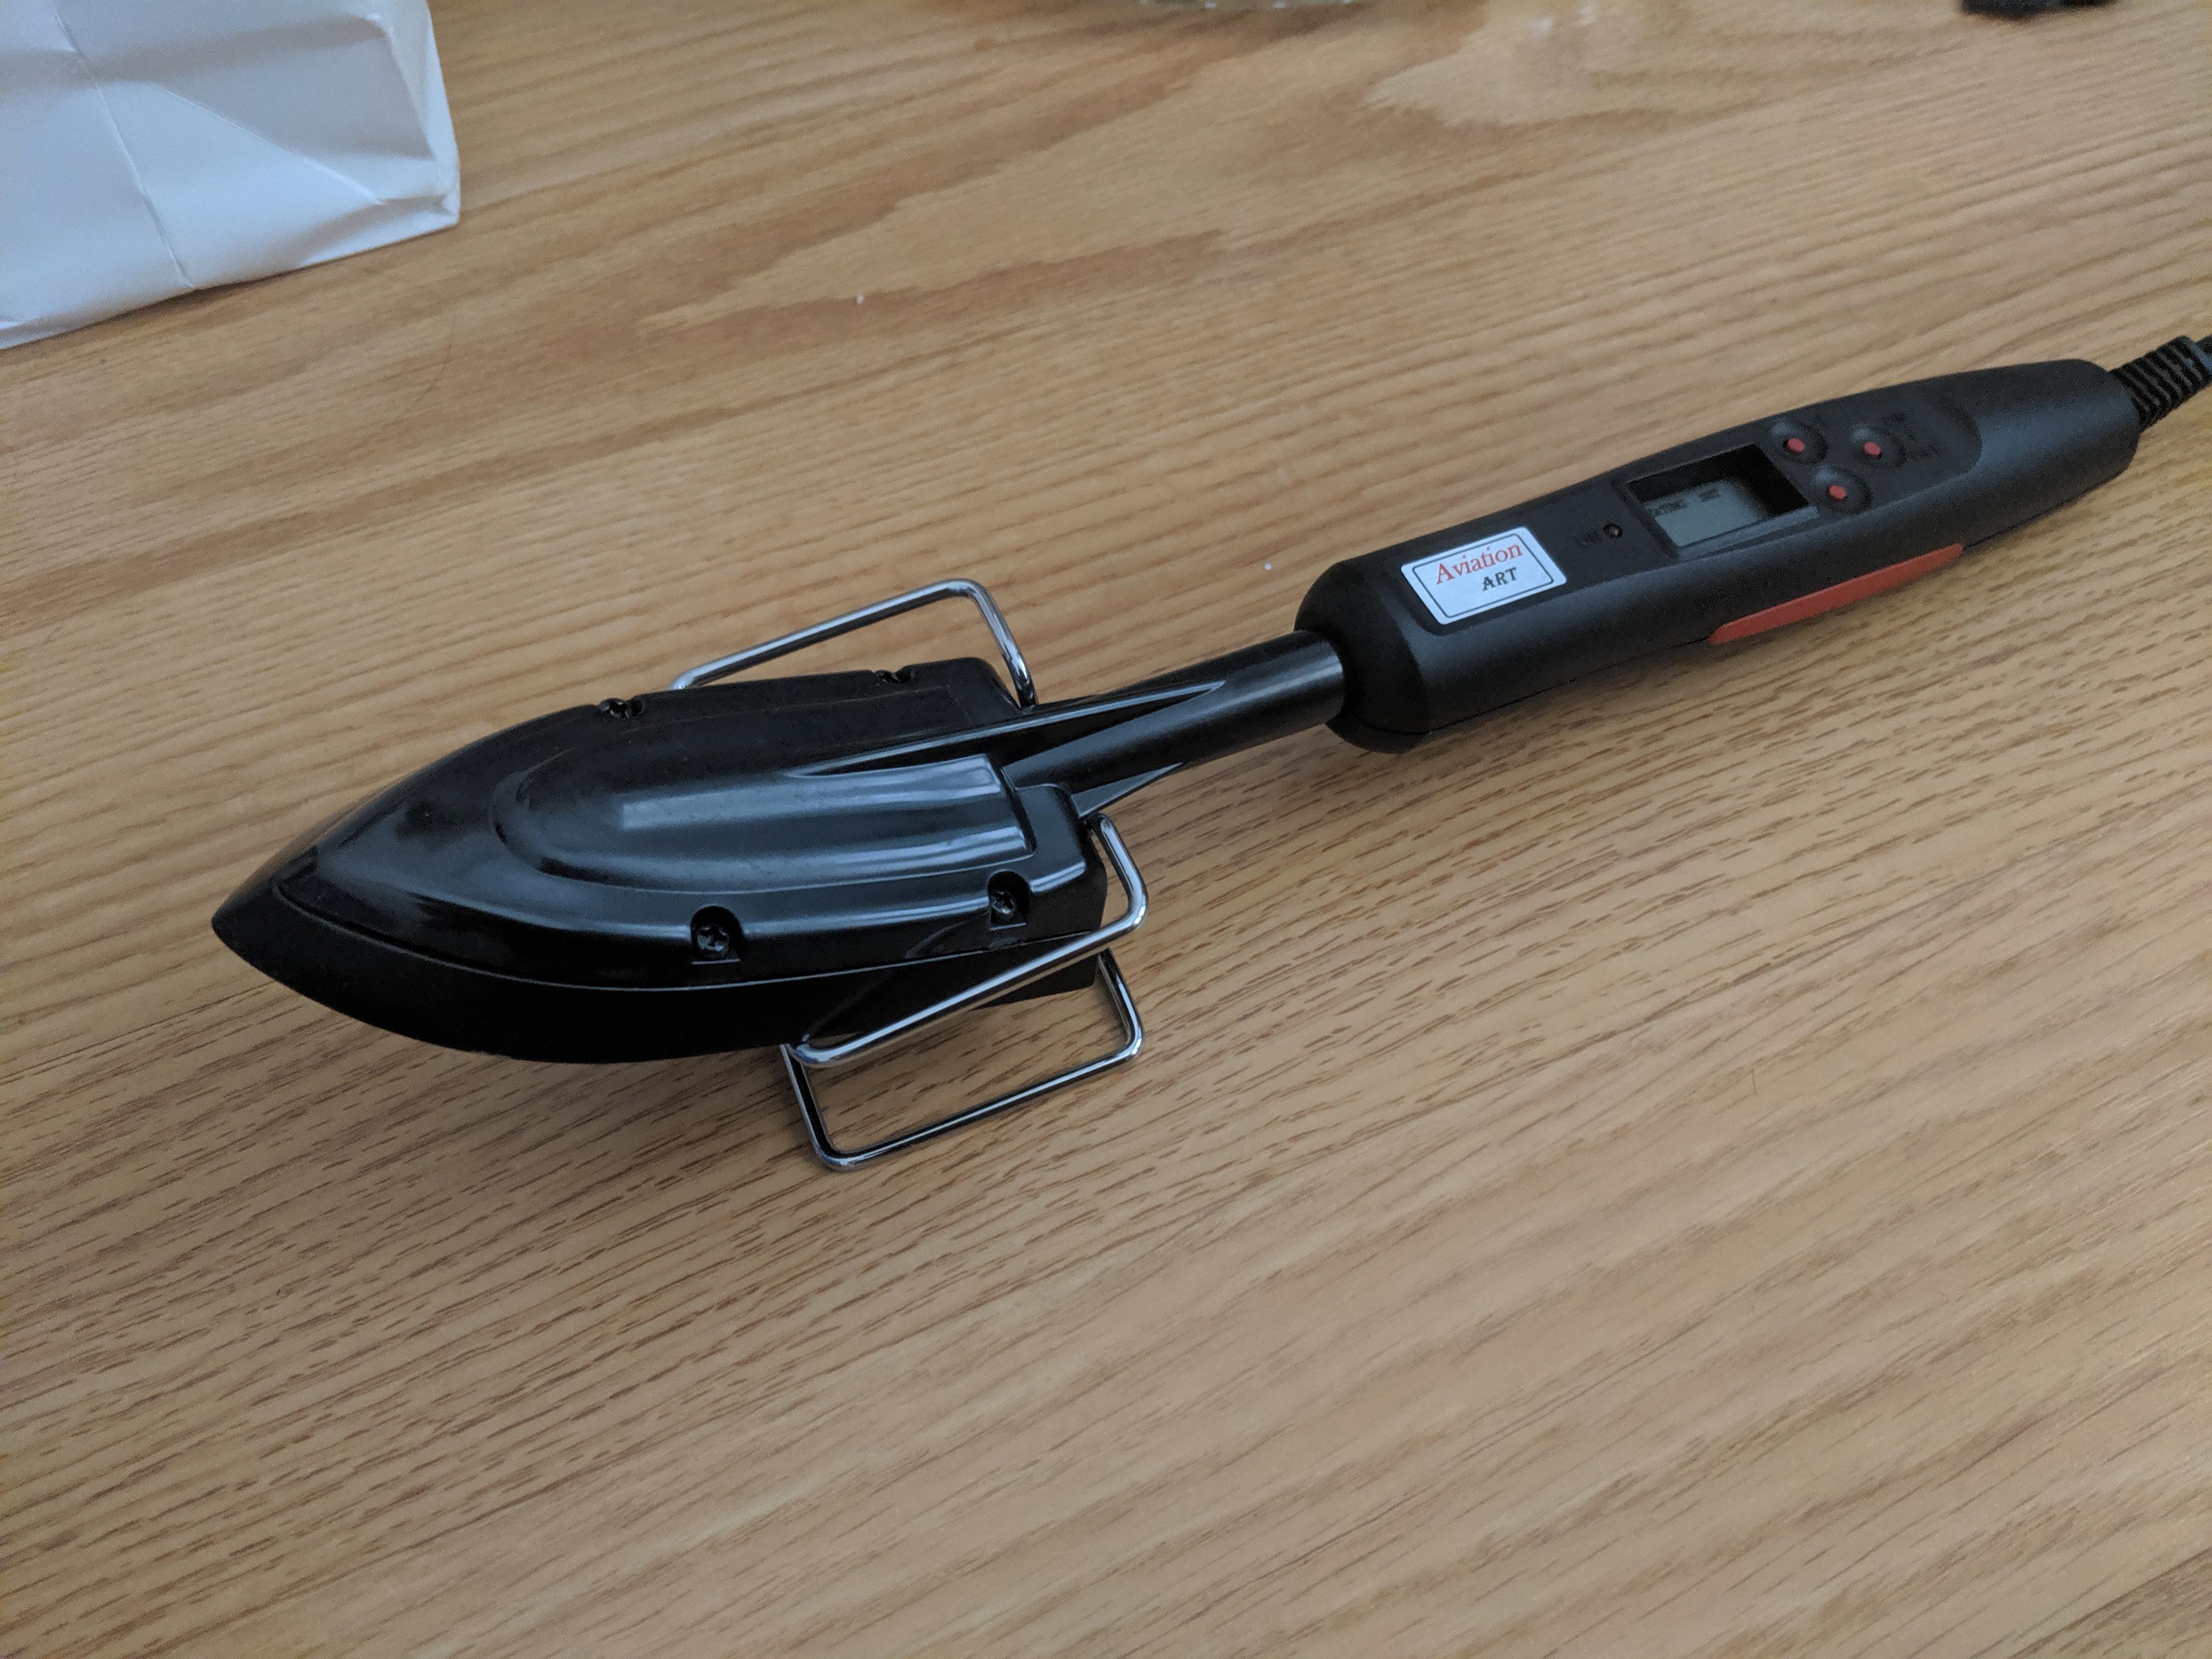
June 2, 2019 at 3:41 pm #10055David OlsenParticipant
I’m a beginner (just practicing welds at this point) so take this all for what it’s worth (nothing) but I picked up the Aviation Art sealing iron from Stewart Systems. Looks like they are selling it for use on full size aircraft, so a bit more money than a model aircraft iron, but still pretty reasonable to me. I think it’s basically a U.S. version of a Prolux sealing iron.
Positives:
- Precise temperature control (+-5C). They are very confident in their calibration, which should take some guesswork out of things, and the box even explains that the center point will be 20-30 degrees hotter than the measurement point. I think this is one case where “do not rely on your iron’s temperature scale” does not apply.
- Sturdy – you can push down with a reasonable amount of force while heating.
Negatives:
- Big – as has been mentioned elsewhere, it’s wider than you really want. The sides of the iron are usable but awkwardly angled upwards. I’ve mostly been using the slight upward slope at the front tip of the iron, but it’s easy to catch and curl other parts of the fabric with the back while doing that, so it might be a good idea to tape things down before you start.
I think I’ve settled on 210 celsius for the 210D nylon. I tried as low as 200C, and it would seal (slowly) but when I tore it apart all the TPU stayed on one side – I think only one side really melted. At 210C I seem to get a nice strong weld, it kind of frays the nylon on both sides if I can manage to get it pulled apart. I think higher temperatures would work (it maxes out at 220) but I felt rushed when I tried it – I want to go slowly and carefully, at least for now.
I’ll have to see how manageable it is in tight corners, but irons seem hard to find so I hope this proves a reasonable option.
-
April 18, 2019 at 5:18 pm #9458jlrose09Participant
Hey Matt,
So I can’t find a Coverite Black Baron for sale anywhere. Any suggestions on which iron to go for? Do you think this hot air welding is worth pursuing? The closest looking thing I could find is the Hangar Nine but upon purchase I was unable to remove all of the electronics (without destroying the device) in order to modify the shoe for better construction. I just ordered a V3 kit which I’m excited about, but I can’t seem to find the right tools for the job. What do you think?
Best,
Jacob
-
April 18, 2019 at 6:12 pm #9459Matt (Admin)Keymaster
The iron I’ve been using lately is the leather iron from Alibaba.com. It requires some modification, but it’s better than the Black Baron because it’s narrower (more info here: https://www.diypackraft.com/construction/tools/ ). I see they’re also selling them on Amazon now too: https://www.amazon.com/Dancing-Wings-Hobby-Temperature-LS-YD-01-004/dp/B01IQL3VBE/ref=sr_1_fkmrnull_1?keywords=RC+Airplane+Electric+Iron+Temperature+control+Iron+RC+Aircraft+Covering+Tools+Iron+for+Balsawood+Model&qid=1555636184&s=gateway&sr=8-1-fkmrnull
If you haven’t returned it, you might be able to modify the Hangar 9 iron without removing the electronics… I don’t have experience with that iron though, so I’m not sure how easy that would be. If you give it a try, please let us know!
-
-
April 14, 2019 at 7:58 am #9402naasParticipant
We made a video describing how to use a hot air soldering station to weld TPU nylon:
-
February 5, 2018 at 12:37 am #5382BruceParticipant
Modify your Model Aircraft Iron for optimum performance building a packraft.
Model Aircraft irons generate heat fast. They have the strength to press firmly on the melted TPU and seal a seam. I got mine at a great price. (https://www.towerhobbies.com/cgi-bin/wti0001p?&I=LXB357&P=0). But the shape leaves much to be desired.
The bottom is too flat, too wide, the sides have too steep a taper, and the tip is too round. So I reshaped one, Confession: the moral effort was huge – taking a file to a brand new tool was really hard. But it was so successful I can unconditionally recommend the effort. Wow, this simple reshaping makes it a really great tool for building packrafts!
(Disclosure: I teach classes thru Folk School Fairbanks, and we are approaching 30 DIY Packrafts, solely due to DIY’s fantastic product.)

As purchased the bottom is flat so you must use it all at full width or none. The tip is too pointy to be of any use and the sides are too rounded to be of much value.
Goal: Flatten the tip to 10 mm. Round the bottom from 25 mm to 10 mm. Establish a 90 degree flat side about 10 mm wide.
Photo 1 flattening the tip of a Top Flight iron. Note: I recommend removing the heating elements first.
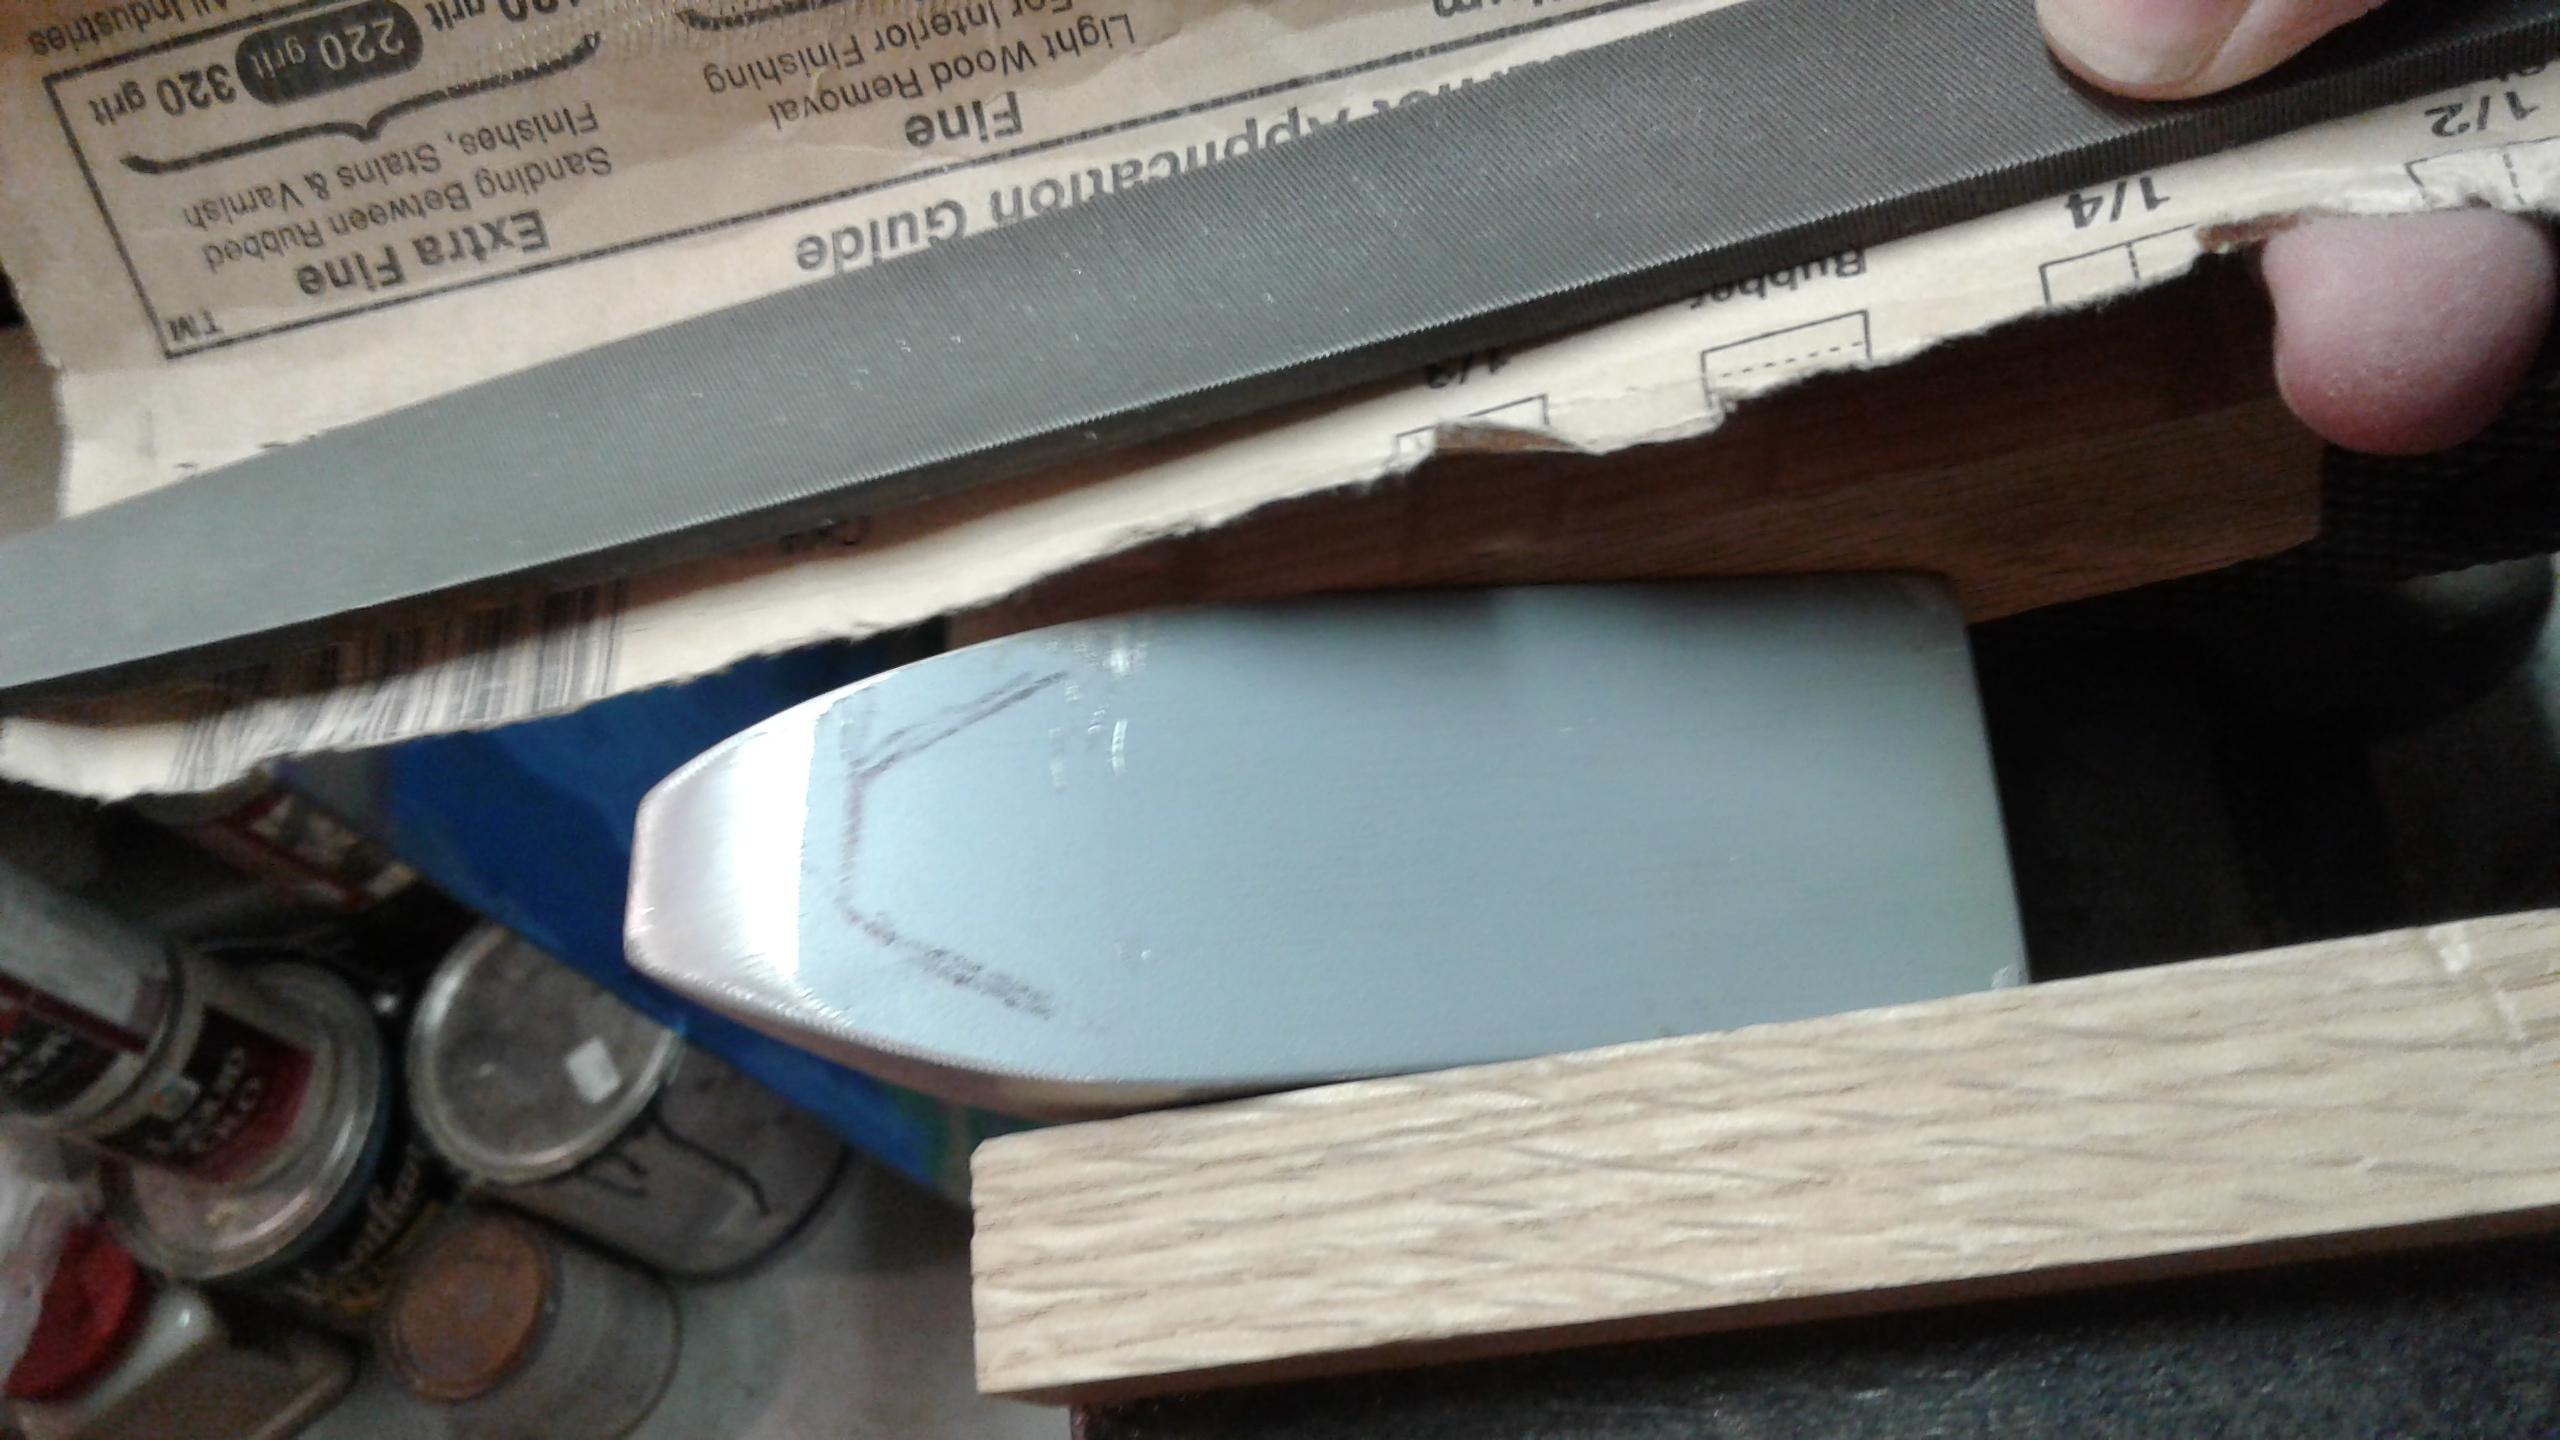
Round the bottom beyond the internal hollow (outlined with marker).
You can see the flattened sides on a Coverite, Flattened at 90 degrees to the bottom. You can also see the front of the bottom is rounded up. Iron has been reassembled.
Flattened side working the edge of a zipper installation. Note again the rounded bottom and blunt tip. The blunt tip is great working the ends of the seam tape!
Flattened tip working along a seam. Yes, this is a V2 being assembled in V3 sequence!
Flattened side working on the inside of a seam. Flattening the side at 90 degrees to the bottom prevents touching the top plate on the iron. Also note the bare aluminum showing where the bottom was rounded.
Rounding the forward end of the iron allows one to use just the tip, without having the full width of the iron in contact. After flattening the sides, I found I could round the Coverite from about 25 mm in width to 10 mm at the tip. The 10 mm blunt tip is really handy.
And yes, after using a file for the first, I had the moral incentive to use my grinder with an aluminum disc for the second and third. Faster, but you will still need to smooth it with a file, 220 grit sand paper, and extra fine steel wool. Then rub it on a scrap piece of fabric to be sure it is polished enough and won’t leave aluminum rubbings darkening your fabric!
Reducing the amount of aluminum in these irons improves the heat transfer. The 165 watt heating element seems to heat even faster. Having both sides flattened allows one to flop the iron over if one side is cooling too fast. (Not as common as it is with a Clover. It is possible to get overconfident, having vast amounts of heat, and still go too fast down a seam.)
I hope this is helpful.
Bruce, Fairbanks, Alaska
P.S.: I have both Top Flight and Coverite model aircraft irons. Matt is right, the Coverite is the better iron. It has a solid handle, while the Top Flight is spot welded. The Coverite thermostat looks better and the heating element is internally screwed to the base. And I got the Coverite for less than the Top Flight. Oh, and if you are worried about totally messing up your base, Tower Models sells a replacement base for about $7.
-
September 6, 2018 at 4:21 am #7012Andrew DutcherParticipant
Bruce, do you recommend the (reshaped) coverite or the JingdaLeather iron? I see you posted about both. Since the iron performance seems to be the difference between a good and poor quality raft (well, and patience while fabricating), I really want to get an iron that works well. Thanks!
-
September 8, 2018 at 5:16 am #7017Lyn St GeorgeParticipant
@Andrew. Bruce has posted some excellent reports on irons and I would consider his opinion definitive. You might also want to consider hot air guns, though not the one I reported on some months ago – this is one of many cheaper tools that don’t regulate the temperature and should not be considered.
Of the three ranges that Steinell make, their professional range is aimed at people repairing car bodies and the like. They all regulate the temperature properly, are light and quiet with durable ceramic heaters, and one has a display allowing you to monitor both the temperature and air flow at any time.
These are only a third of the cost of a Leister or Seivert barrel-grip gun, and have nozzles for other jobs like thawing frozen pipes, soldering new pipes, stripping paint, lighting a BBQ, fixing your kids’ broken toys etc etc. So there are many ways to justify the cost.
I see two benefits to hot air: 1/ it heats the coating with only residual heat getting into the fabric, thus reducing heat stress. 2/ it heats the coating uniformly – where an iron may make patchy contact on curves or an uneven former and leave colder spots that may be poorly welded, hot air will be consistent over the whole target surface.
Just a thought.
-
-
February 5, 2018 at 3:36 pm #5386Matt (Admin)Keymaster
This is outstanding, Bruce! I never thought to file the iron to the shape I want. If it’s alright with you, I’d like to post this under the How-To menu (with full credit to you) so it won’t get buried in the forum over time. Thanks for posting!
-
-
December 20, 2017 at 4:05 pm #5164jonwParticipant
I couldn’t find a small sturdy iron in Sydney Australia and I didn’t want to buy one online without seeing it first as they all looked way too big, so I built this one out of a $15 hair straightener. It was a 40-watt hair straightener and I used the heating elements from both sides of the straightener in the iron. The dial adjusts to 230°C and it seals well when set to 215°C. I’ve tested a few seams and it seems to be quite capable of doing the job easily. Now, at long last, I can start building my raft! I’ll briefly describe how I built it but if anyone is interested I can add more detail.
The flat heating elements inside the straightener are two flat ceramic bars 10mm x 2mm x 40mm arranged in a long strip between two conductive strips, and wrapped in an insulating tape. I took these apart and re-arranged the elements side by side (still in parallel) to be more the shape I wanted (20mm x 40mm) and re-wrapped them with a high temp tape called Kapton (often used in 3d printing). The images below shows only one of the two elements. The blue wired strip on top is part of thermal control.
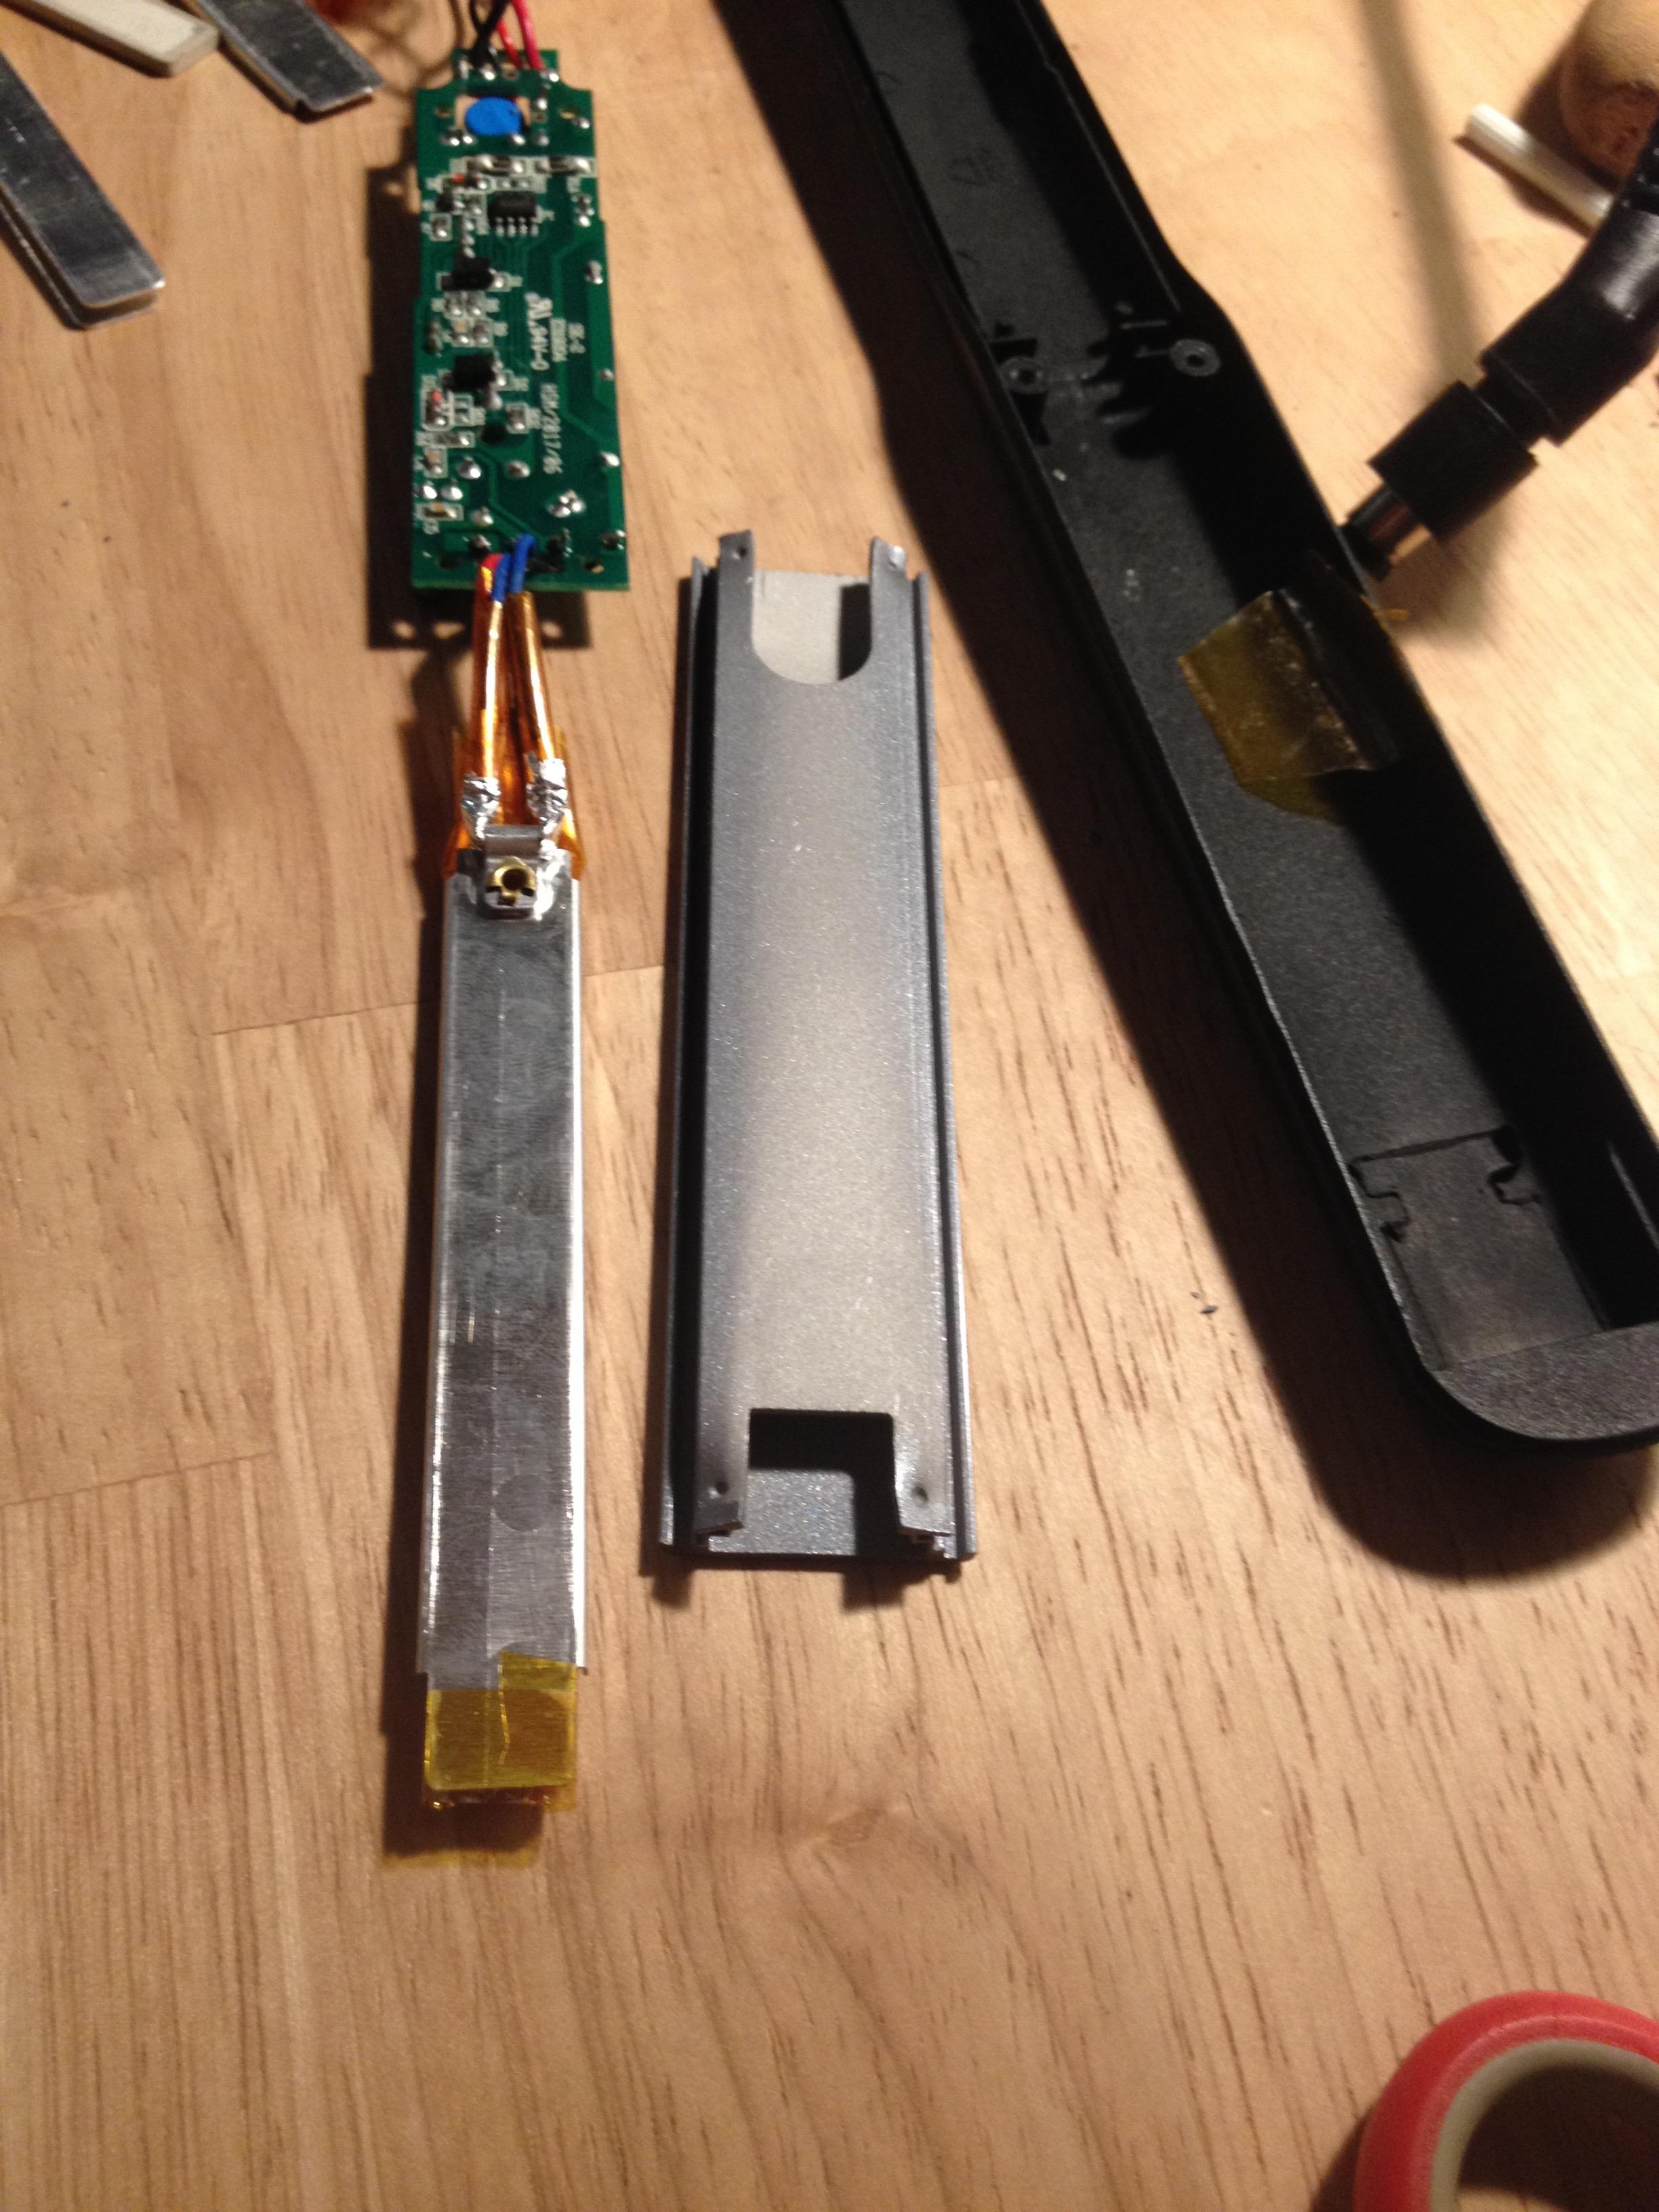
Re-wrapped element and thermal control strip:
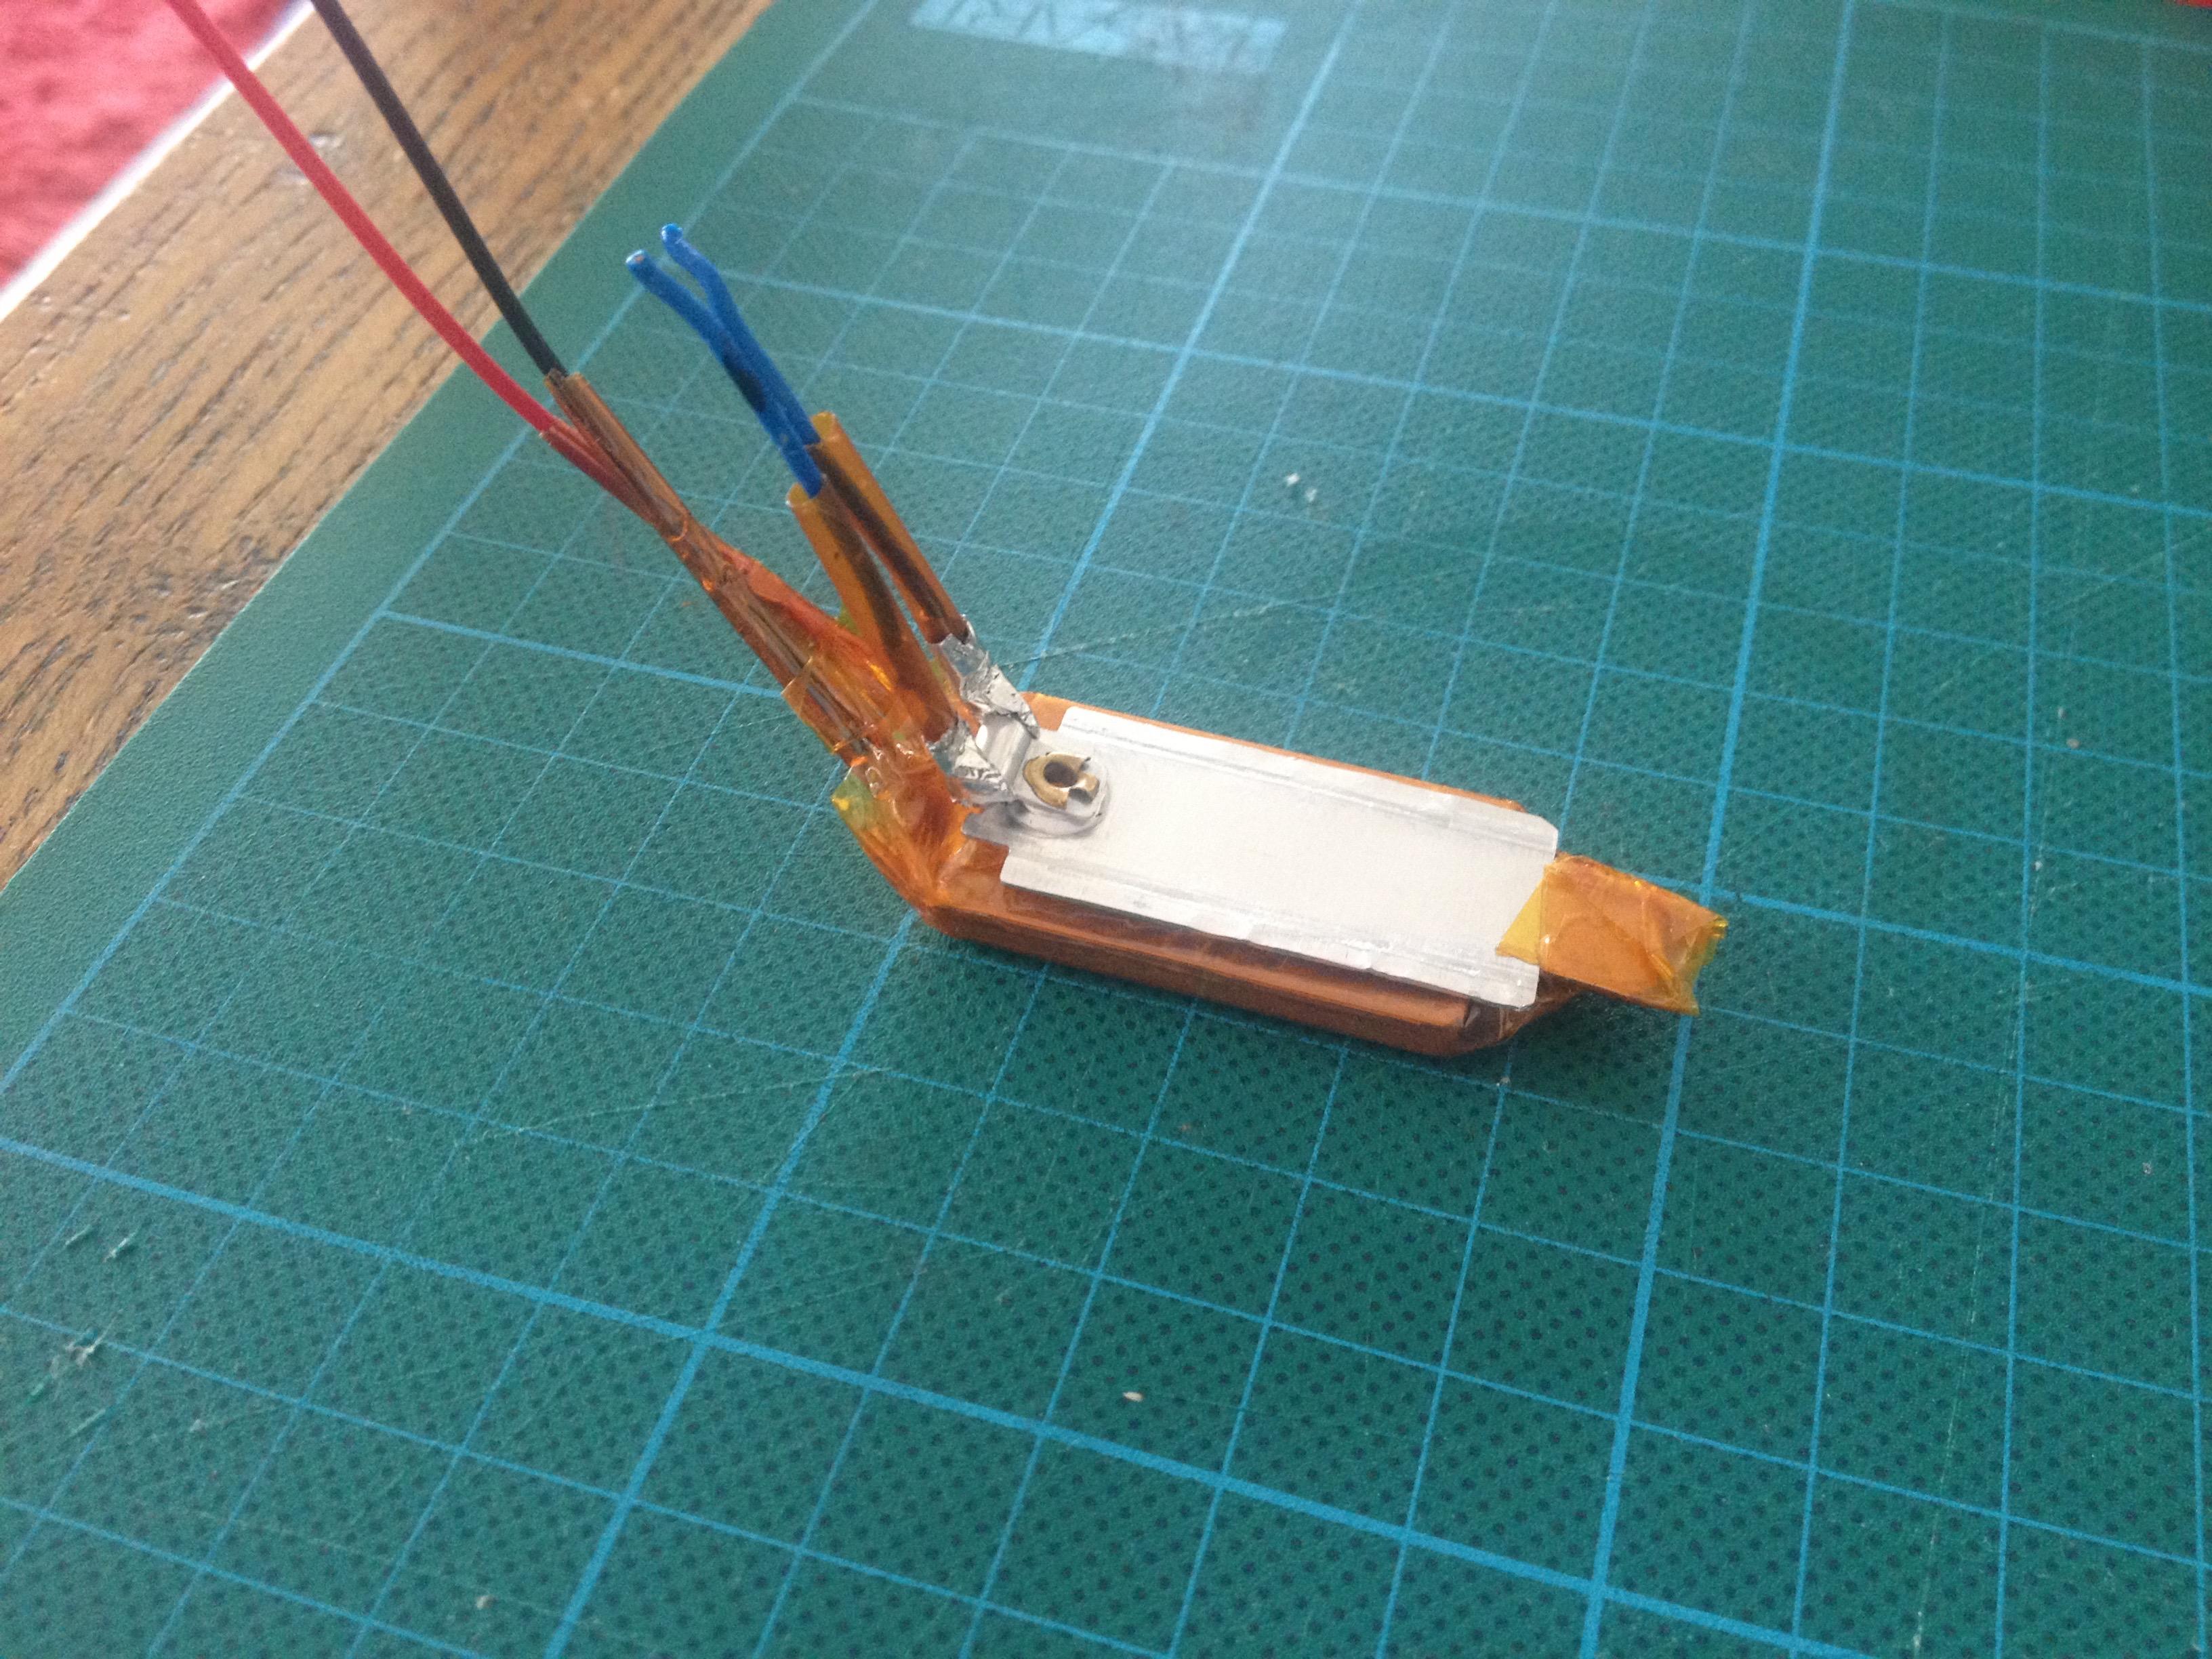
I set the elements up in a foot I built out of brass pieces from a brass door hinge silver soldered together. There are 6 pieces to form the foot, and filed and sanded to shape and smooth the outside. If you look closely at the pics you can see some of the joints to get an idea how it went together. The stainless stem and foot top was a nightmare trying to braze them together but I got there in the end. The wooden handle was shaped out of hardwood, hollowed out and the dial inserted.
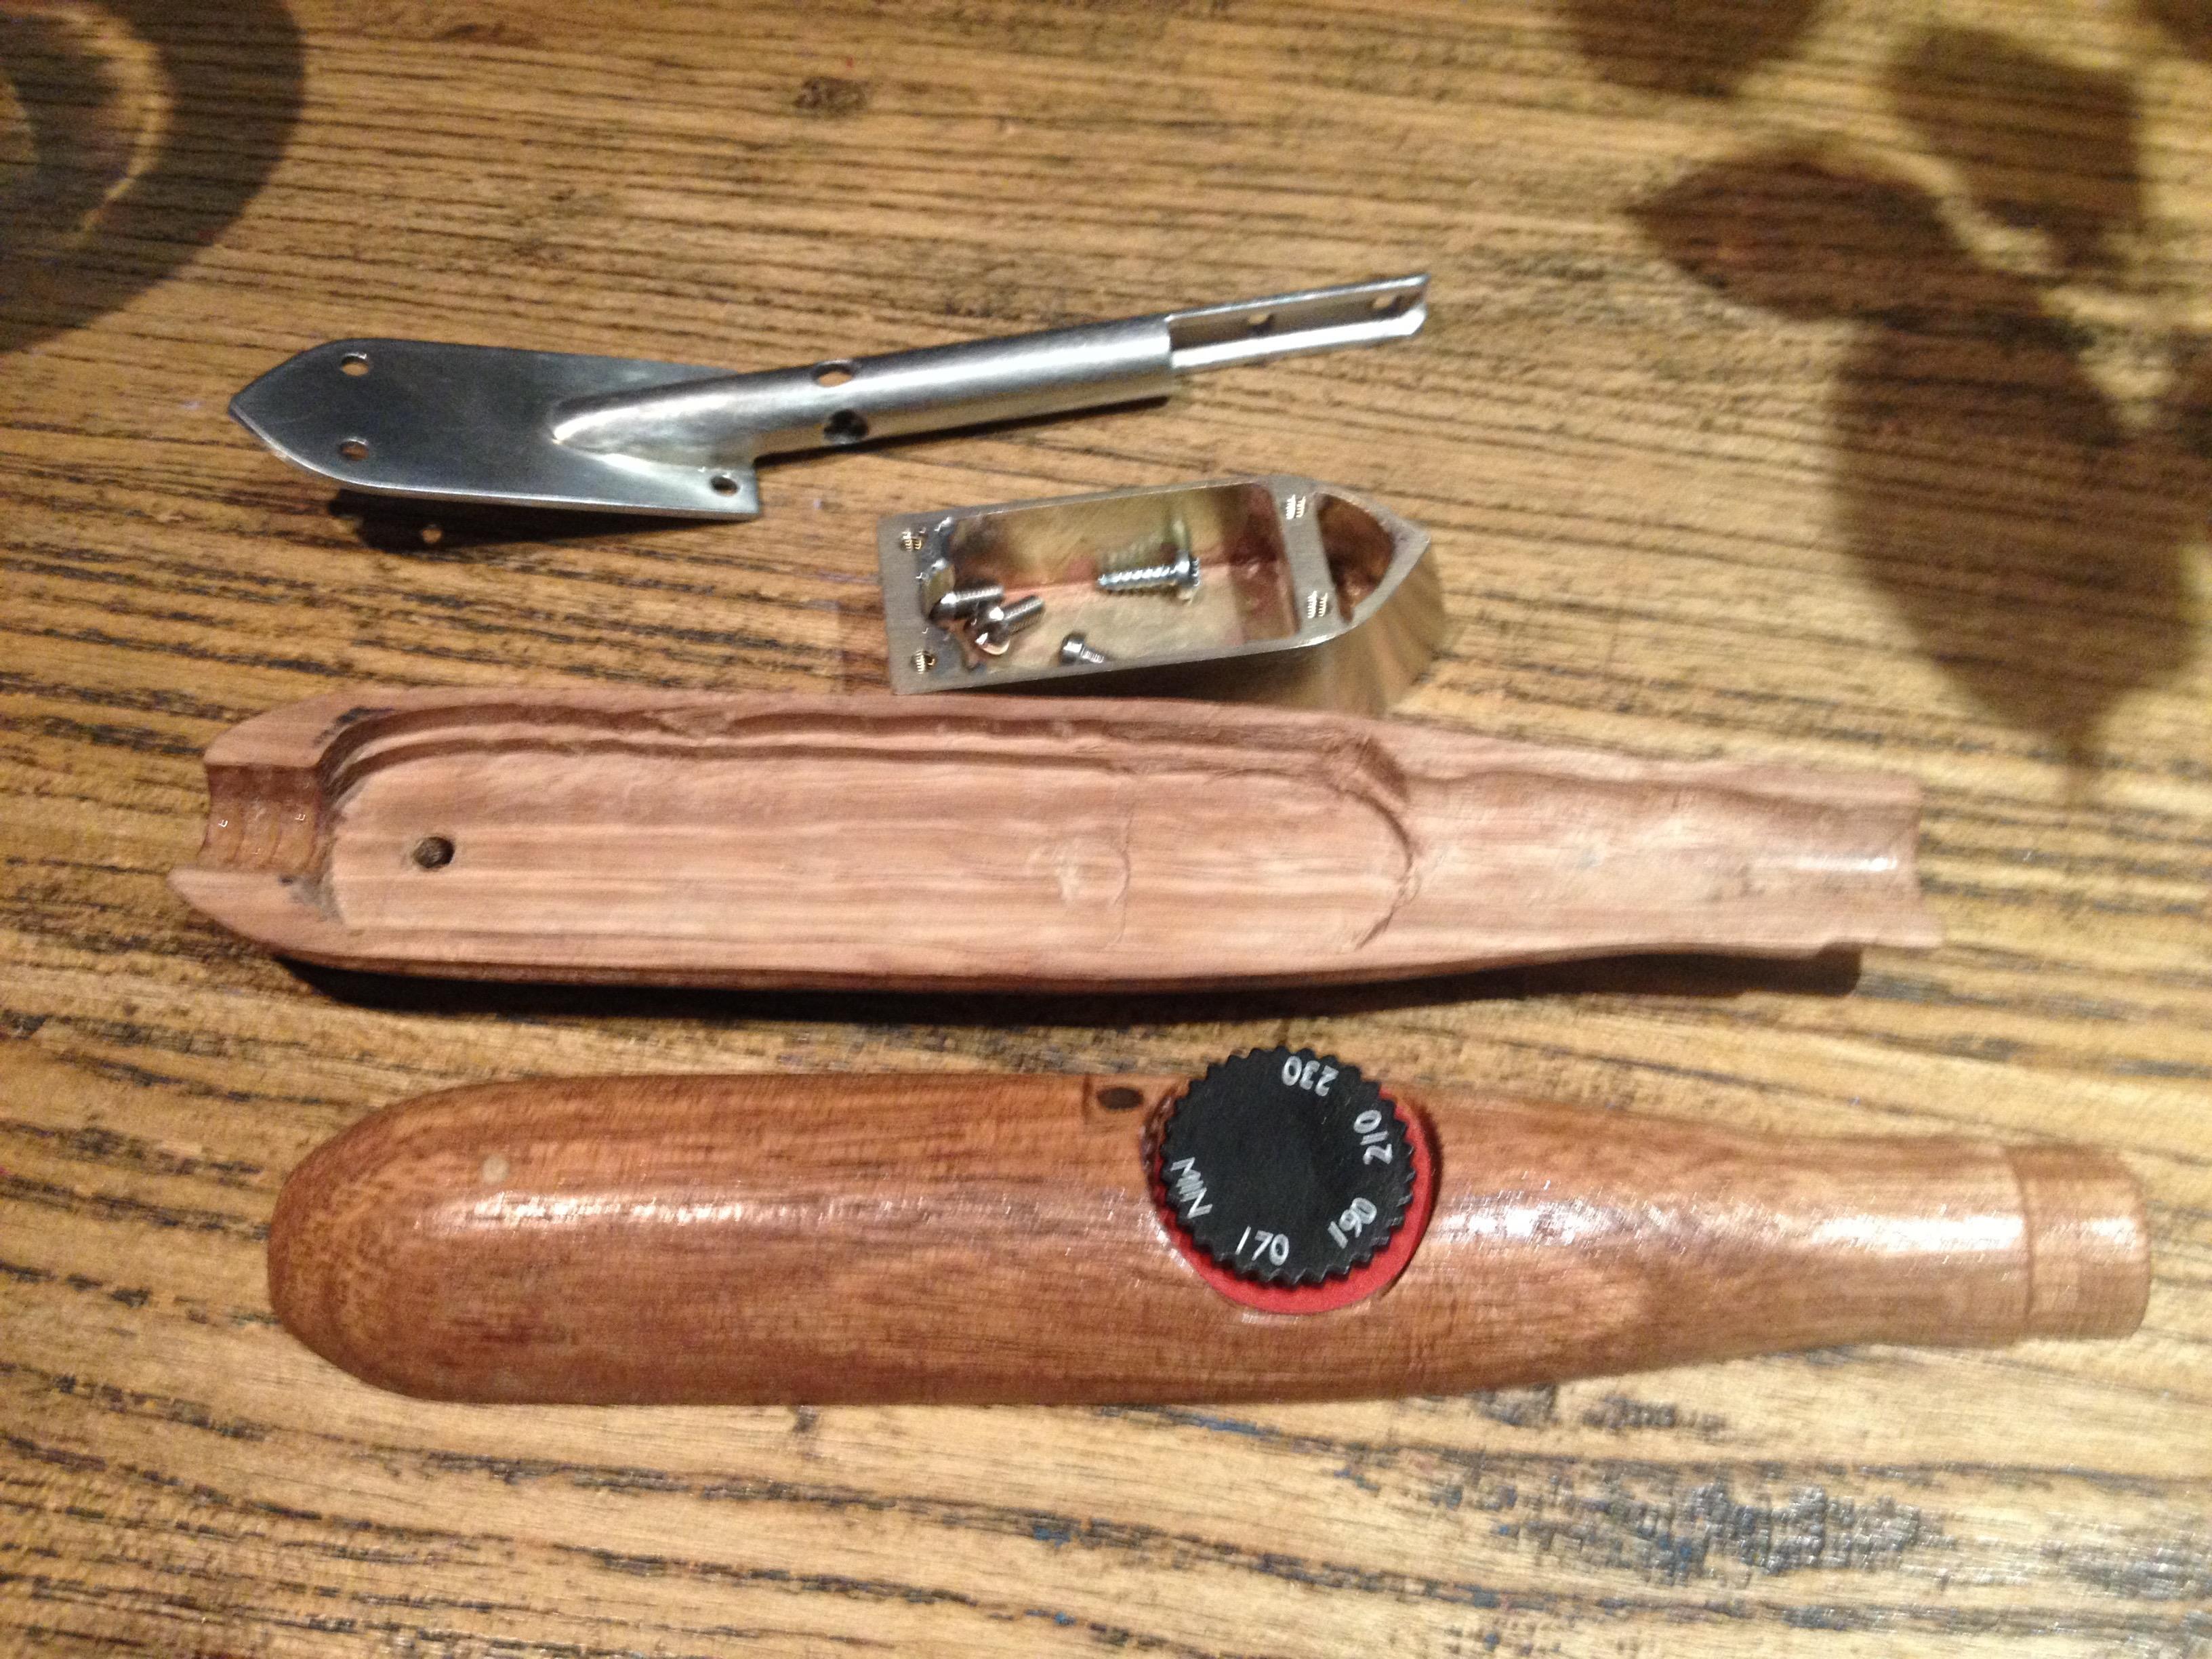
The foot assembled. Note the top doesn’t overlap the sides Matt.
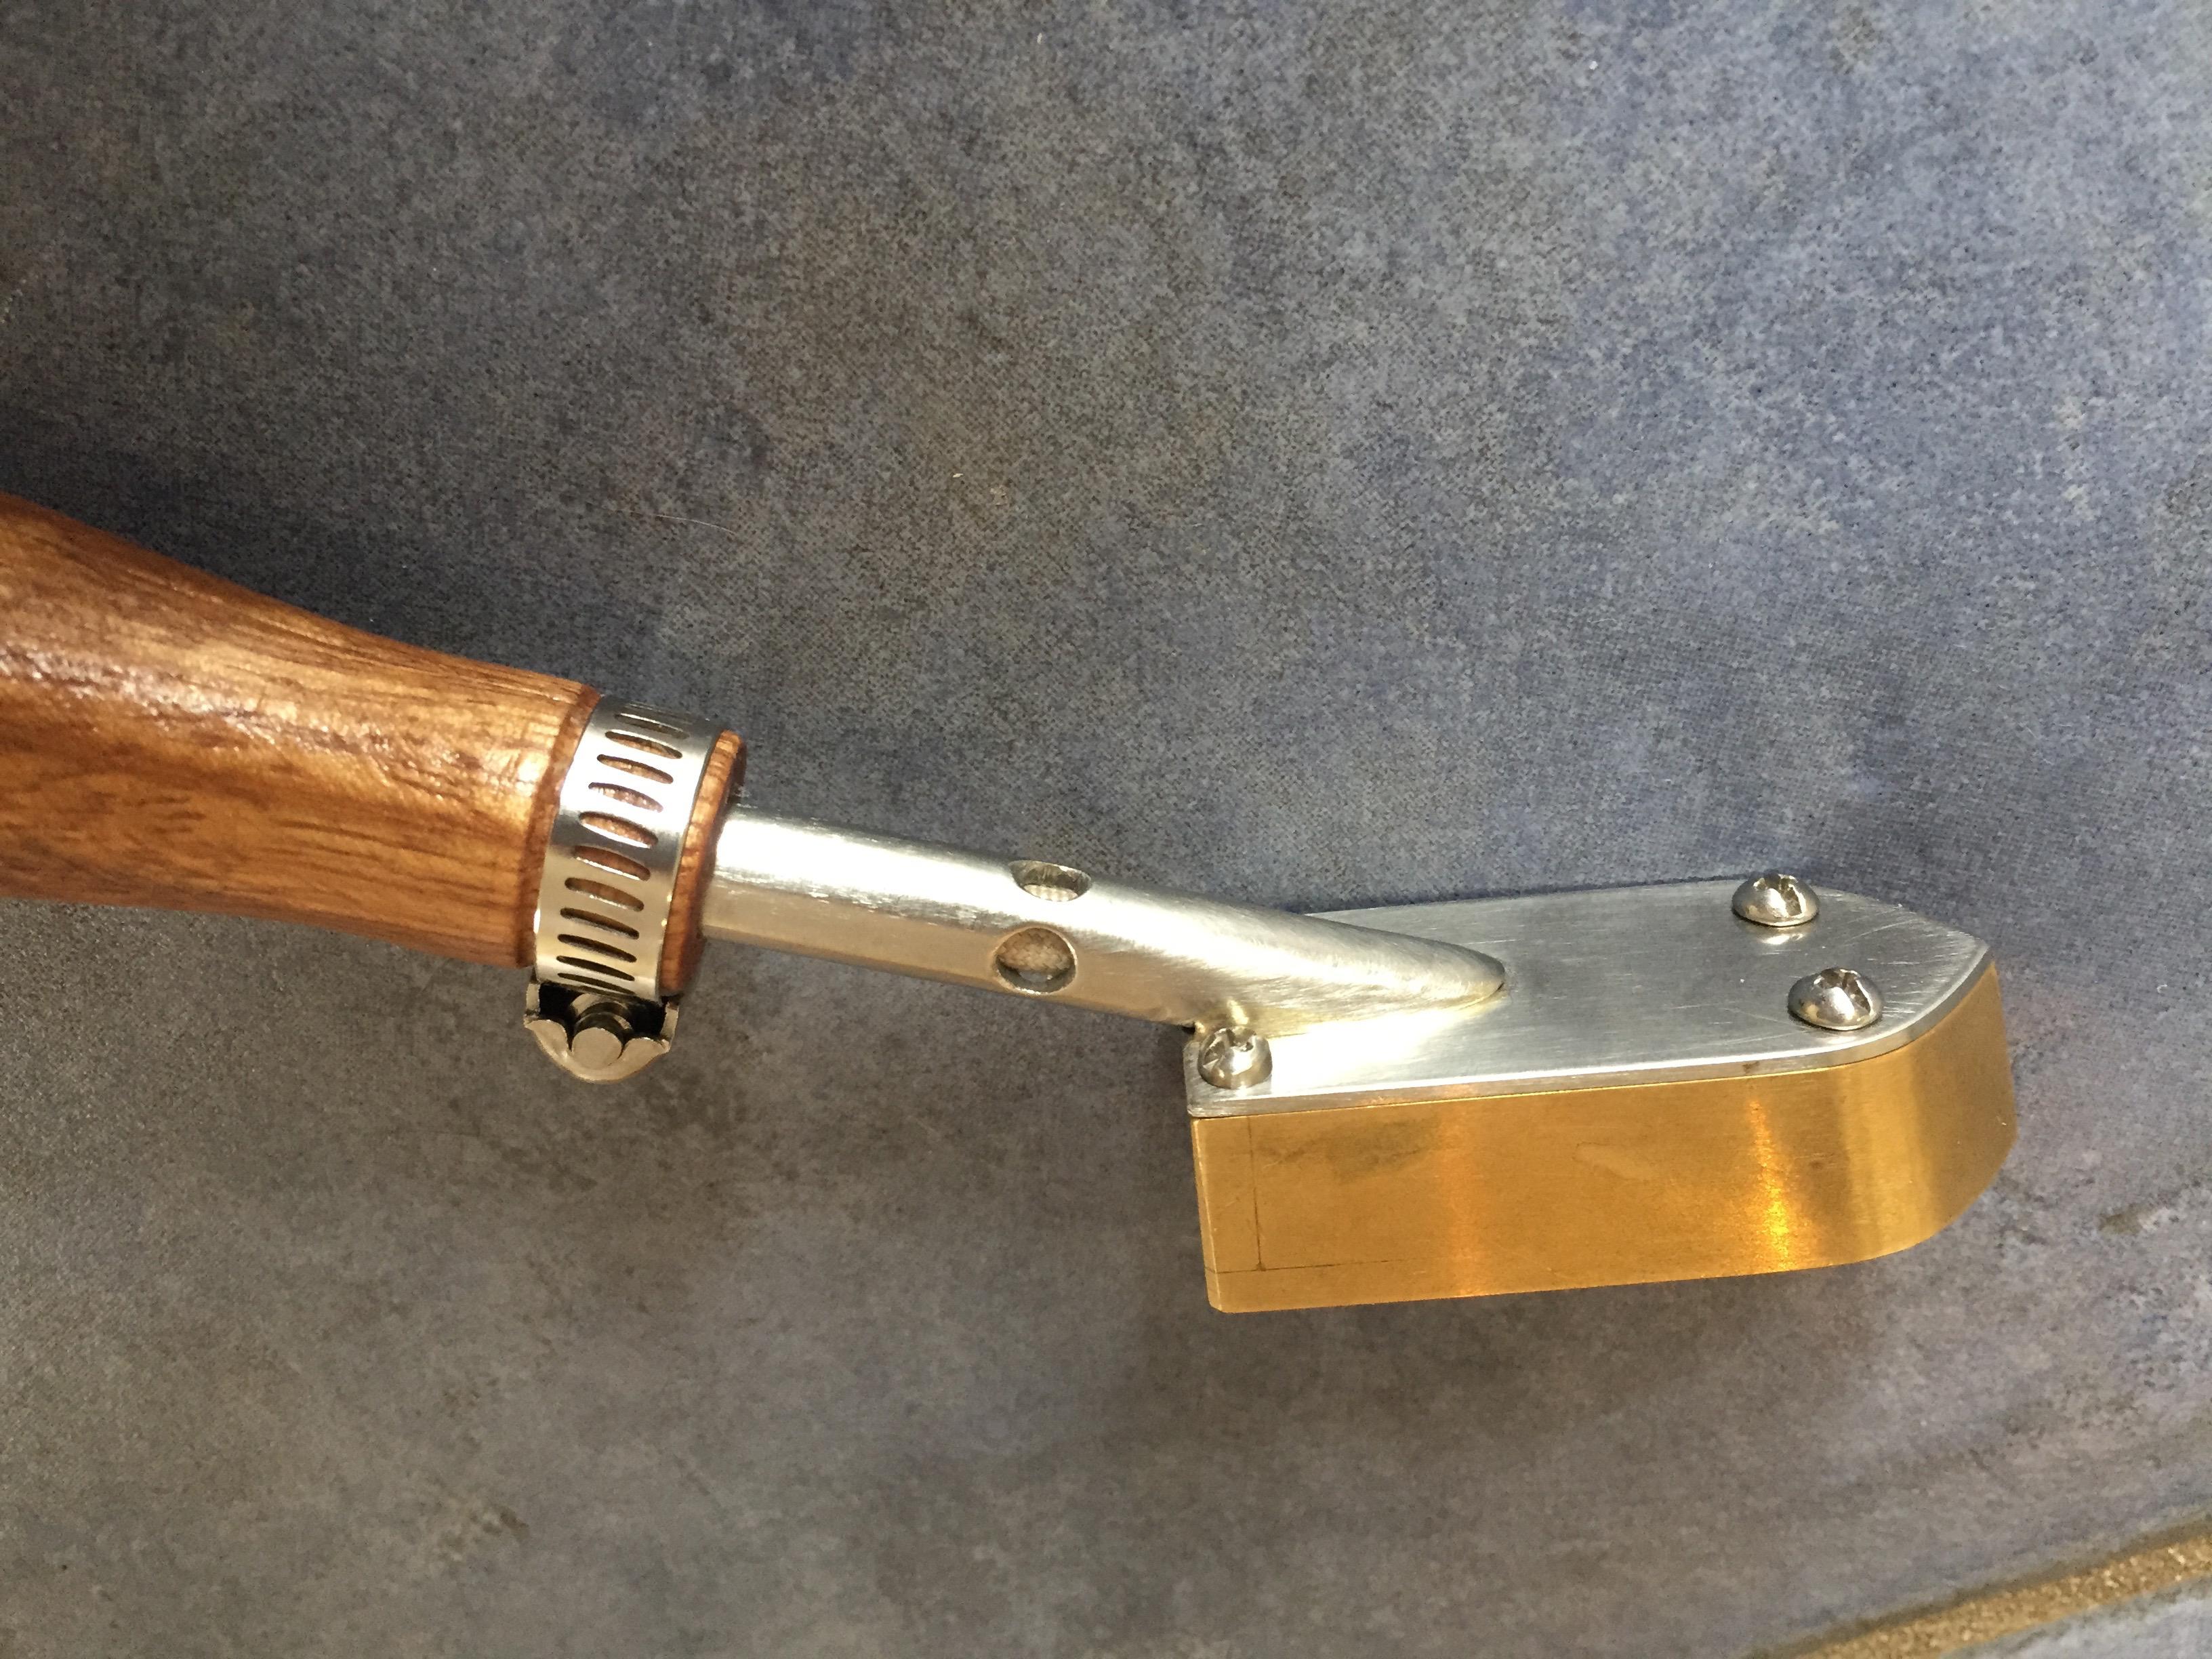
The finished foot is about 23mm wide so will be ok for sealing tapes. The heat does travel up the stem a bit so a couple more holes would have been good, but not so hot that it will burn fingers or handle. Ironically while posting this the hobby shop called, they have just got their heat sealing irons in!…
-
December 21, 2017 at 11:21 am #5166Matt (Admin)Keymaster
This is awesome – thanks for sharing!
-
-
December 3, 2017 at 8:40 pm #5071BruceParticipant
I have tried several irons and can now enthusiastically recommend the JingdaLeather Iron ordered thru Aliexpress, and initially suggested by Lyn, thanks Lyn. I have used the Leather Iron by Jingda Thermoelectronic Products to build both V2 and V3 rafts, one of my own and helping with several built by others. I can complete seams in roughly half the time compared to using a model aircraft iron – due to the better, narrower shape of the Jengda iron and especially the upswept tip that allows sealing at high angles.
I think the Jingda is three or more times faster than the Clover (I built my first raft with a Clover and helped with many others) because the Clover is slow to transmit heat to the foot of the iron and quickly drops below TPU welding temperatures as one moves along a seam.
I ordered mine from: https://www.aliexpress.com/item/220V-150W-50-350C-degree-adjustable-mini-electric-iron-for-leather-clothes-87mmX27mm/32705305023.html?spm=a2g0s.13010208.99999999.288.2C5OLO
Mine came with a US plug adaptor, which worked fine in standard 3-prong US 110 volt outlets. No transformer needed. Please don’t plug it into 220 volt circuit unless you have the electrical knowledge of the difference between one leg Chinese 220 volts and two-leg alternating US 220 volts.
I see others online with better cords (my plastic one melts if brushed with the hot foot) at
and
Some come with UK or EU plug adaptors.
All will need the aluminum foot filed flat so you can best heat seal a seam. Lyn also filed it narrower.
Hope this helps,
Bruce, Fairbanks, Alaska
P.S.: Yes, you need a tandem V# raft too! Fantastic raft!
-
January 3, 2018 at 12:30 am #5191BruceParticipant
If you order an adjustable Leather Iron through Aliexpress, like the Jingda first discovered by Lynn, you may want to also order a 3-prong US plug adaptor. They are inexpensive ($0.66 with free shipping), but hard to find on Aliexpress. Here is a link for one. I haven’t ordered it, just wanted to provide the link so others might. I will order one when I order another iron and then I’ll report back:
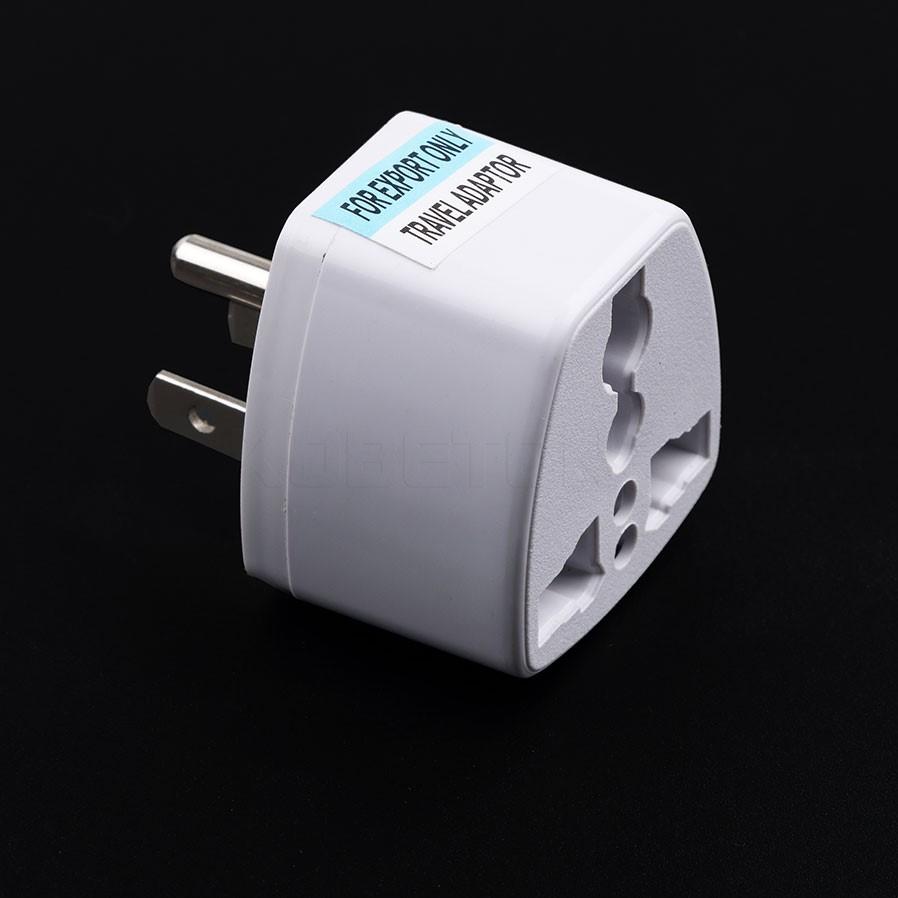
The key search words seemed to be: Universal 3 Pin US Plug Travel Adapter
-
December 5, 2017 at 3:21 pm #5090sldroseParticipant
Hi @brucecampbell ,
Just double checking that you are in north America?
The second two links (with the better cords) only seem to come with uk/euro plugs
and suggest that when operating at 110v the temperature range is max 130deg Celsius.Do you think these are the same as your unit?
The description in the first link (the one you bought) just says 220v and doesn’t list the type of plug supplied.
Just trying to make sure I don’t buy the wrong one, and that it reaches the correct temperature.
Do you think I should just get the one that you bought to be safe?
thanks
Sean
Calgary, Canada-
December 15, 2017 at 4:42 pm #5149BruceParticipant
Sean, Excellent question.
My experience with Aliexpress is limited, but excellent. My guess is that all of the 220 leather irons work the same, but the Chinese sellers can’t really test them and are incorrectly estimating the output based on current, when the thermostat which controls the temperature doesn’t rely on current. The resistance heating element just keeps on heating until the thermostat blinks and it cuts power.
I think that any of these tools with the 350 degree dial and thermostat will work with North America 120 volts – just at lower temps than indicated on the dial – and a lot slower to heat up. Fifteen to 20 minutes! Mine goes way past 250 degrees if I don’t have the dial taped down and accidentally bump it!
I really wanted to order one of the sets of 6 (red handles) for $140 thru Aliexpress, but couldn’t justify it for class use, yet.
I found a simple digital instant-read oven thermometer worked to measure temperature. (Instant is a relative term.) Besides you need one for roasts: see my Dutch Oven Campfire Cookbook at http://www.russia-alaska.com , Ha!
Please post your results!
Bruce
-
January 30, 2018 at 6:49 pm #5320BruceParticipant
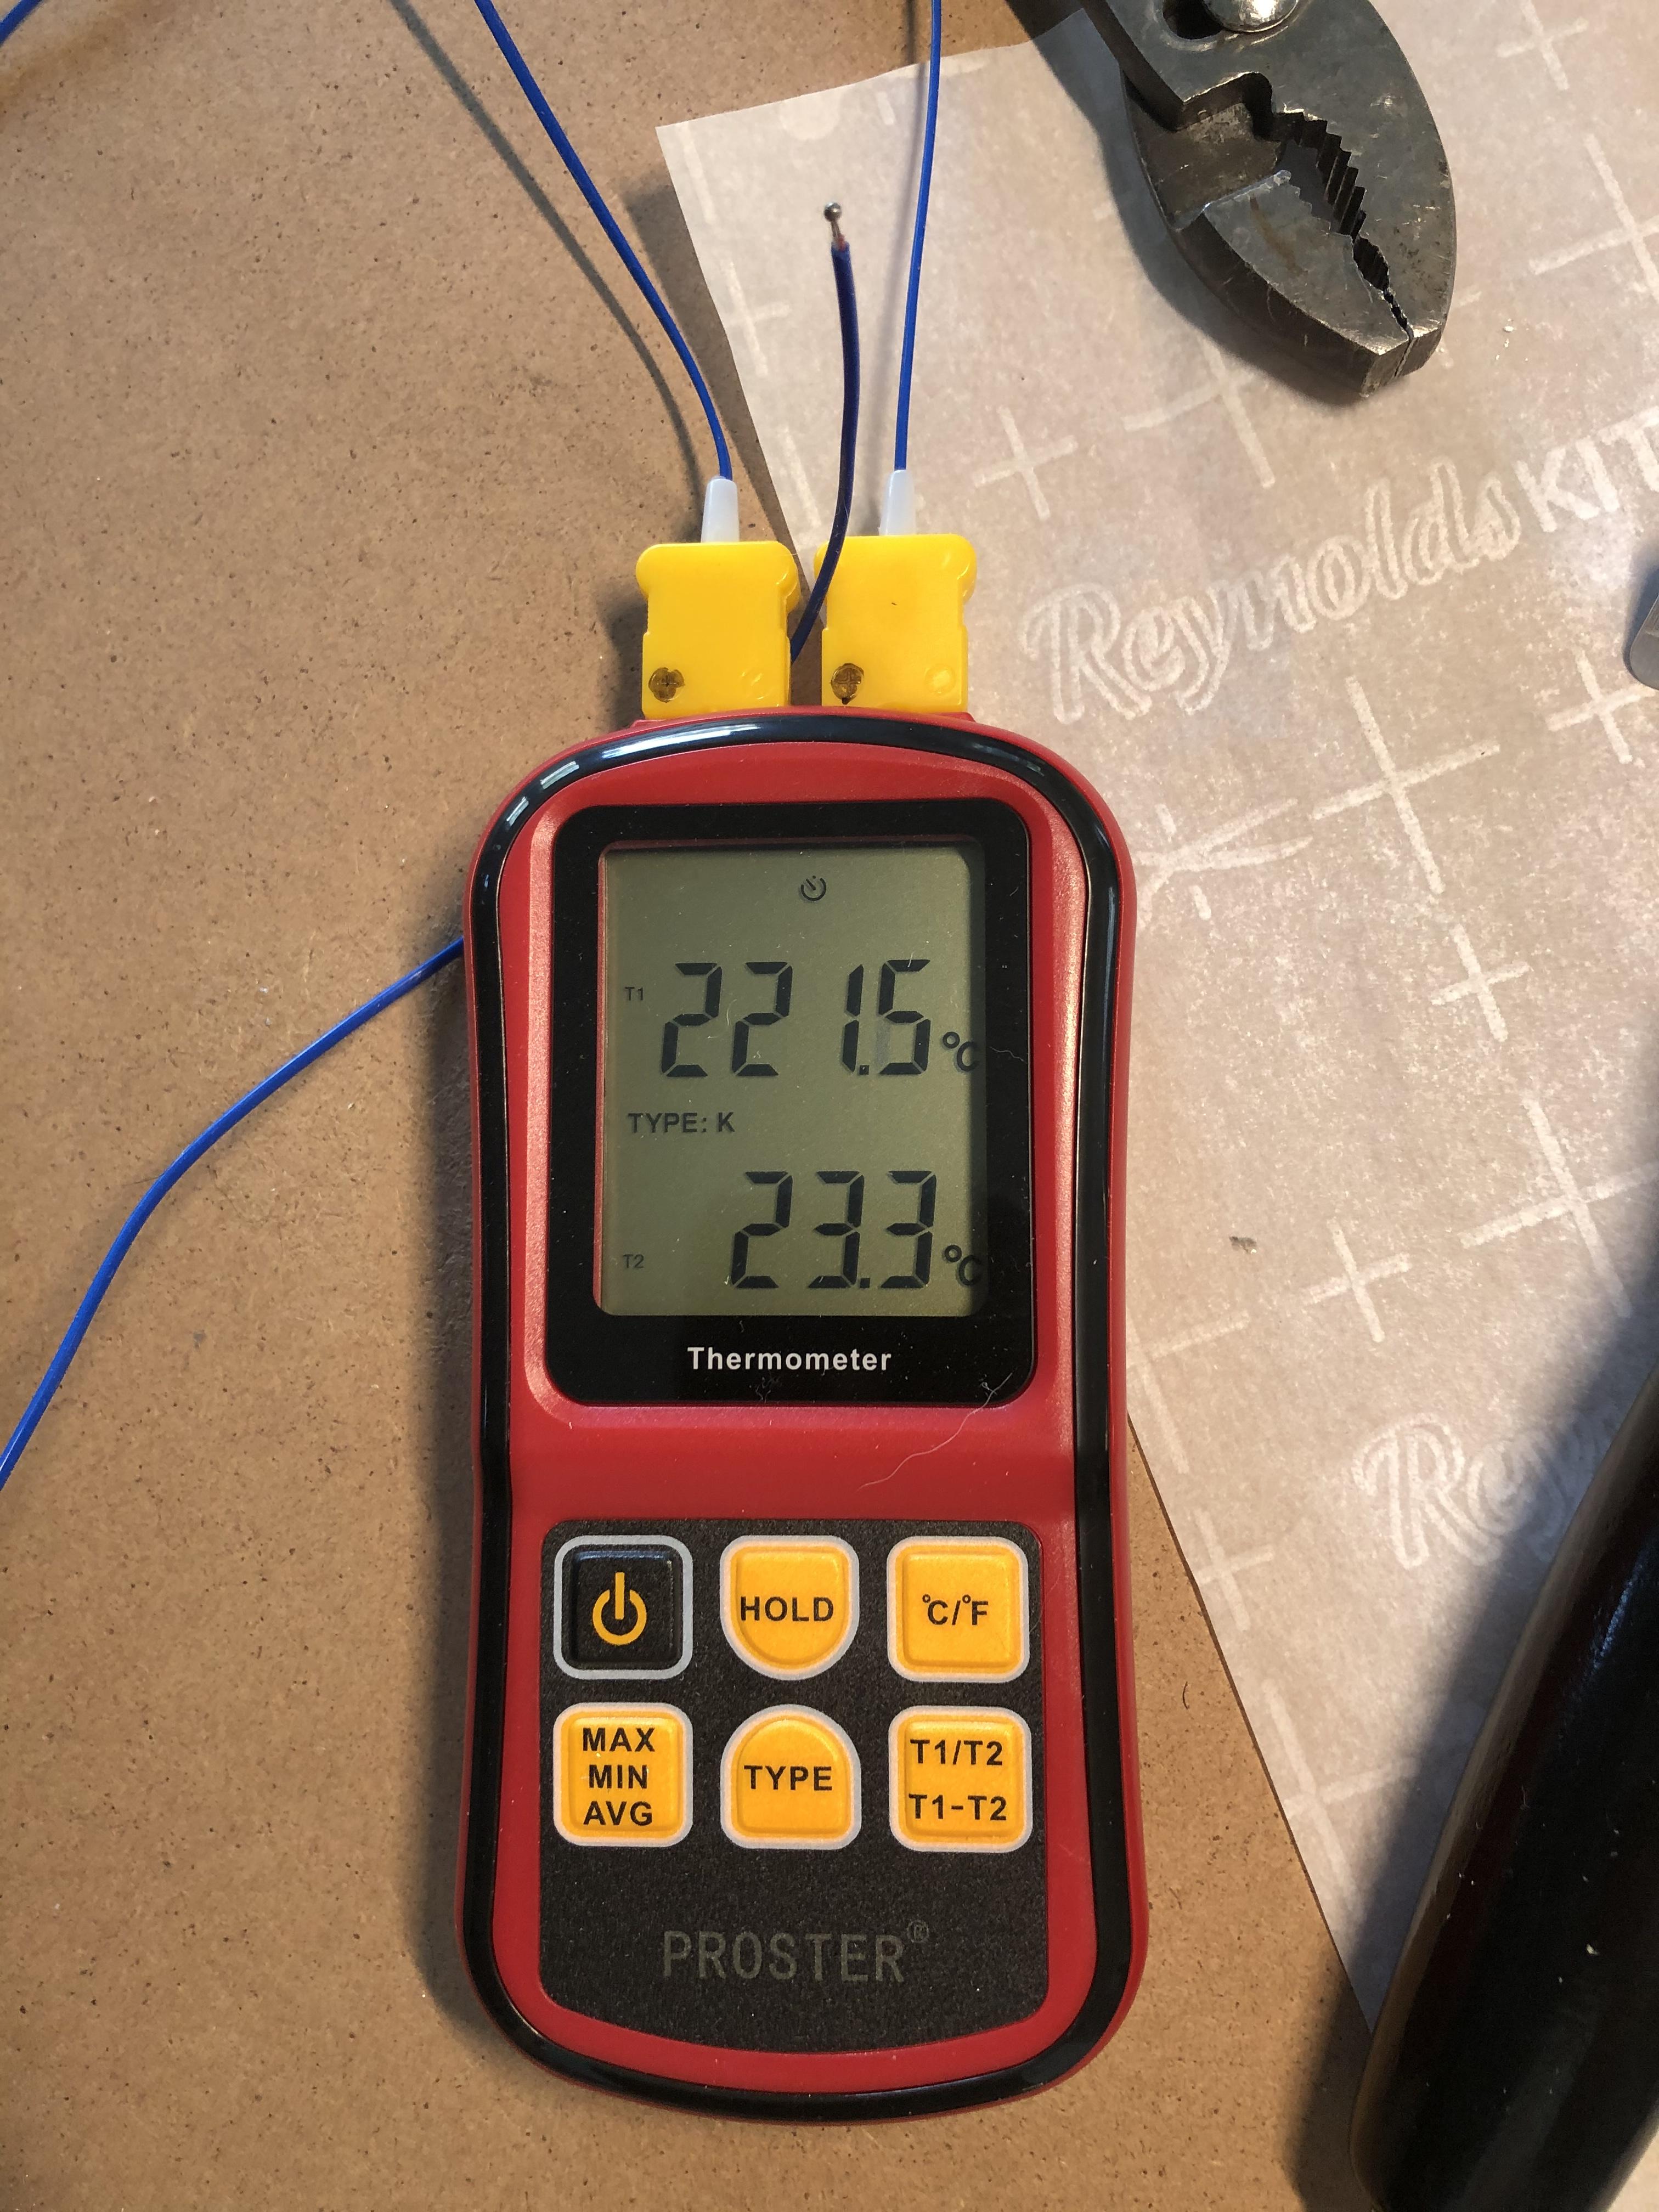
To further answer Sean’s question about the temperature rating of the Aliexpress Adjustible leather iron. I measured the temperature, using a Coverite analog thermometer and a ThermaPro digital oven thermometer. Power source is 120v US electrical power.
Iron dial setting Coverite Temp ThermaPro
300 C 192 C 163 C
325 C 214 C 200 C
On a second iron, from a different seller, but with the same “Jingda Thermoelectronic Products” label, a setting of 295 degrees C yields 205 degrees C, just what I want for heat sealing.
So, yes, the small dial thermostat gives some variance in readings from instrument to instrument, as expected. But No, with two irons to compare, using 120 volt power does not reduce the temperature by 50% as portrayed on some of the Chinese seller’s websites.
Bruce
Fairbanks
-
-
December 7, 2017 at 8:18 am #5096Matt (Admin)Keymaster
Hi Sean – I know Bruce is in Alaska, but I’m not sure about your other questions. Cheers!
-
-
December 5, 2017 at 1:07 am #5083ClemensParticipant
Hey Bruce!
I also want to thank you for all your inputs – really helpful! 🙂
What you mean by filing the foot is to make the bottom side completely flat, right?
Did you do this by hand? Is it hard to do?I also work with the Jingda-Iron and so far, I’m happy with my results (hadn’t much time to built yet though).
I checked the temperature with a thermometer and found that it’s always a little bit colder than it is supposed to be. When set to 225°C you actually get ~210°C which is a good temperature to weld in my opinion.I’ll get my hands on the following iron soon and will review it here as well:
https://jamara-shop.com/Folienbuegeleisen-Digi-Control-Iron
The display with the iron-temperature could be a nice feature…-
February 4, 2018 at 11:37 pm #5381BruceParticipant
In further response to Clemens:
Here is a photo of the filed area on my second Chinese “adjustable Leather Iron” (made by Jingda Thermoelectric Products). The area filed is best illustrated before I smooth and polish it with sand paper and steel wool. Please note the blue tape over the cooling vents to prevent aluminum filings from contaminating the circuit board.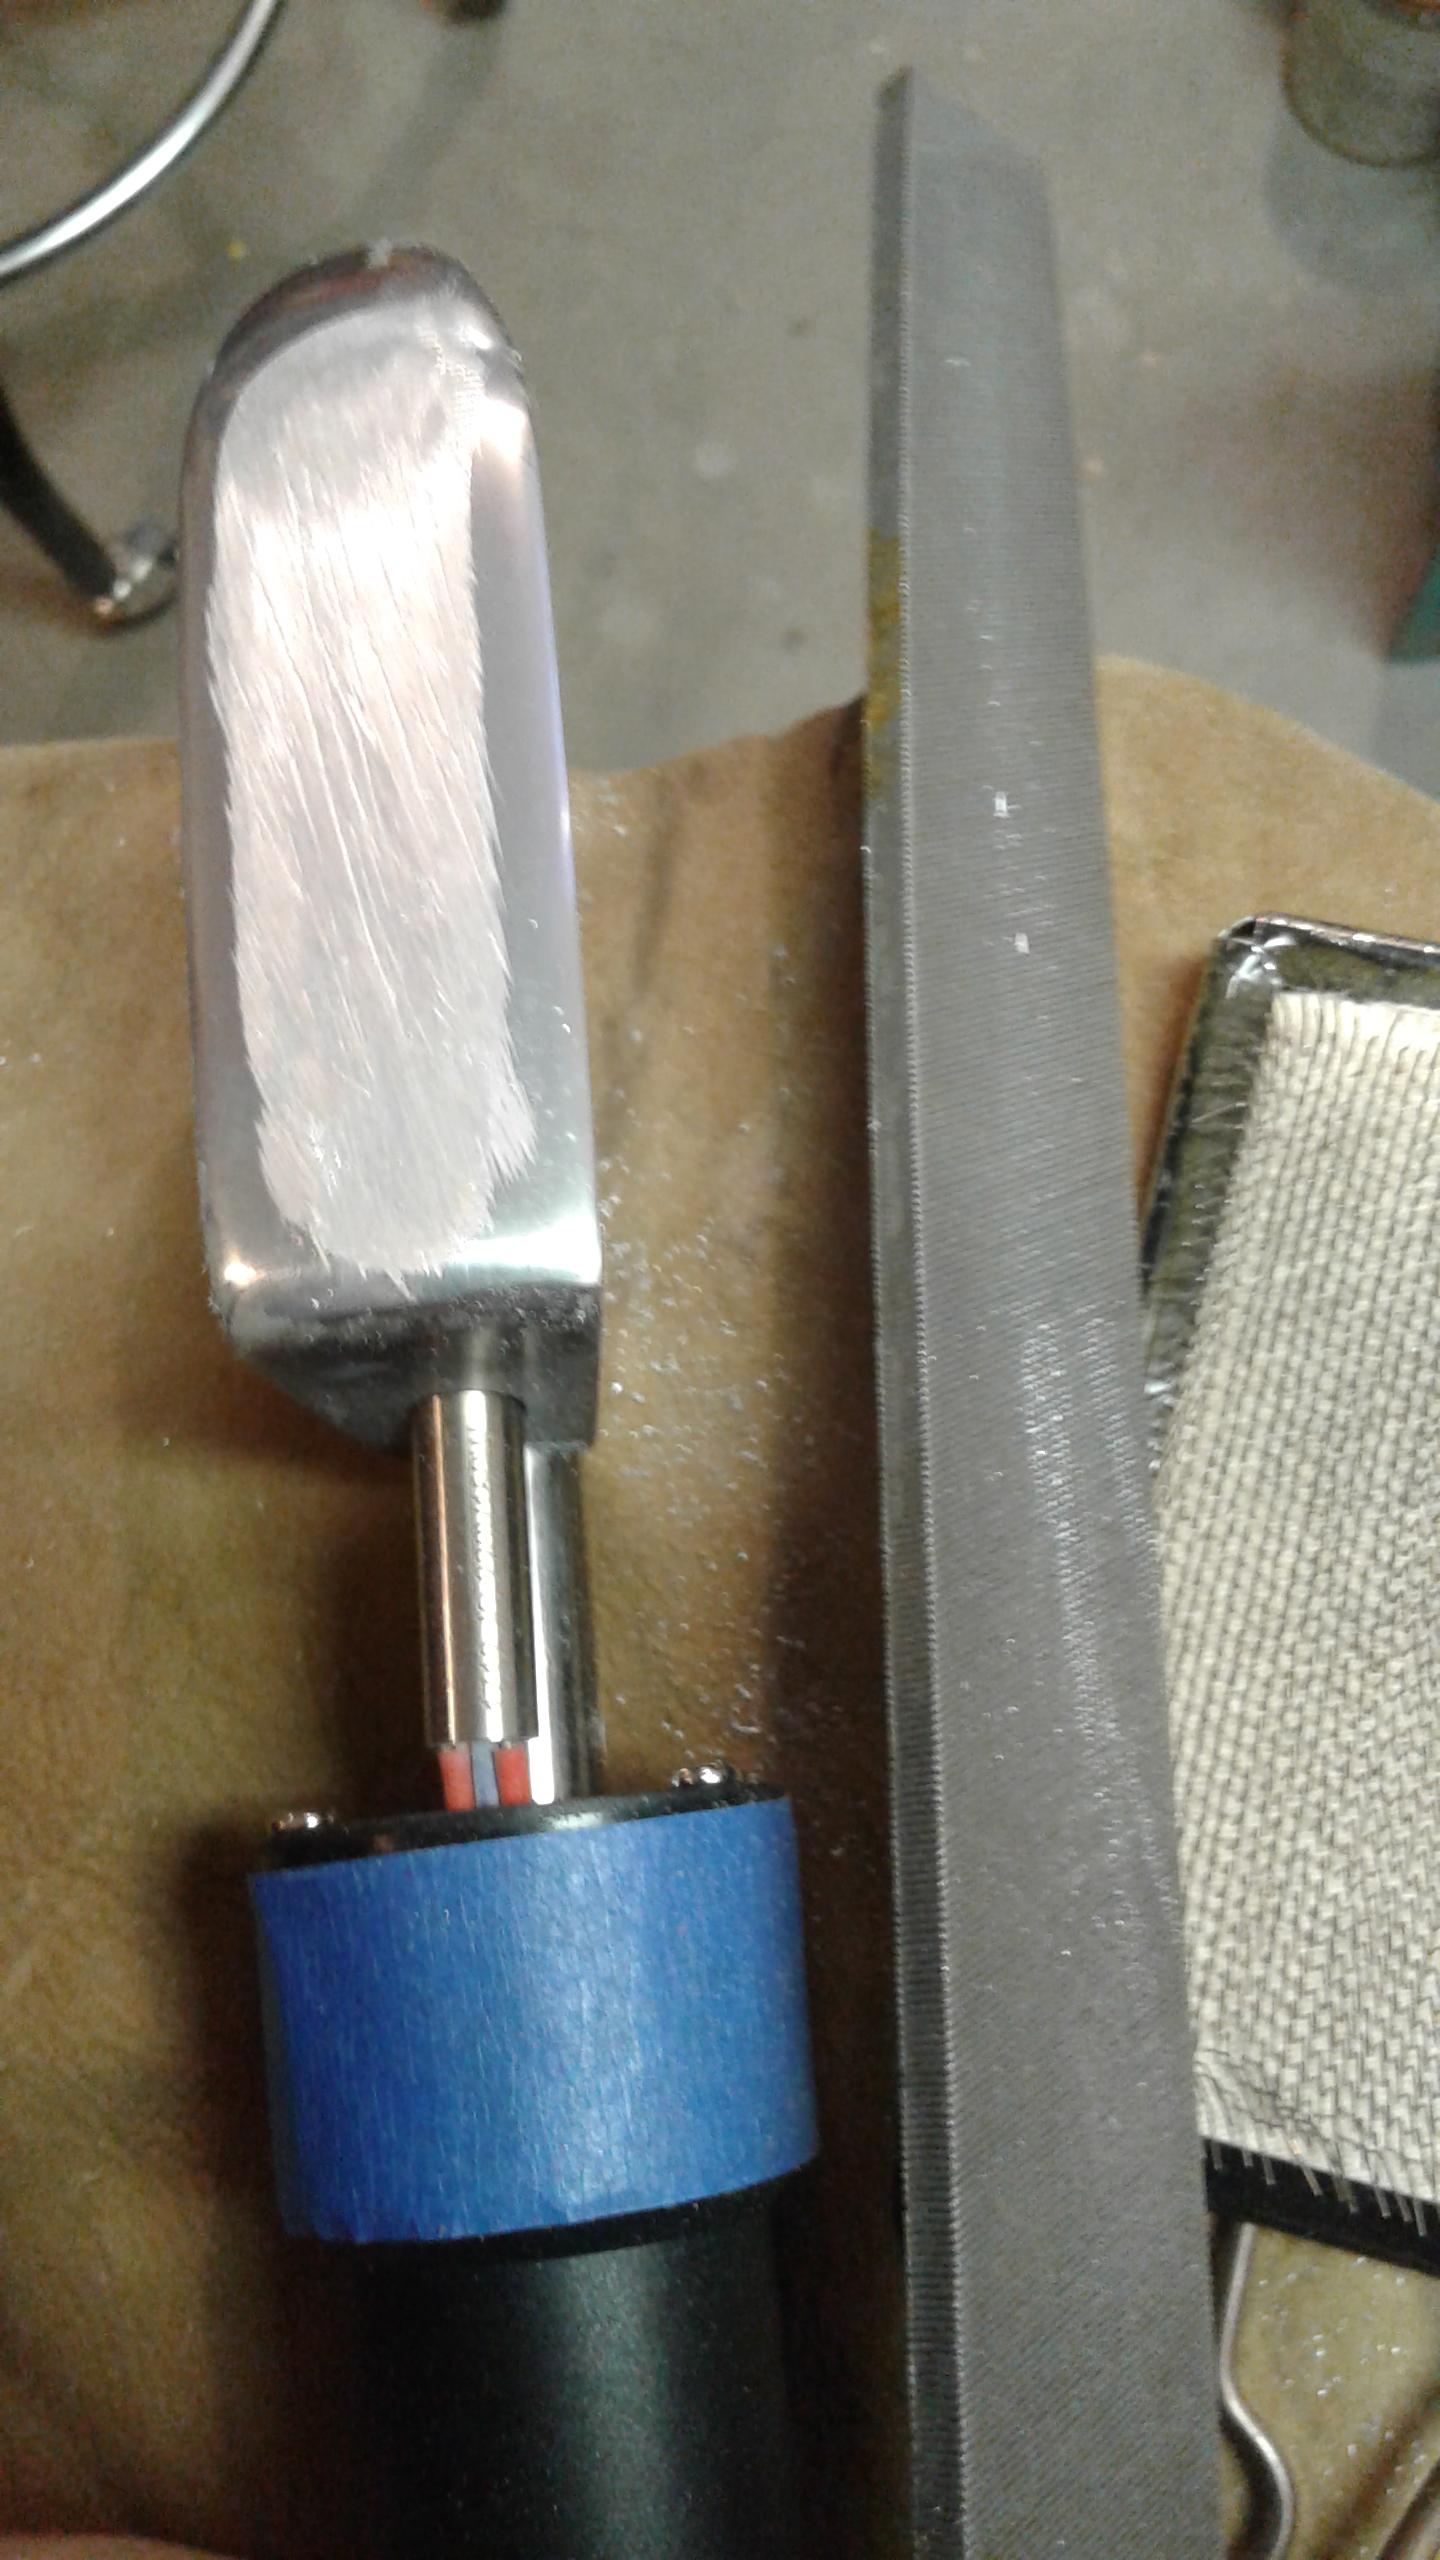
-
December 15, 2017 at 4:54 pm #5150BruceParticipant
Clemens,
The hardest part for me is trying to describe the filing effort. I file the bottom so it has a 19 or 20 mm wide flat area on the bottom. This leaves 2 mm or so of gently rounded edge on each side. I do not file the tip.
I use a coarse file for aluminum or steel. Be aware that aluminum galls, and it will be easier to smooth with sandpaper if you clean small chunks of aluminum out of the file. An alternative would be to use an aluminum wheel on your grinder – and go very carefully.
I smooth the filed area with 220 grit sandpaper, followed by 360 or 400 grit paper and fine steel wool. Then I rub in on wood or paper to see if it is still rough and leaves aluminum marks. I don’t want to leave marks on the yellow fabric!
When done I can use the tip with a raised handle position – and I do this very frequently! Then I slowly lower the handle to use the full length of the bottom. I get a fair way down a seam before the iron cools.
On seams I can tilt the iron to one side, rocking the rounded edge over the tame edge and squishing the TPU to the edge of the tape. Not always easy to see with black tape, it is more readily viewed with seam tape made from red fabric! IMO.
Hope this helps.
Bruce
-
-
December 4, 2017 at 8:35 pm #5079Matt (Admin)Keymaster
Thanks for posting the links, Bruce – I was looking for one of these irons and couldn’t find it. It seems like it’s one of those designs that gets branded with different names, so it can be difficult to find if you’re just searching for it by the brand name. Hopefully the links will stay active!
-
December 15, 2017 at 5:10 pm #5151BruceParticipant
Matt,
Yes, hard to find. I have best luck searching under: adjustable leather iron. There are many models and colors. Be aware: the lowest prices are for non-adjustable irons and I don’t know how these will work. I’ve also seen one with a wider foot – it might be easier to cut off the “wings” to a more desirable narrow foot, don’t know, but here is a link:
Maybe if I knew Chinese? Ha!
Bruce
-
-
-
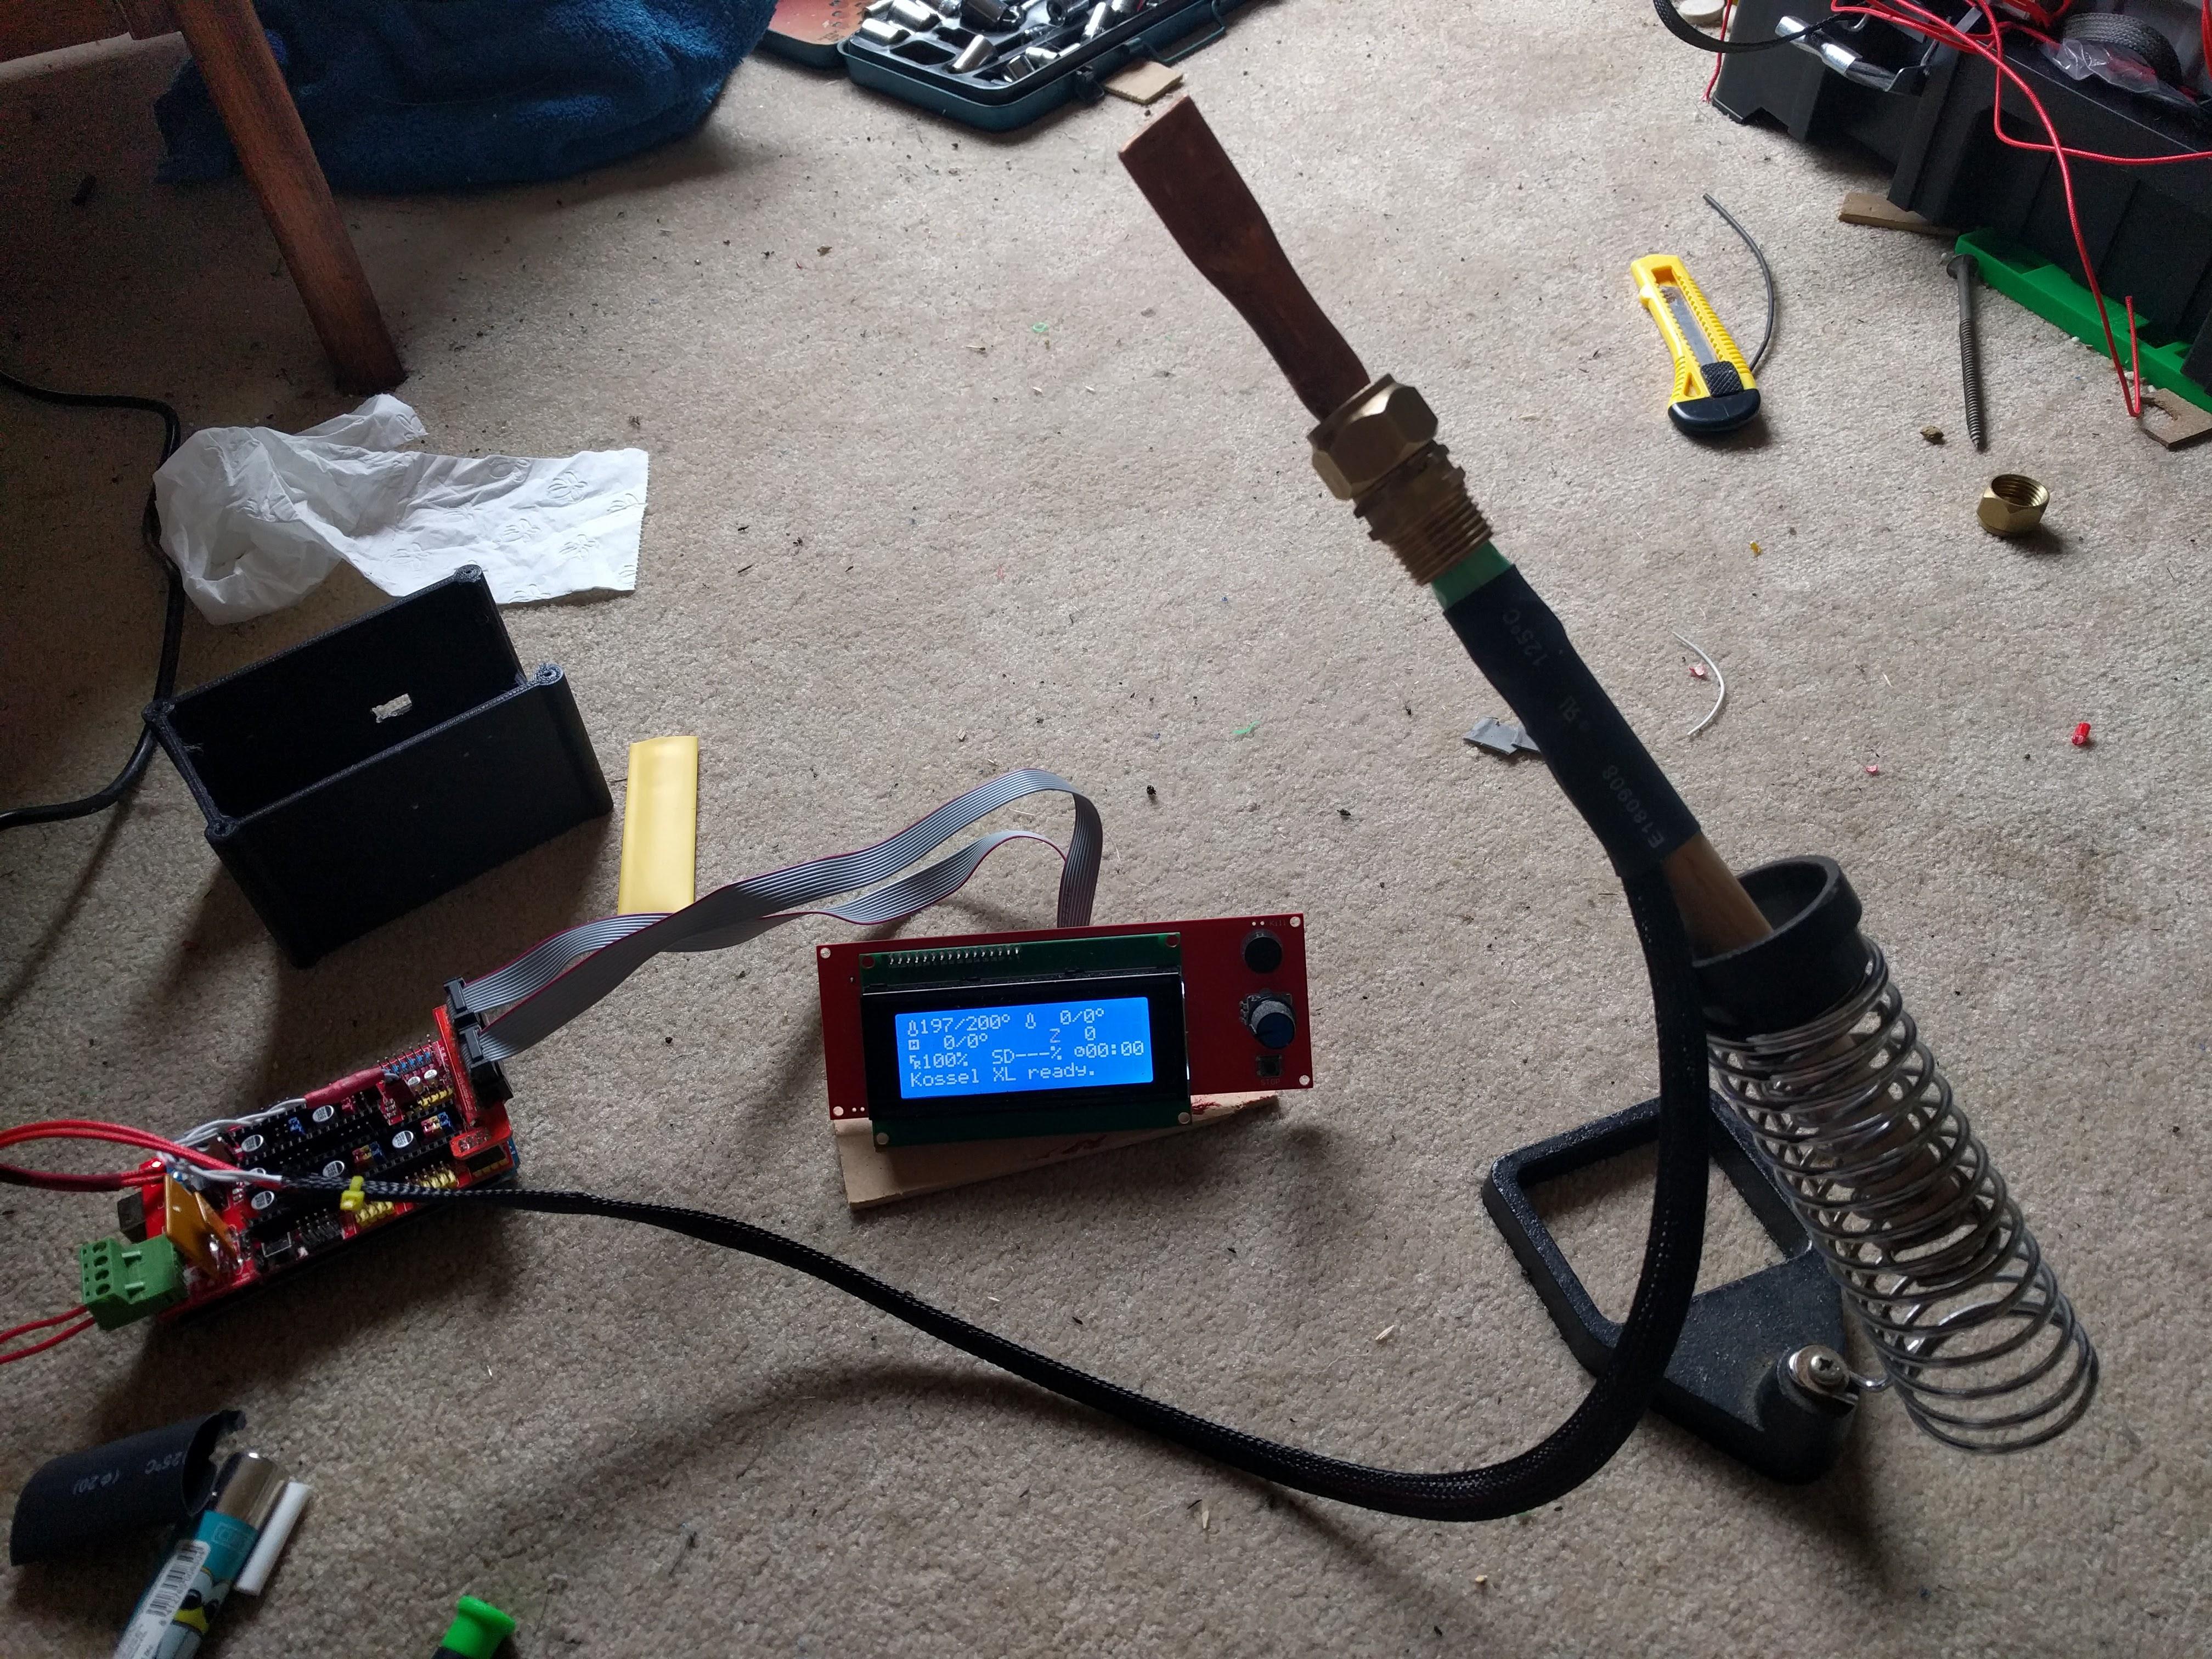
November 8, 2017 at 6:56 pm #4893aaron.scott77Participant
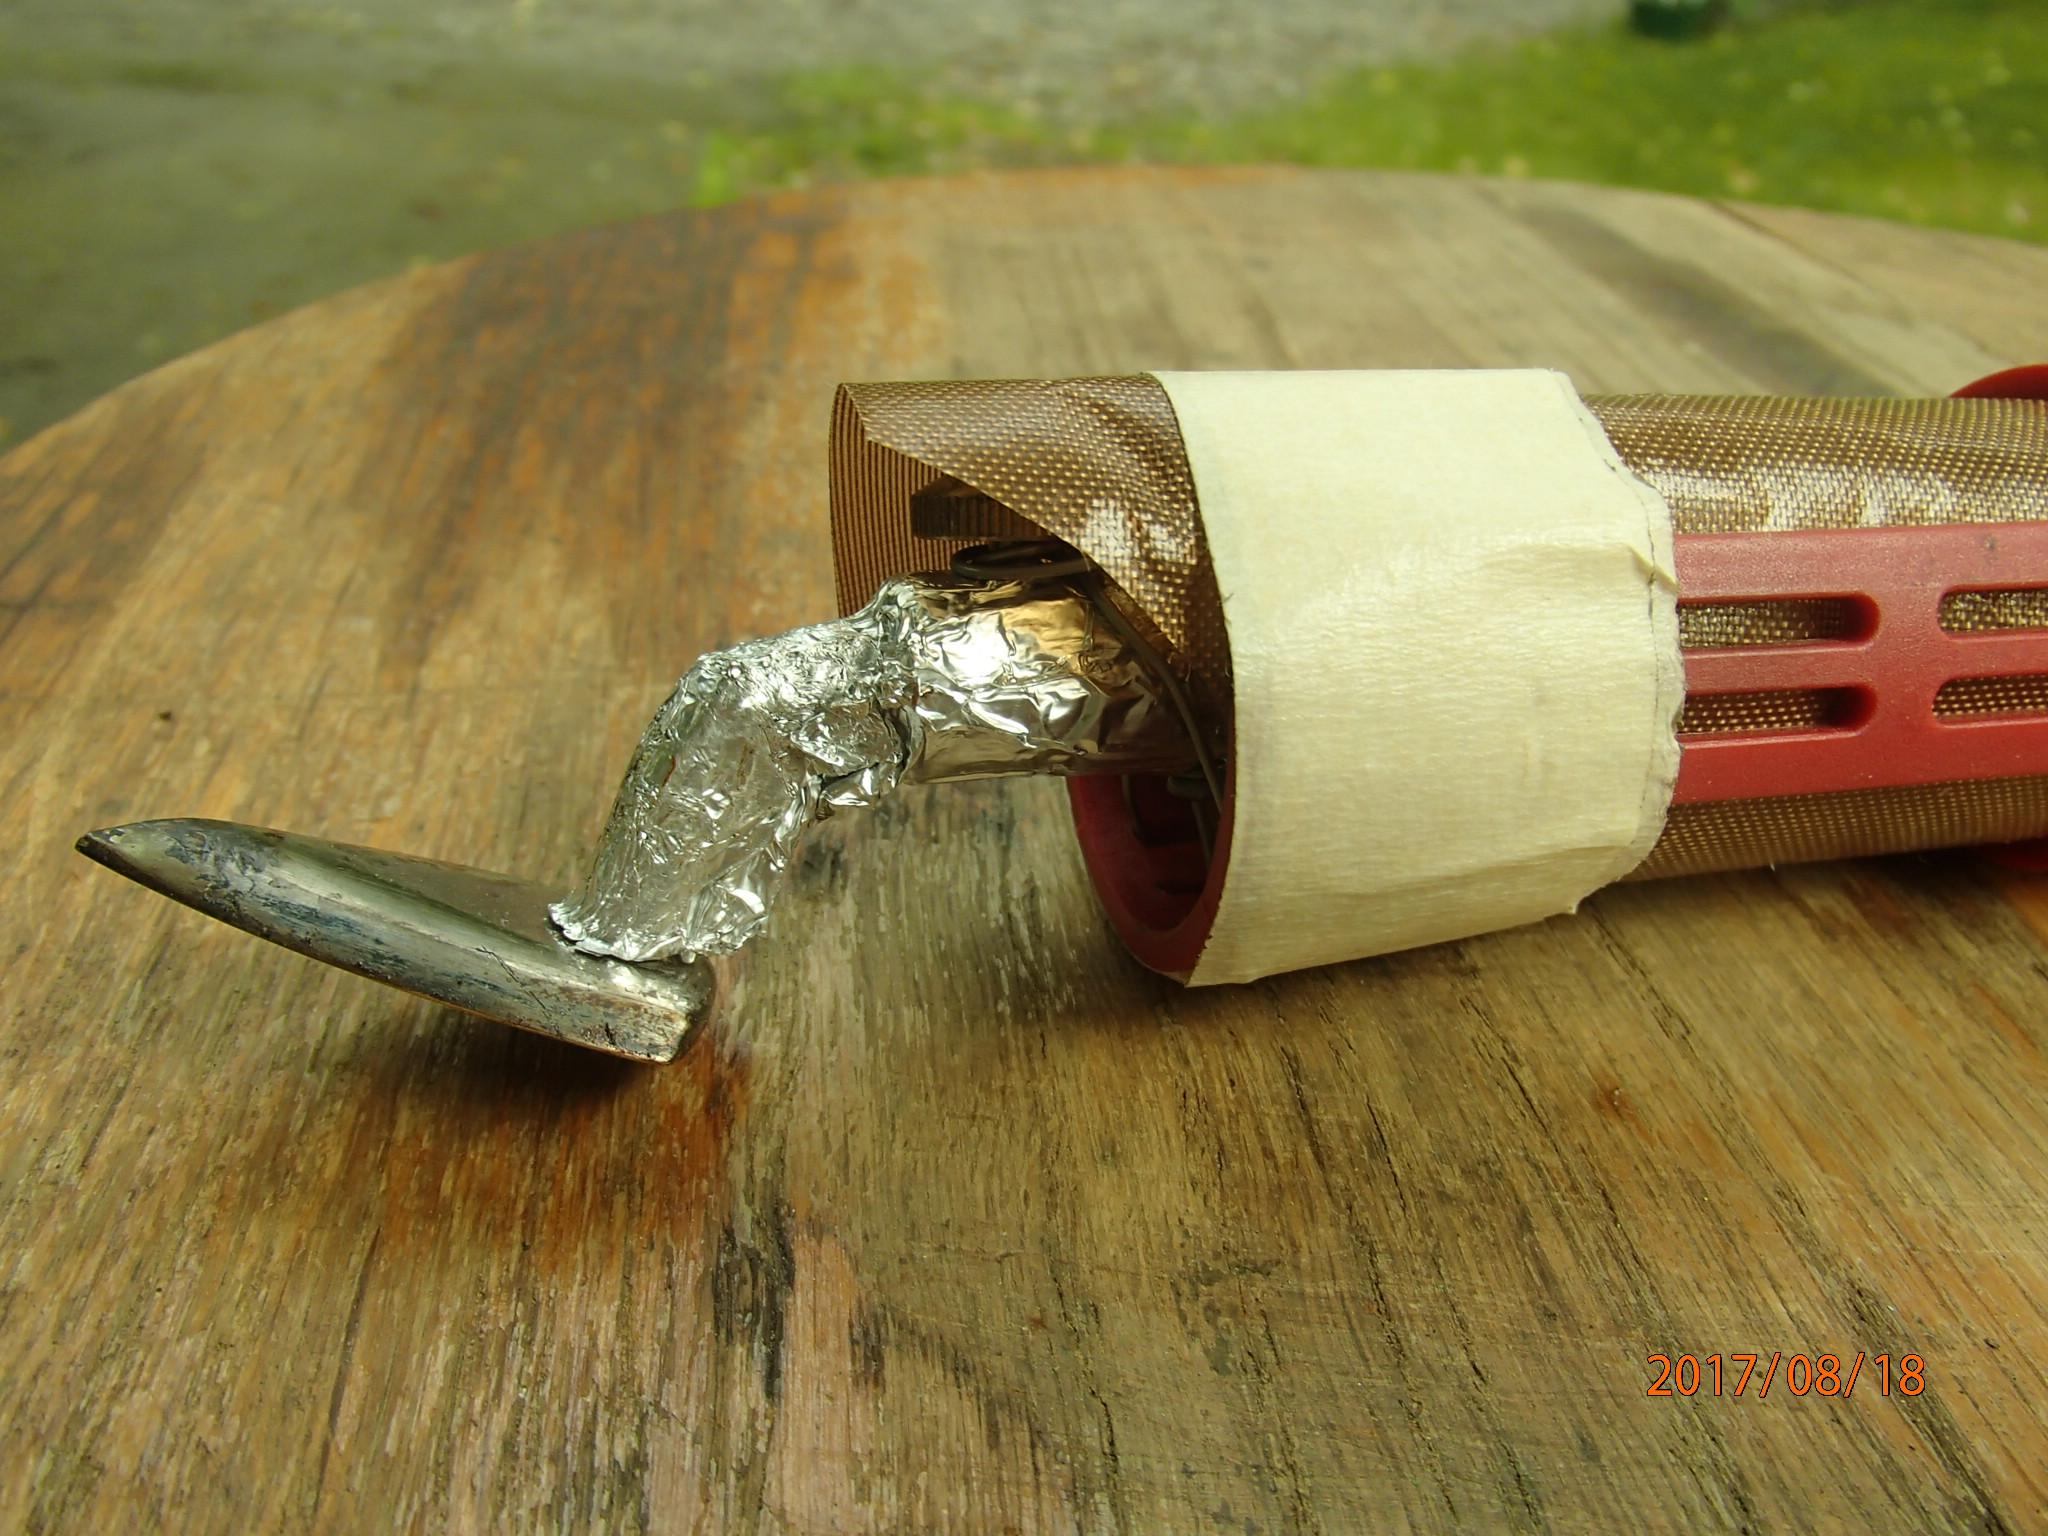
I’ve built a couple of 3D printers and throughout that process I’ve always bought a few spares for when things go up in smoke.
I had a spare control board and heater cartridges. So it was an easy job to mount the heater cartridge inside a piece of copper, along with a thermisistor and heat sink compound.
So I’ve managed to get a PID controlled heat sealer. Totally over the top, but if you’ve got the parts lying around doing nothing.
https://en.wikipedia.org/wiki/PID_controller
Eventually the wooden handle got scorched so I ended up dismantling an old soldering iron and mounting it all on the end of that. I also moved the temperature sensor to the outside because I suspected the internal temp was much hotter than the external surface temp.
The heater is a 12v ceramic cartridge:
I guess you could probably drive one of these with an adjustable 12v power supply.
-
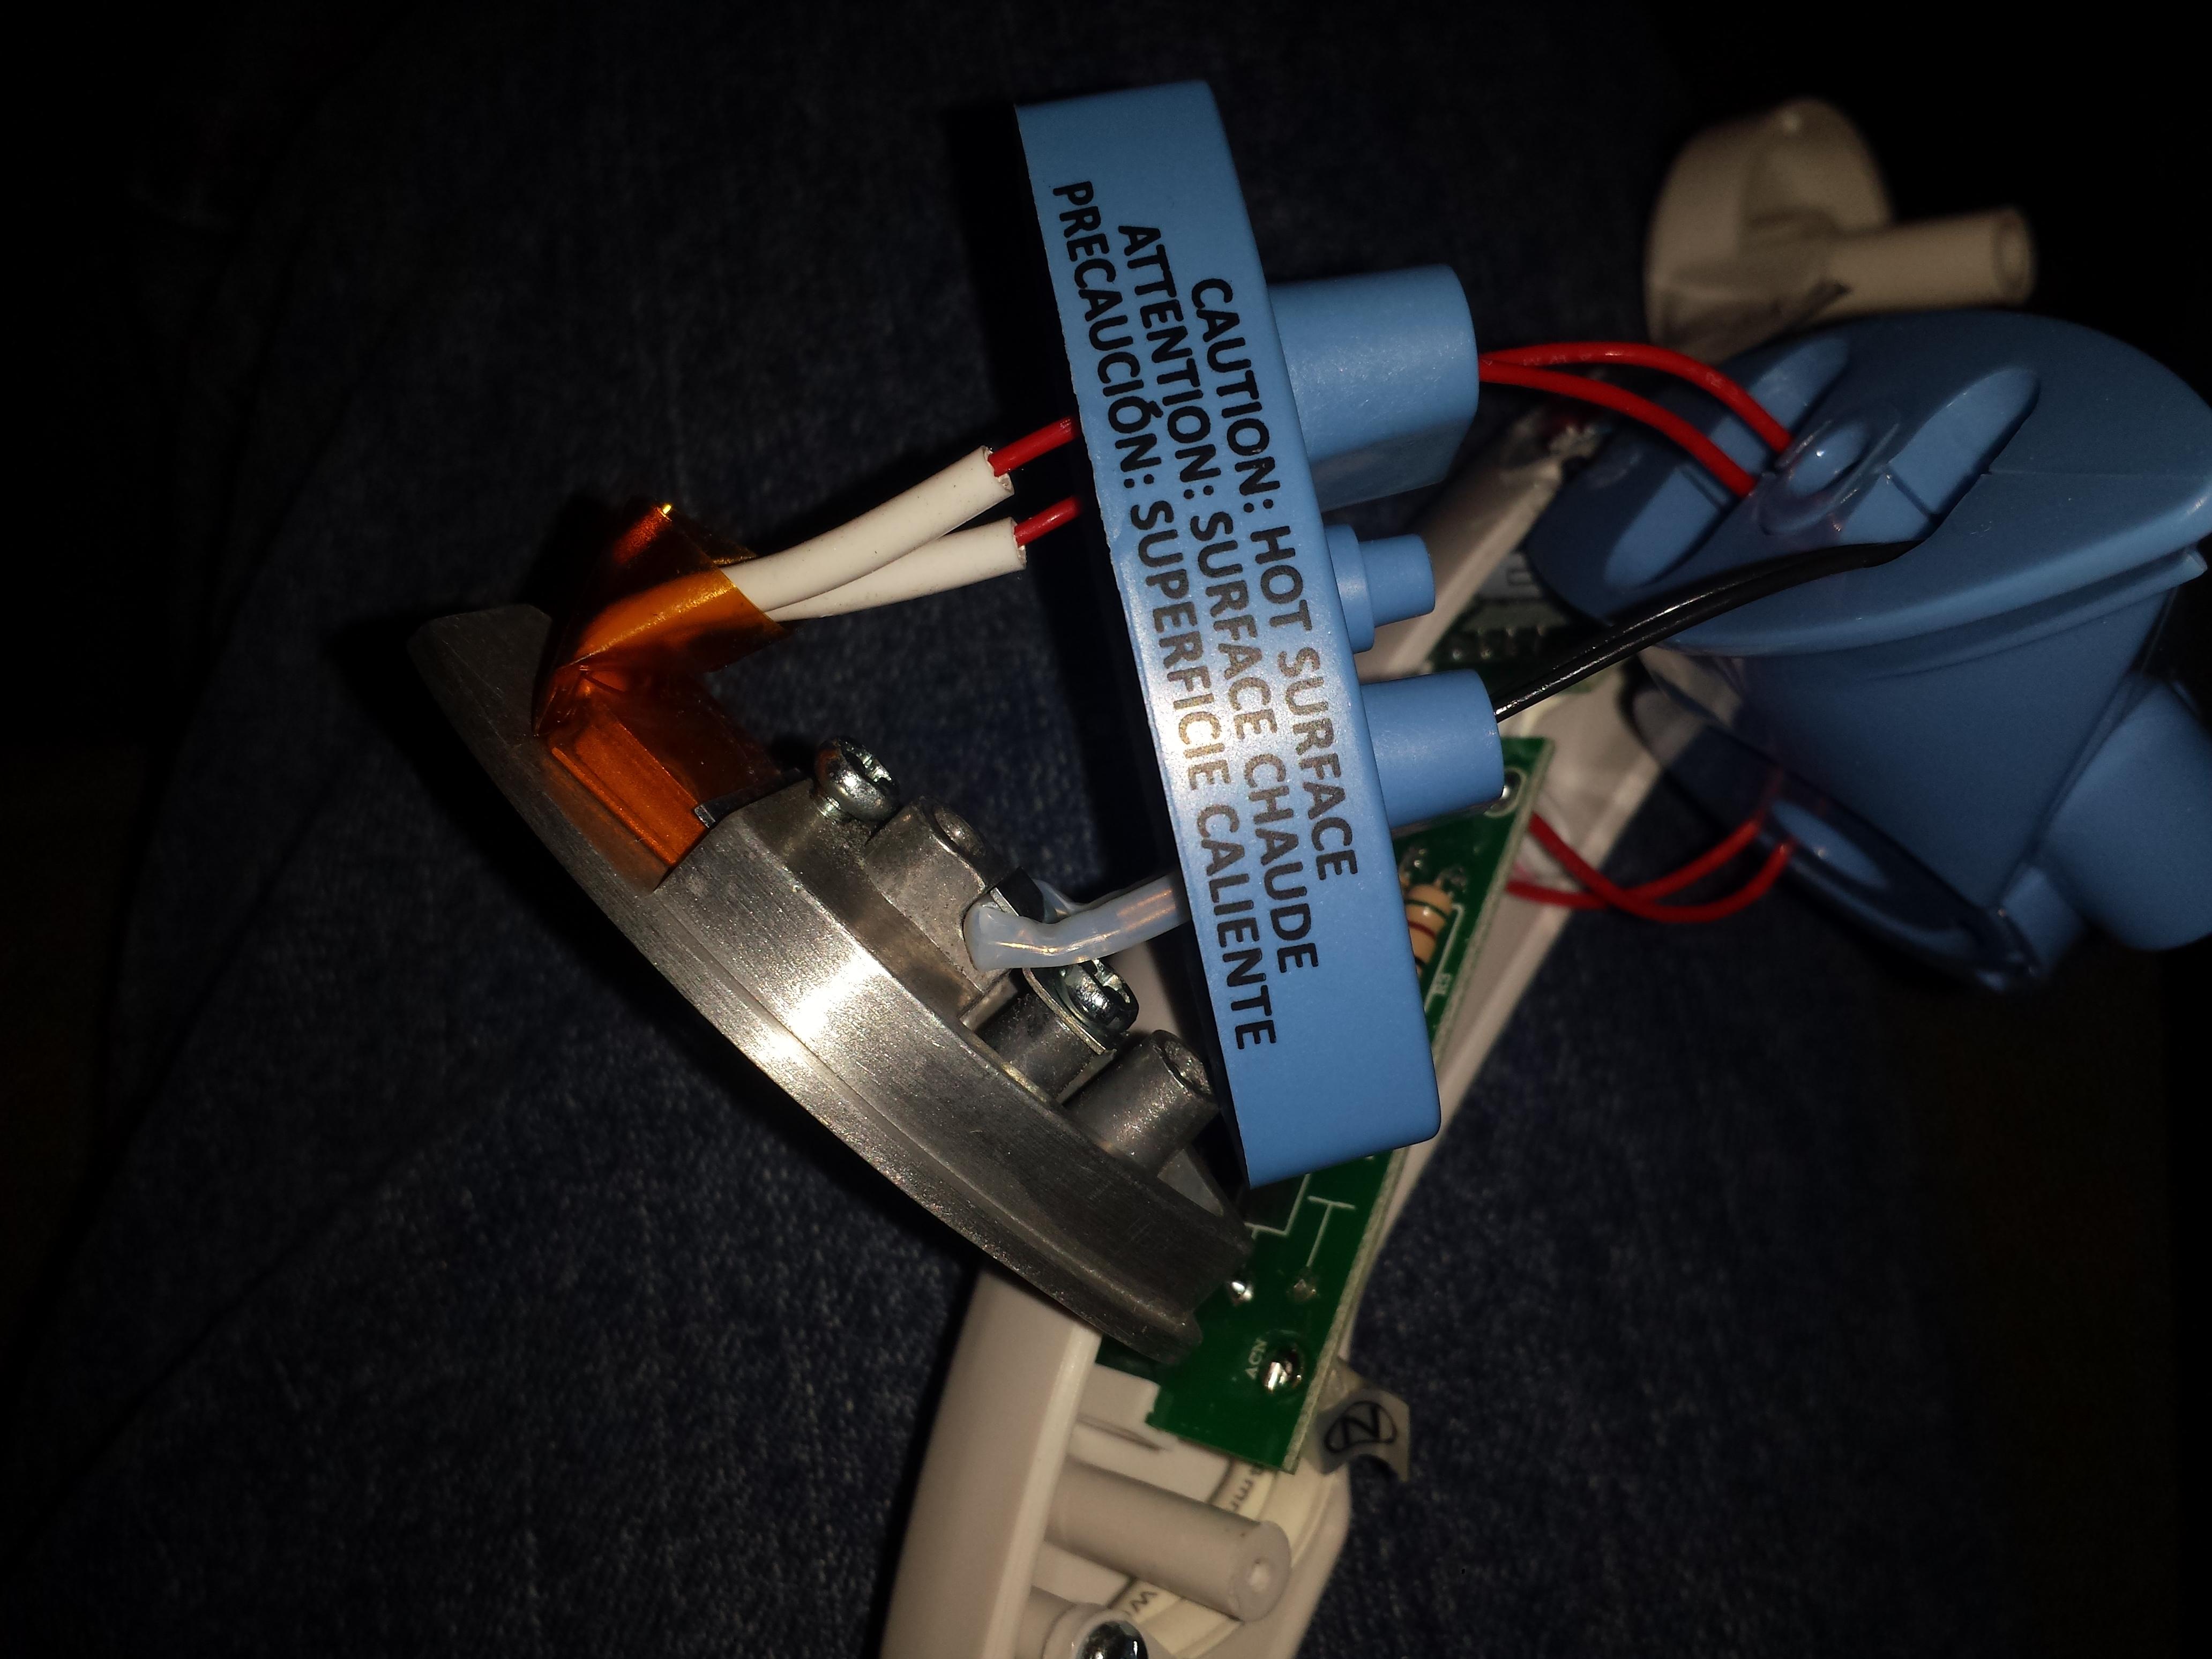
November 8, 2017 at 2:13 pm #4888MonoferraraParticipant
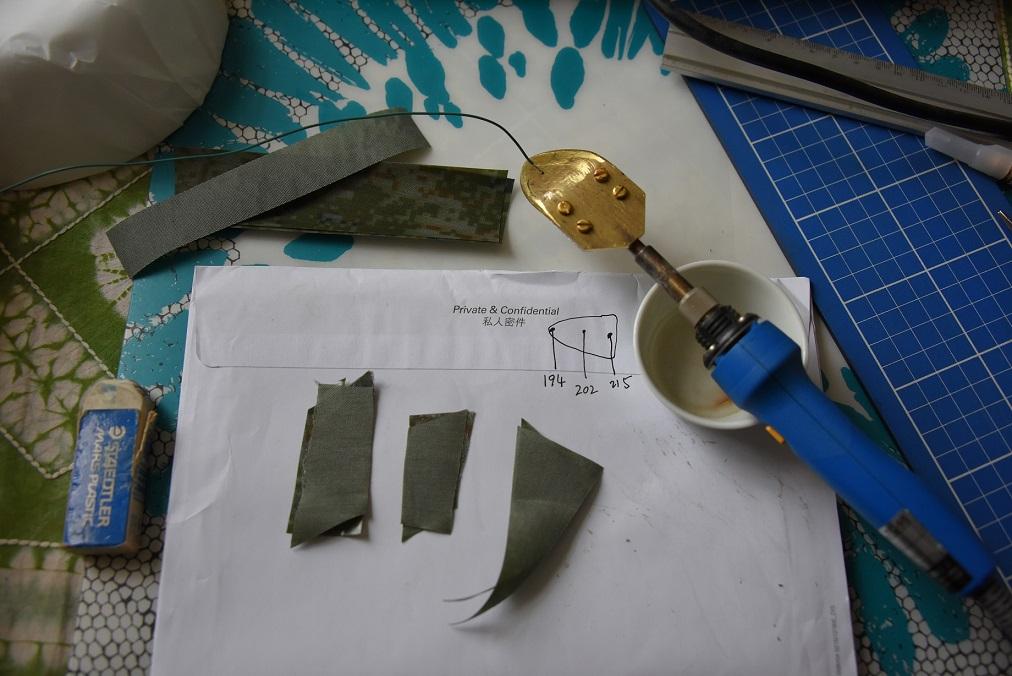
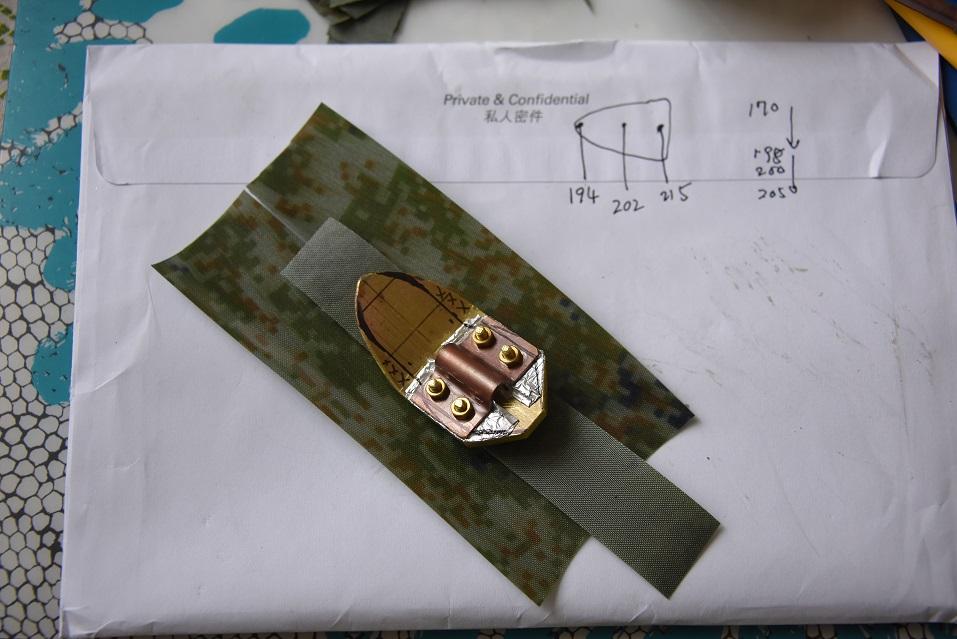
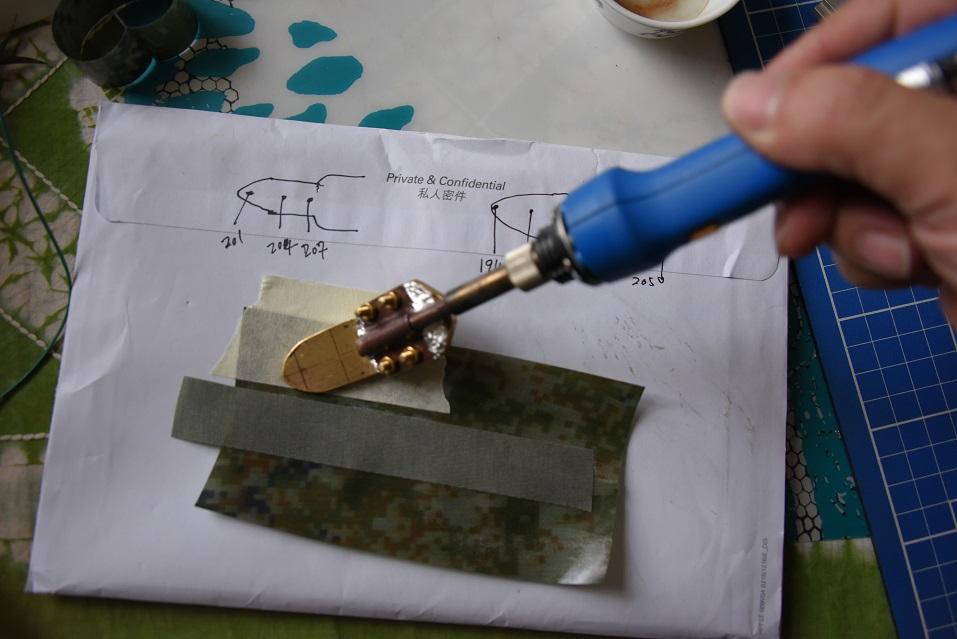
My soldering iron homemade.
philips 25w
test heat sealing ripstop 40D and nylon 201D.
-
This reply was modified 8 years, 8 months ago by Monoferrara.
-
November 9, 2017 at 1:02 am #4903MonoferraraParticipant
<p style=”text-align: right;”>https://vimeo.com/241967462</p>
Video test .
-
This reply was modified 8 years, 8 months ago by
-
October 22, 2017 at 7:52 am #4789waldlaeufer.5105Participant
hello,
i am michael from germany.
i baught a very cheap small iron at a online store called pollin in germany.
today i was testing how it works to weld some etremtextil samples with this iron.
the iron had onl 20w and two temperature areas.
only the very thin 70d blue fabric melted.
all other fabric
500d cordura / 210d double side coated / ripstop 200gr / double sided tpu black 650 gr / 70d black
was to weld with this iron.
regards mike
-
September 8, 2017 at 8:54 pm #4265BruceParticipant
Comparing Heat Sealing Irons: Clover Mini-Iron, Coverite, Top Flight, and Jandga Electrothermal Products
By: Bruce Campbell
Date: September 4, 2017
Background: I built my first DIY packraft using a Clover Mini-Iron and an old household Iron. They worked, but the Clover is slow and fragile. The old household iron was a challenge to keep hot enough.
Coverite and Top Flight irons are 165 Watt tools developed for heat-sealing and shrinking thin plastic film (fabric) onto model aircraft.
The Jindga Thermoproducts leather clothing iron is a 220 volt 150 amp Chinese appliance. It feels solid and heavy duty, and it worked with it’s 110 adaptor in a US 110 volt outlet.
In this comparison I will try to detail what I’ve learned about each iron, its dimensions, temperatures attainable, and various features.
Coverite and Top Flight irons are 165 Watt tools developed for heat-sealing and shrinking thin plastic film (fabric) onto model aircraft wings and fuselage to create a smooth lightweight surface. In the world of boat building I know of one “Skin-on-Frame” ultralight kayak and canoe designers suggests one can use the film as a lighter, smoother alternative to paint or varnish on heavy nylon fabric covering a kayak or canoe frame, though at significant cost. I have never used Aircraft film.
Model Aircraft fabric requires less heat than I use for TPU coated nylon-66 fabric. I find the TPU coated fabric seals best with an iron in the 205 to 225 degree Centigrade (C) temperature range. The Nylon 66 melts at temperatures over 240 degrees. The hottest of the model aircraft fabrics, Monokote, requires temperatures from 100 to 175 degrees C. Low temperature model aircraft fabrics may only need 65 to 80 degrees C.
Given the price range, one would expect significant temperature variation, perhaps 20 to 40 degree C from one iron to the next. But I found much better accuracy, all three Coverite were set for a maximum heat at 199 to 201 degrees C, identical to the Top Flight iron. The thermostats in these irons provide about a ten degree cycle. From the factory this means they hit a peak temperature of 199 to 200 degrees, then cool to 189 to 190 degrees before the thermostat kicks back on and heats back up to 200 degrees.
In use, the heat transferring to the fabric and its underlying base, cools the iron down much further, often under 175 degrees. At the lower temperature the fabric may appear to have “wetted” and sealed, but it is only lightly stuck together and will readily peal apart. To avoid this I prefer a hotter iron, one that doesn’t cool below 205 degrees in the thermostat cycle, as measured with my infrared thermometer or the Coverite thermometer.
While this is just barely hot enough to melt the TPU coating, I preferred to increase the temperature range on all of the irons by adjusting the thermostats in each from 1/8 to ¼ turn. The hotter iron cycled
While it is possible to test the iron’s temperature on scrap TPU coated fabric, I recommend using a thermometer so you be sure the peak temperature is not going to melt your nylon and so you can check it over time. Coveright sells a fine, inexpensive thermometer. I use an inexpensive infrared thermometer. One could easily use an oven meat thermometer. A thermometer lets you know the high and low temperature at your desired setting. It gives you confidence in your iron’s performance.
Dimensions: Coverite is 48mm wide while the Top Flight is 42mm wide. The Coverite is wider because it has rounded “wings” on each side for smoothing around aircraft wings and in tight places. They are both 120 mm long.
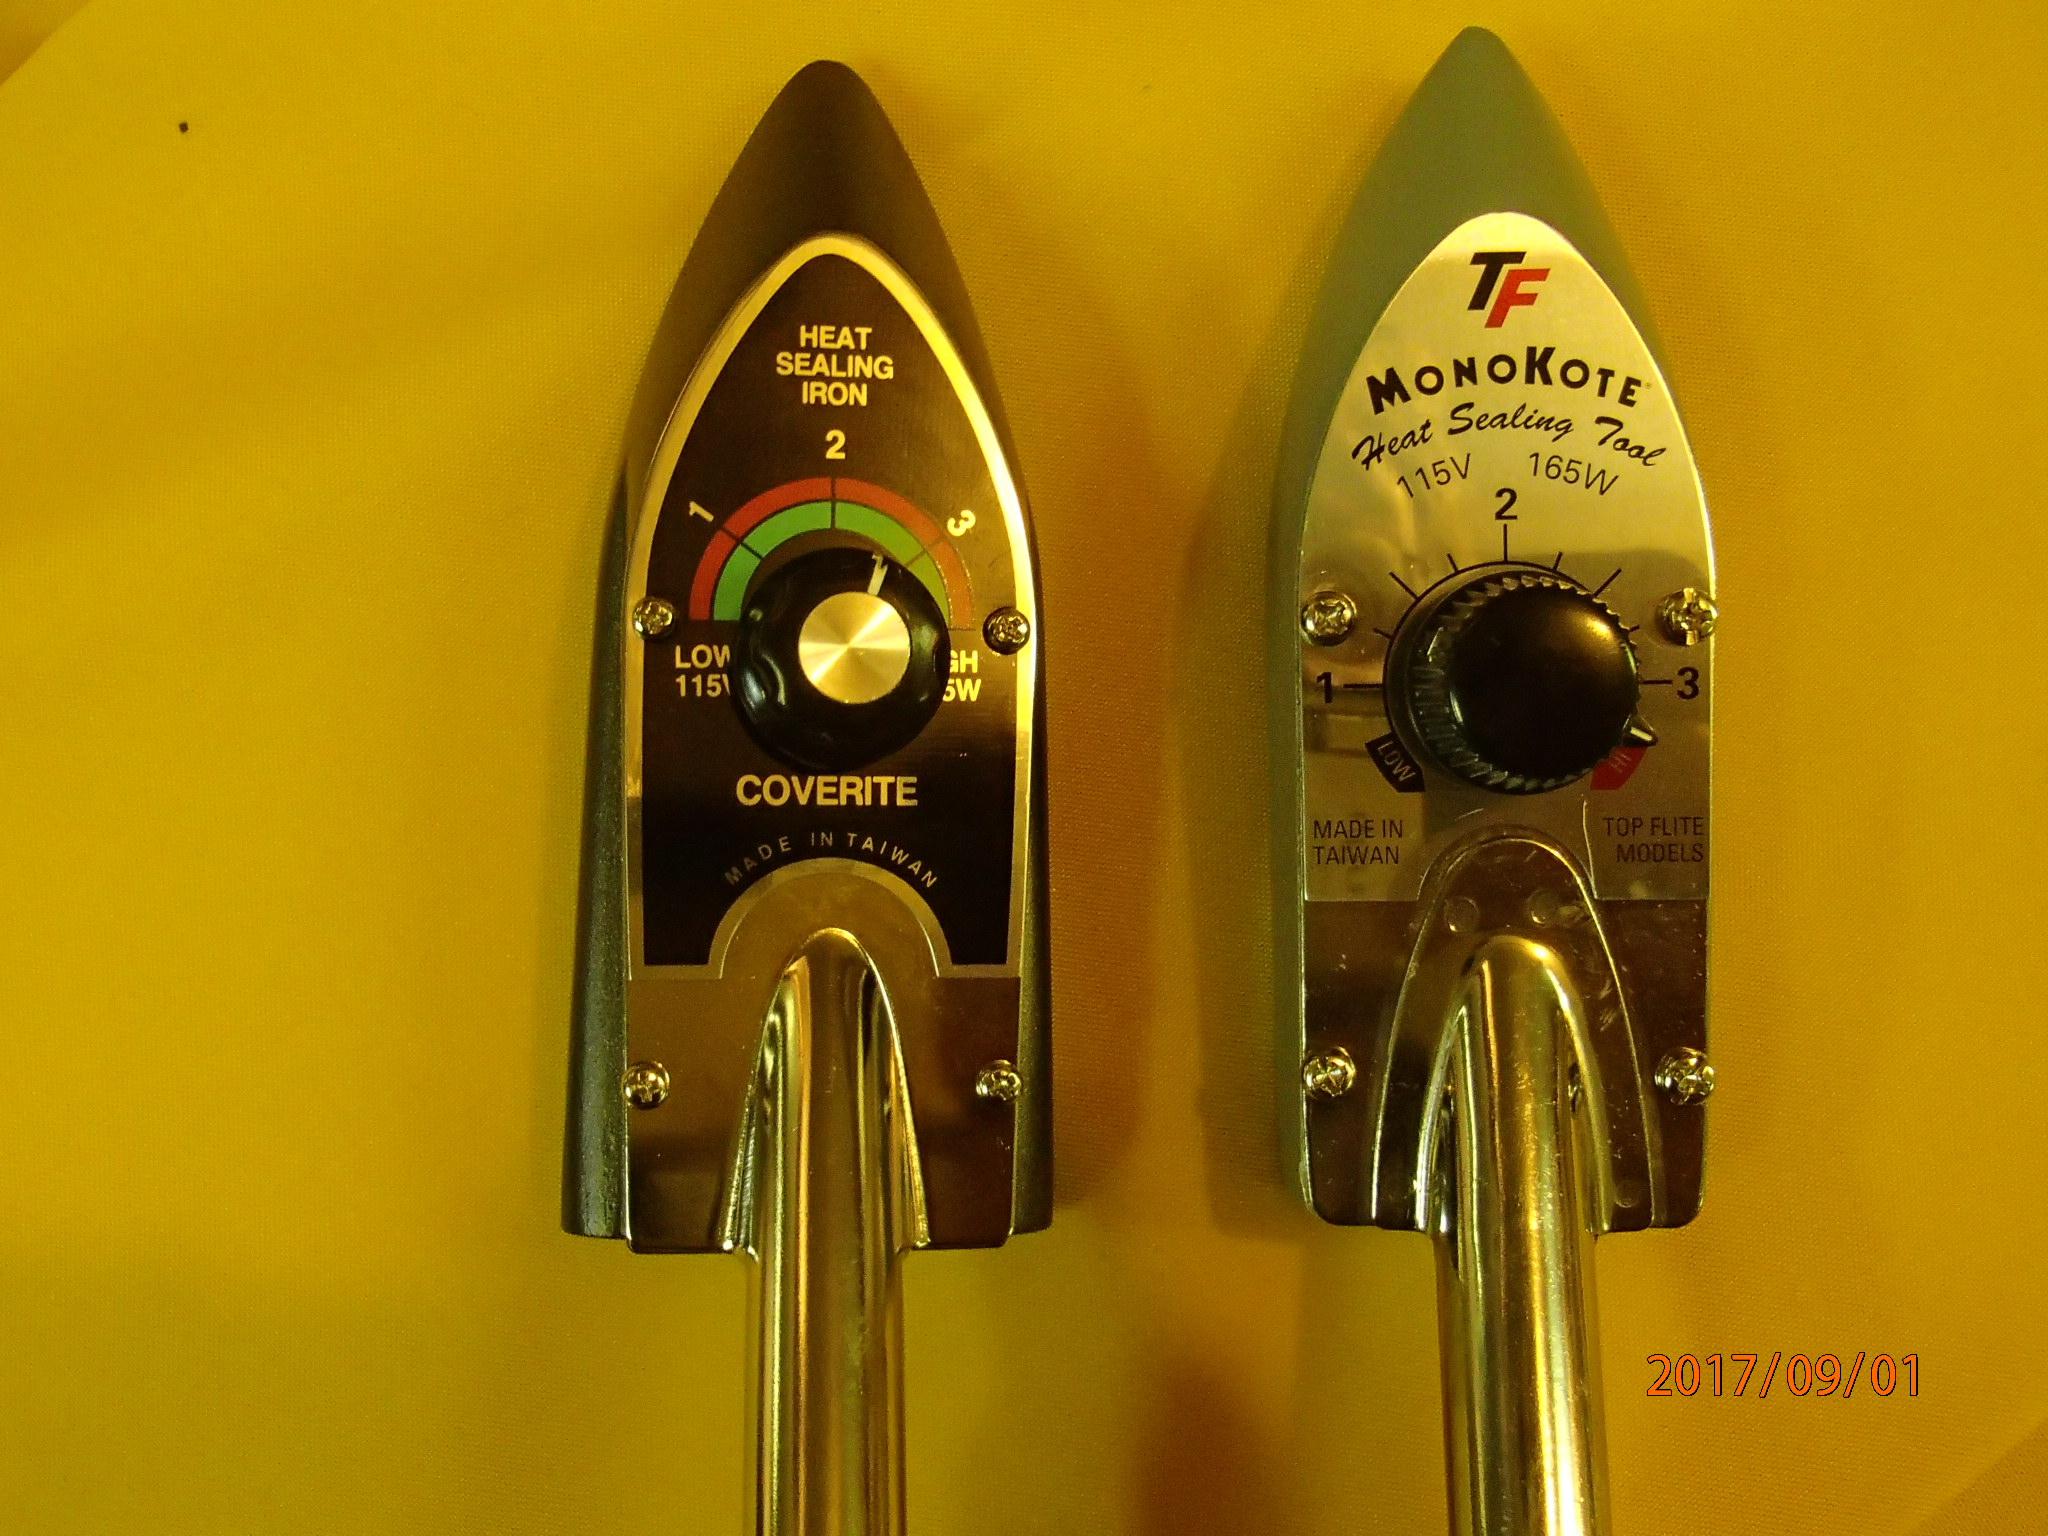
The Coverite handle, left, is a single piece that should prove to be stronger and less prone to failure.The handle on the Top Flight, right, is spot welded to the metal cover for the iron.
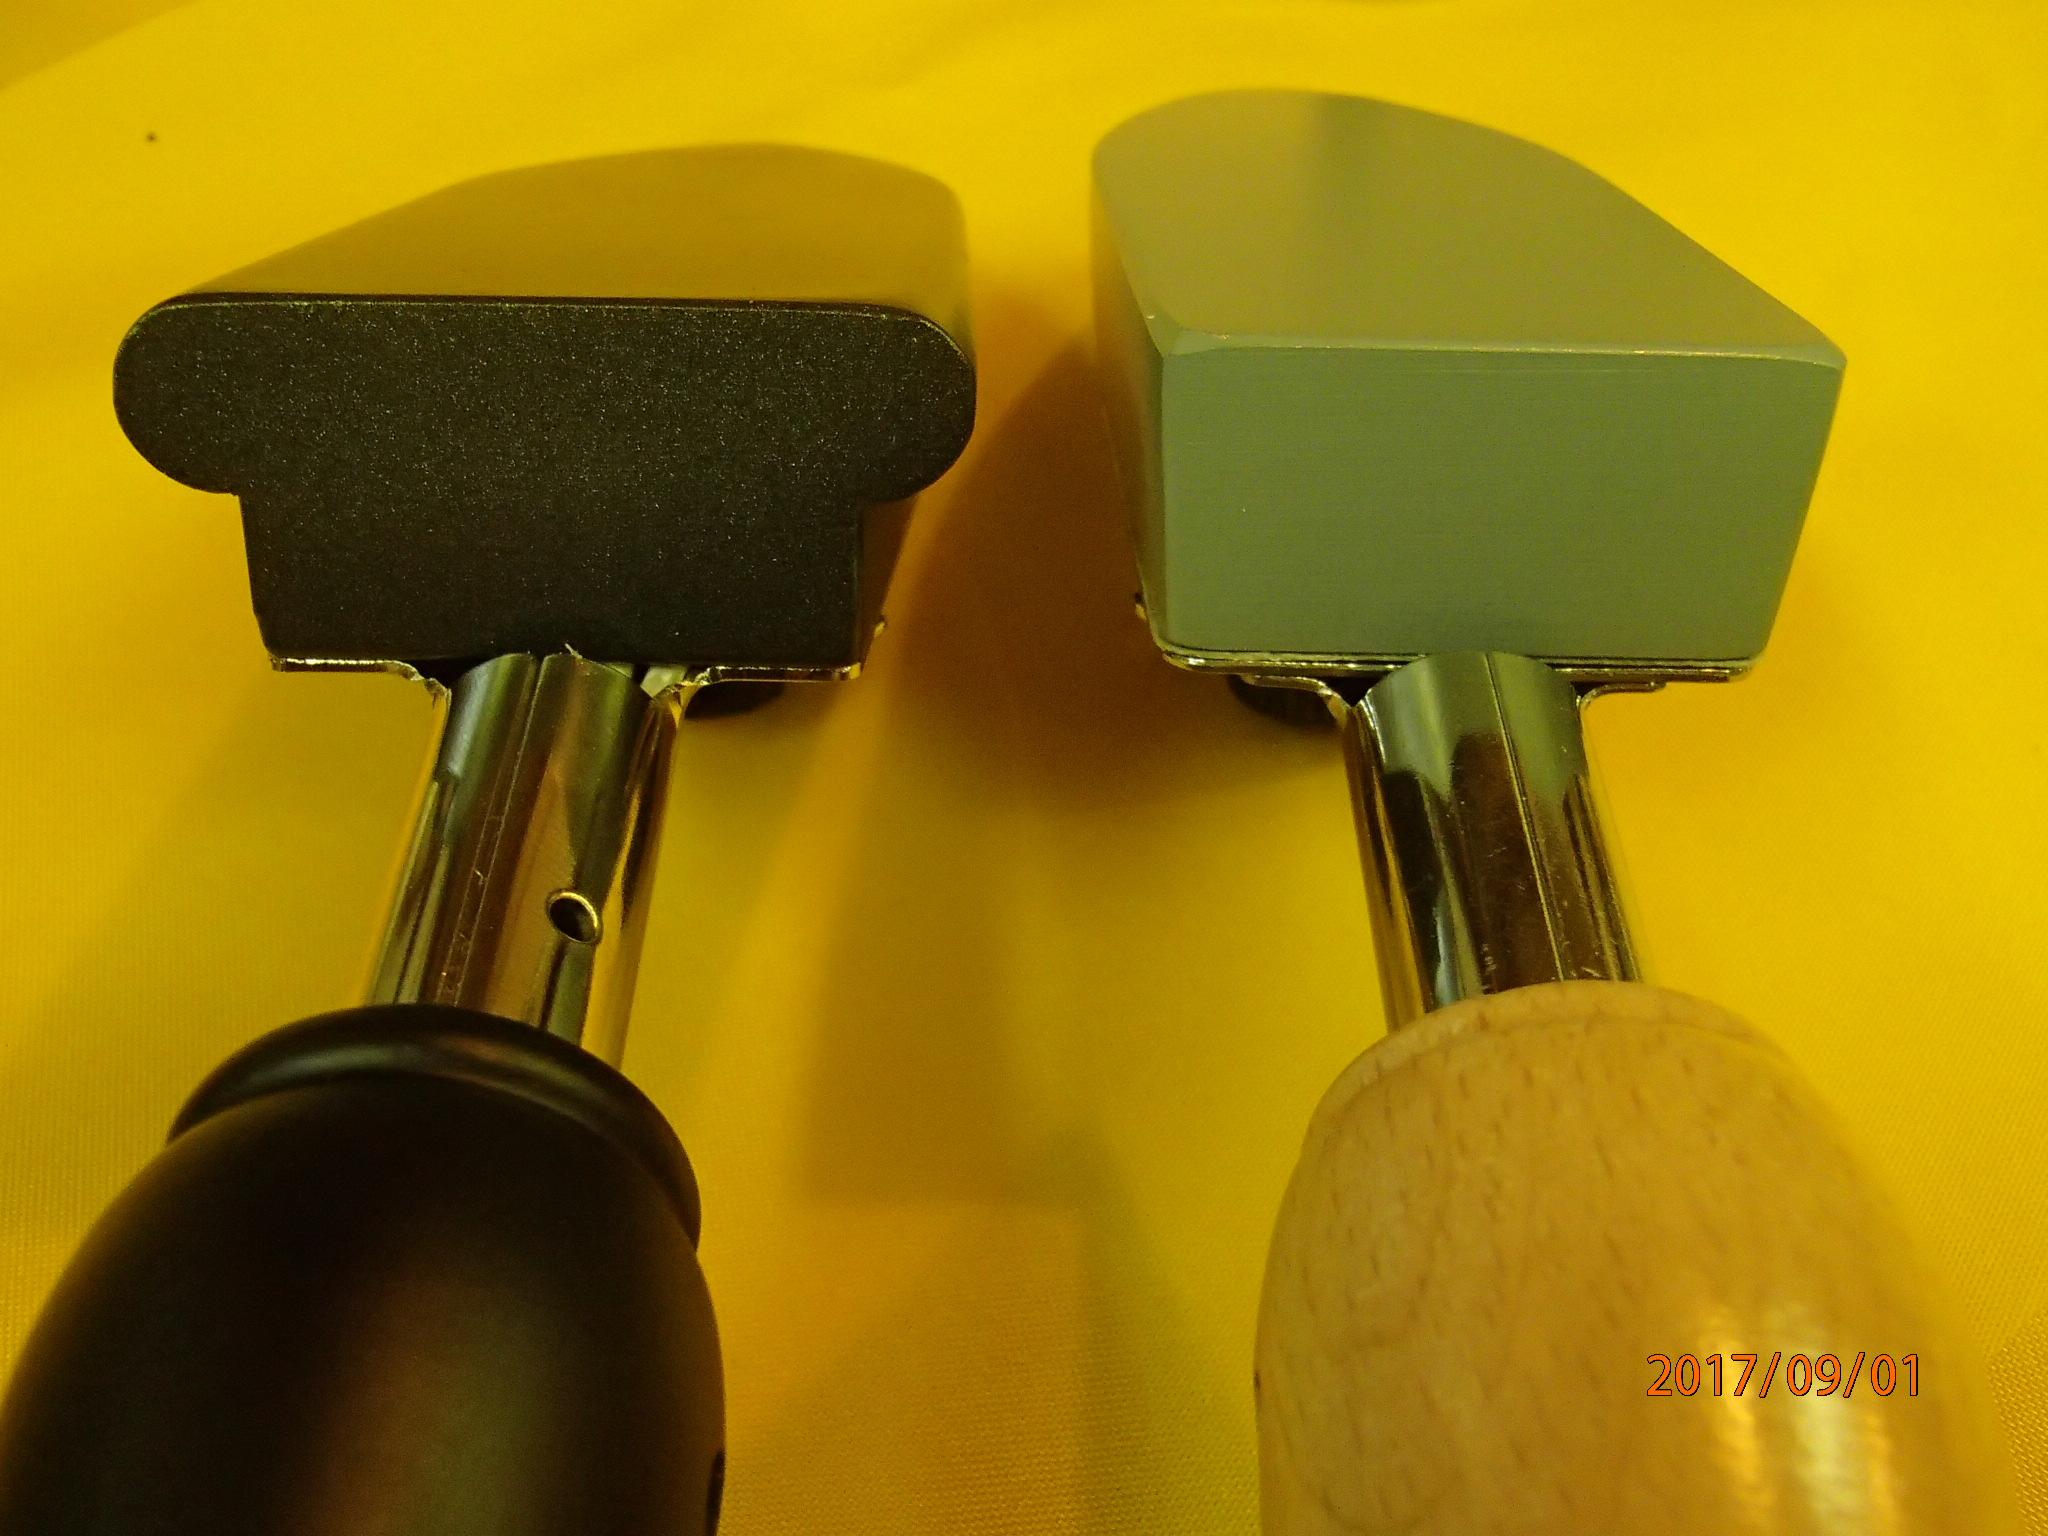
The rounded ‘wings’ of the Coverite on left, square Top Flight on right.
Similarities:
Both have similar ceramic heating elements, the same ceramic tip on the thermostat, and both are adjustable with a fine screwdriver inserted into the brass stem under the knob.
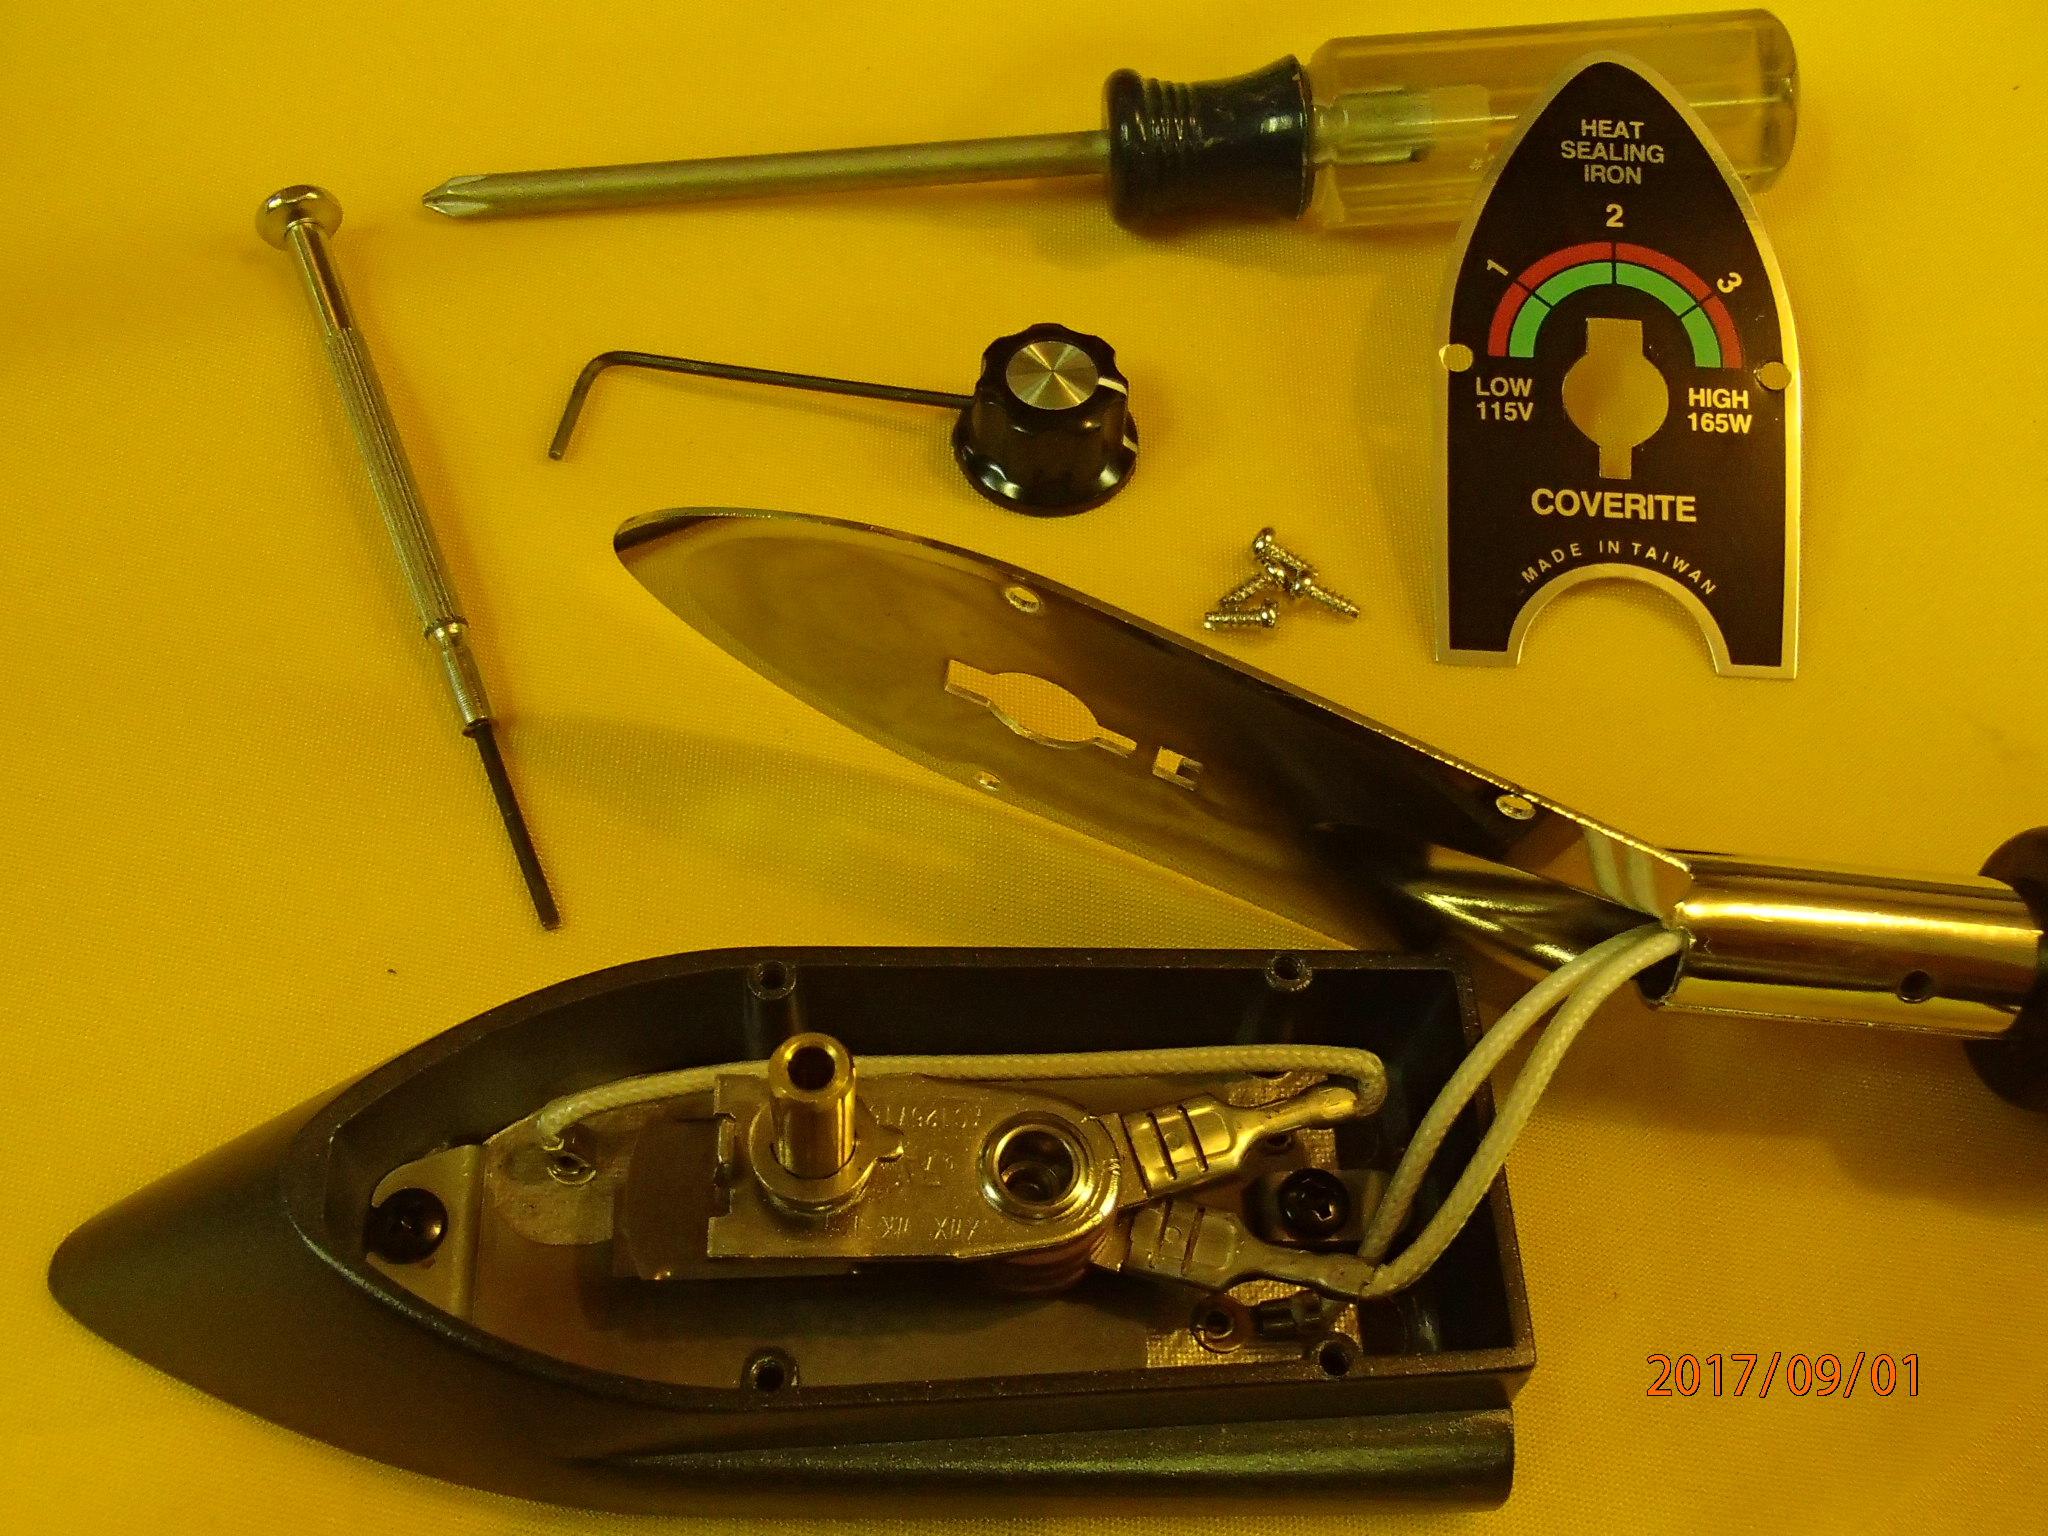
The Coverite internal components are firmly attached to the base of the iron with two black screws. The wiring has glass fiber or other high temp insulation. While the core heating element and thermostat appears identical from my visual inspection. In my opinion, the wiring and solid attachment of the Coverite is superior.
The internal parts for the Top Flight are not screwed to the bottom of the iron foot.
Both irons use what appears to be the same thermostat with superior ceramic tip. The white ceramic tip on the bimetallic thermostat is visible in the center of the photo above. The ceramic tip raises as the iron heats to break the circuit. The irons all rise about 10 degrees C before the ceramic tip breaks the circuit. They then cool 10 degrees for the circuit to be reenergized and begin to heat the foot of iron. The hottest part of all the irons is obviously in the center of the foot.

The temperature range of the thermostat is adjusted with a fine screwdriver inserted into the brass stem under the black plastic knob. A counterclockwise turn increases the heat range. It does not take much. If you need to adjust the peak temperature of your iron start with 1/8 turns and measure the temperature again. If the iron gets too hot, the thermostat may fail, ruining the iron.
The Jindga Electrothermal Products 220v 150 watt heating iron is designed for ironing leather goods. It is a very solid feeling iron with a narrow but massive aluminum foot. The thermostat dial reads from 50 degrees to 350 degrees Centigrade. It has a very nice red light indicating when the current is on and the iron is still heating, blinking when it is at temperature, and off when the thermostat has cut the current off.

It is a three wire, grounded, Chinese 220 volt appliance, which as I understand it is similar to a European 220 volt wiring. As such, one leg is 220 volts and the other neutral, the third wire is a ground. Some internet advice indicated one could use US 220 volt, which is composed of two 110 legs, each out of phase with the other. If you can figure this out, you might be able to use the iron on 220, I found I didn’t have to because it came with a simple converter plug for US 110 volt outlets and it worked. I can only recommend using it on 110 volt current, because that’s all I’ve tried. Lyn St. George, the original discoverer, used it with 220, and the aluminum blistered. I don’t know why.
I’m sure it isn’t as hot as it would be in a 220 volt circuit, but it got plenty hot, measuring up to 225 degrees, and probably hotter, but I simply turned the thermostat down to find my preferred 220 degrees C. It is easy to bump the thermostat dial and inadvertently change the setting, so I put a piece of masking tape over it.
The Jindga iron is 27mm wide and 85mm long. The bottom is rounded in the narrow dimension, and it has an upswept nose. It comes with a heavy three wire cord that ends in an “I” style three prong plug. A US adaptor was included.
Using the irons
Clover Mini-Iron: I built my first raft with a Clover Mini-Iron and an old household iron. The Clover is precise, but slow. The tiny foot cools very quickly as it moves across TPU coated fabric, and it takes a long time for heat to transfer from the element down the thin stem to the wide foot. As I got more experienced with the iron I found myself setting it aside to build heat. The iron would get too hot, hot enough to melt nylon, so I always rubbed it on my smooth wooden surface, and across a small piece of test fabric before touching my raft assembly. And I always kept the iron moving on the raft fabric. To pause or hesitate risked melting the fabric when first touching the iron to the fabric. Unfortunately, the Clover is fragile and one cannot push it solidly against the fabric or it will break. I fashioned a wooden handle to fit over the foot and could press down on the handle while lightly gliding the iron along a seam.

I used an old household iron for larger areas, including sealing in the double bottom and sealing the inside of the tubes to the bottom over a wooden form. The household iron was faster, provided it was set hot enough. It was very easy to move it too fast and get only a very light “stick” between the two layers. At other times it got so hot the TPU coating bubbled and frothed. While the household iron felt like a lot of heat was being transmitted to the fabric, I found I often had to slow down and let it fully melt the TPU coating, going back over and over to work out air bubbles. Yes, I could get plenty of pressure to form the seal.
My current favorite iron is the Top Flight because I have it set to a heat cycle of 215 to 225 degrees C. This is hot, and requires keeping the iron moving when first touching fabric, but it also retains enough heat that one can keep moving over larger areas of wider seams, like the 4 cm tube to bottom seams of a raft. I also prefer the Top Flight because it is 8 mm narrower than the Coverite irons, and because I prefer the flat sides of the Top Flight.
The Coverite irons are better built, and as I get them adjusted to my preferred temperature range I’m sure they will meet or exceed the Top Flight when width is not a problem. This would be true when using a wooden form to determine the seam width.
The Jindga Iron’s narrower 27 mm wide foot is desirable. However, I found it to be slightly too rounded. It required moving it back and forth to melt even a 2 cm width of fabric. It needs a flatter foot to heat more fabric at a time. The rounded foot makes sealing a larger area, even a 20mm wide seam, difficult to seal without trapping air bubbles and it goes much slower. Modification needed: I simply filed the foot flat.
Update: After I filed a 15mm flat on the bottom of the Jindga iron, its performance is greatly enhanced. The iron stays hot, it doesn’t lose heat like the other irons, due to its massive aluminum foot and the nature of the heating element. Using 110 poser, it heats slowly, perhaps 10 minutes of more. The blinking light lets one know when it is at temperature. Measuring with the Coverite thermometer, I do not see a temperature swing, nor does it appear to loose heat from short heat sealing efforts, like the other irons. I will definitely give this iron a hard workout in my tandem build, and will report back.
Conclusion: The Model Aircraft irons have great attraction for wider seams, such as joining tube to floor. The narrower Jindga Thermoproducts iron has a lot of potential to improve speed and quality of the heat seal in seams. I always have my Clover to fall back on!
Further research: I hope to test one of the military surplus 110 volt, 150 watt heat sealing irons next. Cheapest alternative yet. But I sure wish they could be purchased new!
Thank you for wading through this long review!
Bruce Campbell
-
September 11, 2017 at 12:31 am #4324BruceParticipant
Update to Sealing Iron Review
I misspelled the name of the leather iron manufacturer: It is Jingda. Sorry for the typo.
Valad heat sealing irons are manufactured in Montgomery New York, made in the USA. Their website is: http://heaters.valadelectric.com/item/electric-heat-sealers/hs-3t-heat-sealers/item-1115
I have placed an inquiry to Valad Electric Co. to see if they sell direct. Otherwise there a couple new ones on ebay through: MyCyberOffice for $42 plus postage at: http://www.ebay.com/itm/Valad-HS3T-Heat-Electric-Sealing-Iron-150W-120V-with-Stand-/352077085678?hash=item51f96dfbee:g:j3sAAOSw1WJZMffb
Hope this is helpful,
Bruce
-
September 18, 2017 at 4:06 pm #4646BruceParticipant
Update and current recommendations
I tested the Valad HS-3T heat sealing iron. It is the one unit I could not recommend for use with TPU coated Nylon-66 fabric.
The Valad Electrical Company hand held Heat Sealing Iron, model HS-3T, is a 165 watt stainless steel iron that I purchased for $15, well used, on eBay. It can also be purchased new for $750 from the Valad Electrical Company in Tarrytown, New York. I was drawn to the iron because of its narrower foot. Unfortunately, It is the one iron that did not work for TPU coated nylon fabric.
The Valad failed my review for two reasons:
1) The thermostat has a 30 degree C temperature swing (50 degrees F.) causing it to swing from too cool to melt the TPU coating, to too hot and melting the nylon. There is no happy medium.
2) The nice Stainless steel foot was too thin, causing the foot to have two hot spots that were much hotter than the rest of the foot, and I was unable to prevent the hot spots from melting the nylon fabric.
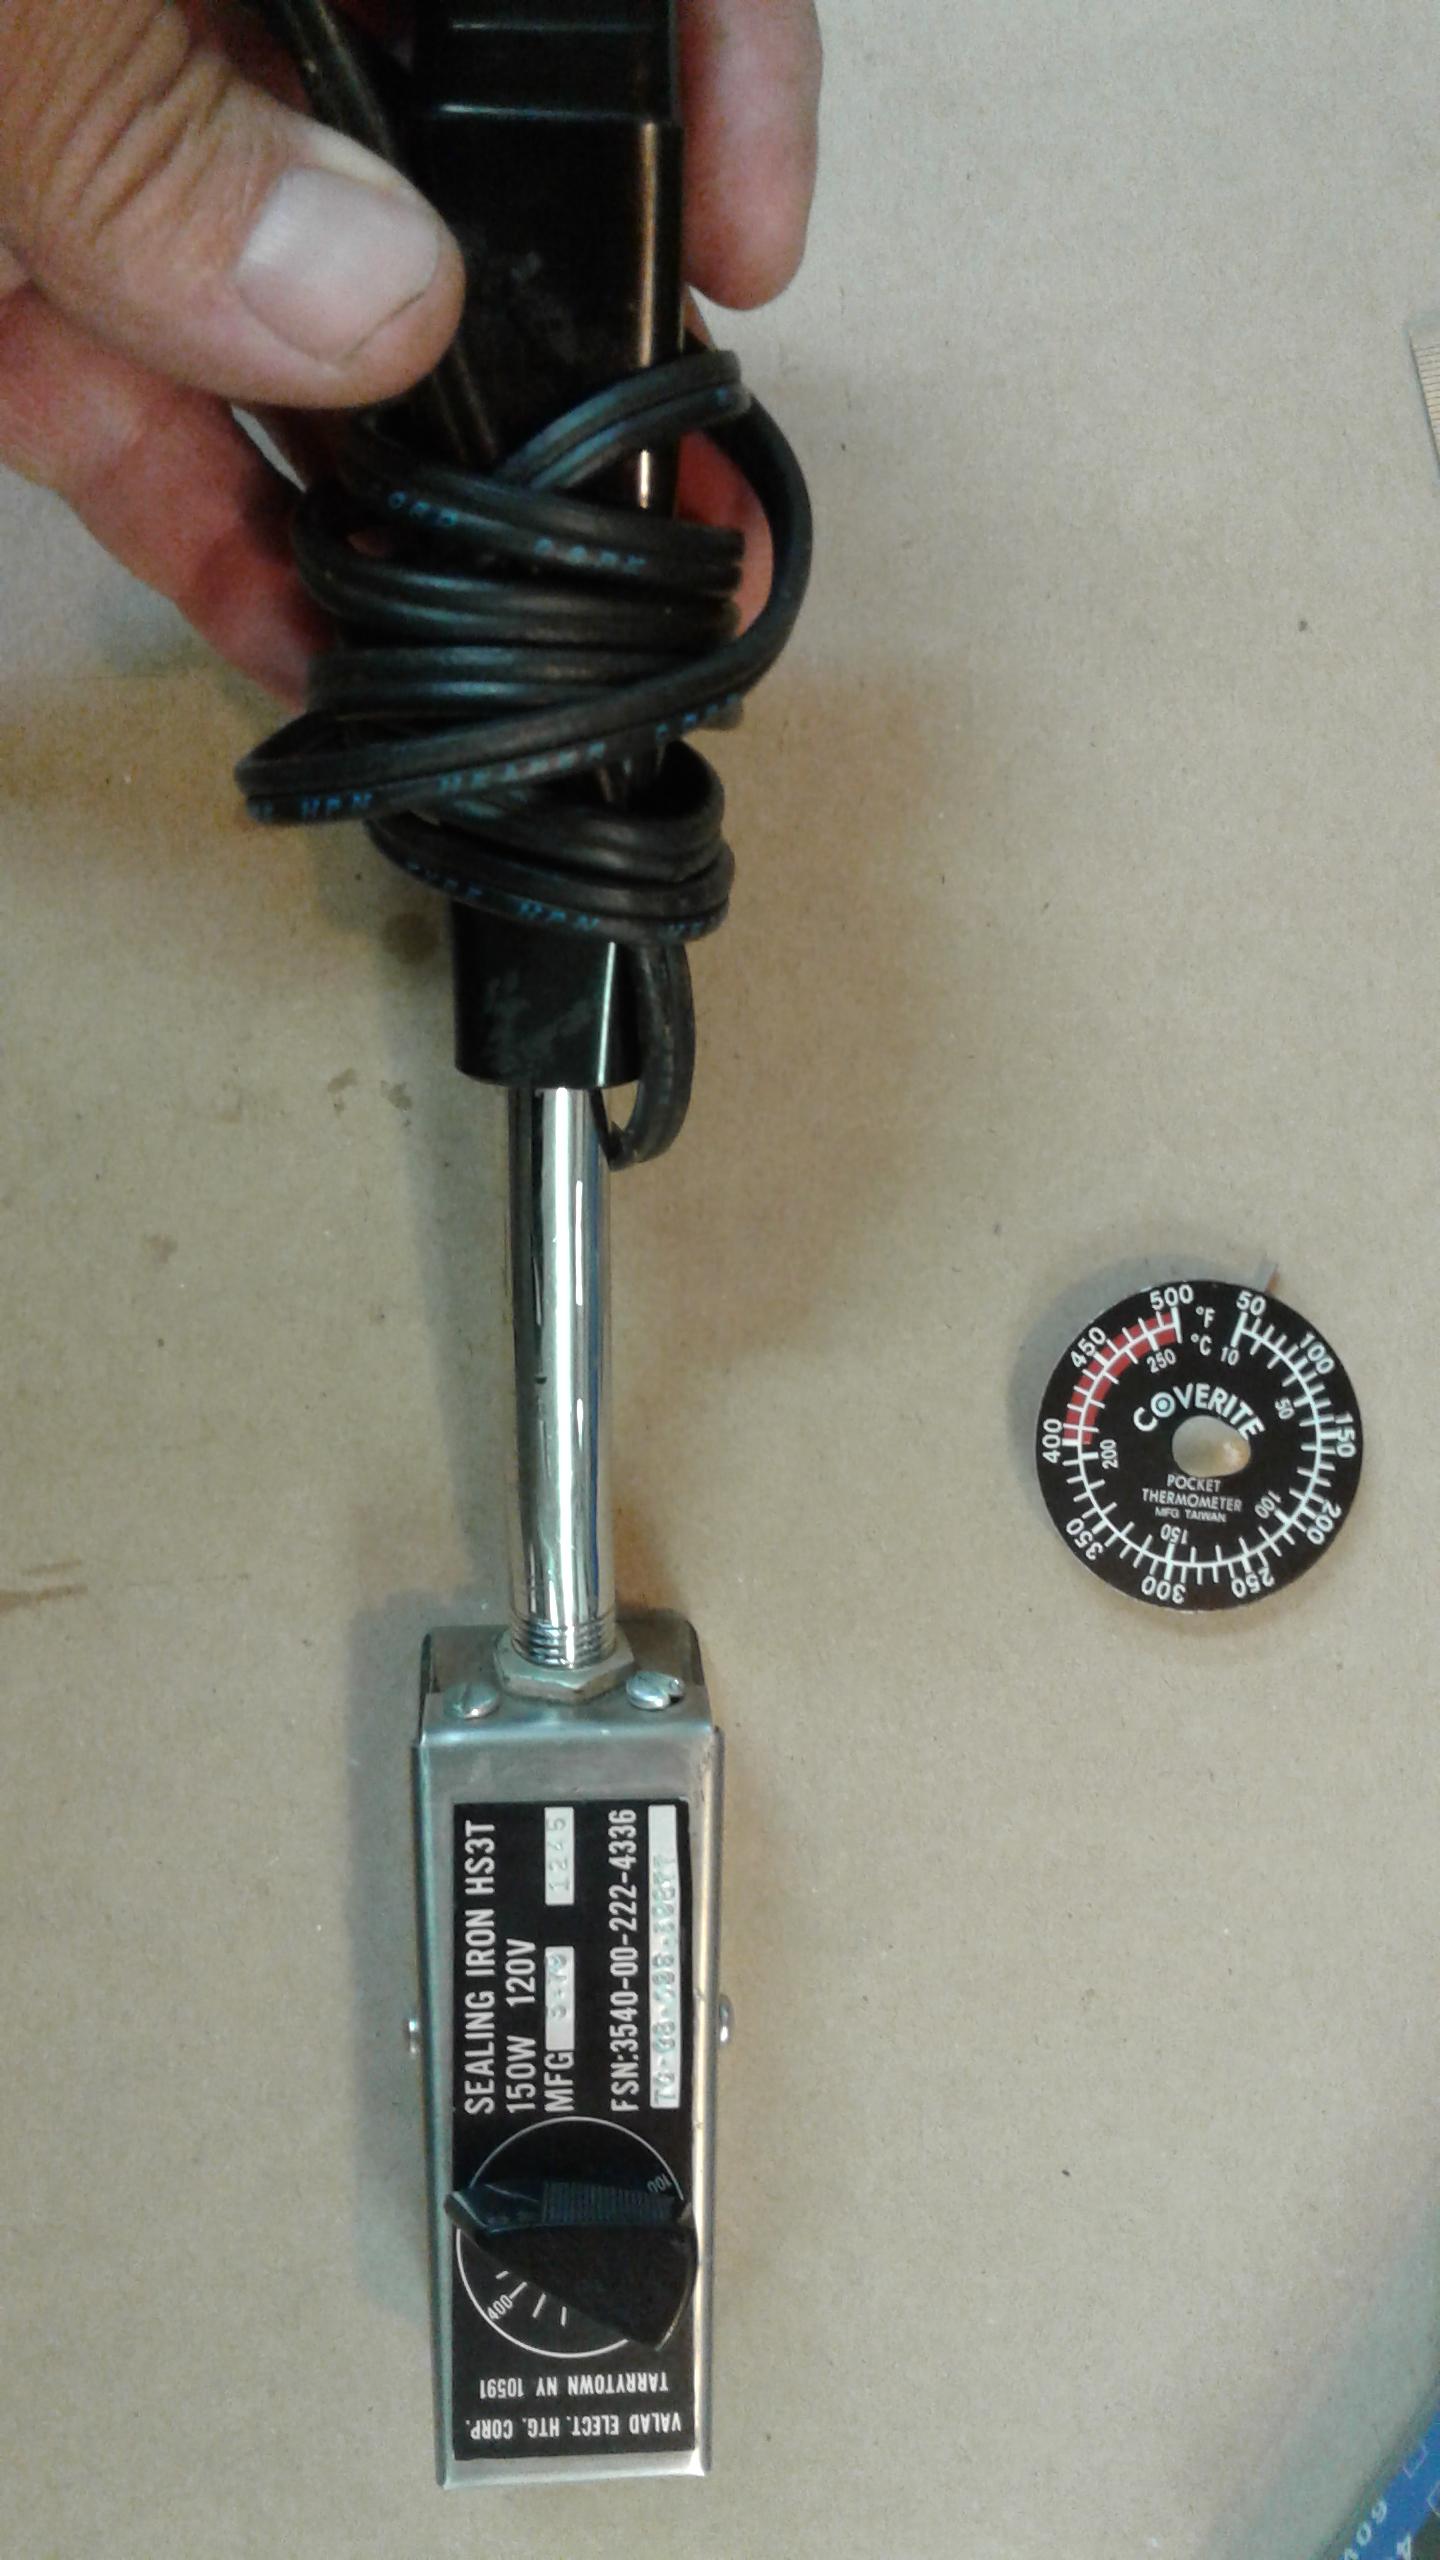
The Valad foot is about 32 mm wide, but the thermostat temperature swing is to great for use with TPU nylon fabric.
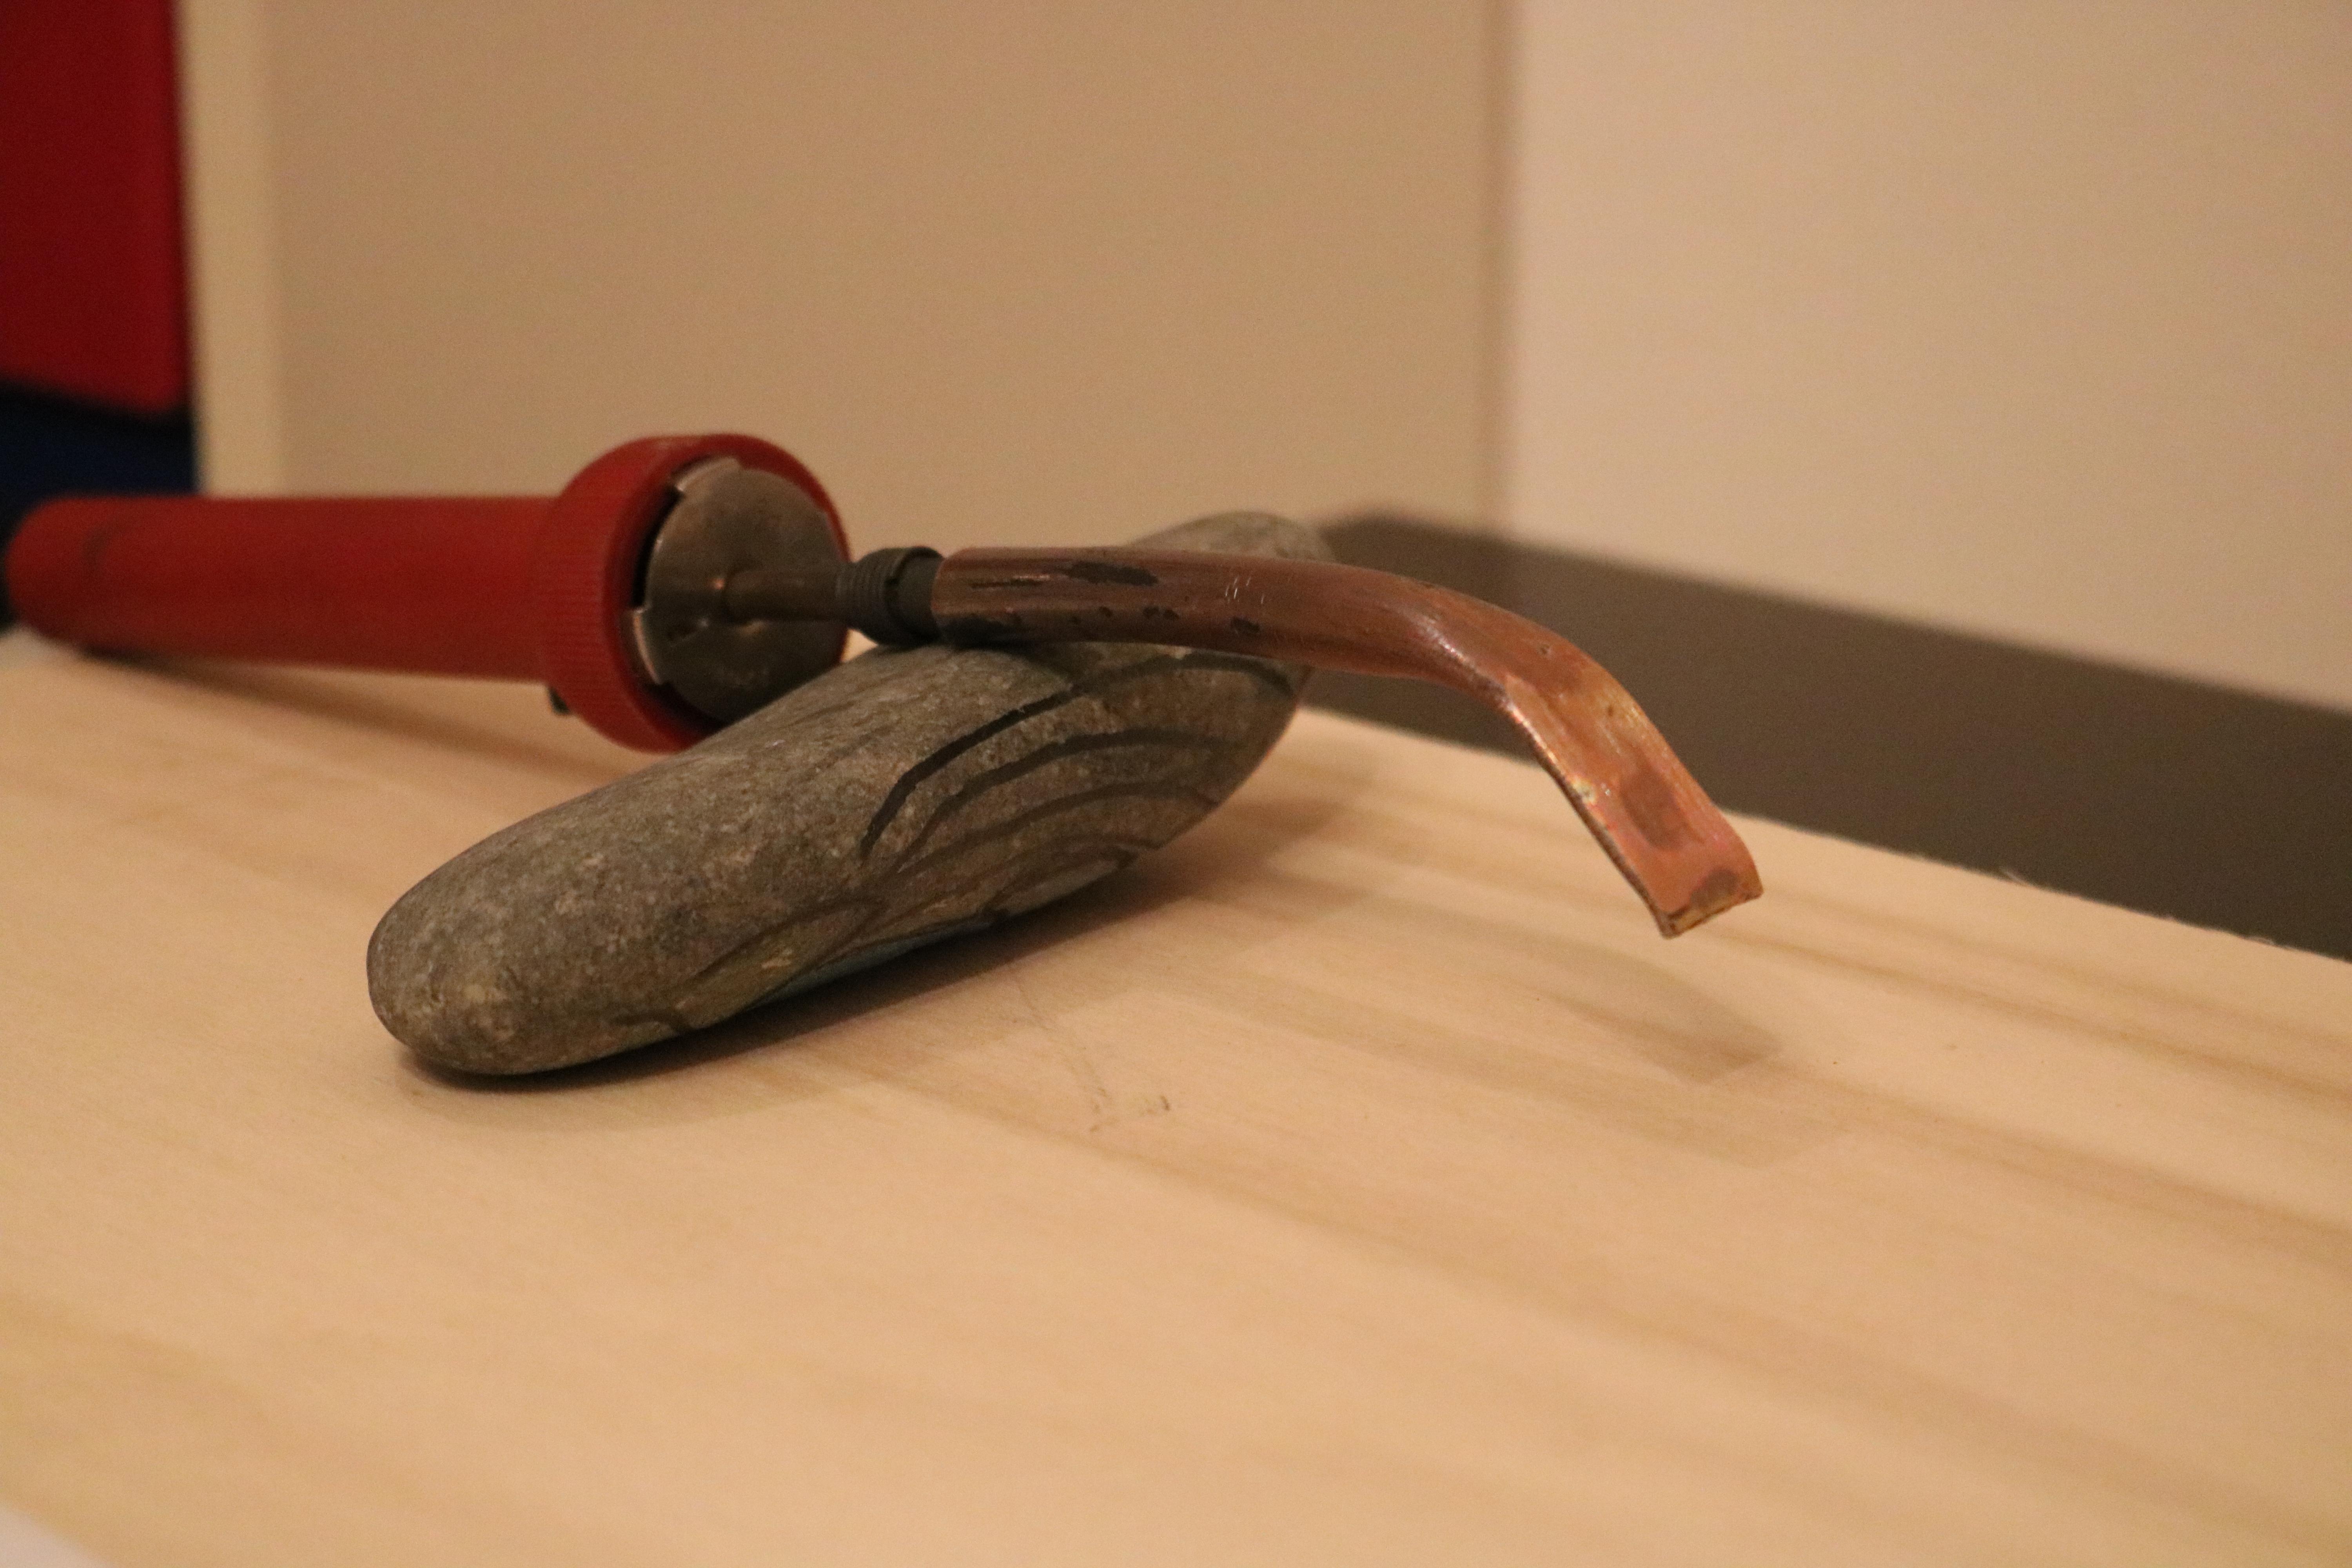
I also purchased an inexpensive 60 watt soldering iron and slid a tight fitting piece of copper refrigerator tubing over the tip. With the tubing off the iron, I flattened the tip and reinserted it to the iron.
The tubing heats slowly, and it feels much like a Clover Iron in use. I was able to get a temperature reading with the Coverite pocket thermometer. When I set the thermostat dial to 300 degrees C, the foot measured 200 degrees C. It is quite possible that it would continue to heat up if one set it aside while working on something else. Same as my Clover Iron. That is why I always have a piece of test fabric to pass the iron over before touching the packraft!
The simple homemade copper foot quickly transmits heat into the fabric. It cools quickly below the temperature needed for a full seal. Just like any iron of this size one has to move slowly down a seam and check for full adherence!
Updated conclusions:
I recommend either the Top Flight $20-30 or the Coverite $20-30 (TowerHobbies.com) heat sealing irons PLUS a Coverite pocket thermometer, digital infrared thermometer, or an oven thermometer. You need a thermometer to check the peak temperature, and to confirm the change when you adjust the peak setting of either iron. Out-of-the-box, I find them too cold by 20 to 30 degrees C.
A Clover Mini-Iron, $24, Amazon, needs reinforcement BEFORE you use it. A thin steel wire over the heating element and just barely tight under the red plastic guard. The narrow foot works seams, but it is very slow. Greatest problem using the iron is how slow one must go to prevent having a partial seal that doesn’t hold under pressure.
The Jengda 220 volt iron, purchased thru Aliexpress for $29 has potential. I have only used it on 110 volt US circuit. To use it I first filed the foot flatter. And I taped the thermostat in place because it is easy to bump. The high mass of the aluminum foot retains heat making it a faster option than the Clover.
I made a copper foot for a 60 watt soldering iron. The iron heats well above the temperature we need. A thicker piece of tubing might increase the thermal mass. One has to tape the thermostat dial in place or it too can be bumped out of whack. It is a low heat mass option and is slow to use.
Hope this helps,
Bruce
Fairbanks, Alaska
-
October 26, 2017 at 9:36 pm #4808BruceParticipant
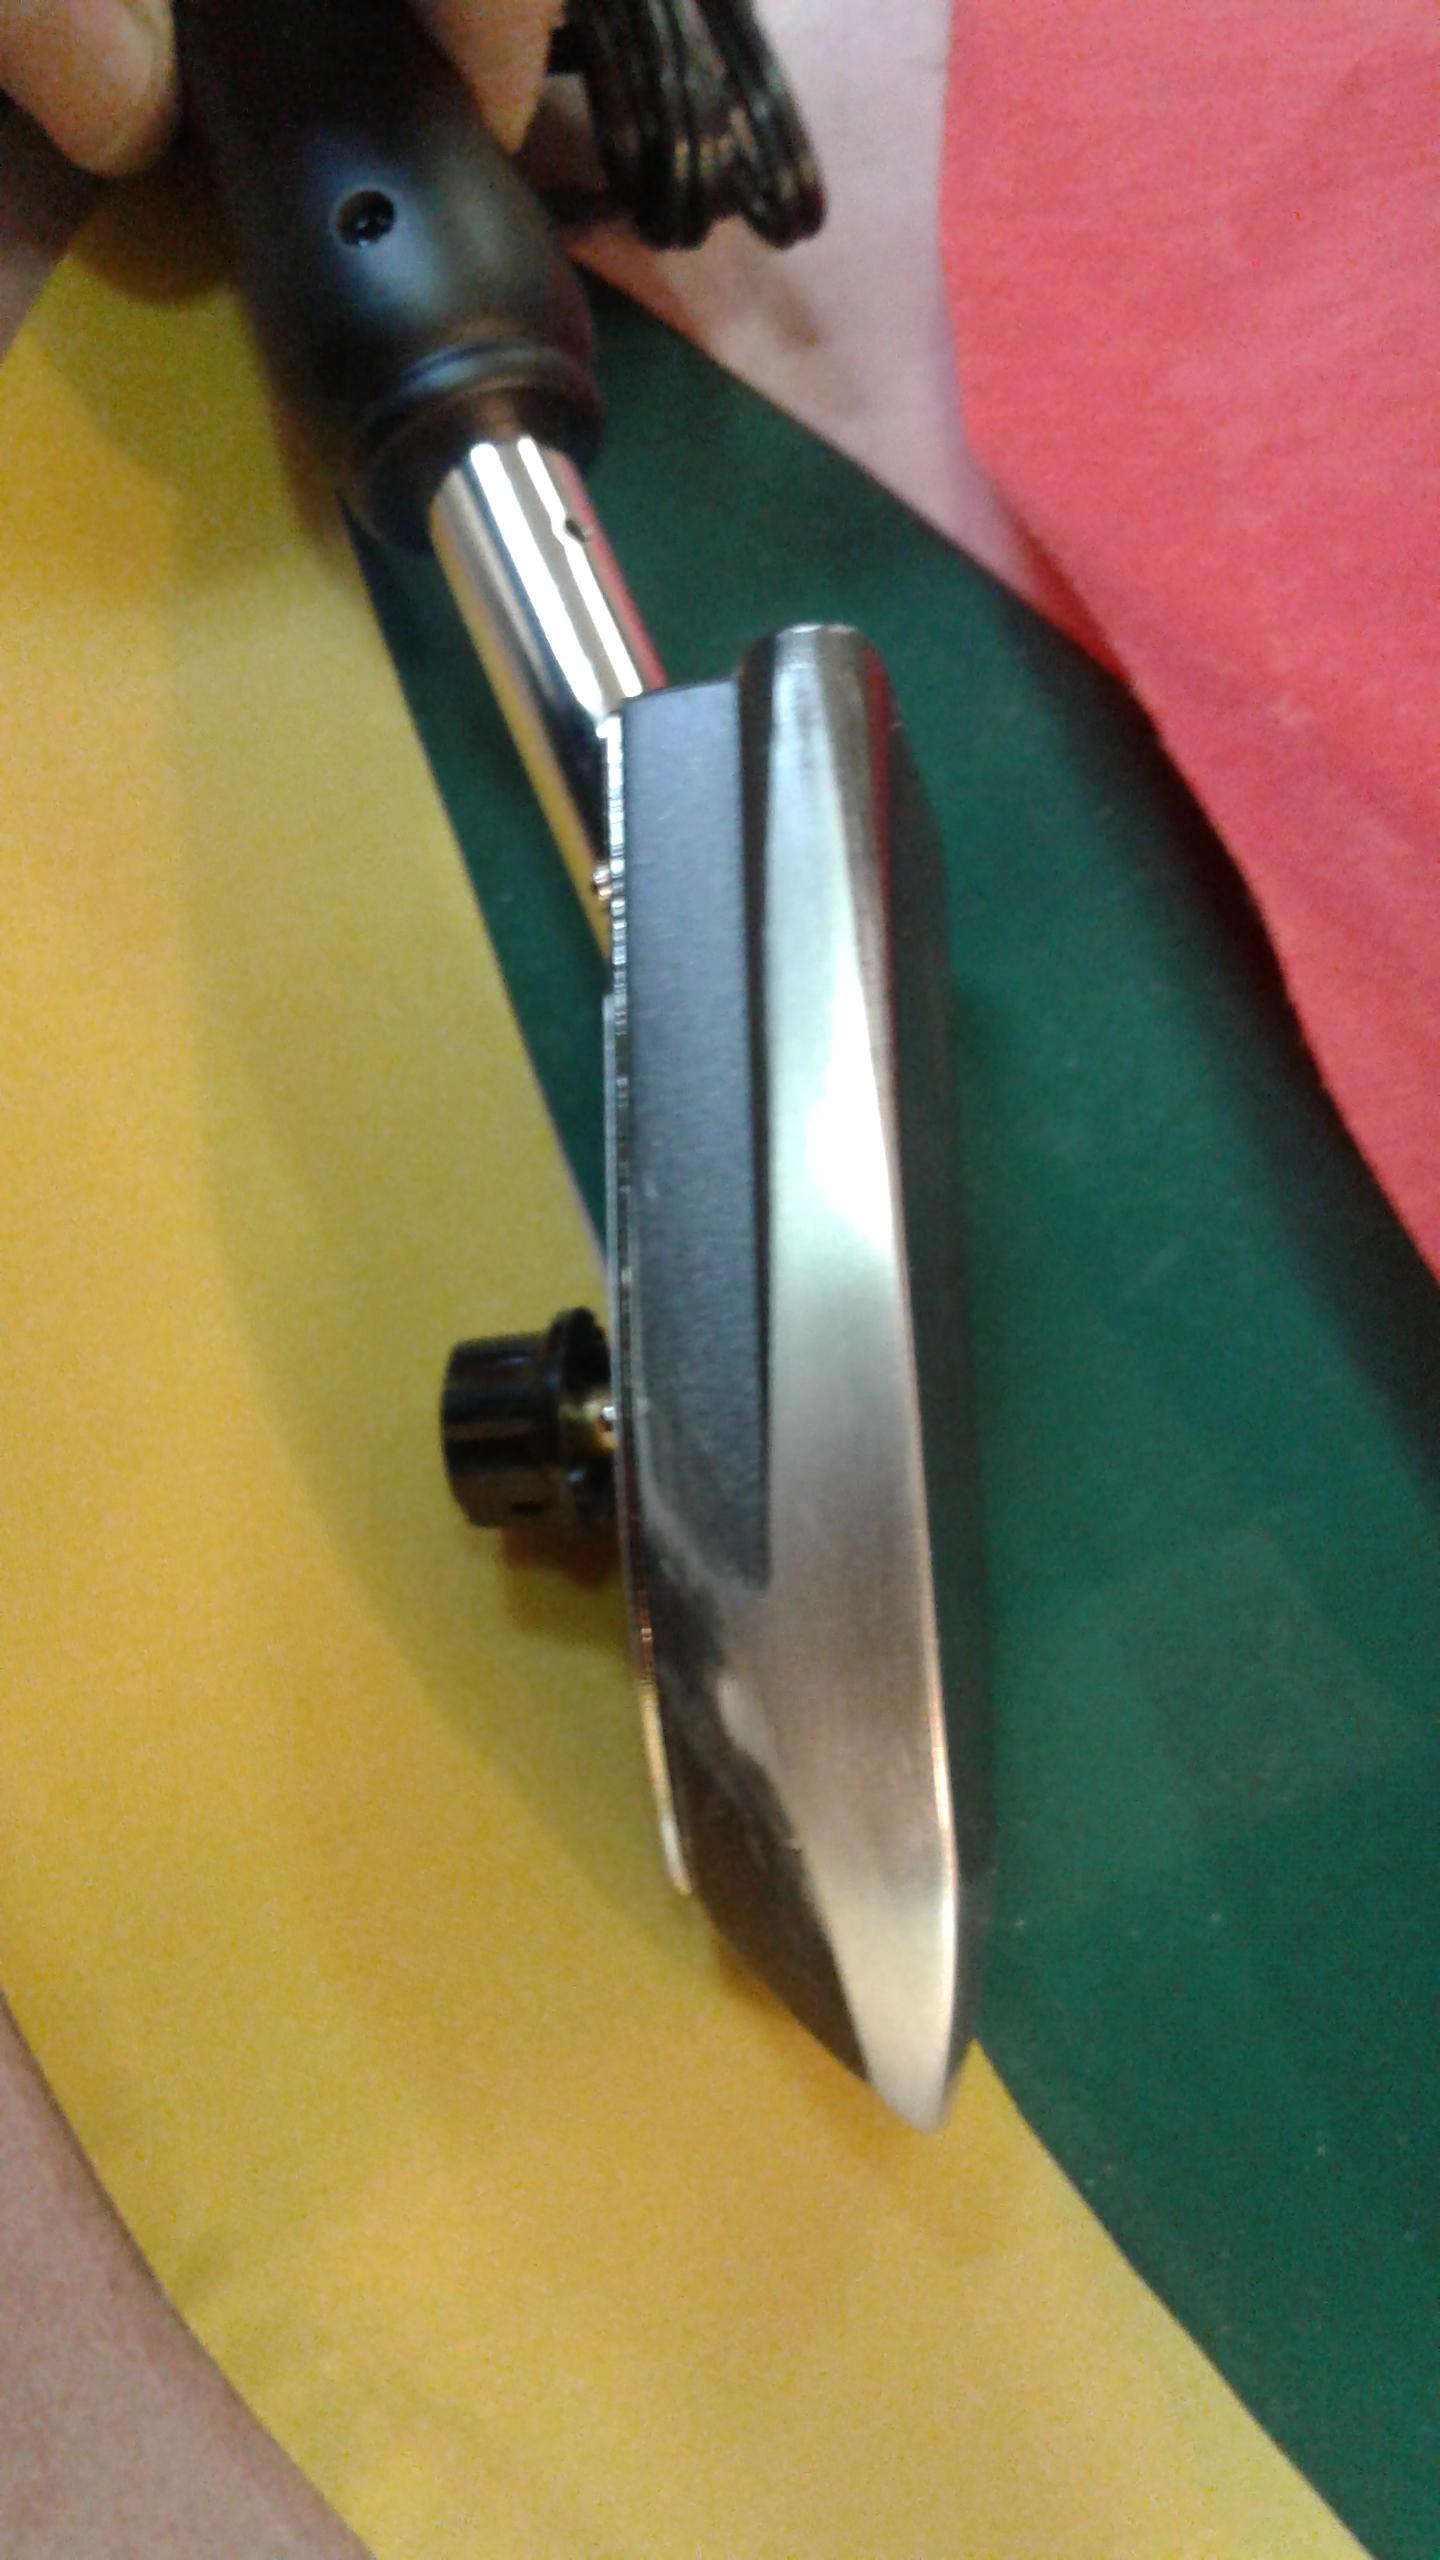
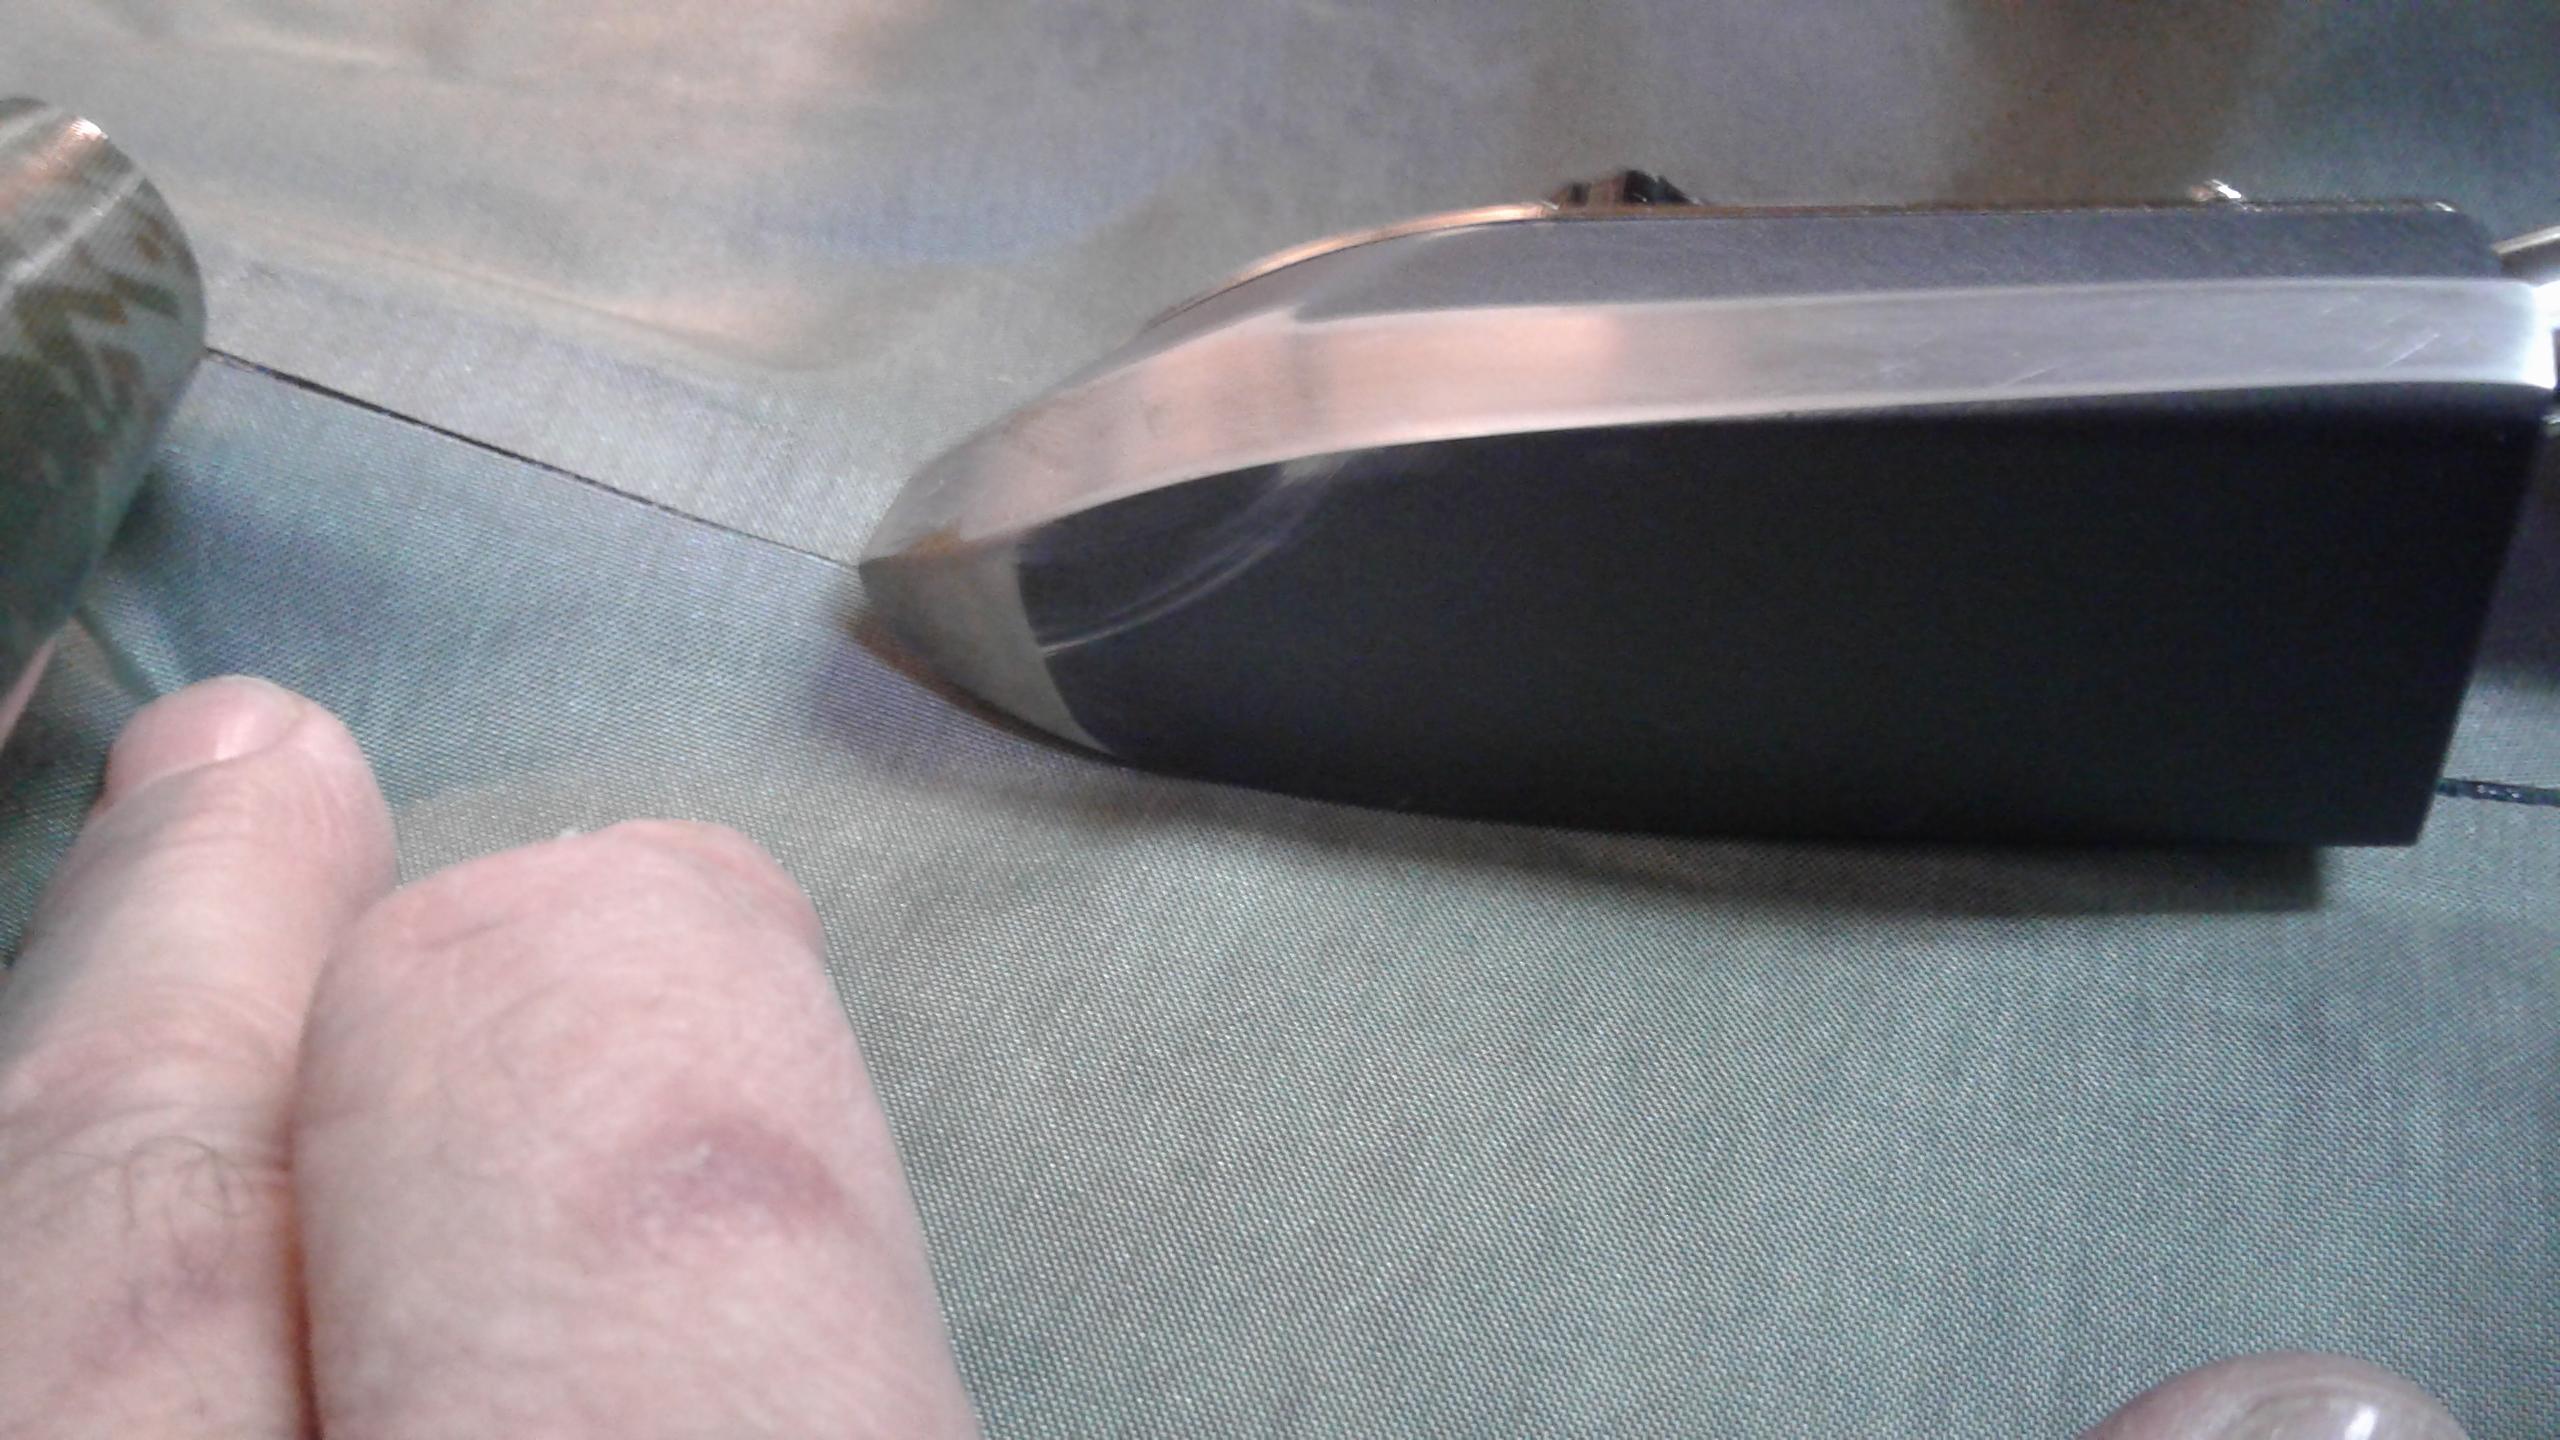
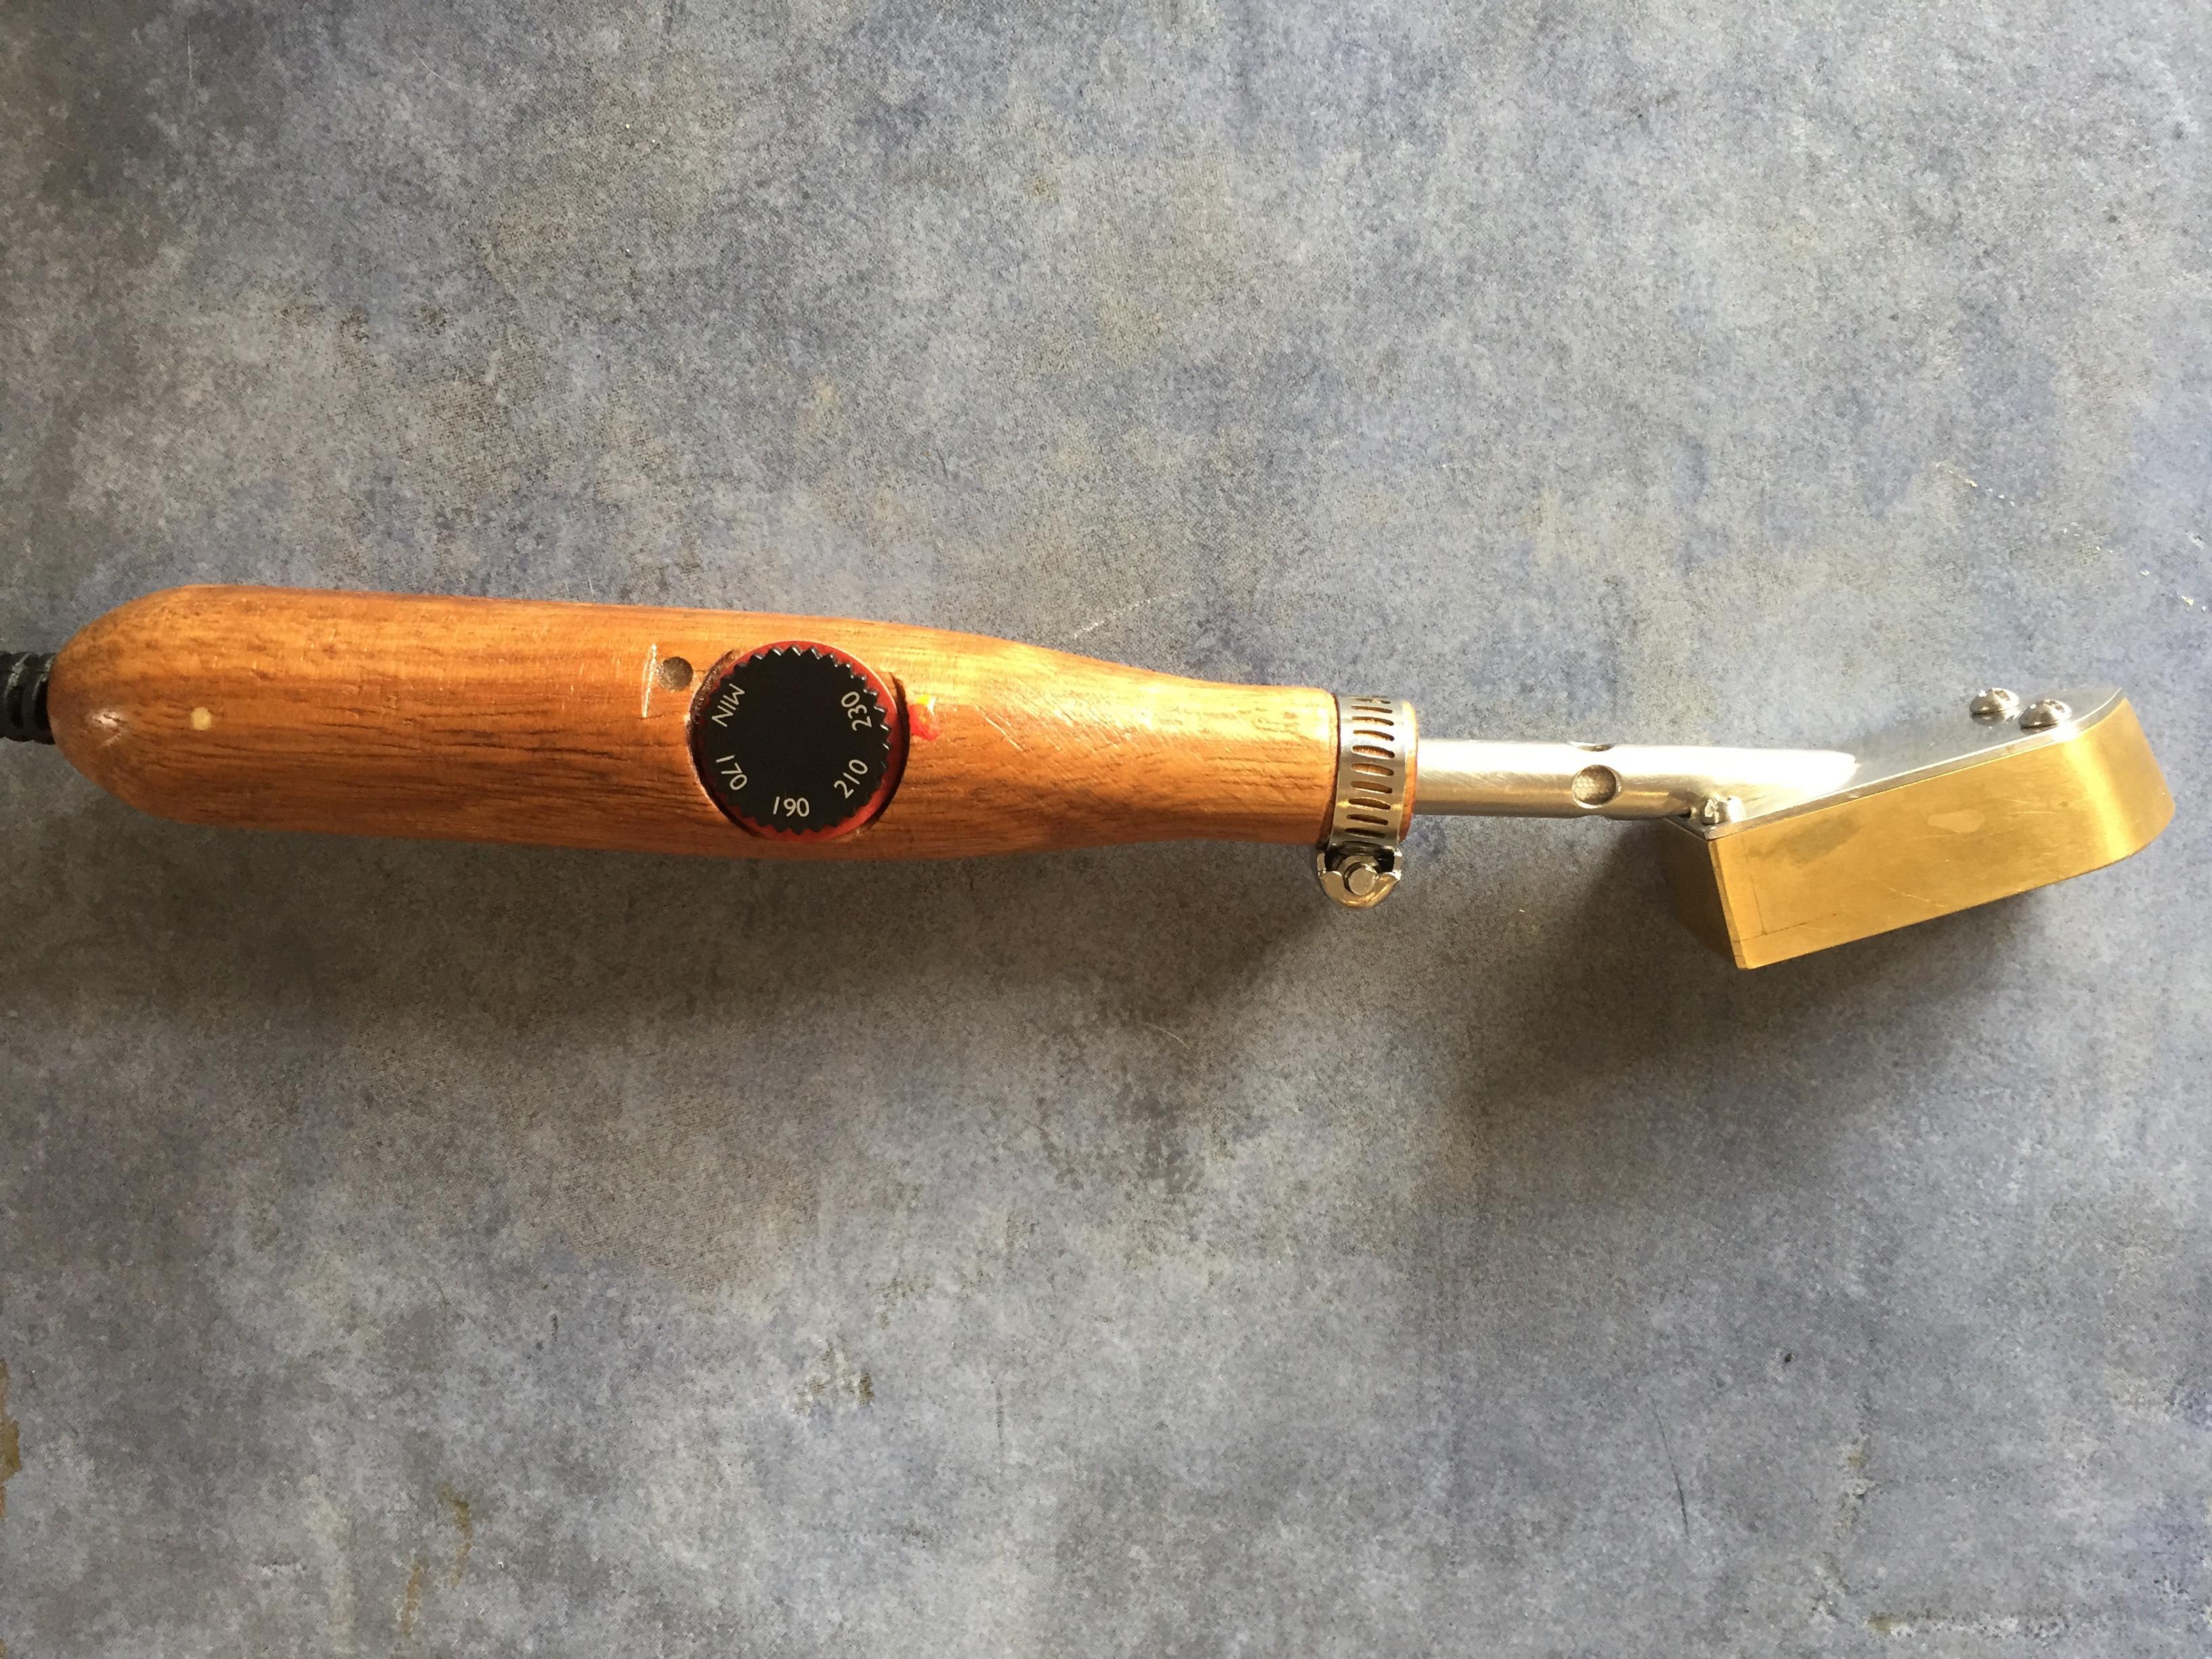
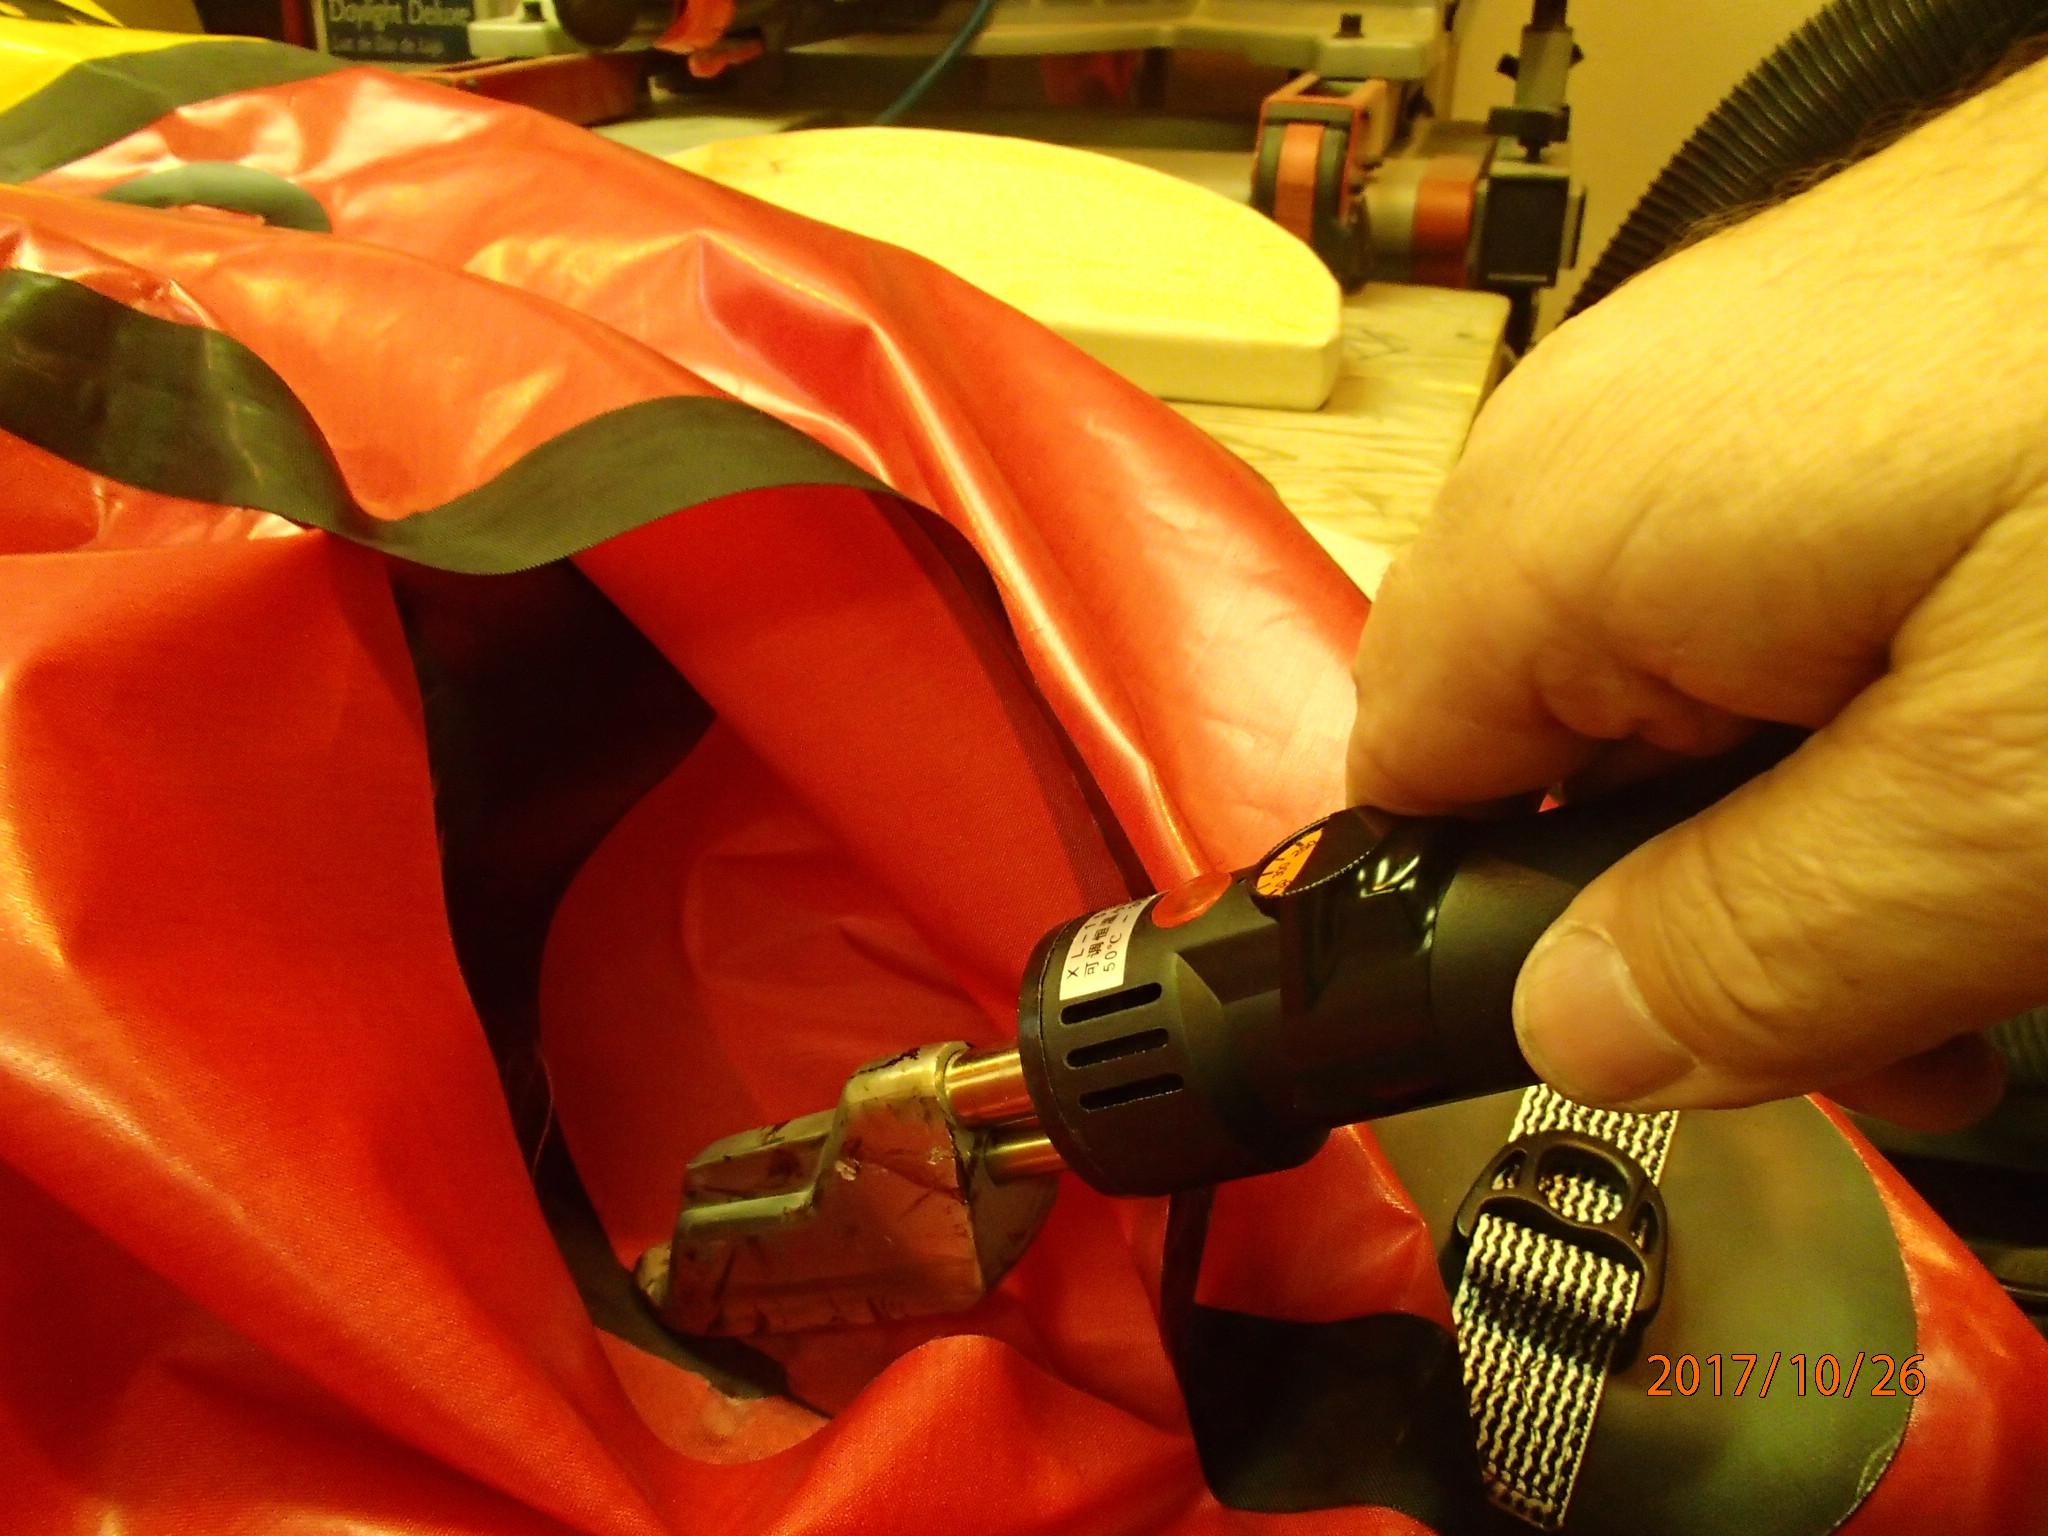
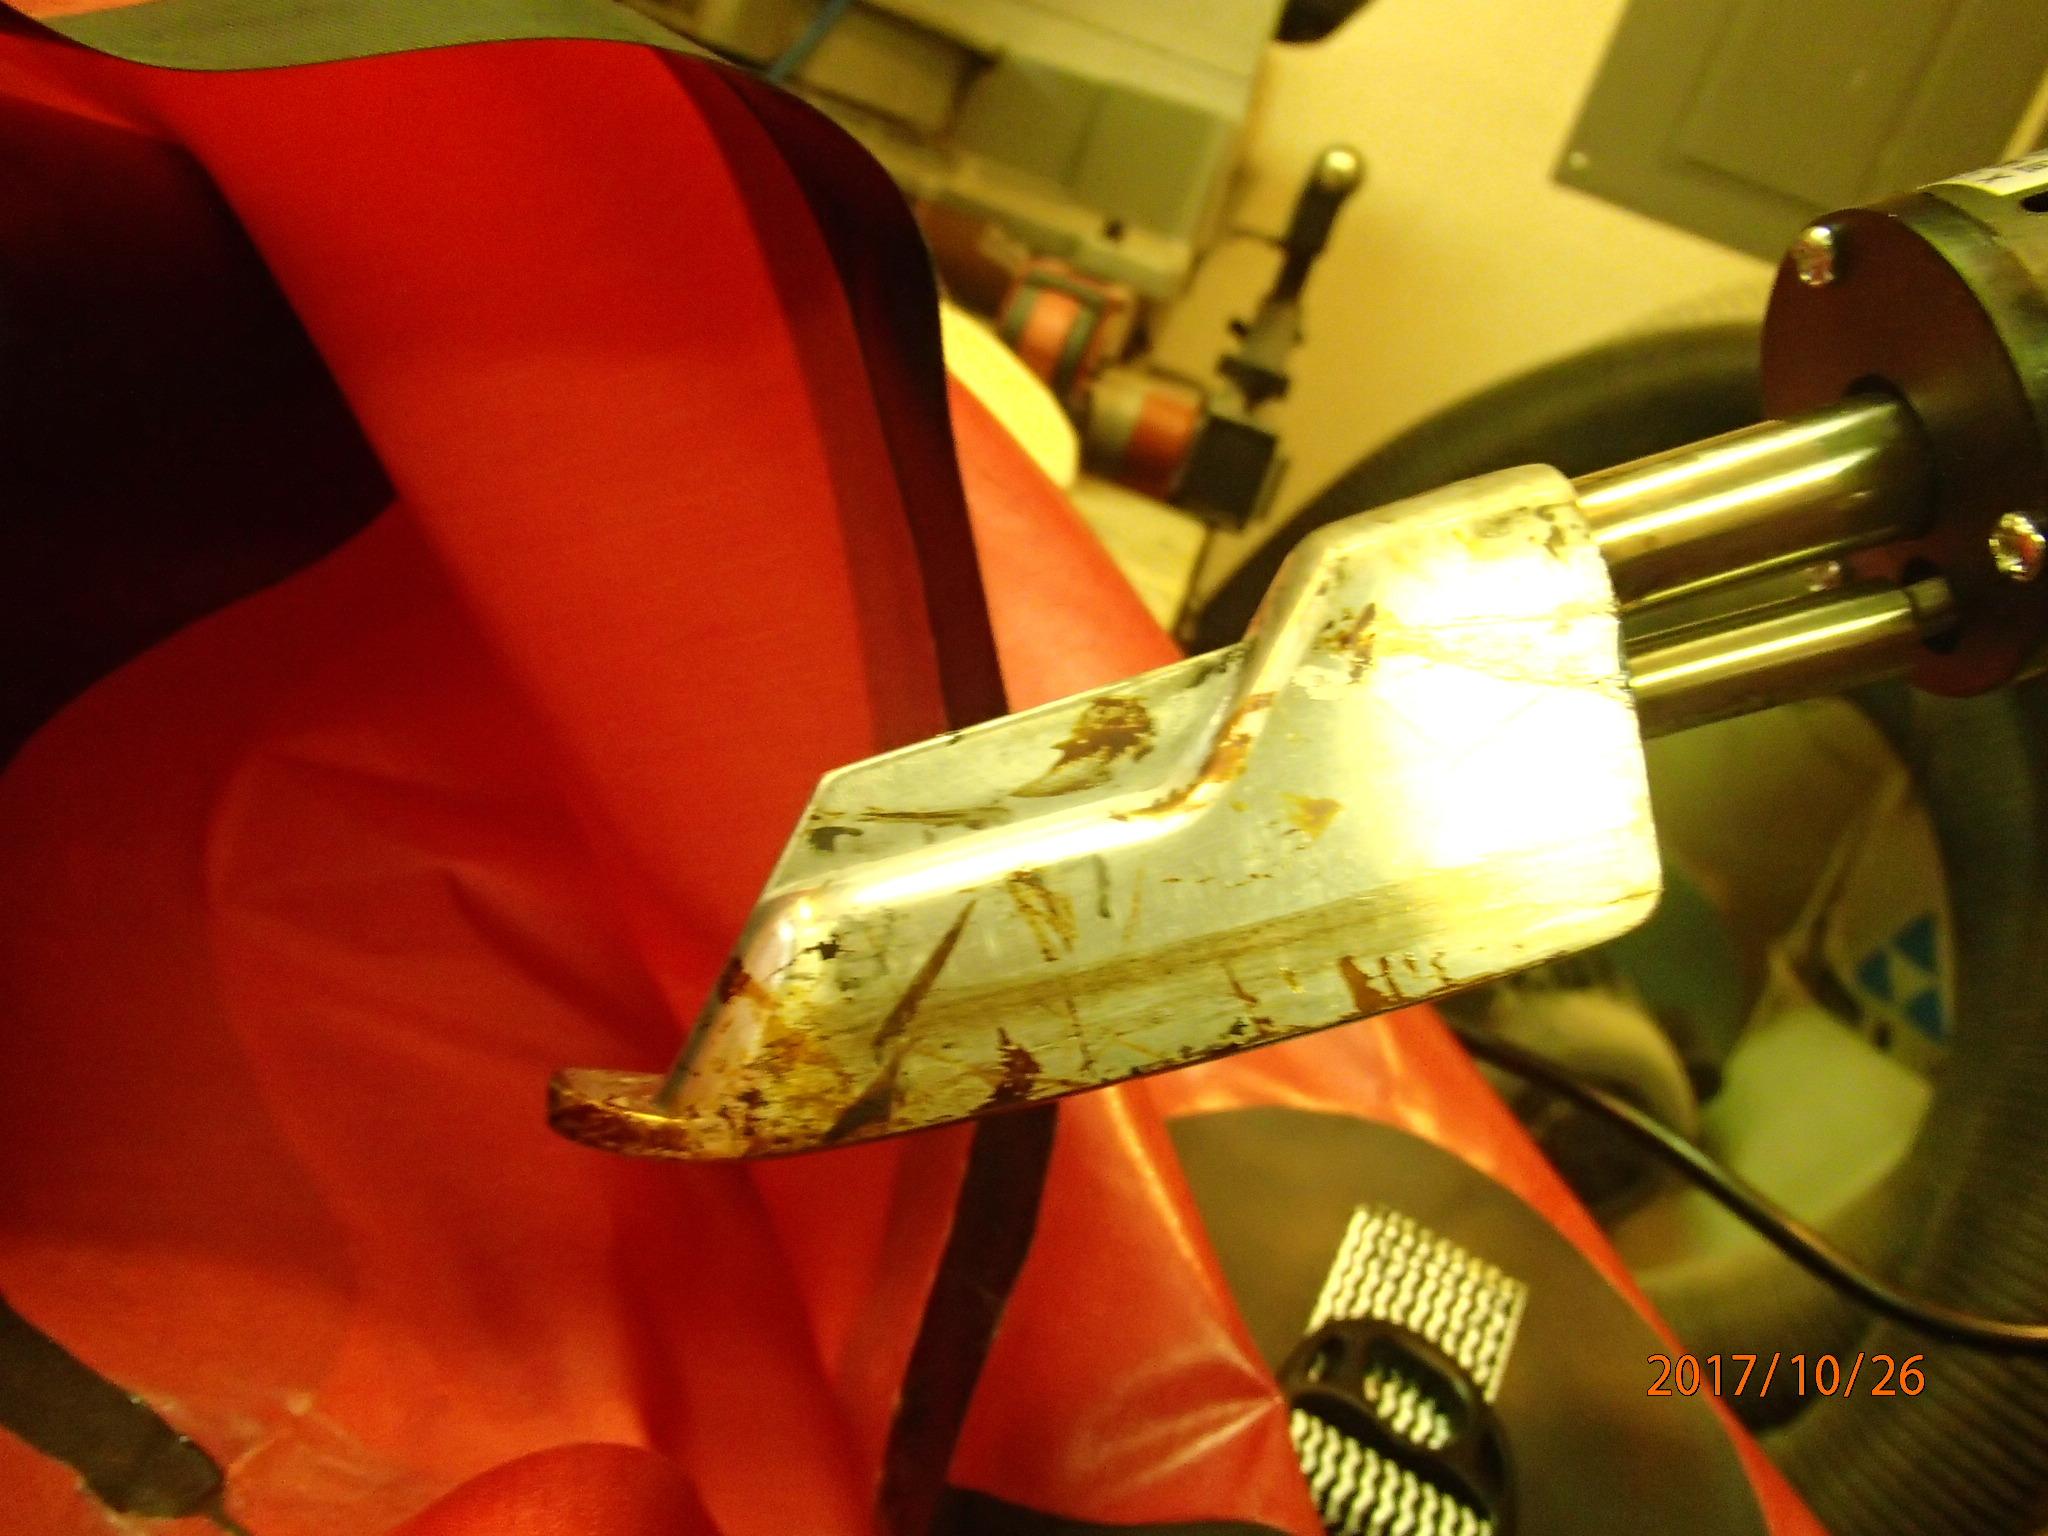
The uplifted front of the Jingda Thermoelectric Products “leather” Iron, purchased through Aliexpress, makes it indispensible for tight spots and small corners especially when finishing the ends or reaching through bunched fabric.

The tip allows one to reach and heat spots at high angles.
-
-
September 11, 2017 at 11:07 am #4326Lyn St GeorgeParticipant
I’ve started using my Jingda “leather” iron again after all. Having ground and filed the bottom flat and the width down to 24mm, it really is quite good. The minimal temperature drift and massive heat retention is excellent. As for the shoe on mine bubbling, it has to be poor metallurgy. I have to assume that it’s made from recycled alloys, and they left impurities in. Different batches will have different levels of impurity.
-
October 13, 2017 at 12:34 am #4742BruceParticipant
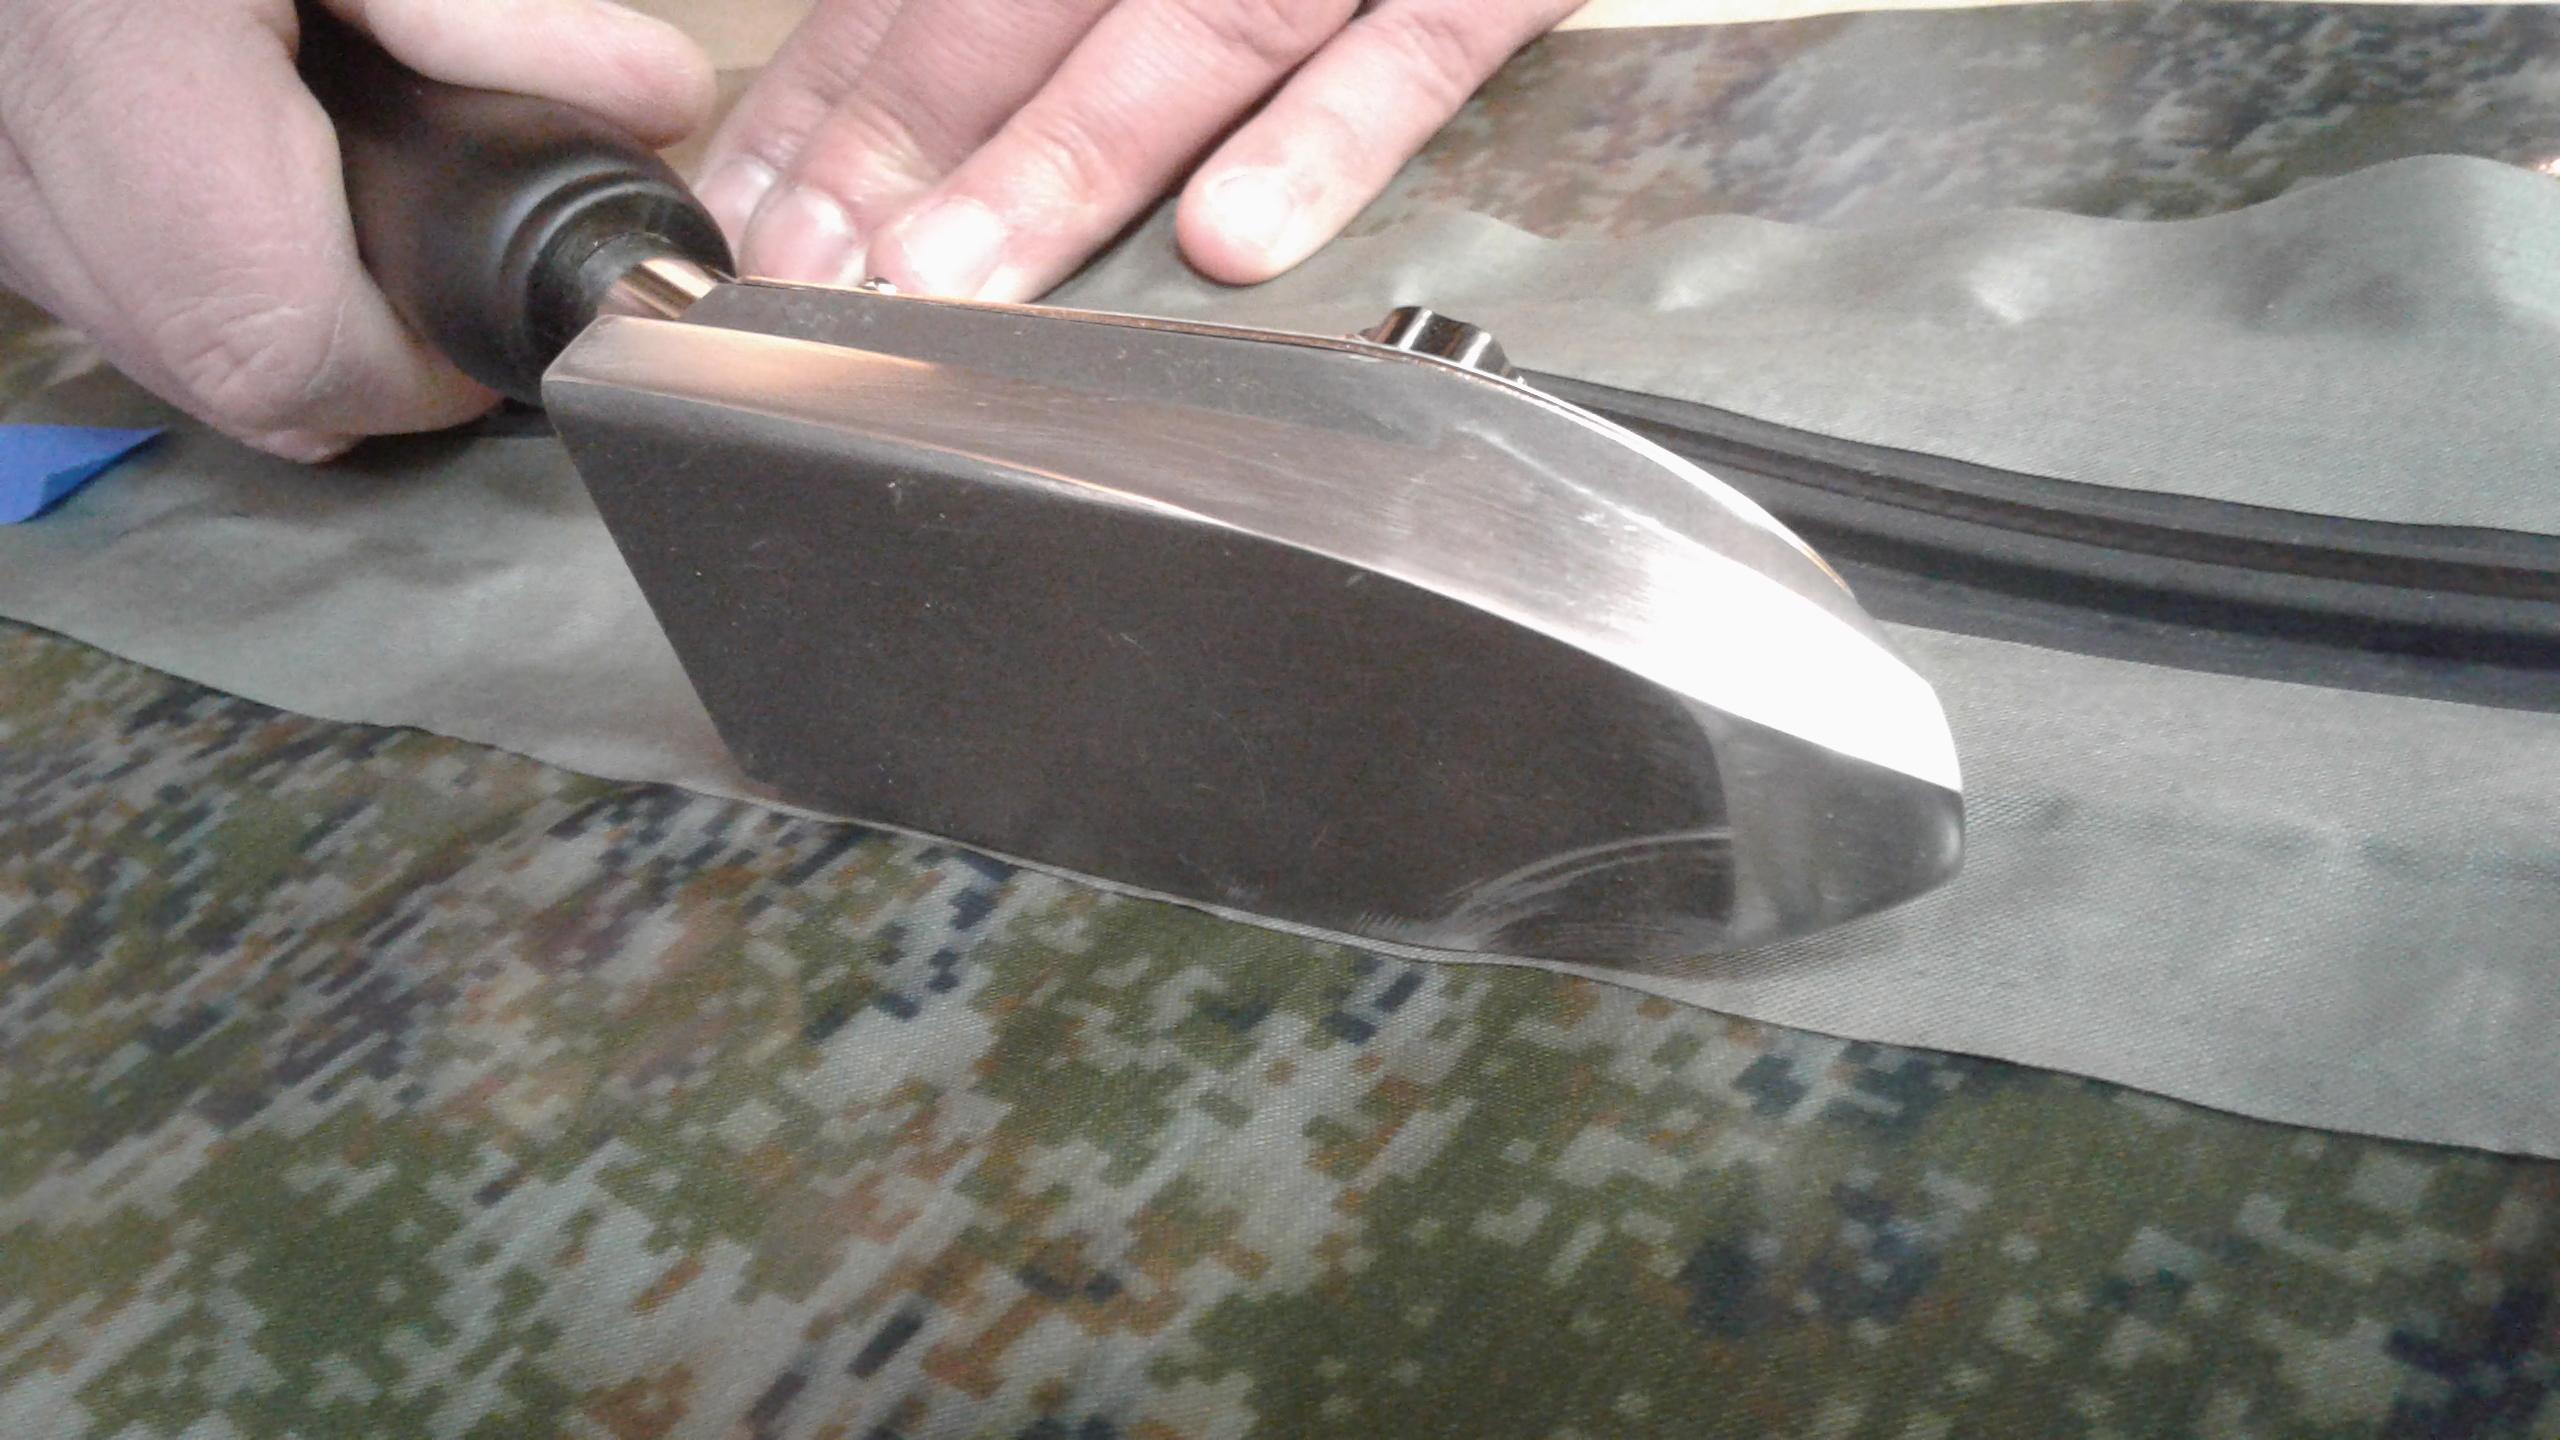
I have been using the Jingda Leather iron for a couple weeks now and I would not want to give it up. Thanks to Lyn for discovering it. With the relatively simple modification of filing the foot flatter it becomes an indispensible tool. I particularly like the uplifted tip that provides accurate work in tight corners, and allows one to approach the edge of a piece of fabric with good control.
I cannot measure the temperature with my infrared thermometer, due to the reflectivity, but using a digital oven thermometer, it appears to have very little temperature swing, probably due to the digital thermostat. It will get hot! And the thermostat dial has to be taped down. If you have a file, and are willing to rework a new tool, I can recommend it!
I am using it in standard US 110/120 volt current. (Mine came with a simple plug adaptor, which you can also buy one online for the Chinese “W” style plug.) It does not take a converter/transformer to use, just a simple plug adaptor.
Now, if I only had the courage to take a file and round the tip of my model aircraft iron so it isn’t totally flat . . . .
-
-
-
September 10, 2017 at 3:10 pm #4309Matt (Admin)Keymaster
Thanks for your review, Bruce!
-
-
August 20, 2017 at 3:46 am #4020Lyn St GeorgeParticipant
Re the leather iron from Aliexpress mentioned in Comments.
I’ve just used mine in earnest (though not on a boat, alas) and have to change my opinion. The shoe is a solid lump of alloy, yet after a few hours it bubbled! See the photo. It looked like a chrome plating with bubbles, but after taking it all apart it is actually solid. The bottom of the shoe is also bubbled and will need filing smooth if it’s ever to be used again.
Worse, the temperature knob moves every time the handle is gripped, so one minute it’s too cold and the next you’re looking at a burnt and melted lump of nylon. Removing the knob and using a screwdriver on the shaft and an infrared thermometer is one solution.
Worse yet, sometimes when pressing down the light will come on – pressing the other way will turn the light off. Suspiciously as though it’s bending and making unwanted contact somewhere.
After pulling it apart, you can see that one of the wires going into the heater element is bare – the sheathing stops just short of the element. The blue-sheathed wire is 2-core and will be the feedback. Putting a meter across the other two where they join the PCB gives a full 230v. Hmm. Granted that’s 230v into a bare wire into a ceramic core inside the metal heater in the metal shoe, but the blue cable is crimped at the entry point and who knows what’s faulty inside, out of sight.
I don’t think I’ll use this again.
-
August 23, 2017 at 5:59 am #4027keopgaardParticipant
Got this in the mail today. Seems to be working just perfect. Test sealed 40D fabric and started with 150 C or aprox. 300 F, perfect! Now waiting for the diy-kit from Matt.

-
This reply was modified 8 years, 11 months ago by keopgaard.
-
October 9, 2017 at 8:08 am #4723keopgaardParticipant

Modifyed soldering iron. Bought on eBay and the iron is a 60 watt iron with adjustment on the output heat. The iron shoetip is from another soldering iron also bought on eBay, but that iron did not delivered the propper heat. The iron fot is the cut down to 25mm with and the tickness under the fot then grined down about 5 mm so the heat transfer faster. Seams to work fine under my third packraft build.
-
This reply was modified 8 years, 11 months ago by
-
-
August 19, 2017 at 12:15 am #4016BruceParticipant
It is easy to adjust the temperature on a Top Flight model aircraft heat sealing iron. I suspect the other brand irons can be adjusted too, if needed.
When I got mine, it heated to about 198 degrees C (according to my innexpensive infrared thermometer – an oven meat thermometer works just as well). It was not hot hot enough to seal TPU fabric, a light stick, but not a full seal.
To adjust the thermostat, loosen the screw and remove the black plastic knob. Reaching down into the hollow brass stem with a fine jewelers screwdriver, turn the little screw counter clockwise to increase the heat. Try it in 1/8 turn increments, it doesn’t take much. My guess is that many of these will heat up just fine, and mine was just set too low at the factory. But it is easy to change. I really like the 165 watt heat source, and the added thermal mass these irons have. It greatly speeds up heat sealing larger seams!

-
August 18, 2017 at 12:02 pm #4015BruceParticipant
I recommend everyone reinforce their Clover Iron before first use! I loved Chris Christy’s solution, above, but couldn’t find a 1/2″x 13 “Tee” nut. I bought some aluminum round stock to toss onto the lathe to make a supply for our classes, but after thinking about how much work was involved, I “discovered” 4 inches of thin steel wire proved to be much simpler, stronger, and anyone can do it!
Use thin steel wire (I used galvanized picture hanging wire, do not use copper because I think it’s too conductive) to form a loop up through the red heat guard, over the heating element, and back to the red handle. Gently snug the wire taught, but only finger tight – don’t over stress the tiny dimple spot welds at the base of the handle.
I also recommend taping a piece of teflon over the heating element to cover the large top screw. This screw gets hot and can melt through nylon if you lose track of it amidst your partially assembled raft!
Of the 25 or so rafts we’ve started at The Folk School Fairbanks, we’ve suffered 5 or 6 iron failures. If they were expensive, this would be a complaint. But frankly, they do the job fine for such an affordable (inexpensive) tool. Compared to household irons, Aircraft heat sealing irons, Dritz Petite, various soldering irons, and everything else we’ve tried, we always go back to our Clover Mini-Irons for the fine detail and precise application of heat that they provide.
Of course, I’m absolutely thrilled to hear Matt is bringing out new plans to allow the wider model aircraft irons to work!
Bruce Campbell

-
August 19, 2017 at 12:21 am #4017BruceParticipant
I also recommend putting a piece of teflon, parchment paper, or tape between the wire and the red guard. It helps ensure the wire doesn’t melt through the guard. Here is a picture of a teflon guard over the top screw. Yes, if it gets too close the masking tape scorches.
-
-
July 24, 2017 at 6:22 pm #3724mogdenParticipant
Same thing happened to me as Chris Chitty above with the Clover II from Amazon US — Mine was hot enough but after a few uses the heating element broke off from the handle because of the poor construction of the mount. I’m looking into modifying my soldering iron now.
-
July 20, 2017 at 10:06 am #3684Matt (Admin)Keymaster
Thanks to Steven S. for sending a link to this inexpensive rheostat. It might be helpful for those using a regular (non-adjustable) soldering iron as their heat-sealing iron because it would allow them to dial in the perfect temperature.
Due to the solid state electronics in mini irons like the Clover, I’m not sure if it would work with them, but it might be worth trying.
Thanks, Steven!
-
May 4, 2017 at 8:12 pm #3137PaulParticipant
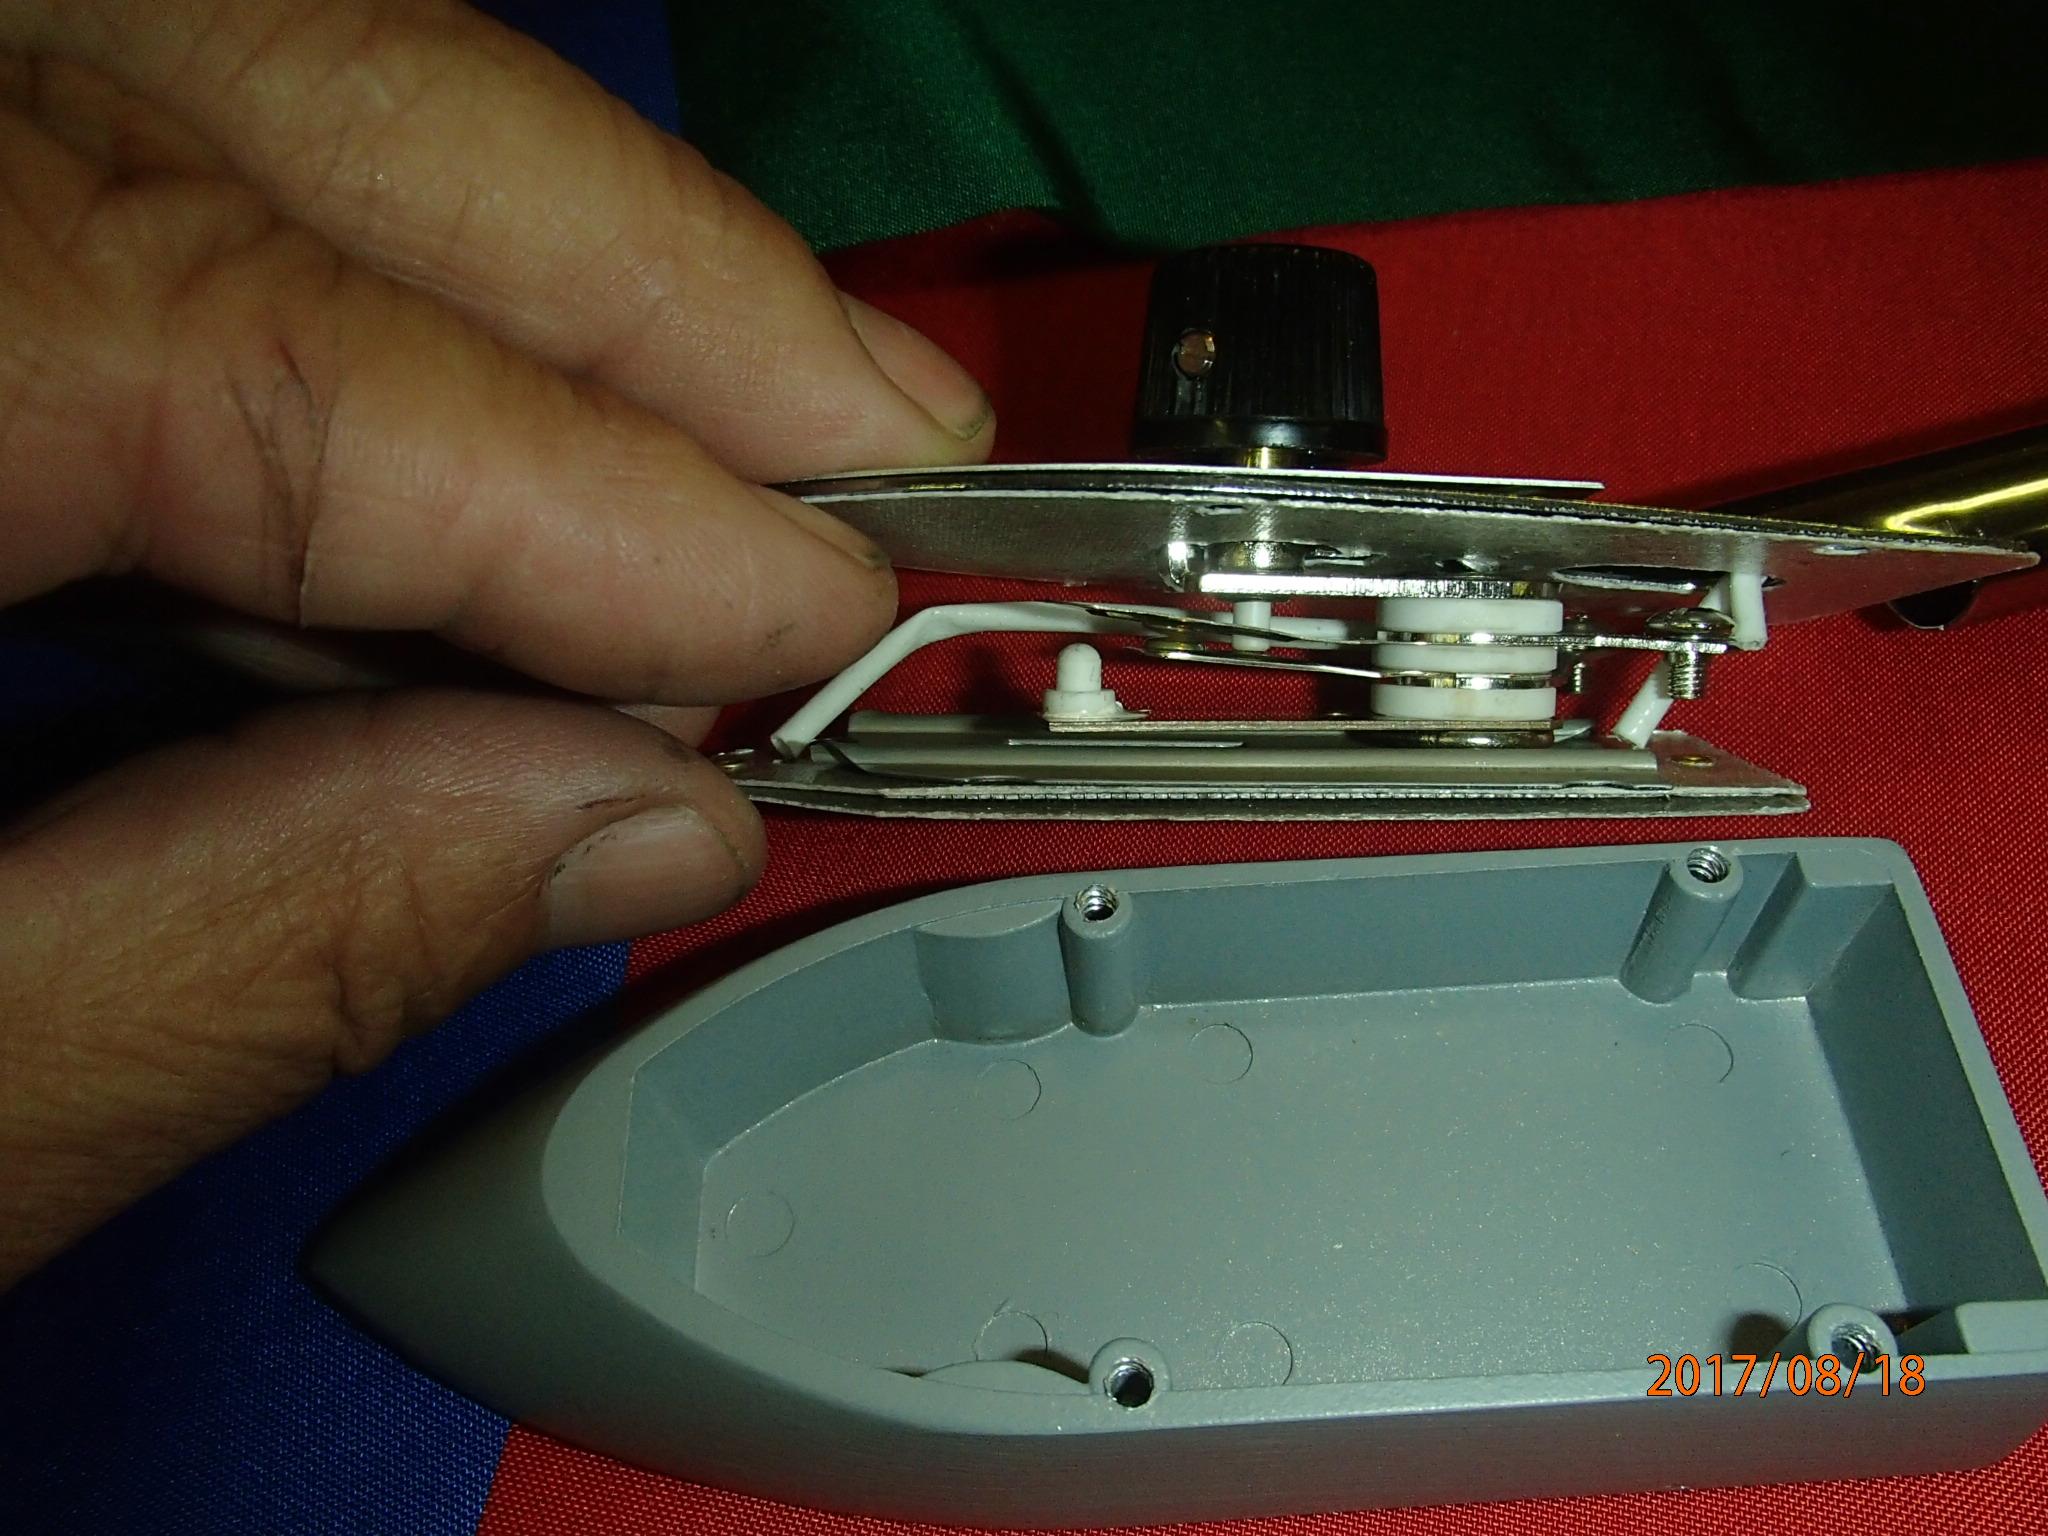
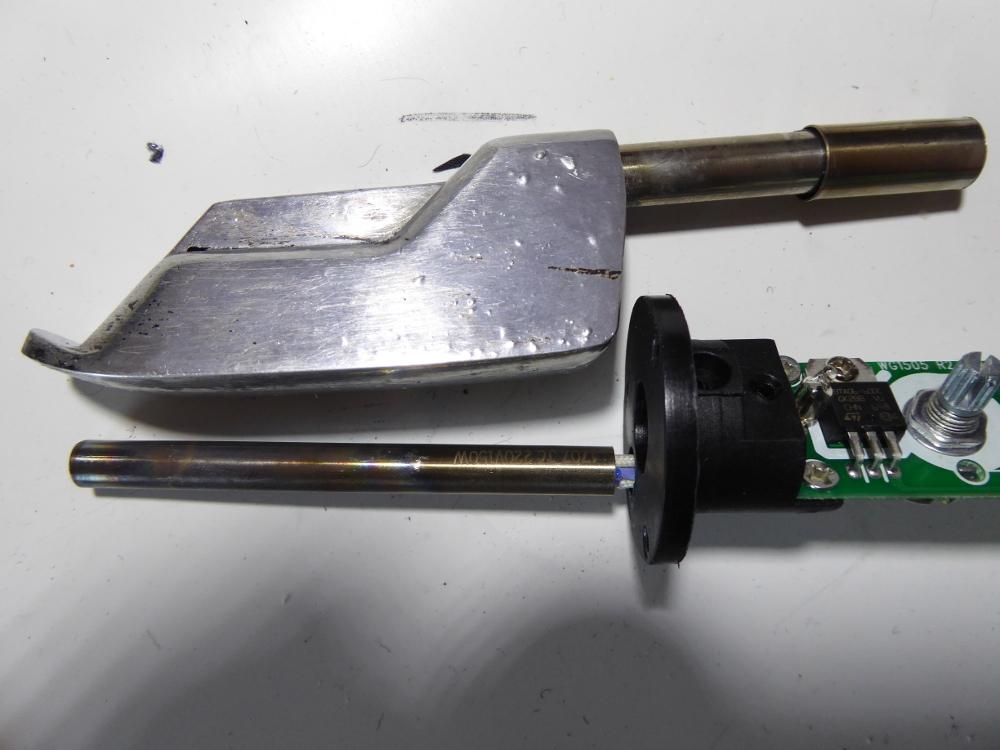
I opened up the Petite press iron curious as I am. on the left with red wires attached is the heating element bar, on the right with black wires is the temperature sensor. the temperature sensor is the feedback element that shuts the heating element off based upon which of the 4 temp settings its set to. the screw on the left of the iron is the set screw that holds the heating element on the floor of the iron; while the screw on the right of the iron holds the temp sensor to the iron via a small bracket thing. My guess is that variation between units may come from how tight these screws are; my theory is that if one tightened the heating element set screw perfect (not to crush the heating element) to maximize heat transfer, and to loosen the temp sensor screw a bit to minimize heat transfer such that it won’t tell the controller to shut off so soon. Obviously one wouldn’t want to completely disengage the temp sensor as it serves a purpose and likely prevents melting the plastic housing of the iron. I have performed this procedure on my unit and will test it on both the 210D and 40D fabrics once my boat supplies come in. also note that the heating element starts at about half way from the front of the iron to almost to the rear
-
May 5, 2017 at 10:46 am #3140Matt (Admin)Keymaster
Cool – let us know how it goes!
-
-
April 26, 2017 at 1:43 pm #3039Chris ChittyParticipant
Clover Mini Iron II Modification
Hey All,
I just received my kit and started trying to put it together when my Clover iron started letting me down. Mine was able to generate adequate heat but the cheesy dimple connection of the “stem” to the handle immediately loosened up with the lateral pressure I was applying to it, to the point where the red hand guard would touch the fabric before the iron could get the right angle.
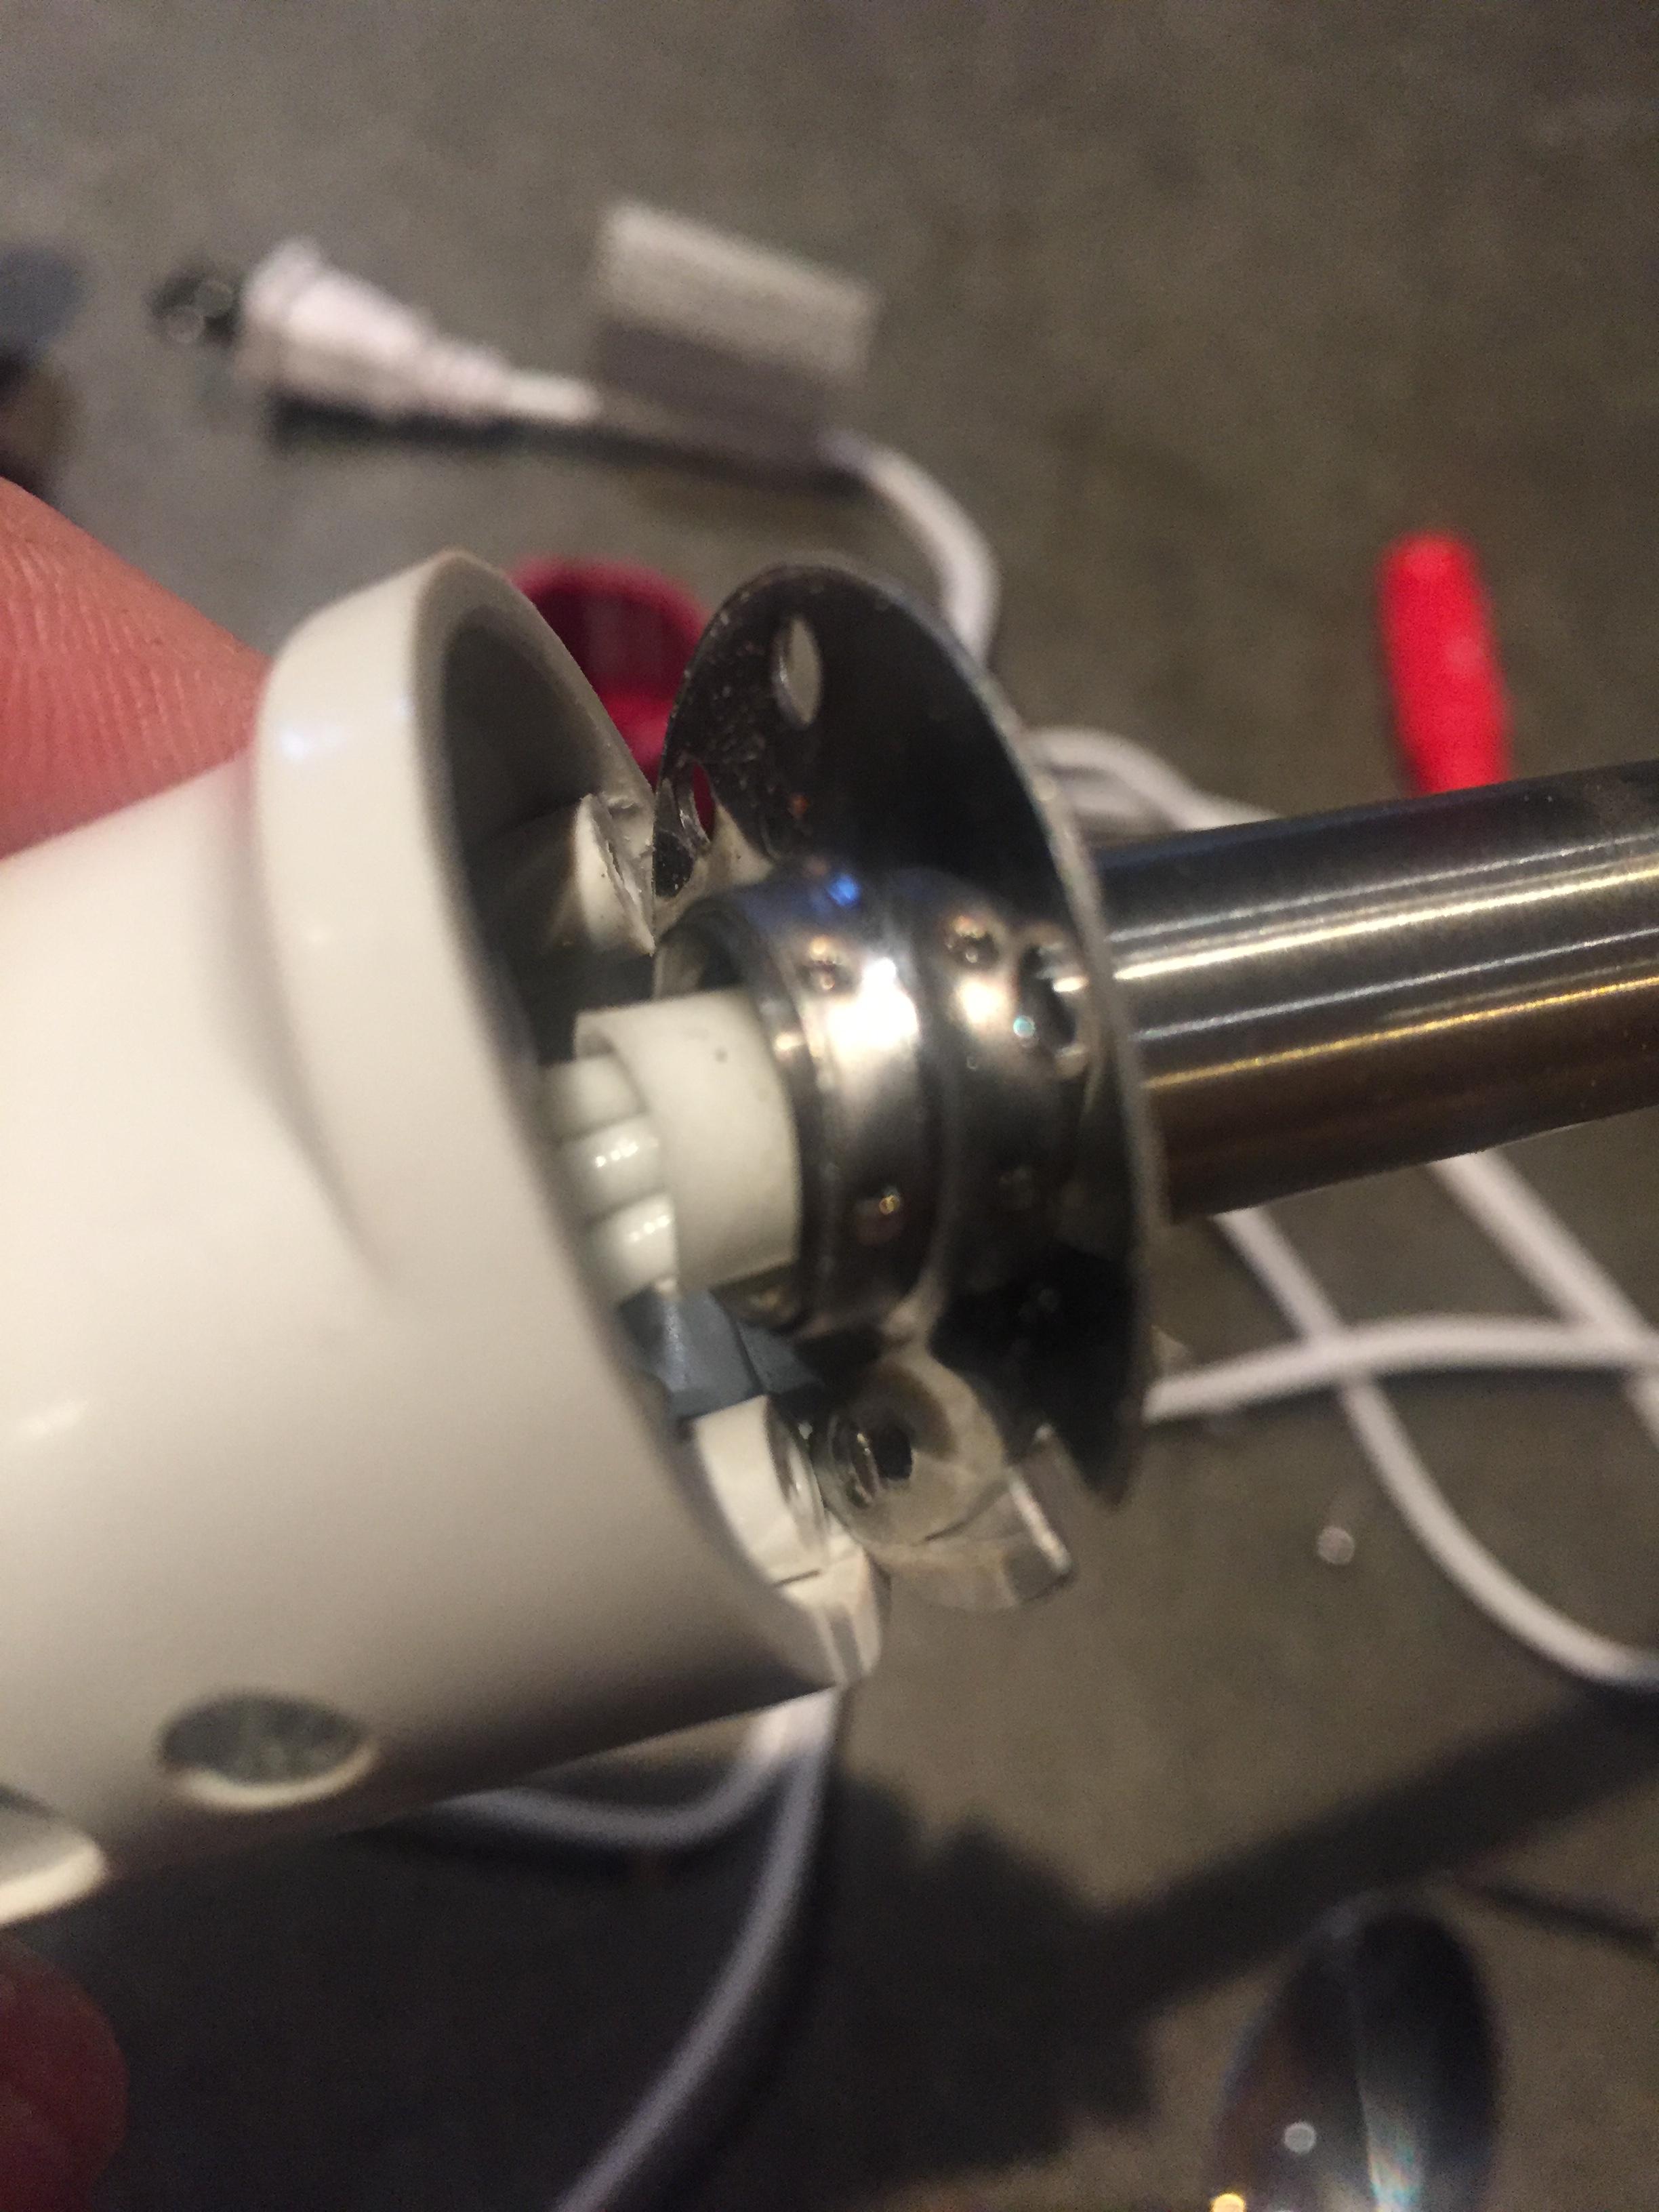
You can see the press fit connection is not designed to withstand any sort of force on it. I went to the hardware store and picked up a 1/2″ weld on T-nut like this:
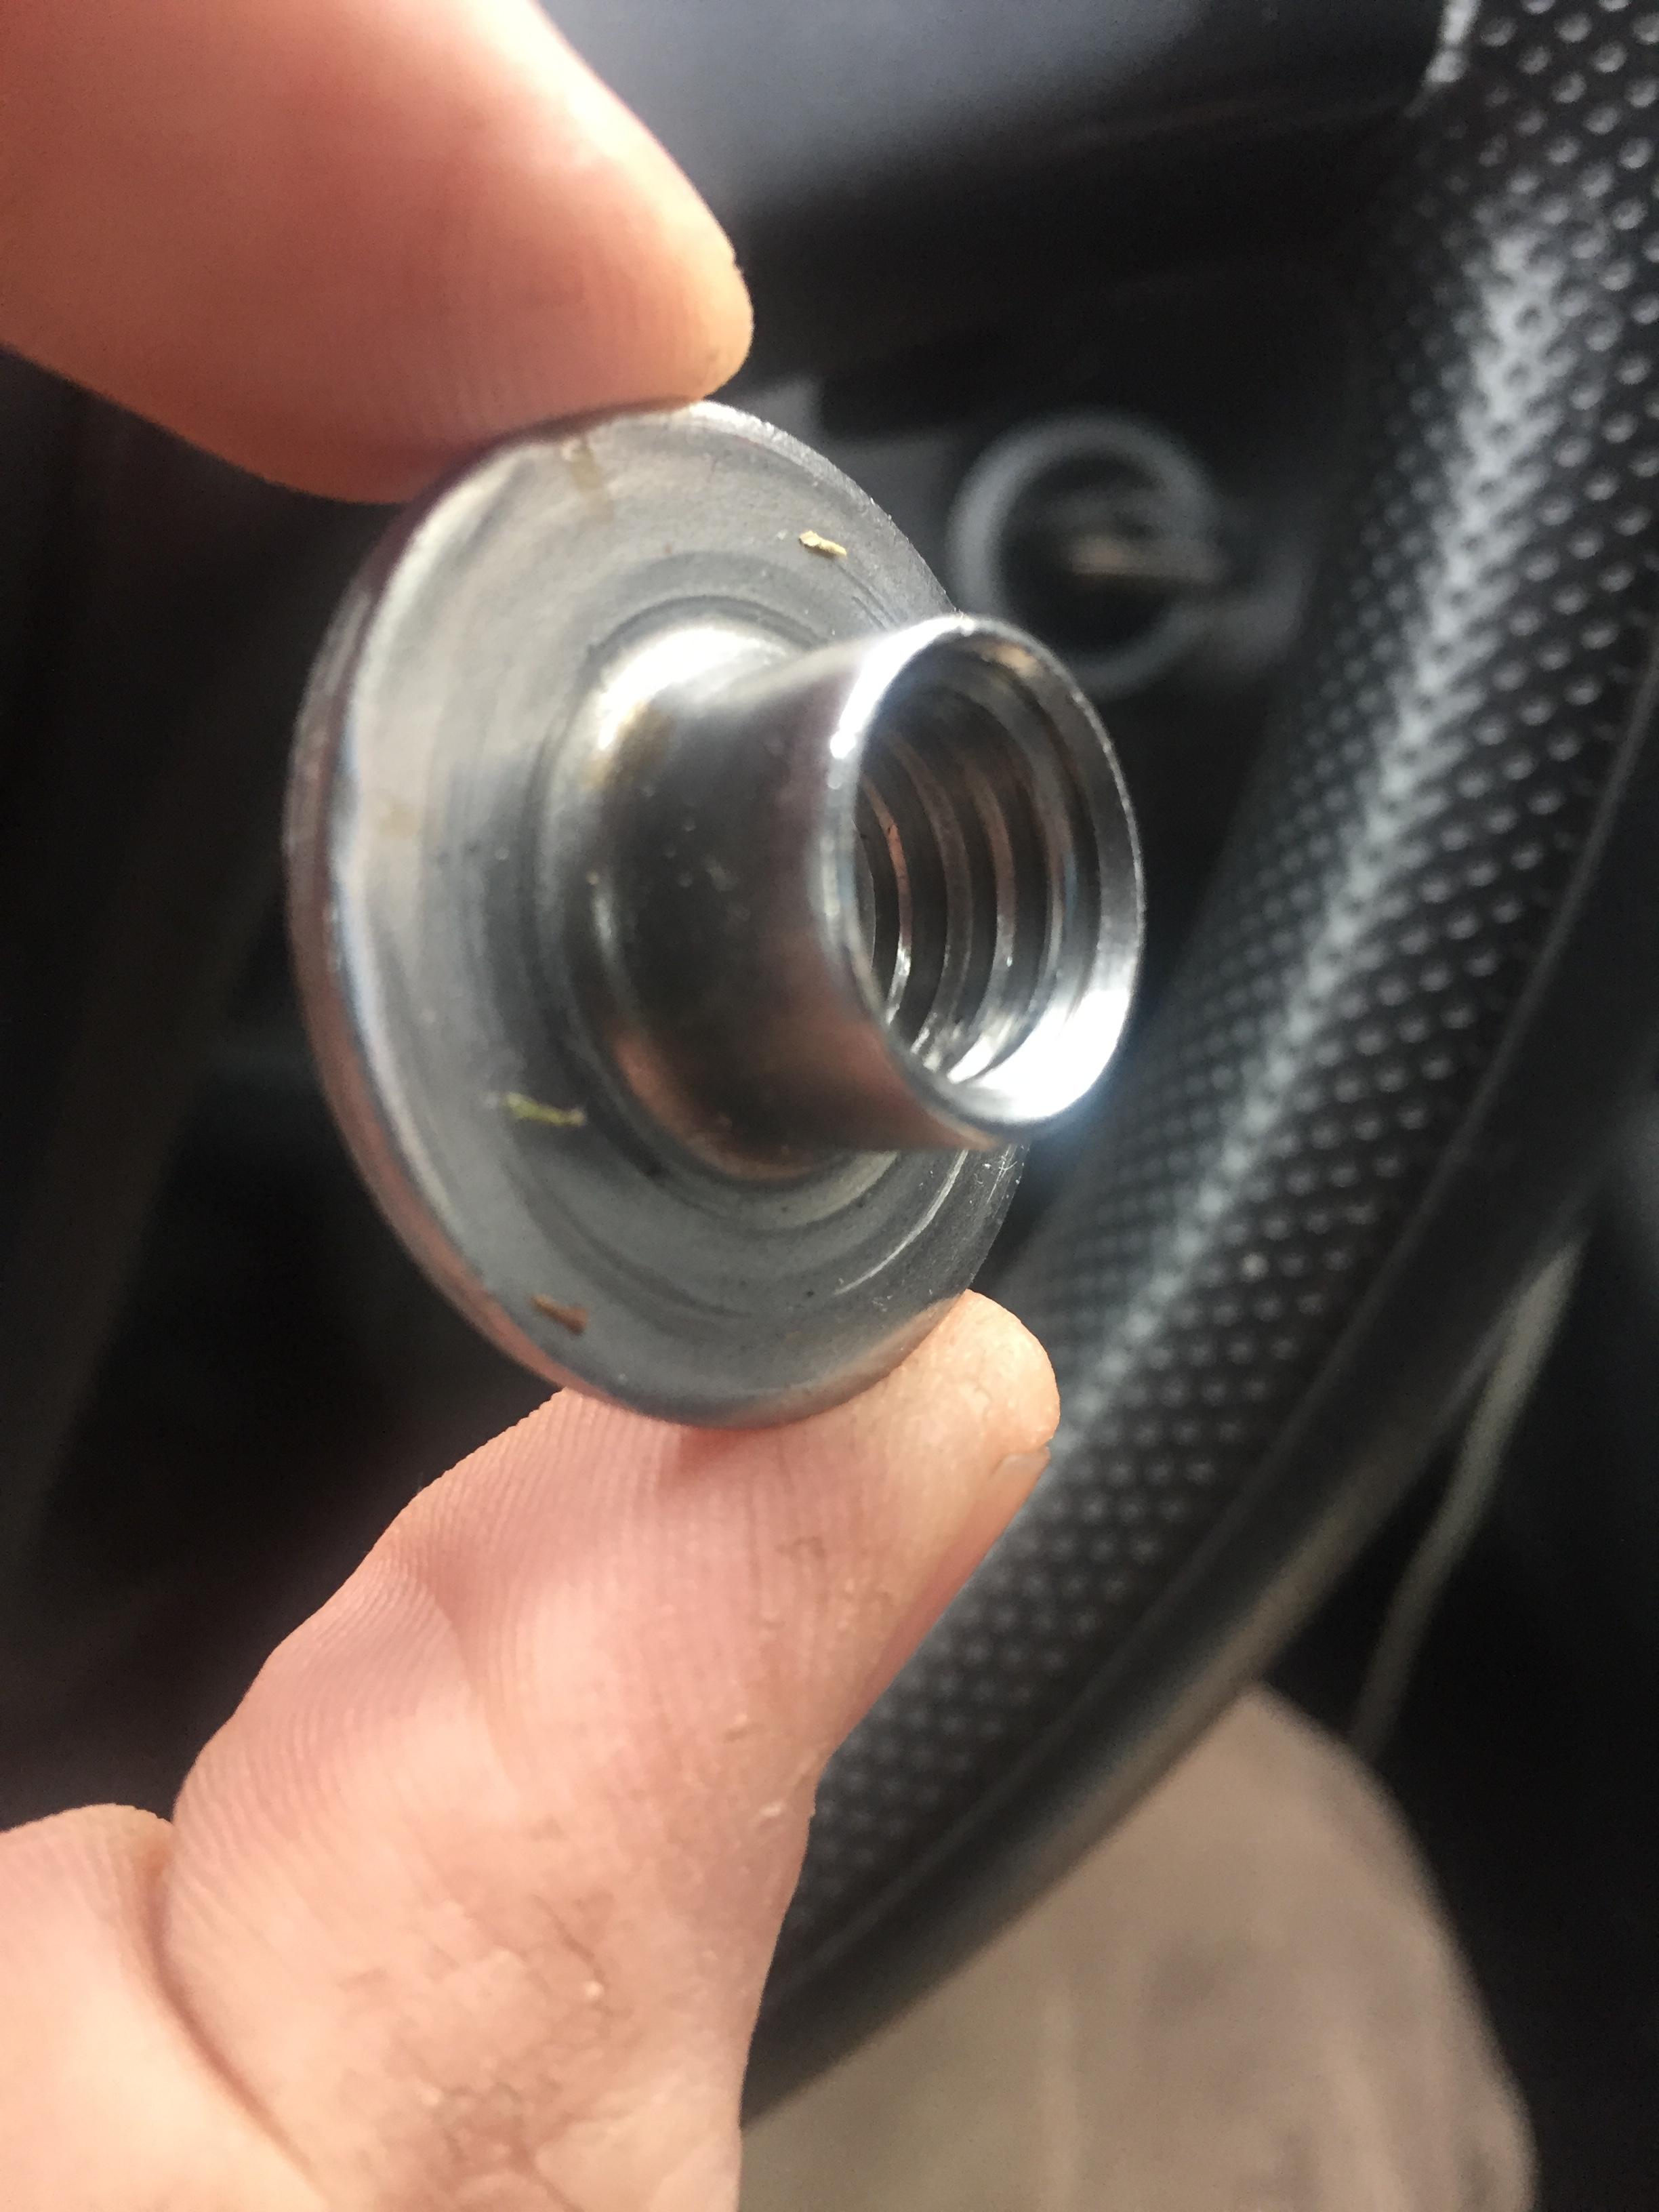
I cut the red pastic hand guard off in order to get at the screws and used that as a pattern to drill 1/8″ holes in the T-nut for the mounting screws. I reamed the threads of the T-nut with a 31/32″ drill to clear the stem and installed the T-nut in place of the hand guard. You might notice that I ground some flats on the flange of the nut to chuck in the vise.
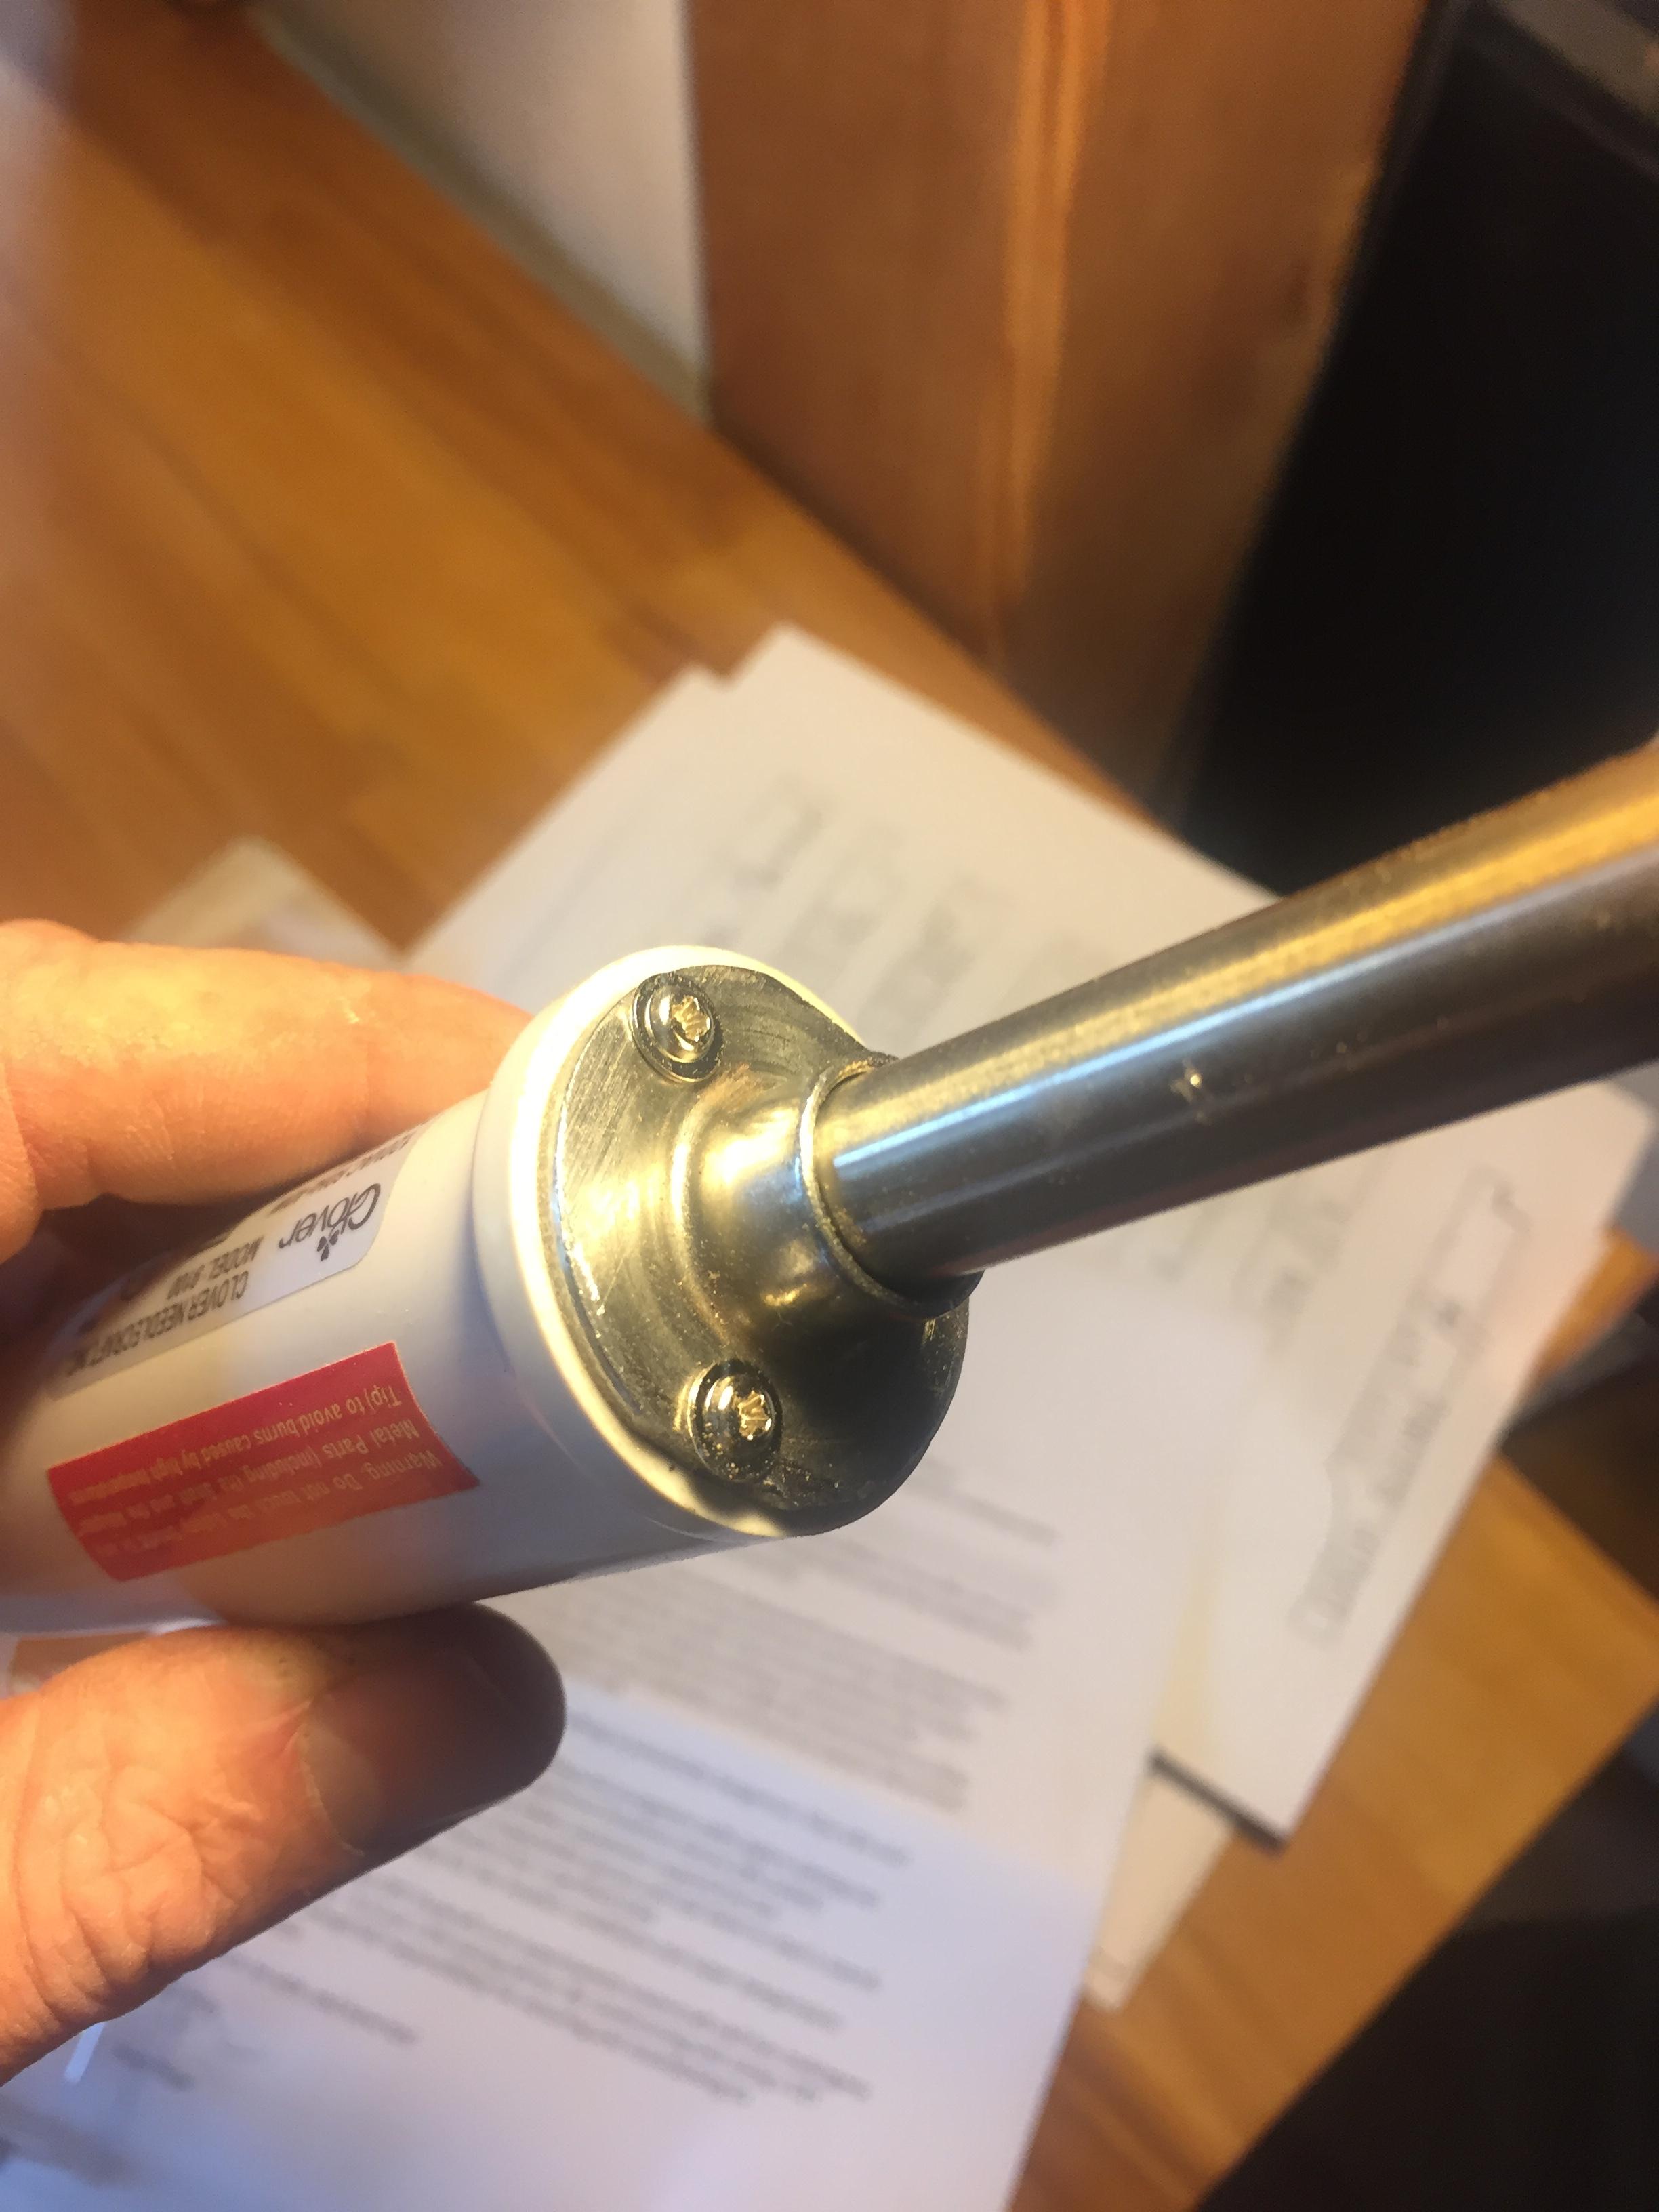
It is now quite stout. I haven’t done much work with it but I am feeling a lot better about things. I think you could put a piece of 5/8″ pipe over the T-nut with a couple of set screws in lieu of aluminum foil if you needed an insulator. I’ll let you know how it works as I do more work.
-
This reply was modified 9 years, 3 months ago by Chris Chitty.
-
This reply was modified 9 years, 3 months ago by Chris Chitty.
-
April 26, 2017 at 5:28 pm #3042Matt (Admin)Keymaster
Wow, good work, Chris! I wondered what that connection looked like inside, but didn’t have a screw driver long enough to take it apart. Thanks for posting!
-
This reply was modified 9 years, 3 months ago by
-
April 25, 2017 at 5:38 am #3021Kwok Wah LaiParticipant
Hi there,
Thanks for the inspirations.
I am going to make it from the kit and have to have a sealing iron.
Got no Clover Mini here so have to do modification on my 20W ham soldering iron.
That is what I could do with limited mech and metal resources at home.
Got a piece of an inch wide and 1/8 thick brass metal to make the tip, this is what it look like after some sawing, drilling, filing and bending.
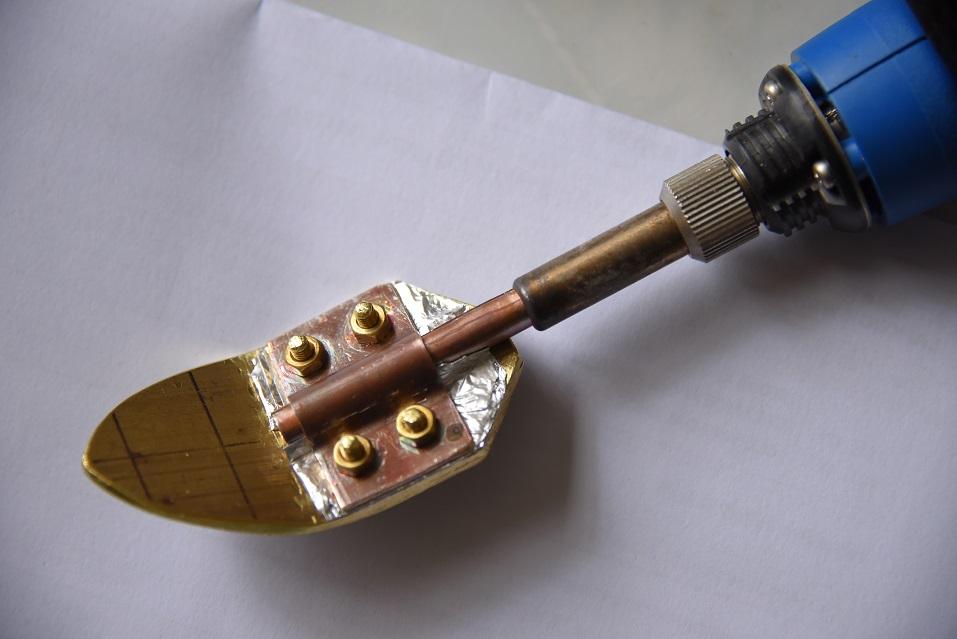
Adjustment of temperature is, similar to others, by taking power from my 400W living room lamp dimmer.
Then practiced sealing with some scrap fabrics and found the tip was too wide for 20mm width seam straps, so narrowed the tip down to about 18mm wide and filed the bottom edges in round shape.
Tried again sealing, this time handling is good. Placed the tip flat on the fabric and press while sliding with back and forth motion about a distance of one and a half inch for few seconds then press and hold the fabrics with an eraser rubber for few seconds before releasing. I’ve got some papers placed under the fabrics.
Repeated the sealing with dimmer knob set from low to high positions, if temperature is low (roughly below 190deg.C) the bonding was like sellotaping and fabrics were peel-able apart easily.
When temperature was set too high (roughly above 210deg.C), fabric’s surface was darken a bit fast and tpu melts quickly together with more wrinkle arround the sides of tip.
When temperature was set to about and between 200 and 205deg.C, fabric wrinkles a little bit upon ironing but the bonding is strongest.
I used a K-type thermocouple and a multi-meter to measure tip’s bottom surface temperature before soldering, however, the reading gives only rough figures of temperature due to un-calibrated setup.
Also, as heat capacitance of this tip is low (few 10th grams of metal), so temperature regulation is bad that temperature drops after few seconds of tip’s contact with fabrics and a 20W heater power was not quickly enough to heat charge up the tip again to the set temp. I have to wait for sometime between two ironings.
I still do not have confident to solder the raft, hence, I wish to practice more soldering first before going ahead with the real thing.
So I used some scrap fabric materials to make a hiking water bag.
Cut the top of a PVC bottle and used some Aquaseal to glue it to the bag.
Final product will hold about 2 tall AL cans of beer.
The two bottom corners were soldered good, no leaking by applying heat only but there is leaking at the junctions on the middle of bottom, due to where too much of fabric folding together, I guess.
So I applied some Aquaseal to the gaps, they cured after an hour into a flexible layer of rubber and the bag is no more leaking now when squeezed.
But it smells, with odor of the glue…
I will try some more soldering practice before doing the real stuff.
Thanks for reading.
-
April 19, 2017 at 1:43 am #2950Tommy EngebretsenParticipant
I’m also looking at this. I live in Europe, so I’ll need a 22ov appliance.
I can se a lot of people using hotair guns, but then you’ll need an extra hand to apply pressure.
There is also a lot of heat sealing irons around that seems interesting, but few of them seem to get hot enough.This raises a question. I guess the the fabric has specified temperatures for welding? There definetly should be… And if not, what is the experiance, what temperature levels is sufficient?
will this one do the job? https://www.aliexpress.com/item/PROLUX-DIGITAL-LCD-HEAT-SEALING-COVER-IRON-SOCK-STAND/757065537.html?spm=2114.40010308.4.2.zQW1vA
-
April 19, 2017 at 9:43 am #2955Matt (Admin)Keymaster
I have used a similar sealing iron (I built my first packraft with one – you can see it in my older videos) and it works fine for sealing, but the ironing surface is too wide for most purposes so it is a bit slow because you have to use the tip or the edge of the iron instead of the flat surface.
The heating tools that I have used do not have accurate temperature gauges, so I can’t say what the actual sealing temperature is, but I will buy a laser heat sensor tomorrow so I can check the ideal sealing temperature and I will report back after that (tomorrow the price drops from $100 to $20 at my local hardware store!).
-
April 20, 2017 at 2:55 am #2984Tommy EngebretsenParticipant
Great, thanks for the feedback… Maybe a soldering Iron with a DIY tip and a regulator is the way to go then. I see extremetextile.de are operating with weldling temperatures on their garments. Strange if your producer don’t have any statements about this?
-
-
April 19, 2017 at 8:47 am #2954Mike MonsosParticipant
I have my hot plate set at about 244C or 470F. I have no way to test the exact temp other than the adjusting knob’s markings. I have my home made irons on the hot plate preheated. It takes approximately three seconds to weld with a single application of the preheated iron on the fabrics to be welded. At this temperature the fabric will not burn or wilt in three seconds. After the three seconds I use a cold “iron” to press and smooth out the fabrics after the heat application.
Mike
-
-
April 16, 2017 at 3:57 pm #2929Mike MonsosParticipant
I’d like to add another option for your heat sealing. I use a commercial hot plate and some “irons” in various sizes to make my welds. The hot plate is pretty simple and can maintain a steady heat of about 240 degrees. The irons are home made with aluminum square stock cut to different lengths from 3/4″ to 3″ affixed to cedar blocks with JB weld. The square stock is in 1/2″ to 3/4″ wide (just under the 7/8″ belt size.
I let the blocks heat on the hot plate and use them to heat the welding length, return the block to the hot plate and use a cold aluminum plate heat sink to press the weld and set the weld by reducing the temp of the fabric. The weld takes about three seconds of contact to do the job on a flat surface. On a arch you need to roll the iron over the arch in a slow process to heat the fabric enough for the weld.
After we finish the welding of the belts we go over them one more time laying flat to finish off the ruffles on the edges and make sure we have a full weld seal across the belt. You can also iron out ridges if necessary in your belts.
Mike
-
April 16, 2017 at 4:12 pm #2930Matt (Admin)Keymaster
Hi Mike,
I’m interested in trying this method, too. A cheap hot plate would probably work as a heater, or even a clothes iron held in a cradle – anything that would maintain a consistent temperature.
About how long do the irons stay hot before you need to reheat them, and how many of a given size do you need to make so you can switch between them without having to wait for the next one to heat up?
-
April 16, 2017 at 5:53 pm #2935Mike MonsosParticipant
You will need a hot plate that can hold a steady temperature. They have some used commercial ones on the big auction site that should do the job for under $100. The one I have is about $400 but it is more than necessary in my opinion.
I preheat the hot plate to 240 with my irons on it. I like to have two of each size on the hot plate. I use one and make my three second weld, set it back on the hot plate and then press the weld with a cold iron to cool and set the weld. Then I grab the #2 of the same size and do another weld. To be honest you could probably do it with just one iron of each size. We have a club program where I help members build your rafts so we are both welding so having some extras work well for a team approach.
These irons lay down a nice weld, much more reliable than the clover tool in my opinion. you can buy the aluminum from Online metals for very little money to make you own irons.
Mike
-
April 16, 2017 at 6:01 pm #2936Mike MonsosParticipant
This is something similar to what I use,
Be sure to check to see what the temperature range is before you buy one
Mike
-
-
-
-
April 16, 2017 at 11:32 am #2926OlympicMtnBoyParticipant
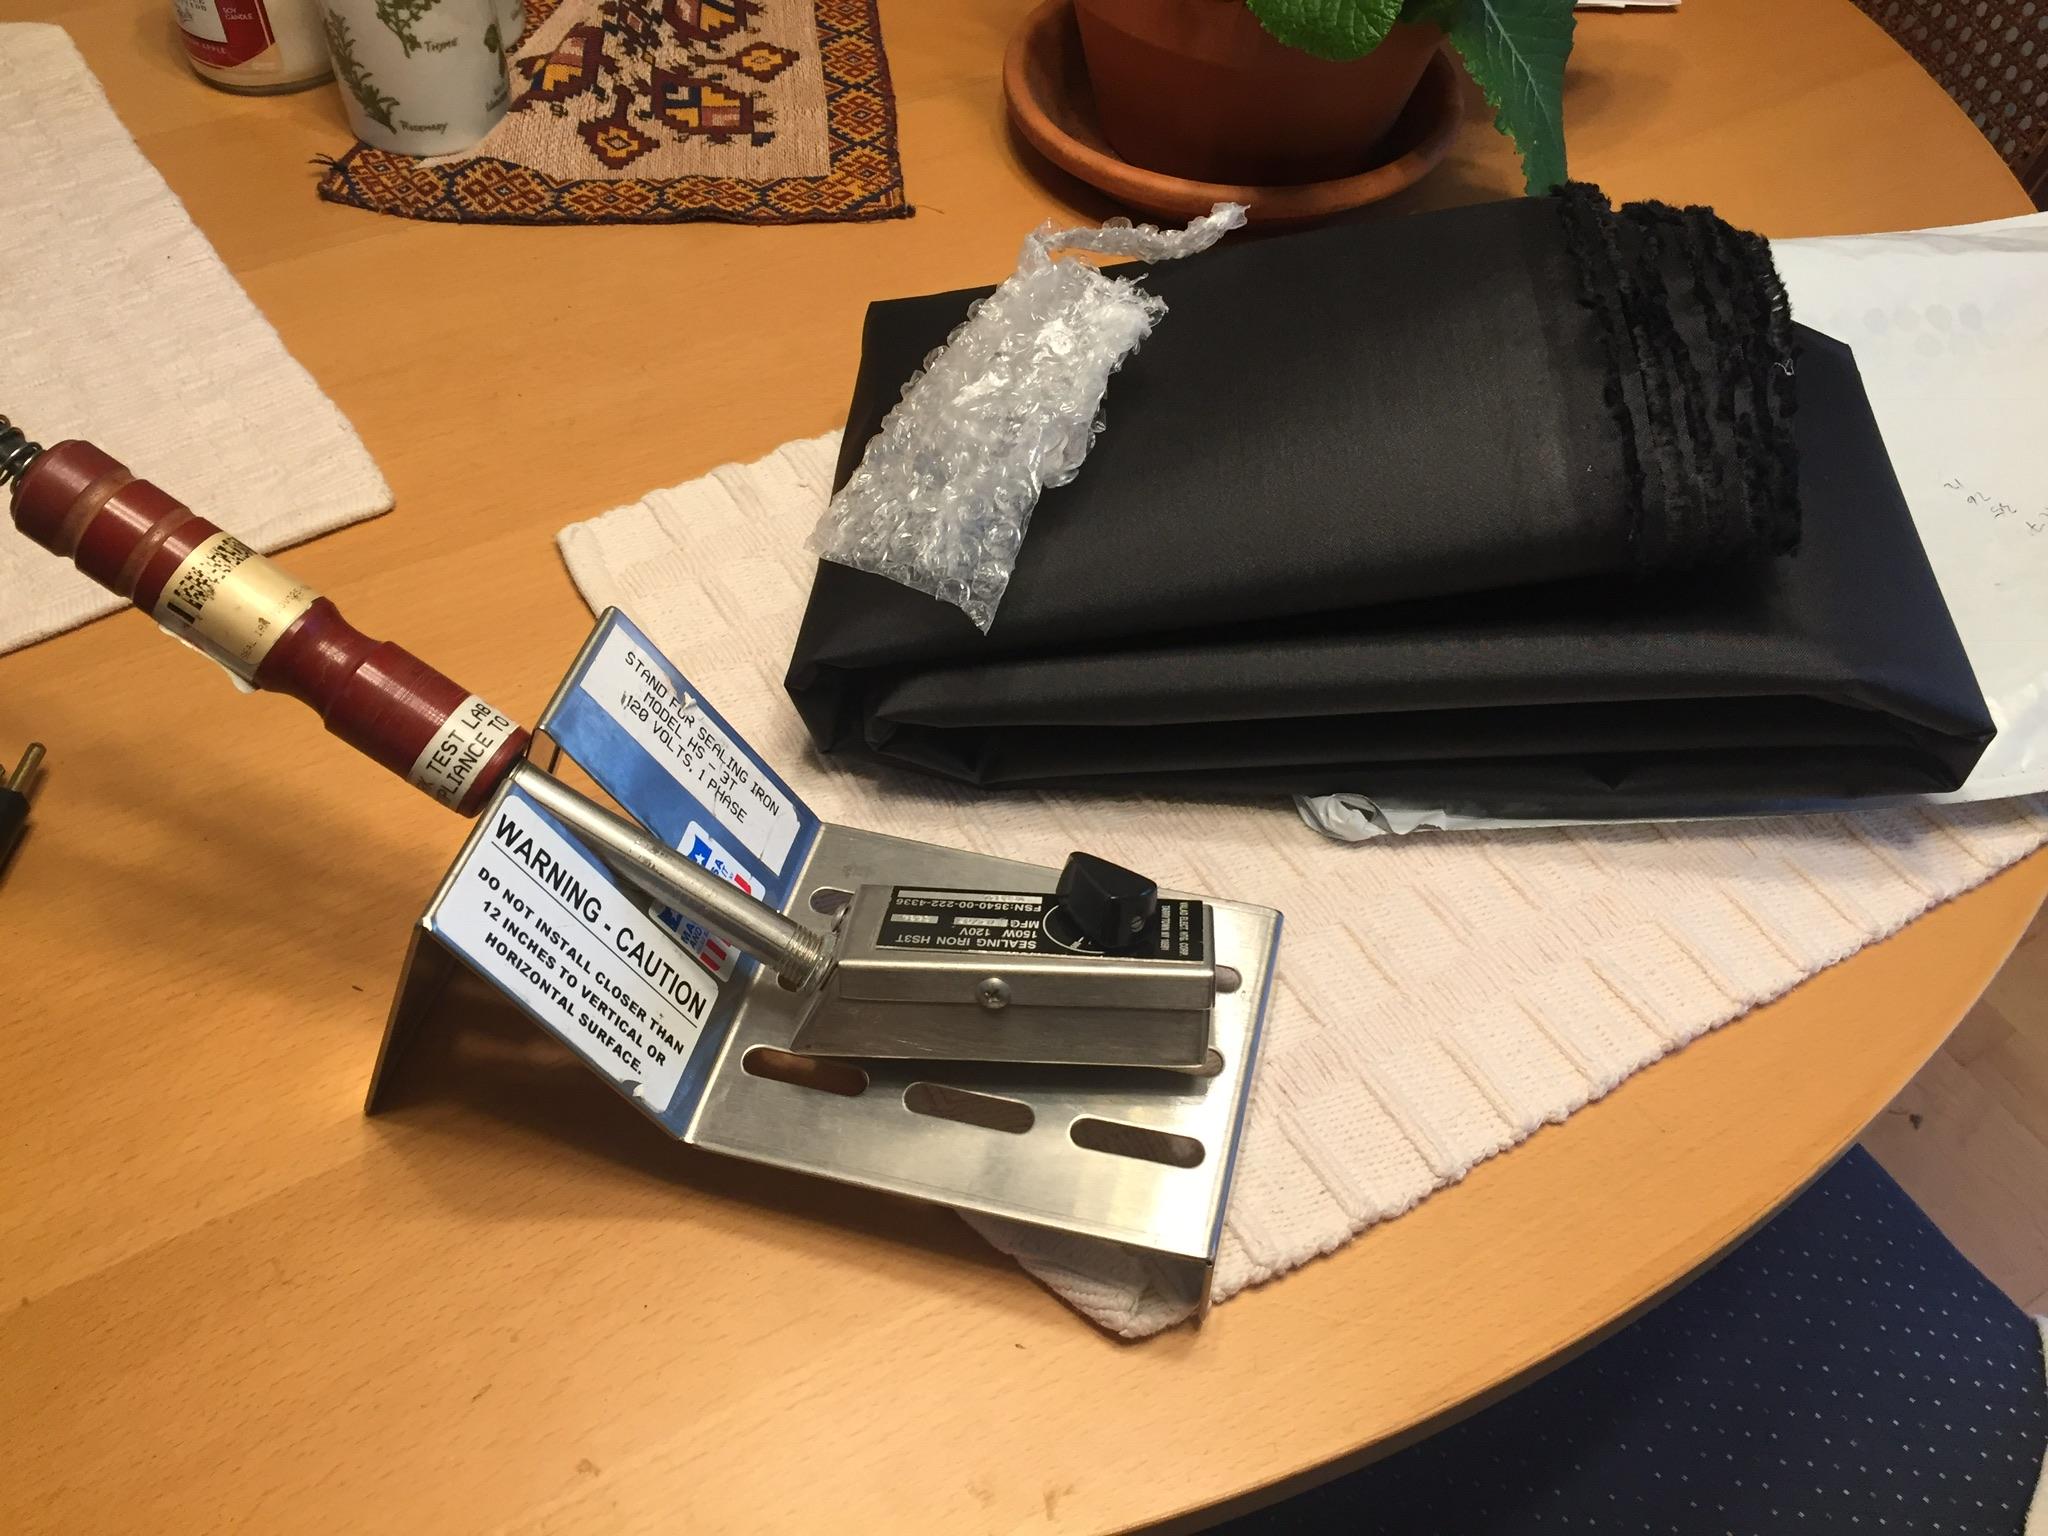
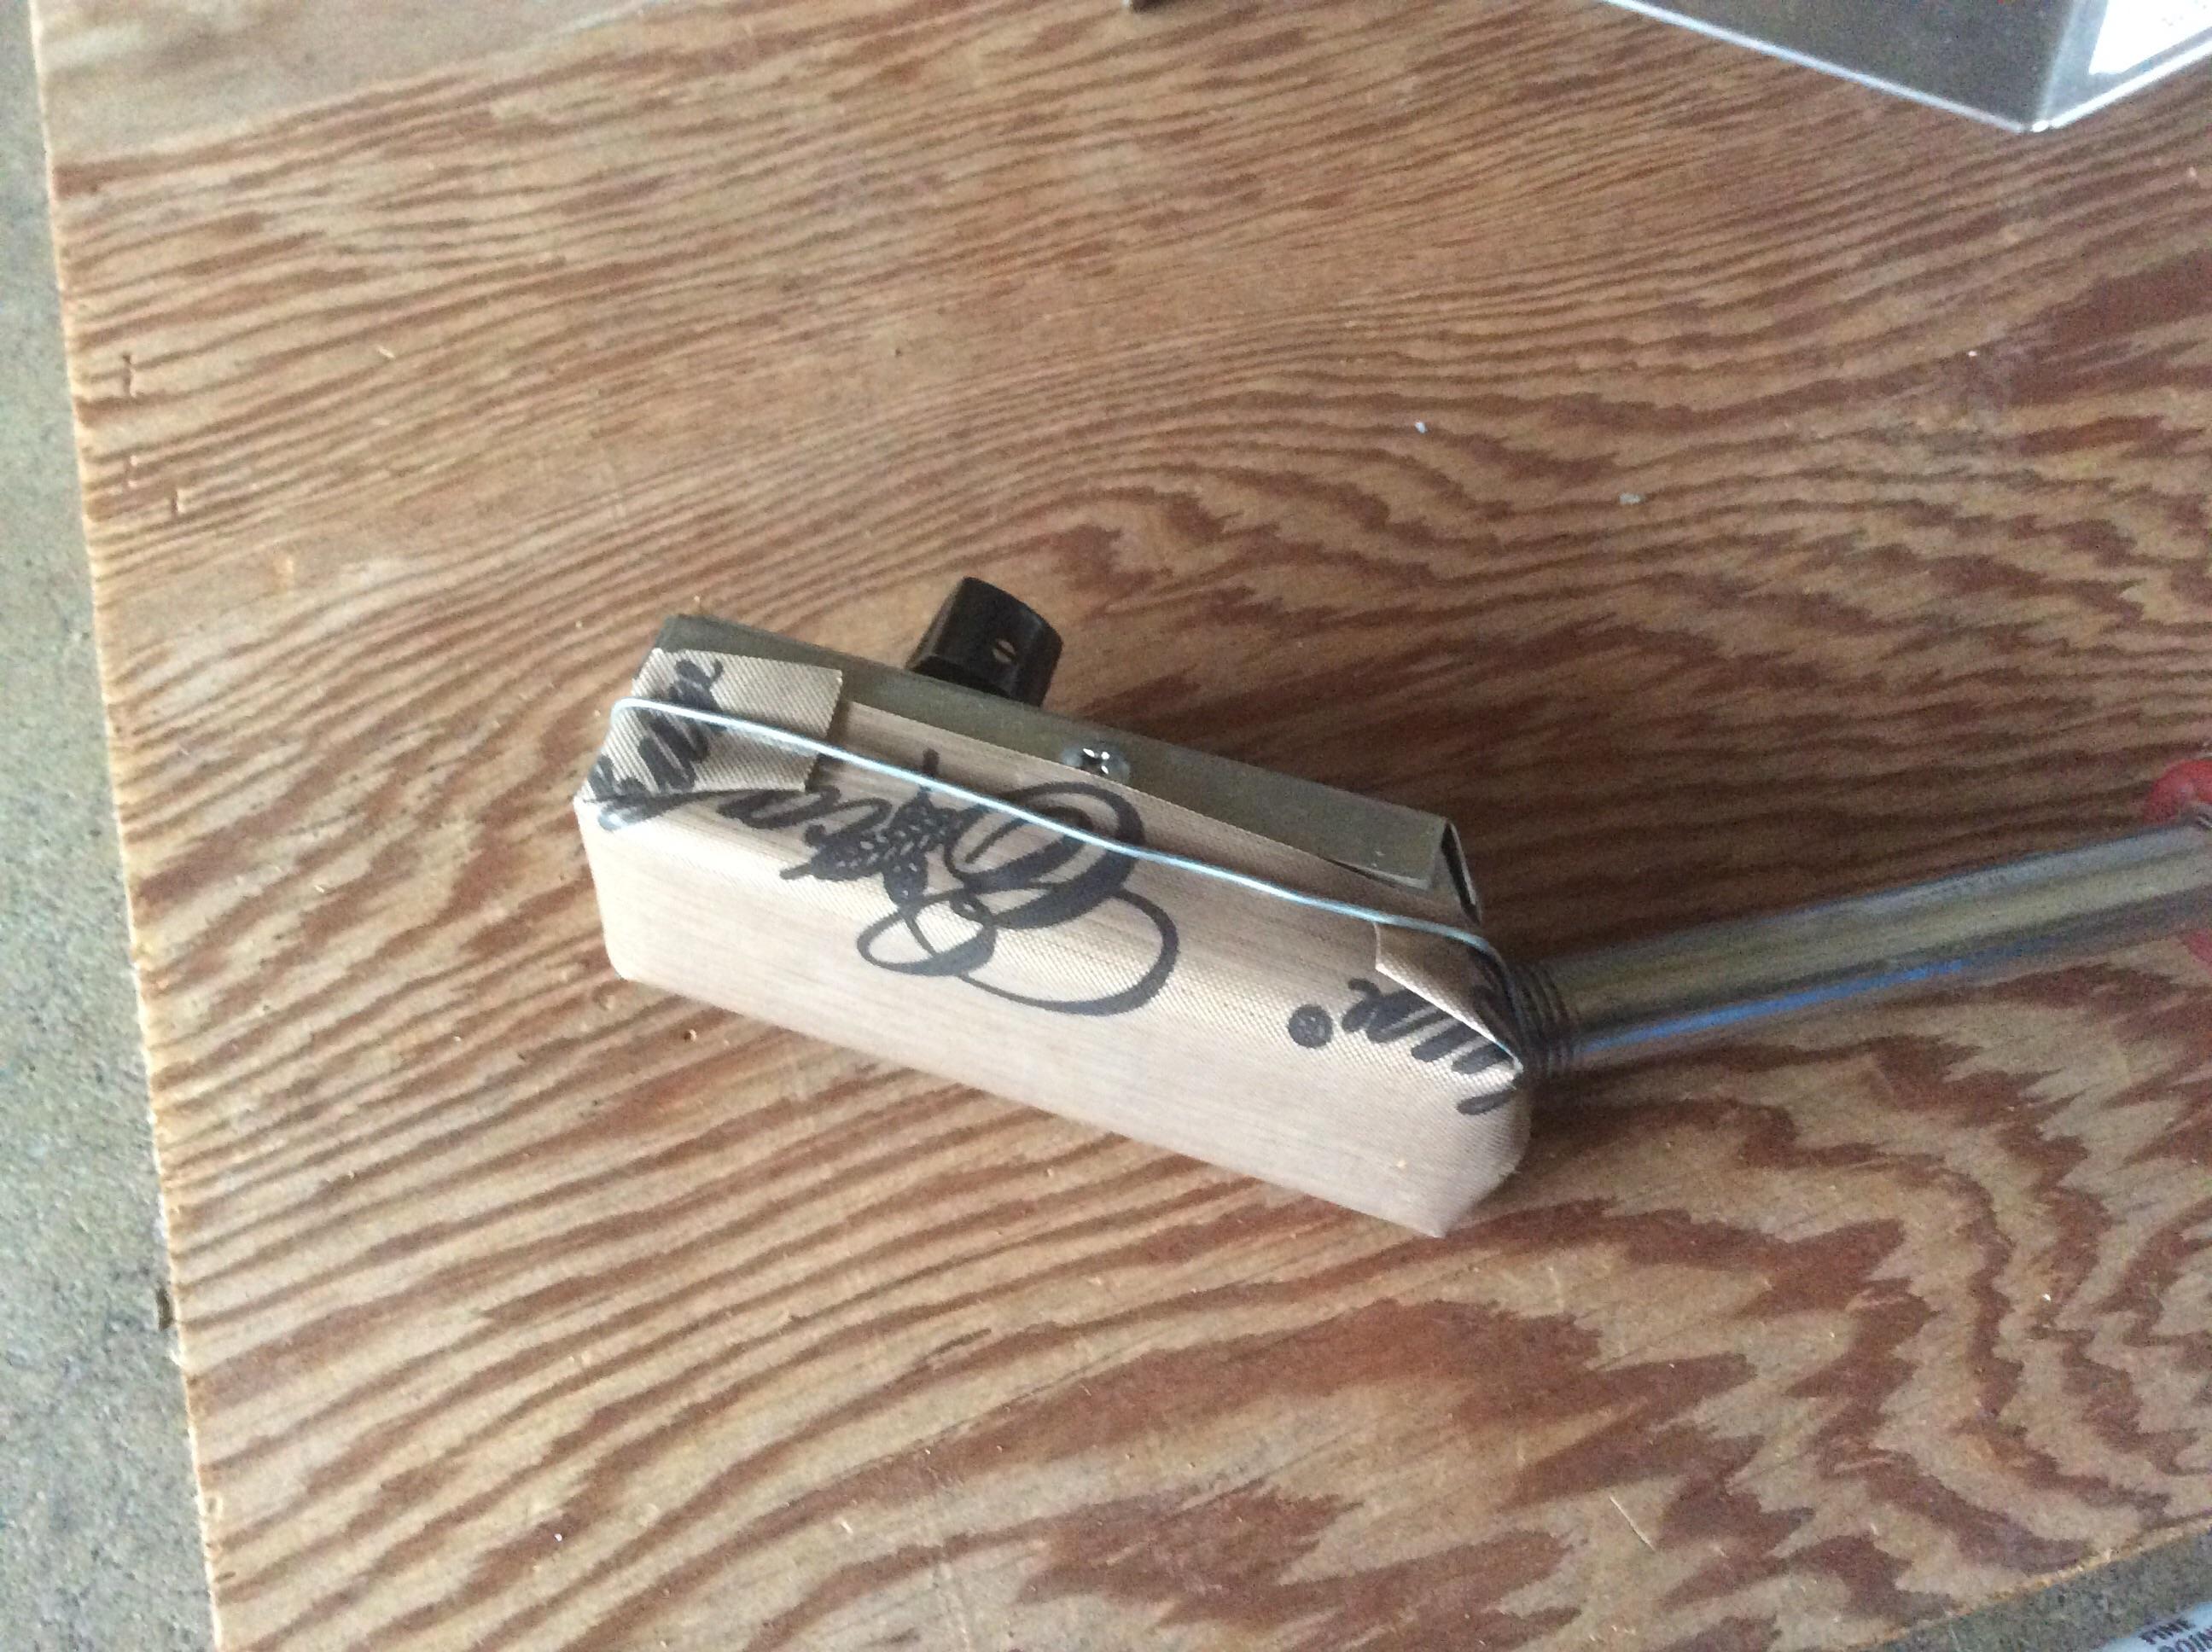
I picked up a military surplus Valad Heat Sealing Iron off eBay like one of these: http://www.ebay.com/itm/VALAD-SEALING-IRON-HS3T-150W-120V-HEATING-PARTS-TOOL-HOT-ELECTRIC-MILITARY-USED-/172624490089?hash=item283138ae69:g:Sb0AAOSwoydWqAl8
I didn’t have much luck with the clover either, this is much heavier and seems to hold the heat better. My friend Evan found a similar industrial sealing iron for $75 used somewhere that has a heavy solid iron end that works well too. They are both just about the same width as our seams.
His came with a teflon type cover which I realized was the same as my Excalibur food dehydrator sheets so i cut a small piece form one of those. This helps the hot iron from sticking to the fabric, especially when I first start and the center of iron is hottest in one spot. This works pretty well now.
I’m interested to see how the hot air welders end up too!
-
April 16, 2017 at 3:40 pm #2927Matt (Admin)Keymaster
Interesting – thanks for the post!
-
-
April 11, 2017 at 10:55 am #2905Matt (Admin)Keymaster
My Dritz Petite Press arrived today and this one does not get hot enough to seal properly. Others report that the Petite Press works for them, so there may be variation among them (as there is with the Clover irons). I will try to modify mine so it works (it is almost hot enough), but at this point I cannot recommend it.
-
April 13, 2017 at 5:36 pm #2919JebParticipant
Lame! They have a heat setting of 1 – 4. Needs a 5 perhaps.. I was surprised when I opened the package it only says it’s 10 watts! Hard to believe it could do anything with 10 watts, but the heating element is right in the pad. I did find that it never ever ever got too hot, which is nice as after a while I stopped even bothering to test it on scraps. Mine seems to work fine on a regular seams, but it does struggle with pieces like the zipper and doesn’t have the power to really be able to use the tip as the heat is centered around the middle of the shoe. Sorry it didn’t work for you, this inconsistency in irons is annoying. I already ordered a second one, I hope it works.. I did find it makes a big difference what you have underneath. A lightweight wood panel seems to be best as it doesn’t act as a major heat sink.
-
-
April 6, 2017 at 12:49 pm #2883JebParticipant
Not thrilled at all with the clover irons. Both our 120v units don’t get hot enough to do anything. I already had a Polyvance Miniweld model 7 airless plastic welder and it works very well. Also just picked up a Dritz Petite Press portable mini iron, it seems to work very well too. The Dritz is more ergonomic than most for those long seams, and the shoe is 23mm wide.
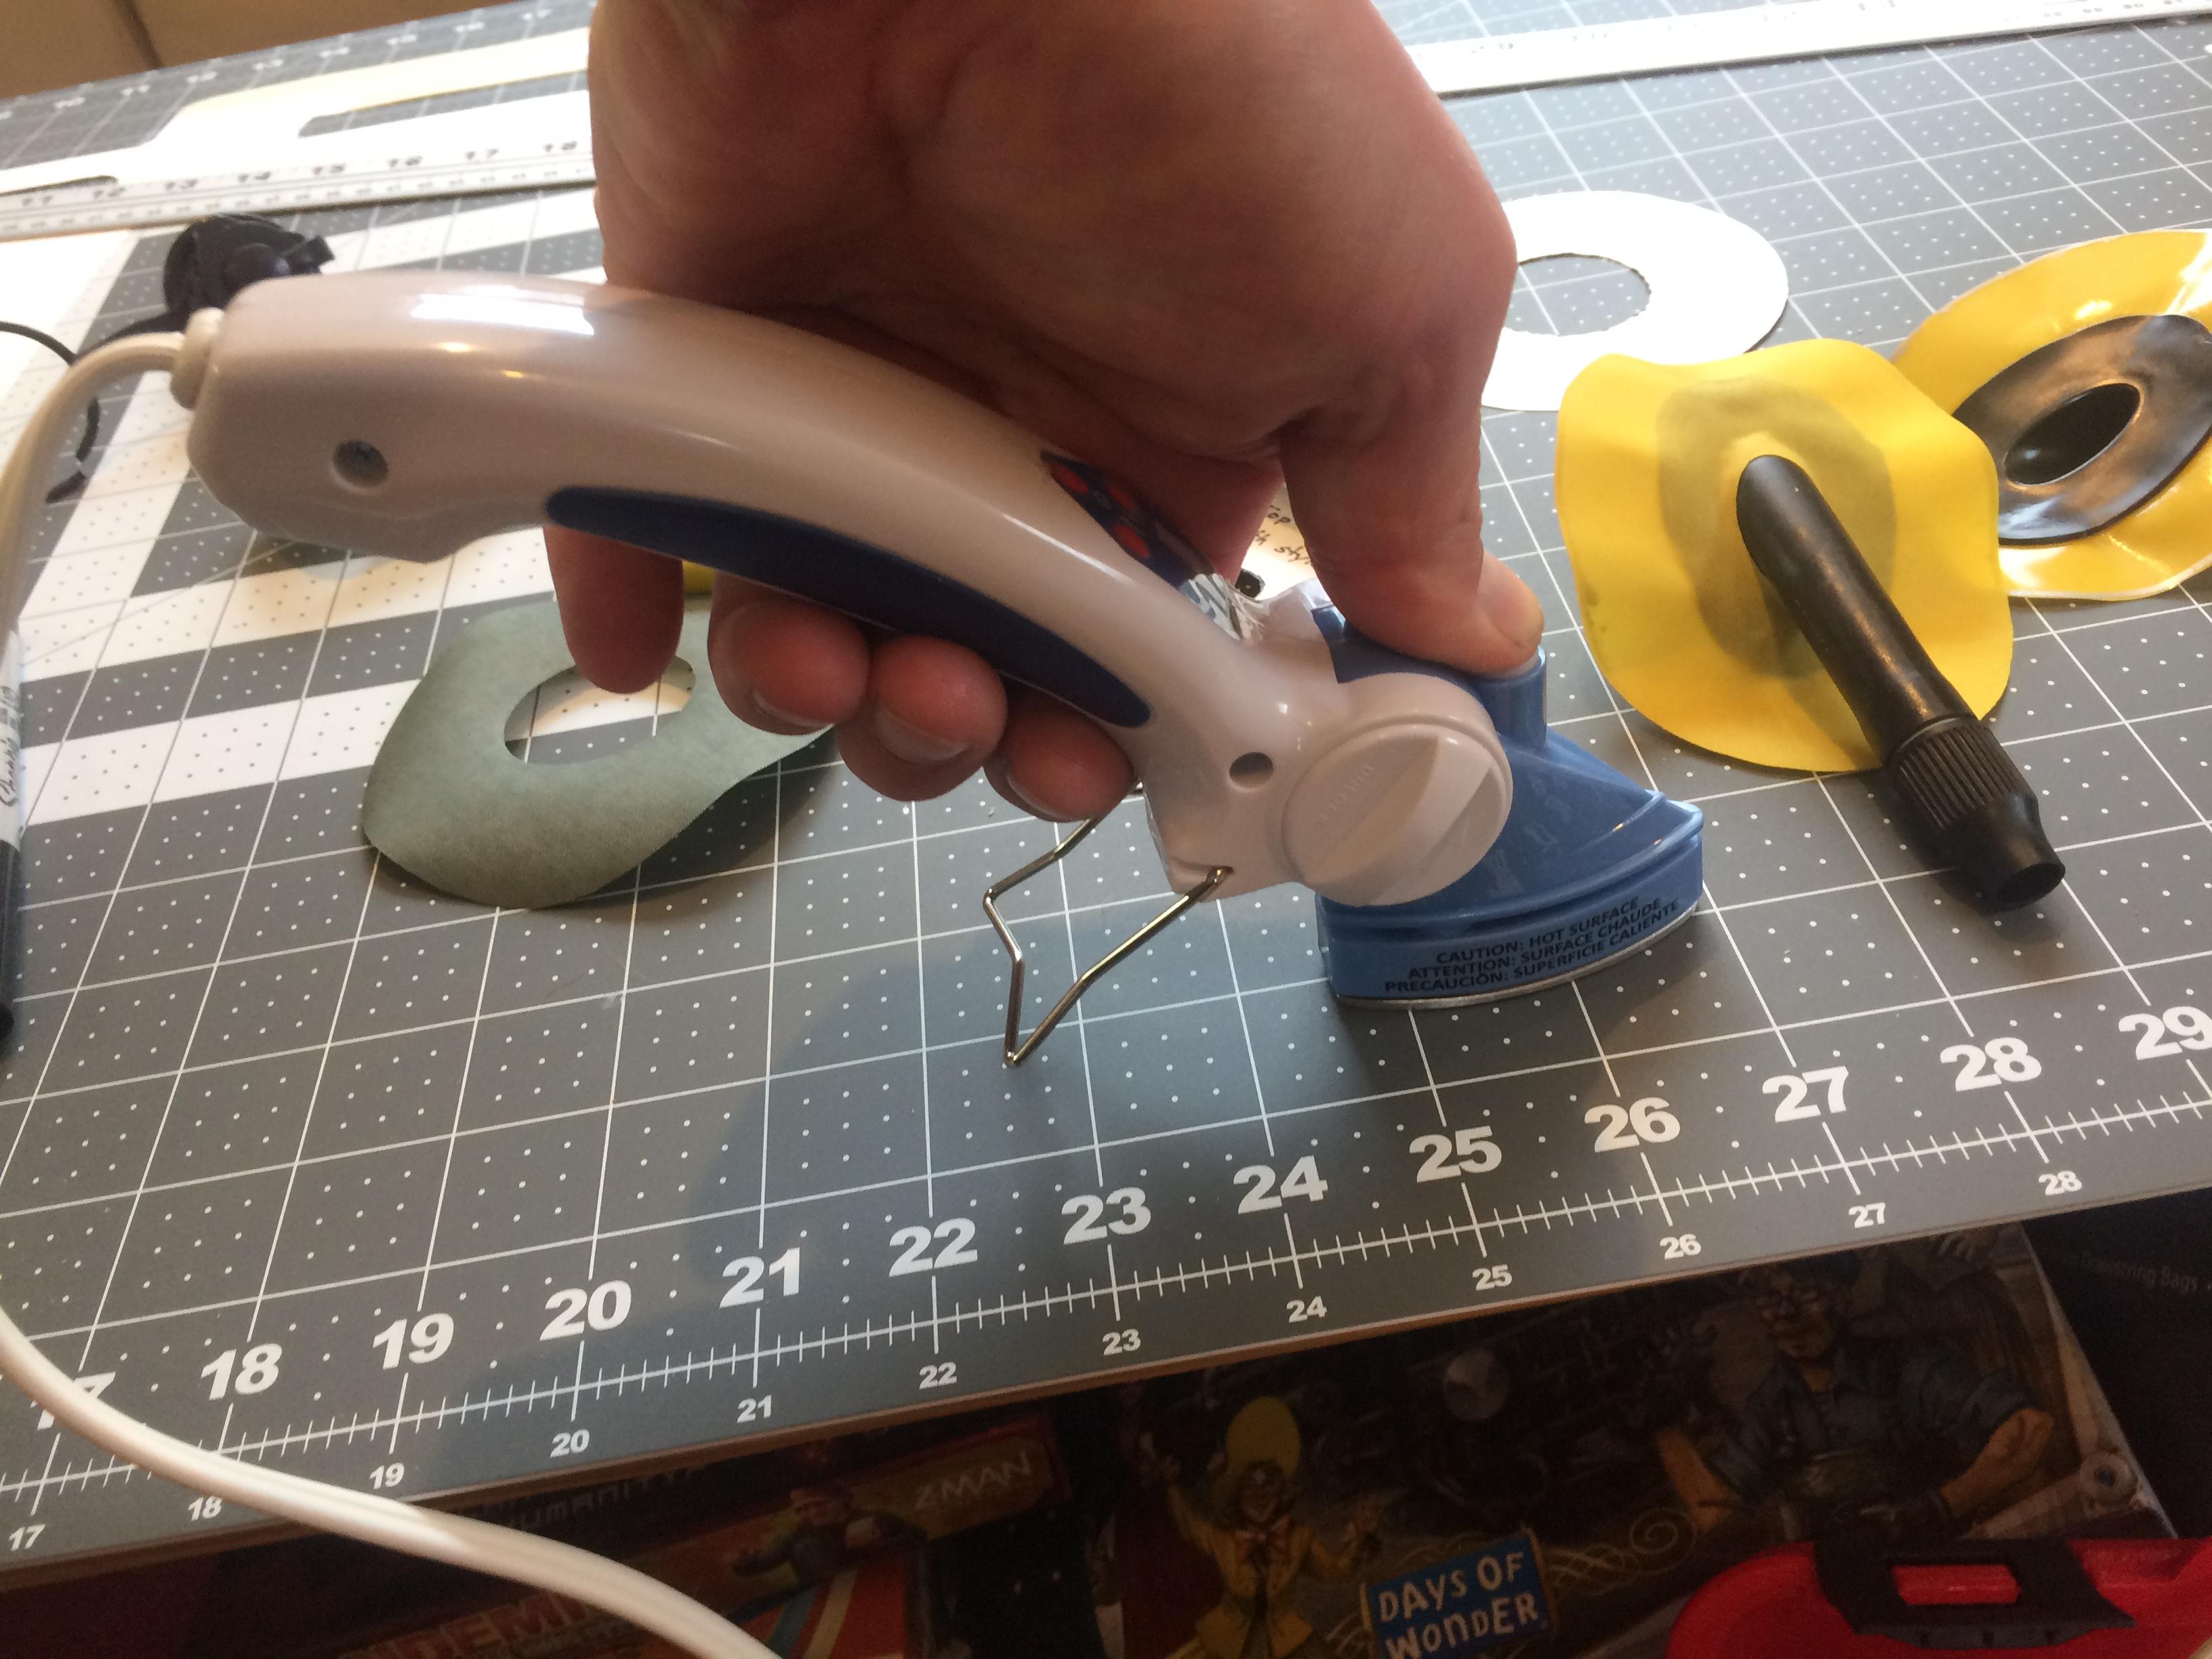
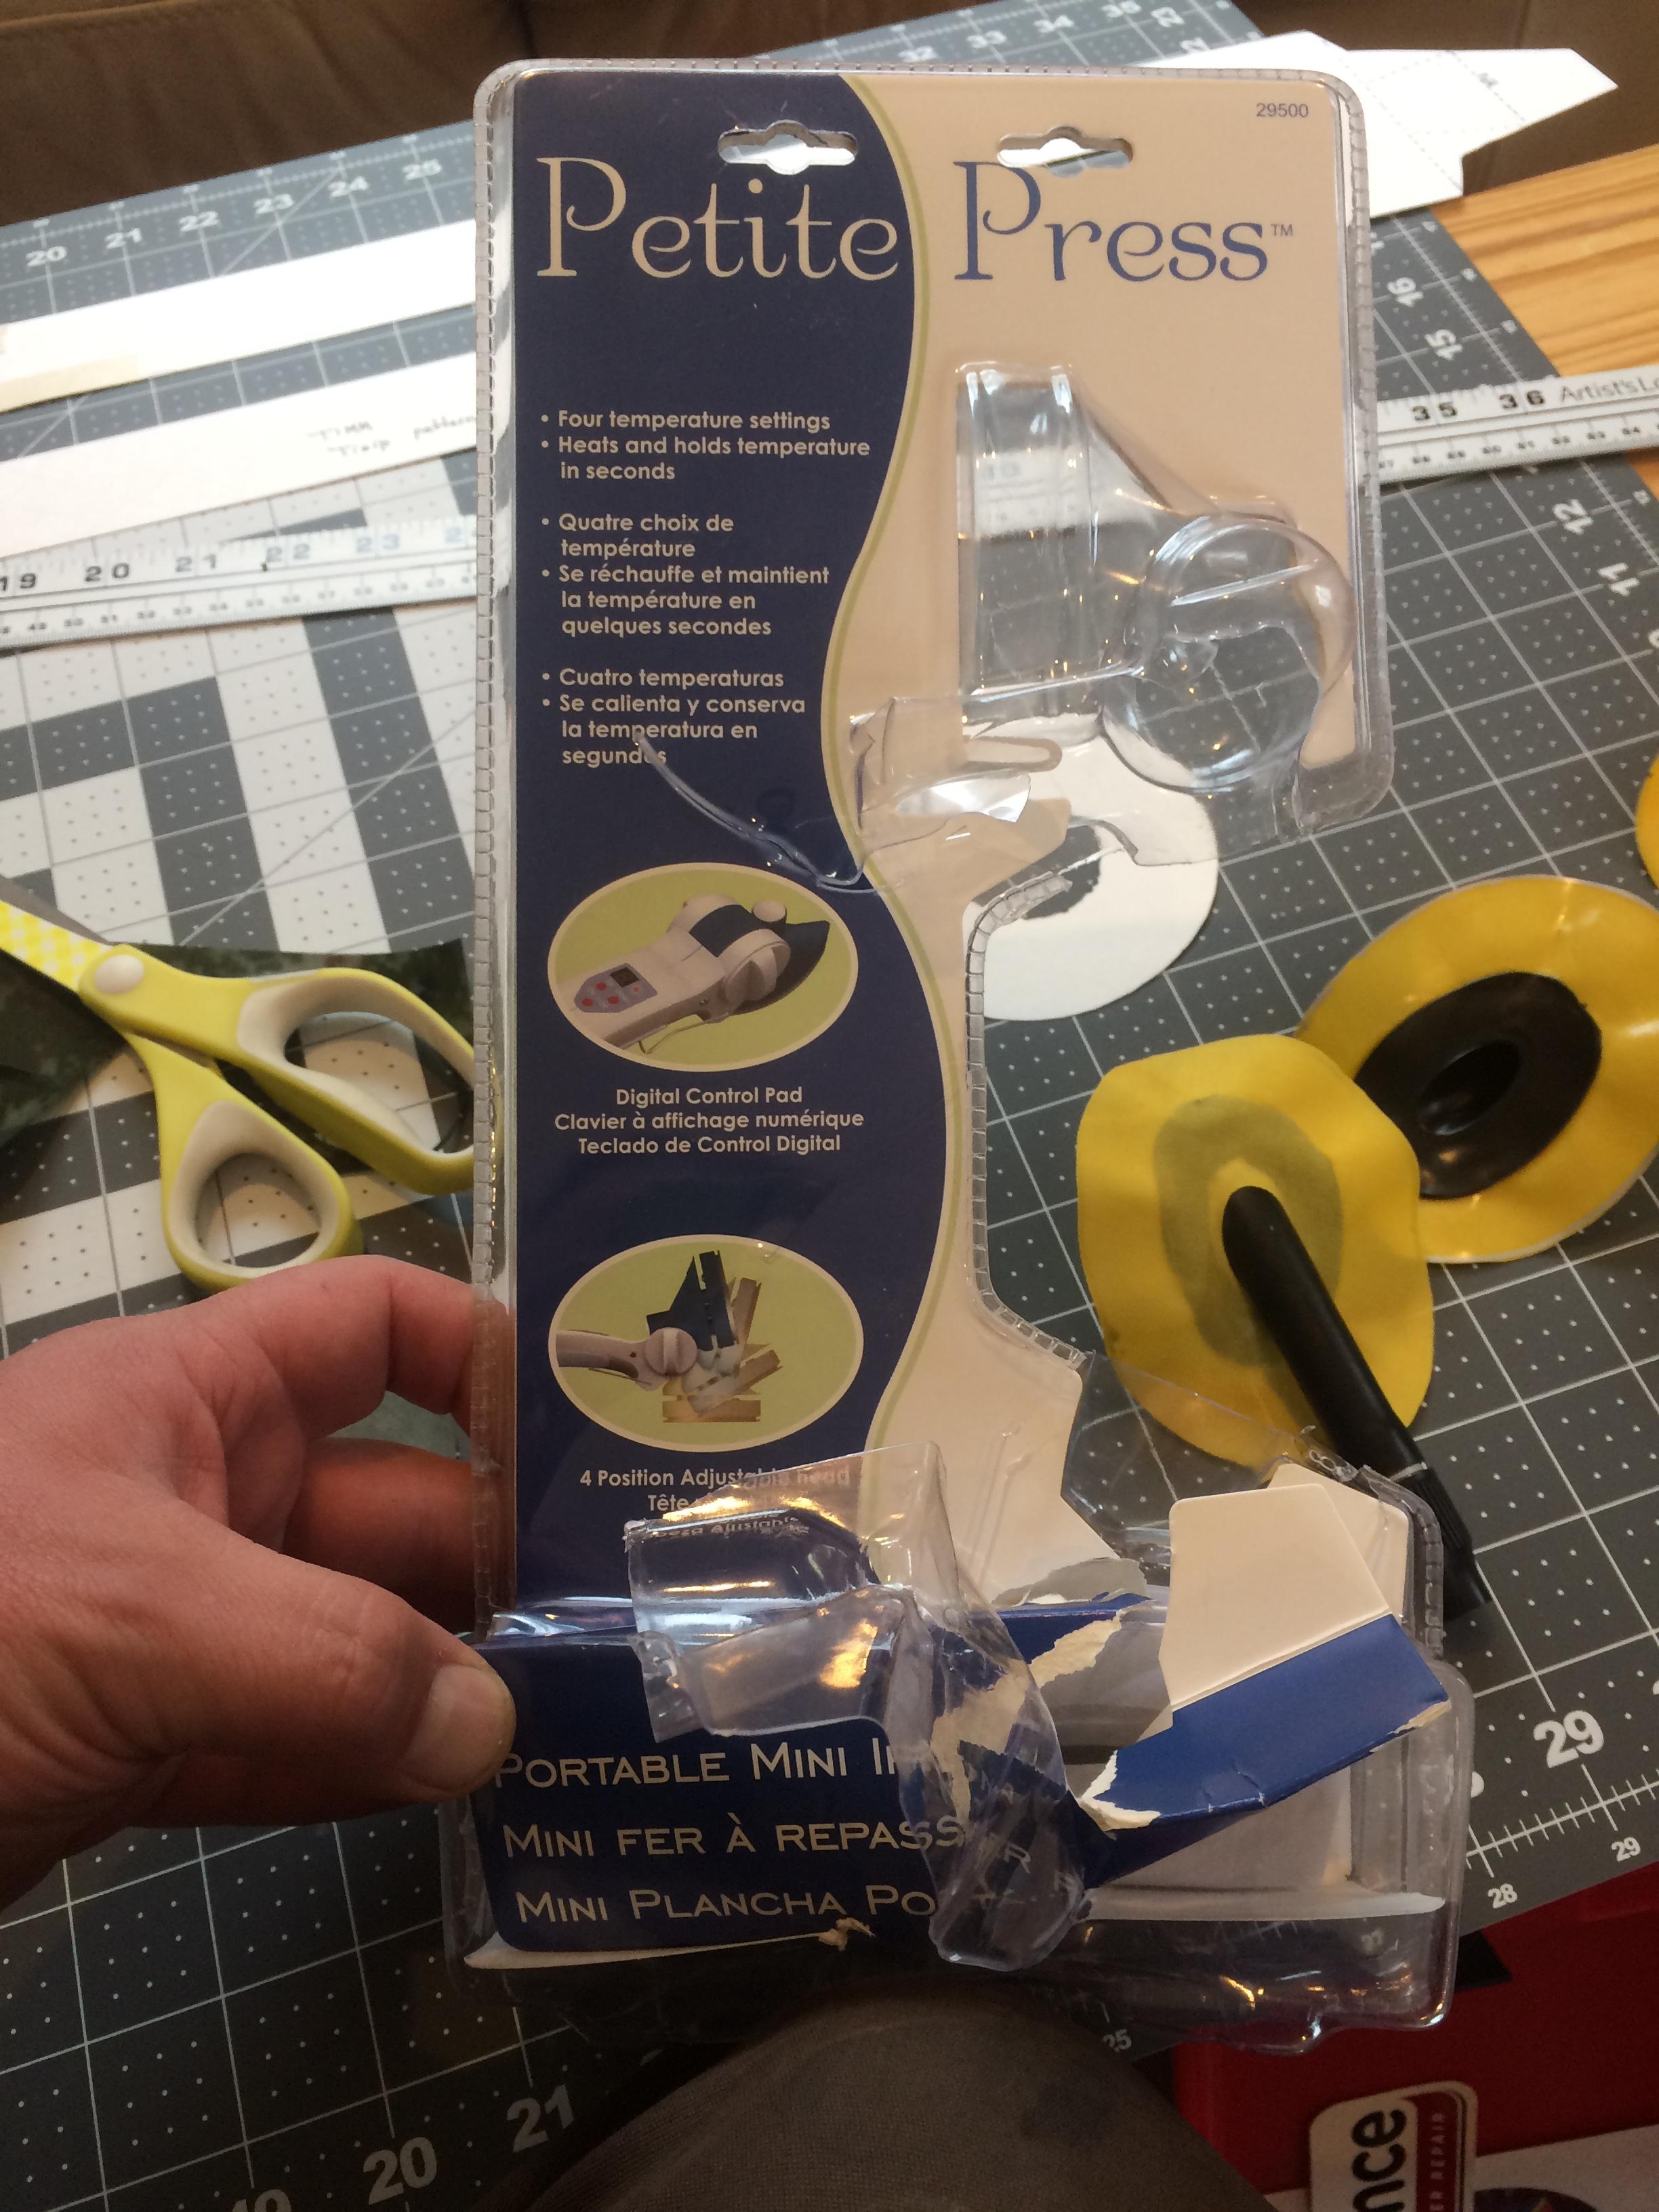
-
April 6, 2017 at 8:30 pm #2885Matt (Admin)Keymaster
Thanks, for the reviews, Jeb! I was wondering about both of those irons. I think the Polyvance will be out of most people’s price range, but the Dritz seems like a good option, especially since Clover seems to have a quality control problem or design flaw that leaves many people disappointed.
-
-
March 2, 2017 at 8:33 am #2613Matt (Admin)Keymaster
Some people have been having issues with their Clover Mini Iron II not getting hot enough (especially the 240V version sold outside North America). If you’re in this situation you could try wrapping the heating element and/or shaft with aluminum foil to insulate it so more heat is conducted through the shaft to the foot. Most of the iron’s heat is lost to the air, so by insulating the shaft, more heat will be conducted to the foot.
Note that doing this could overheat the iron and damage the its circuitry or even start a fire! If you try this, you do so at your own risk! Never leave an iron unattended when it is switched on!

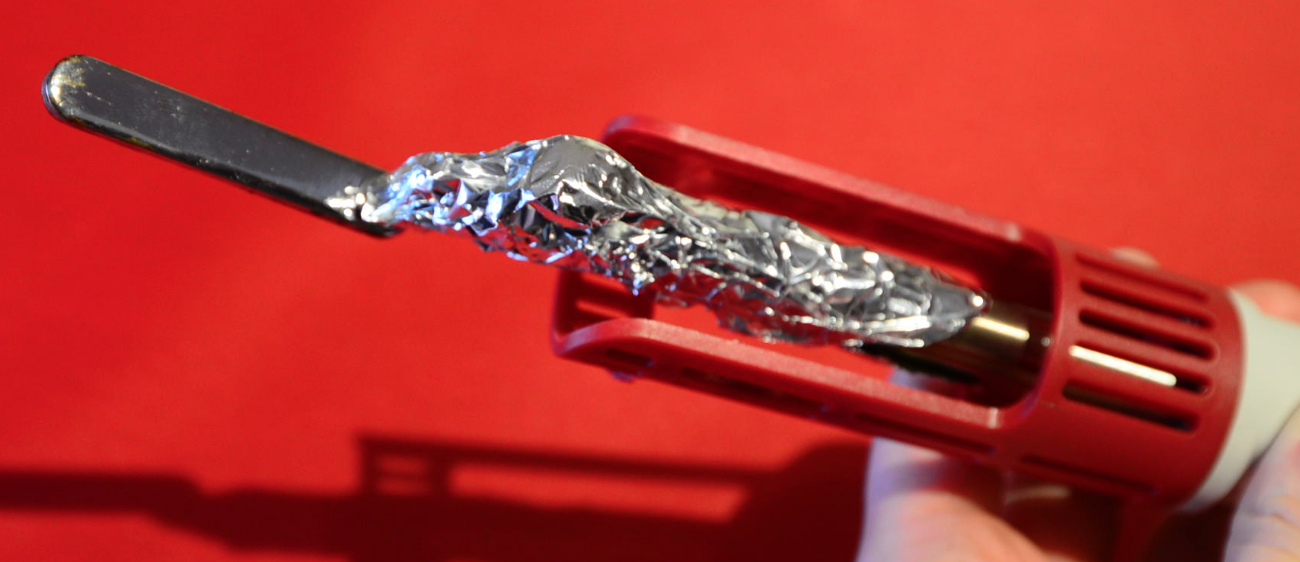
-
March 3, 2017 at 7:46 pm #2622hiroshiParticipant
japan is 100V. clover mini iron is high-low version.
The cause of the puncture is lacking in the adhesion by temperature being low.
Because temperature was low, I improved a soldering iron.
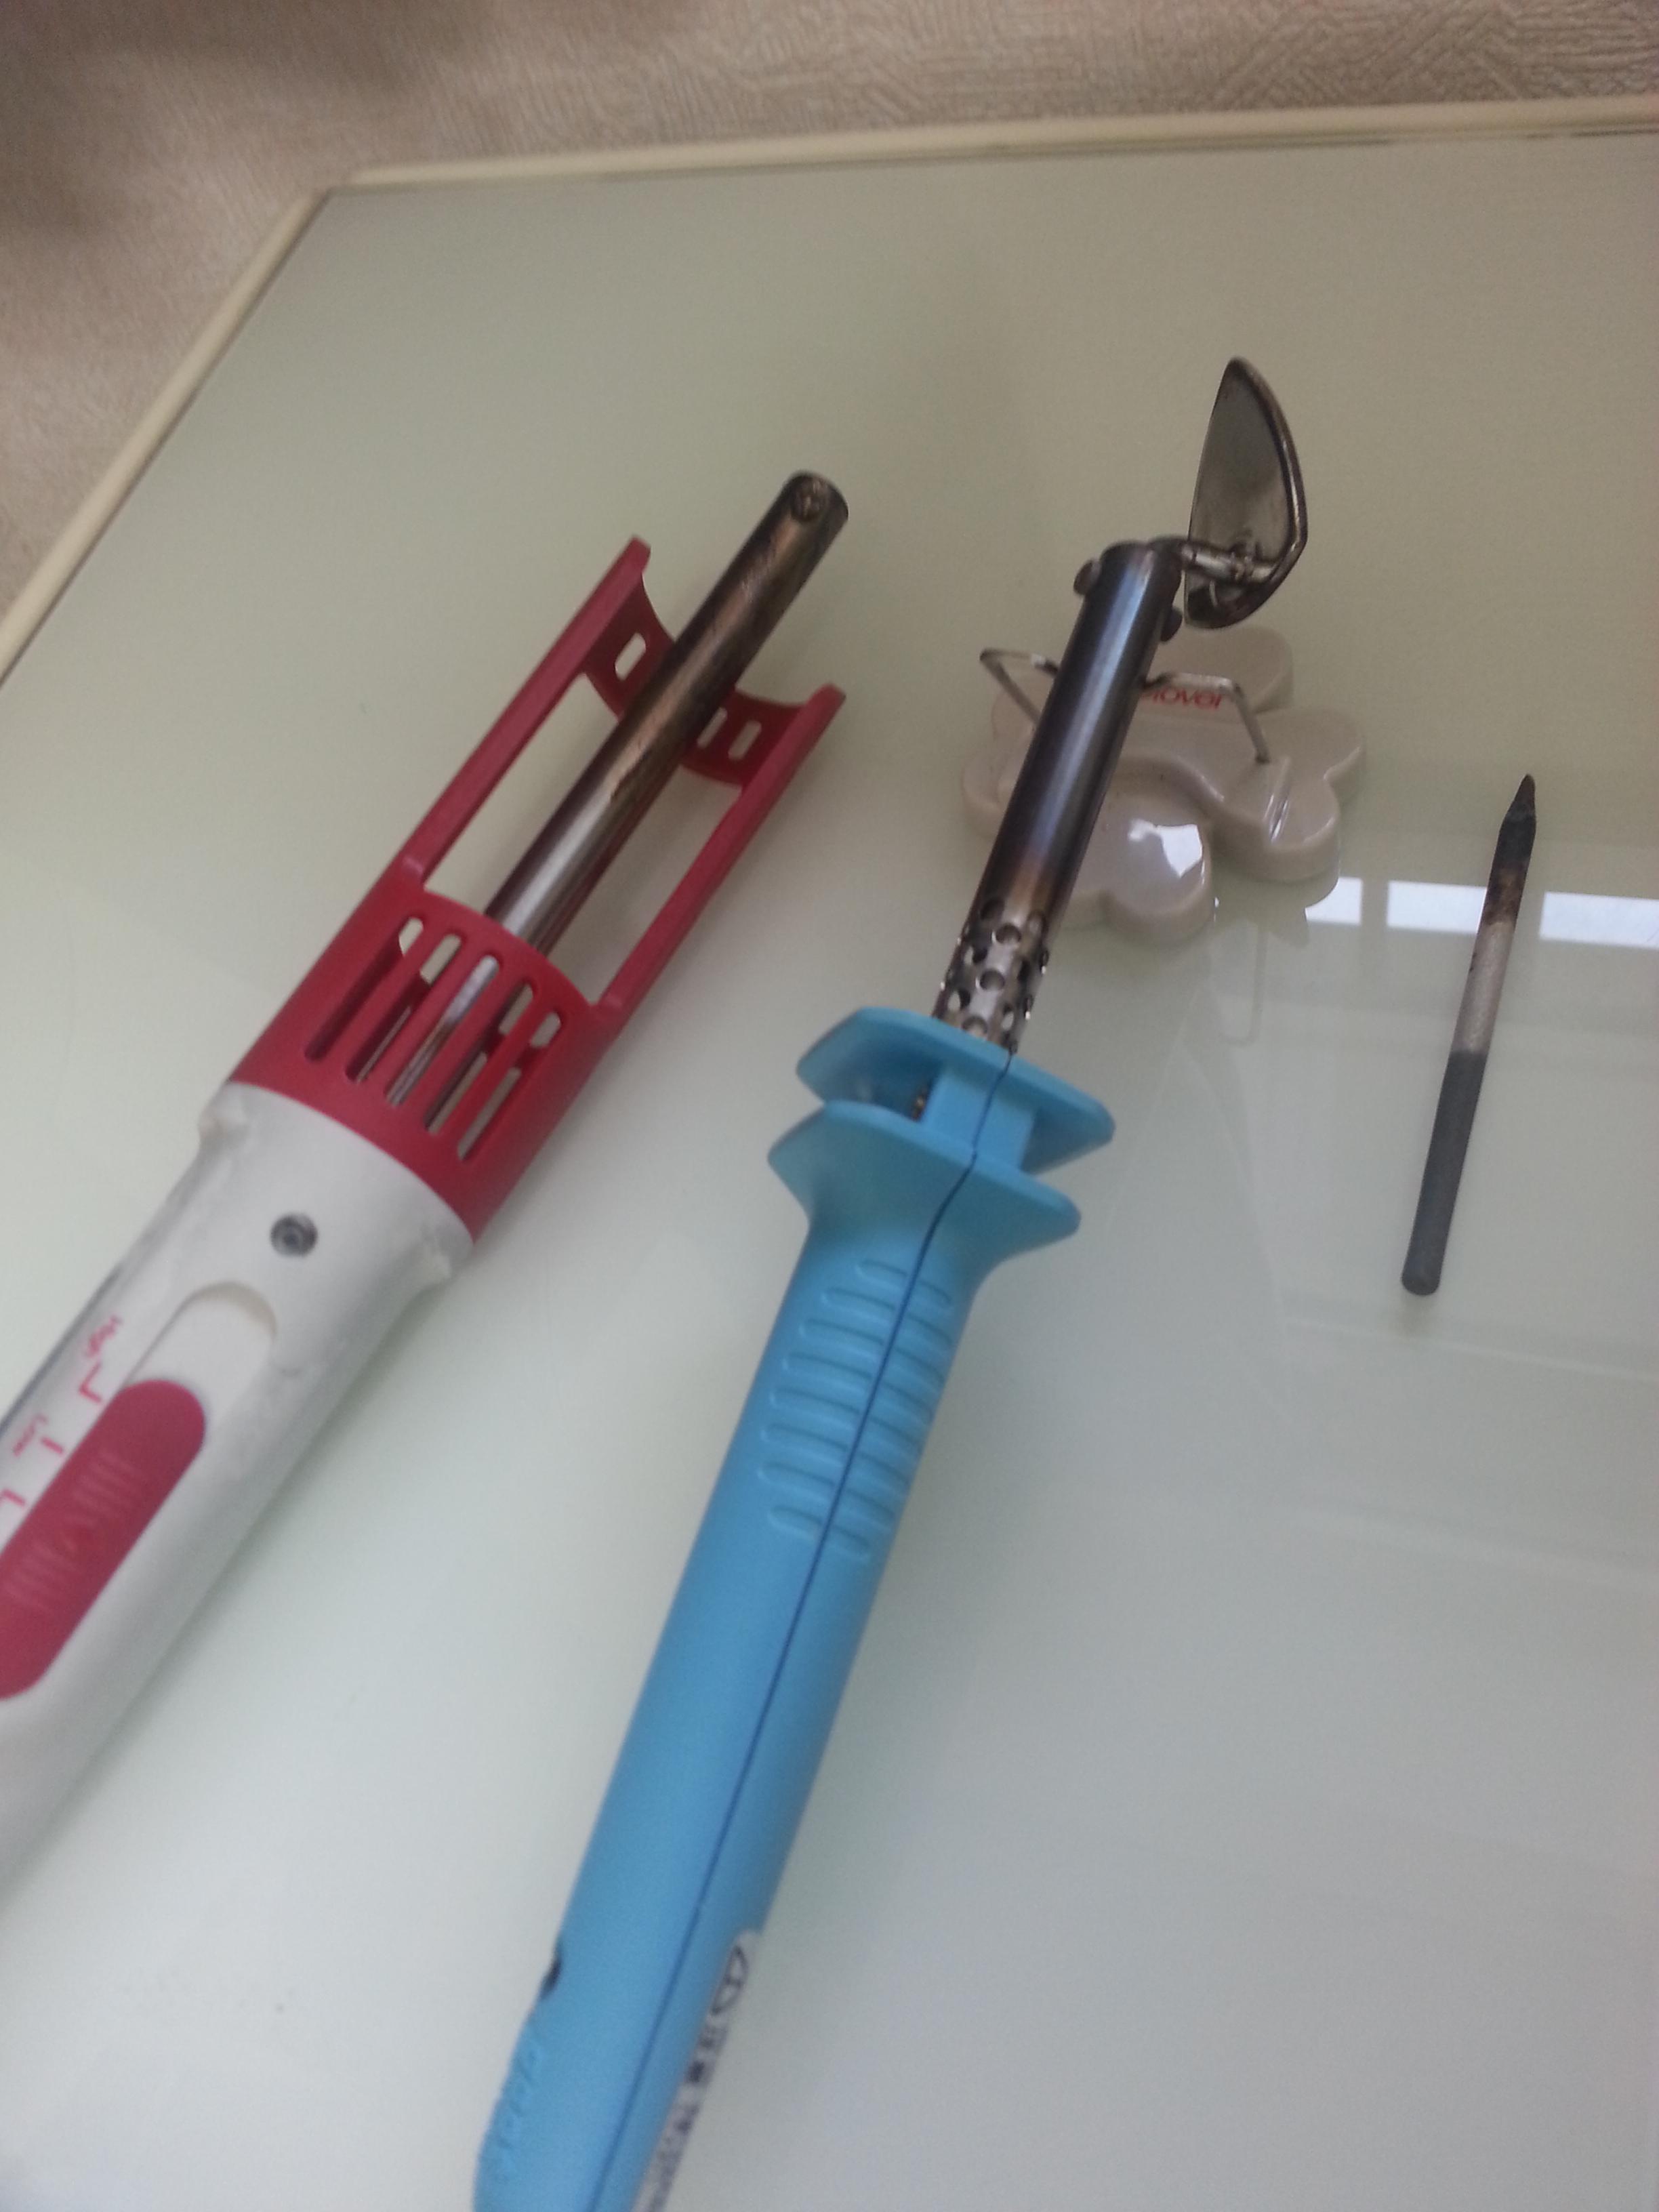
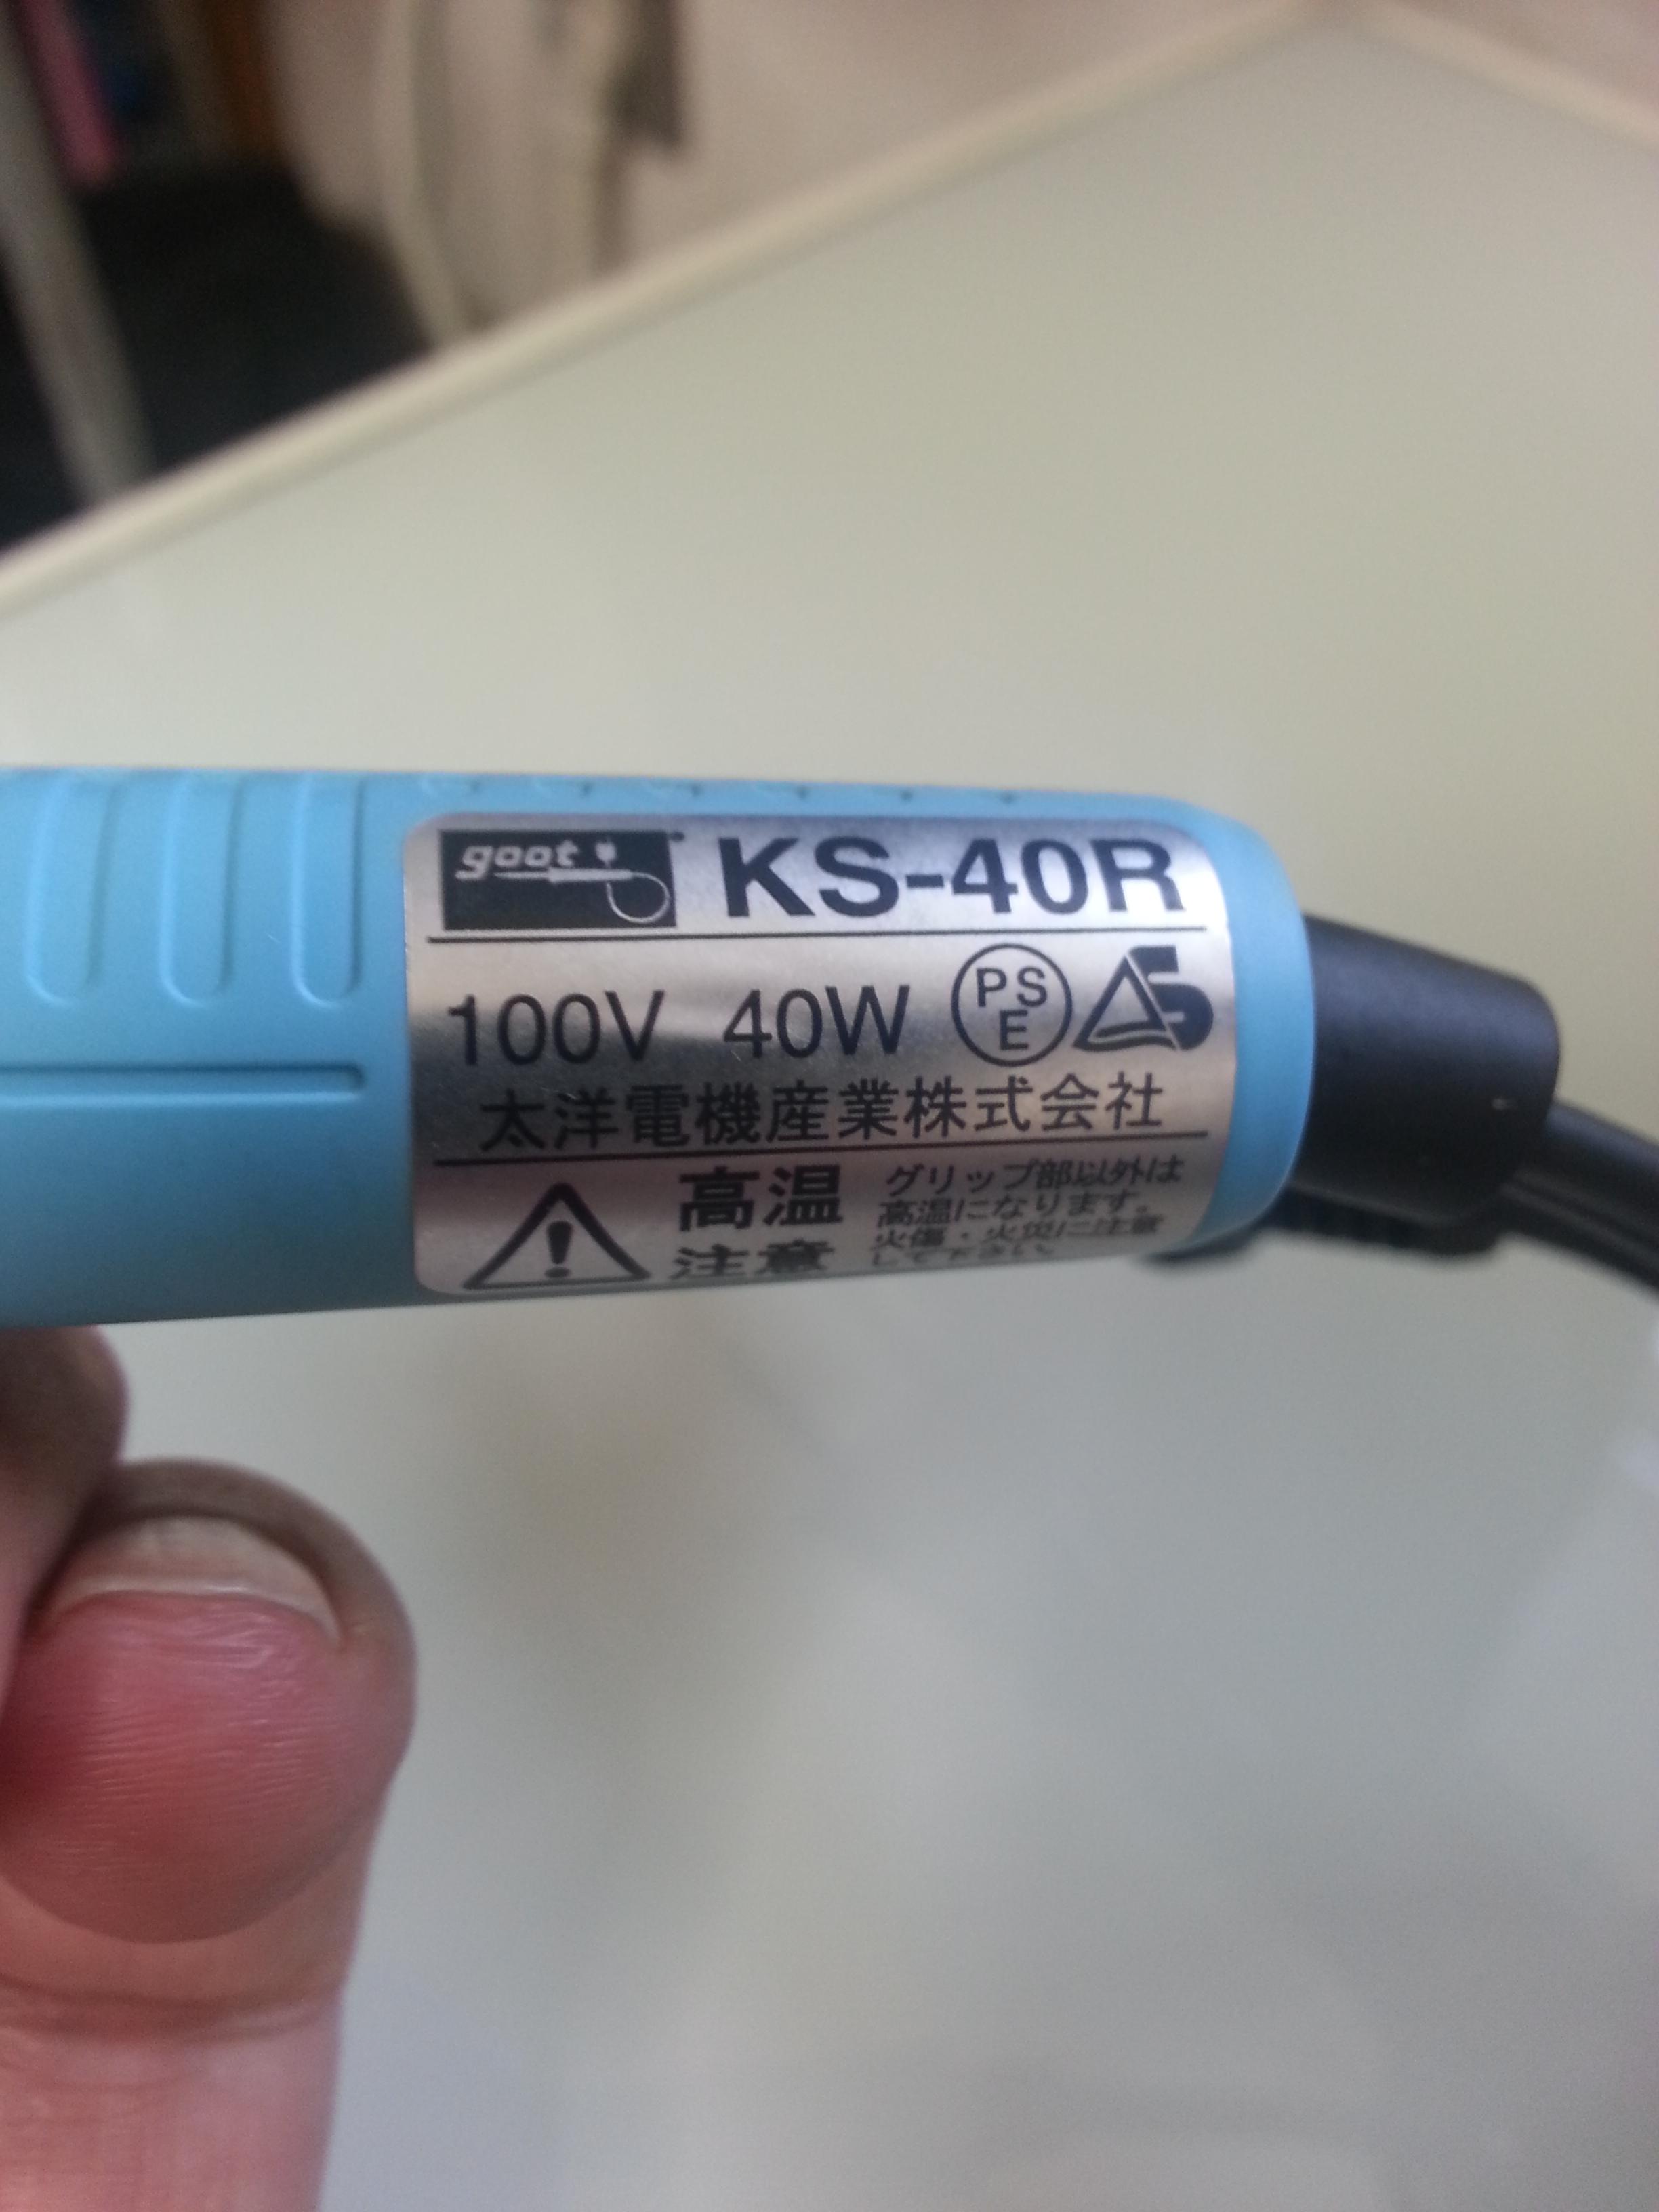
-
March 4, 2017 at 2:47 pm #2625Matt (Admin)Keymaster
That looks like a good solution, Hiroshi!
-
-
-
February 21, 2017 at 11:03 am #2545Lyn St GeorgeParticipant
After becoming disillusioned with my broken down sealing tools, I sat and watched youtube videos on hot air welding guns and then went and bought
this one from ebay.I’ve only had it a couple of days and only played briefly with it, but I’m very impressed. It comes with various bits including a 20mm flat nozzle and a silicone roller, is nicely balanced in the hand and should be very easy to use with a little more practice. Bonded joints are strong and uniform, and very quickly made. It’s very practical to tape two pieces of fabric together with gaffer tape the full length of the joint and then weld the seam tape on the tpu side (as for the boat tubes) – the gaffer tape is barely even warm when ripped off. This should make it a doddle to line things up properly. Works just as well on that 30D/100gsm white fabric from Seattle Fabrics as on Matt’s 210D/280gsm fabric.
In summary, this is the bee’s knees. A very valuable addition to the toolbox, and it gives me huge confidence that the finished boats will be strong and survive anything we might do in them.
-
April 13, 2017 at 5:53 pm #2920JebParticipant
Are you still liking the hot air gun Lyn? I imagine this is probably the best route to go for the folks that want to do a lot of raft building, and I could use it for other plastic welding too..
-
April 14, 2017 at 2:53 am #2921Lyn St GeorgeParticipant
I see it as a valuable addition to the toolbox that will be used on other jobs too. I have the 1500W version but there is a 1080W version on ebay for the price of a Clover iron, though you need to get the 20mm nozzle separately. Anyone who’s done any gas welding will find this a natural tool to use, though you need to develop some specific skills to get good results.
On the positive side the heat is consistent – unlike an iron which loses heat as you work. Though you have to be careful to keep the speed consistent – if you inadvertently pause while fiddling with the roller it can burn holes clean through the nylon. The air flow is very focused and stays at the nozzle width until it hits something. I flattened the 7mm round nozzle to about 10mm wide, and that proves useful for welding baffles onto a seat cushion. All the heat goes into the tpu coating and almost nothing is transferred to the other side of the nylon, so you could easily weld fabric coated on both sides. Or weld one side without affecting glue on the other side, and so on.
On the negative side it blows a large volume of air – think leaf blower – and anything not gaffer-taped down will blow away. The end of a seam tape will get twisted and welded to itself due to the air flow, so you need to extend the ends enough that you can hold them straight and then trim to size. The heating element looks very fragile, so it’s important to let it cool on fan only before switching off.
I’ve only practised with it so far, but when the new green fabric arrives I’ll make both boats together and try to make a video of the gun working.
-
-
February 21, 2017 at 11:39 am #2546Matt (Admin)Keymaster
Thanks, @lynsg – this is great news! I will give it a try myself. Until now I’ve assumed that it would be too difficult to manage three pieces of fabric, an air gun, and a roller all at once. Are you heating between the layers and then setting the air gun aside and picking up the roller to roll the seam?
-
This reply was modified 9 years, 5 months ago by Matt (Admin).
-
This reply was modified 9 years, 5 months ago by Matt (Admin).
-
This reply was modified 9 years, 4 months ago by Matt (Admin).
-
February 21, 2017 at 12:11 pm #2549Lyn St GeorgeParticipant
I haven’t yet had time to do more than a couple of hours testing, but it’s quite practical to use the gun in one hand and the roller in the other, following directly behind the gun. It also seems to work well, though it will need more practice, to wrap the seam tape over the roller so it trails behind, and use the roller in your palm and two fingers to guide the tape. This worked on one test on a flat surface, and with practice should work on a curved surface.
Also, you can tack-weld the tape in place at various points along its length, the same as you do with arc welding when you know things will otherwise buckle out of shape. Or start welding from the centre and move towards the ends, trimming to length when you get there.
Taping the two pieces together prior to welding is probably key, and finding that you can do that without melting the gaffer tape makes things much easier. All the heat goes into the tpu coating, and the other side of the nylon is not hot.
-
February 22, 2017 at 10:20 am #2552Lyn St GeorgeParticipant
When I get a minute I’ll make a little guide to bolt in front of the roller – something to feed the seam tape through as it comes from behind the roller and allow it to be steered. Will also keep the tape at a flatter angle to the fabric and closer to the gun, and add a little drag to keep it taut. Fiddling around with fingers and thumbs is too awkward.
-
February 27, 2017 at 7:06 am #2580Lyn St GeorgeParticipant
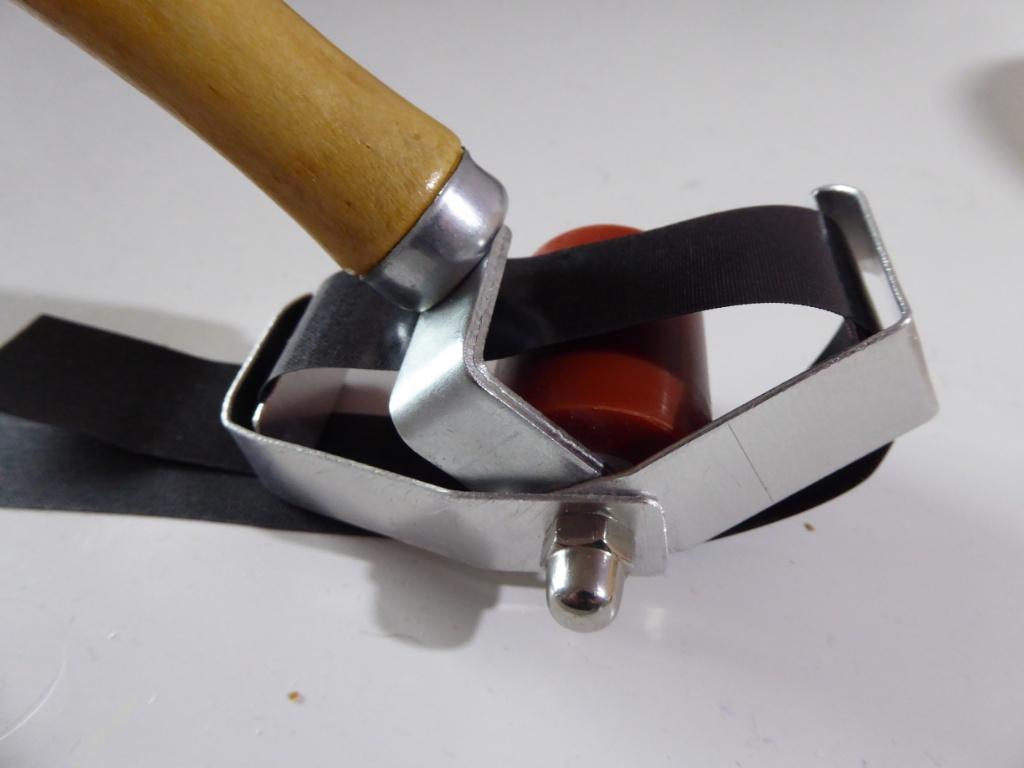
Here it is – it proved better to add a second guide at the rear to feed the tape straighter into the forward guide.
-
February 27, 2017 at 12:54 pm #2587Matt (Admin)Keymaster
Excellent work, Lyn! Did the bolt and nut come with the roller, or did you have to replace them to accommodate the thickness of the guides?
-
February 28, 2017 at 5:50 am #2589Lyn St GeorgeParticipant
The alumuminium bar is only 15×0.9mm (barely strong enough) and the original bolt is plenty long enough for this thickness.
-
February 28, 2017 at 11:02 am #2592Matt (Admin)Keymaster
Excellent – sounds like an easy modification 🙂
-
-
-
-
-
-
This reply was modified 9 years, 5 months ago by
-
-
January 5, 2017 at 7:59 am #2144Lyn St GeorgeParticipant
Yes, that’s the one. I’m in the process of bodging up a fix with some PVC waste pipe to slide over the whole length, and some silicon tubing to make a collar around the hot end. It will end up very strong and usable, but will still be a bodge and I really can’t recommend it.
-
January 5, 2017 at 4:40 am #2138Lyn St GeorgeParticipant
I’ve just tested this iron after adding a set screw to hold the Clover shoe, and broke the handle in half. Didn’t push down at all hard either.
I do not recommend this iron.
-
This reply was modified 9 years, 6 months ago by Lyn St George.
-
January 5, 2017 at 7:54 am #2142Matt (Admin)Keymaster
Hi @Lynsg,
That’s too bad! Was it the eBay 58W iron you mentioned above? I had a similar problem with one of the soldering irons I tested.
-
This reply was modified 9 years, 6 months ago by Matt (Admin).
-
This reply was modified 9 years, 6 months ago by
-
This reply was modified 9 years, 6 months ago by
-
December 30, 2016 at 7:03 am #2079Lyn St GeorgeParticipant
The soldering iron I have is this: ebay 58w iron, very cheap but effective.
It uses solid tips of 6mm diameter and I made a welding shoe from heavy copper tube, hammered flat and smoothed off to 11mm width. Having seen the clover iron I have bought a large shoe and will soon add a set screw to the iron heater to hold the clover shoe in place.
The original 70den/170gsm tpu fabric I got from extremtextil 5 years ago welds nicely at approx 280deg C, but the new lot just melts at anything more than approx 160C (the dial is not marked finely).
-
December 30, 2016 at 5:54 am #2077TomiParticipant
This is my robust but cheap heat sealing tool setup:
1. bulk 40W soldering iron (“absolutely too hot”, cost 8 eur)
2. light bulb dimmer 0-100% (cost 7 eur)
3. tool tip from copper tube (quite heavy tip for more stable tip temperature)
4. spare soldering iron tips for different shape sealing tips (3 eur, not needed)Here in Finland the dimmer can bought for example from here:
http://www.biltema.fi/fi/Rakentaminen/Sahko/Ajastimet/Himmennin-2000022447/
Note: do not use dimmer with any “active” electrical equipment. Plain resistive load like filament light bulb or bulk soldering iron are fine.The dimmer adjusts the power of the iron. That is not exacatly constant temperature device but seems “enough constant”. If power is adjusted it takes some time to stabilze.
For my next packraft I may buy basic solder station wich has active constant temperature control itself. (Exactly I have high quality solder station already but it is for SMD electronic work and I didn’t wan’t to modify that for packraft making… :D)
-
December 26, 2016 at 10:02 am #2052Roman KoudelkaParticipant
A web link where you can buy?
-
December 26, 2016 at 4:28 pm #2054Matt (Admin)Keymaster
Here are some sources for the Clover Mini Iron II around the world. Please post more if you find them at a better price or a new location and I will update this list.
-
This reply was modified 9 years, 7 months ago by Matt (Admin).
-
This reply was modified 9 years, 7 months ago by
-
-
December 19, 2016 at 3:05 pm #2043TristanParticipant
I bought the one that you reviewed on the site here, the Clover Mini Iron II. It gets the job done, but I’m not in love with it. The hot setting is too hot and burns the nylon. The medium setting works, but I’ve found that it requires a lot of pressure and a going back and forth over the area to get it to seal well enough. I got the narrow tip for it, and I like it better than the one that comes with the iron.
Matt, I’ve seen you use the Top Flite Sealing Iron in some of your videos. How do you like it? What setting do you have to have it at?
-
December 19, 2016 at 4:59 pm #2044Matt (Admin)Keymaster
Is your Clover always too hot on the High setting? I’ve found that mine can get too hot if I leave it sitting on a stand for a while, but then if I rub it on some wood or something for a few seconds before using it, it cools to the right temperature. I think part of the problem is that the stand holds it with the tip slightly elevated, so hot air rises towards the tip, keeping it slightly hotter than it would be if the stand held it tip-down. I might experiment with a new stand to see if this changes anything.
Have you tried boosting the “Mid” temperature by wrapping a bit of aluminum foil around the shaft?
The Top-Flight sealing iron is nice because its temperature is adjusted by a dial, so it can be fine-tuned, but it’s really too wide for making packrafts so I don’t recommend it. I built my first packraft with it, but it was painfully slow because I couldn’t use the flat part of the iron (too wide), just the tip and the edges. I have the temperature set to “3” for sealing the fabrics I offer, though some other TPU-coated fabrics melt at this temperature. The videos that feature this iron were shot before I got the Clover.
-
December 25, 2016 at 6:55 am #2051Andreas HergenhanParticipant
ich habe gute erfahrungen mit einer digitalen lötstation gemacht
lötspitze ist ein aluminiumblock etwa 20x10x5mm mit einem loch in der mitte zum aufstecken
und mit teflonfolie umwickelt. Arbeitstemperatur bei 210 den 340 °C-
January 2, 2017 at 1:50 am #2103
-
-
-
-
December 18, 2016 at 10:03 am #2029ChrisParticipant
I bought the Trim Sealing Iron Q-Model 606-1 in the first instance. I did not work. The iron simply does not produce enough heat. It was advertised for kite and rc plane decals. Probably it is good for these – for packrafting isn’t.
-
-
AuthorReplies
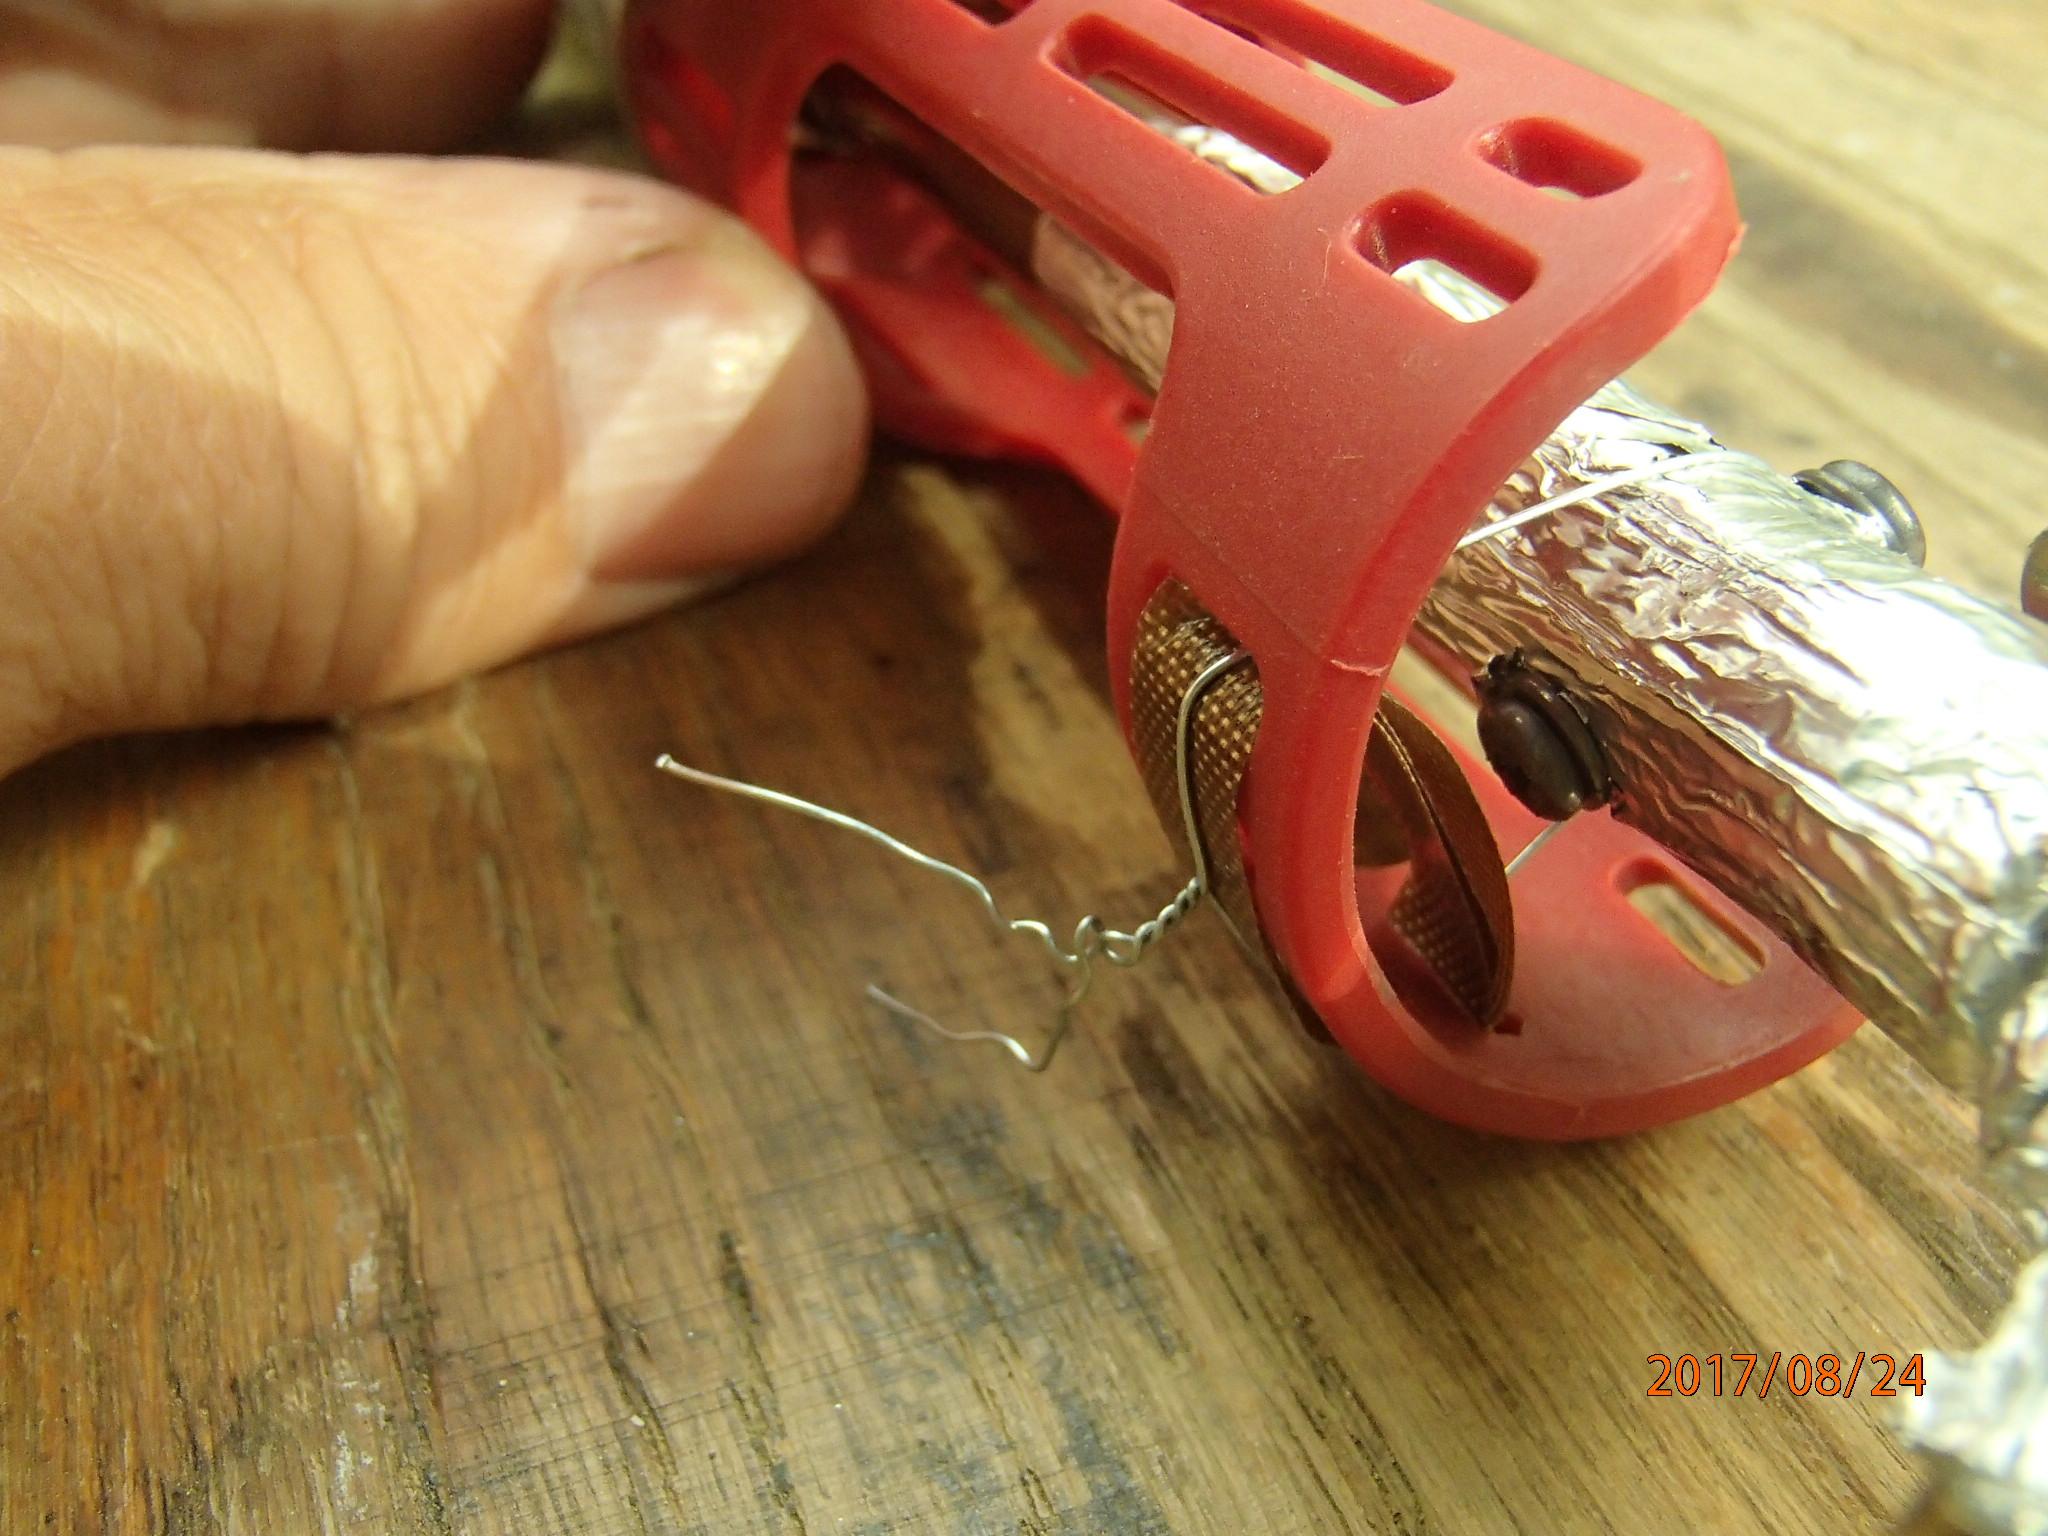

- You must be logged in to reply to this topic.