-

Lishay became a registered member 1 year, 7 months ago
-
Keytree replied to the topic DIY Accessories in the forum DIY Packrafts 1 year, 7 months ago
I received an assortment of adapters with a new Flextail pump I got through Aliexpress. I took apart another boston valve and just attached it so I can screw this in to my raft when it’s time to inflate. Need to be a bit fast when it’s done to swap out the valve insert, but it allows for no hands inflation.
-
Keytree replied to the topic DIY Packraft Photos in the forum DIY Packrafts 1 year, 7 months ago
I finished up my Skeena build much more quickly than the Atlin. Probably about 20 hours or so. Second time through was much easier. I went for a simple, small boat this time and omitted the TZip. I really like the color!
I figured having a second boat would be helpful if I wanted to bring a friend with. Also I joked with some canoe friends of…[Read more]
-
Matt (Admin) replied to the topic DIY Accessories in the forum DIY Packrafts 1 year, 8 months ago
Cool! Great idea!
-
Uncle Fred replied to the topic DIY Accessories in the forum DIY Packrafts 1 year, 8 months ago
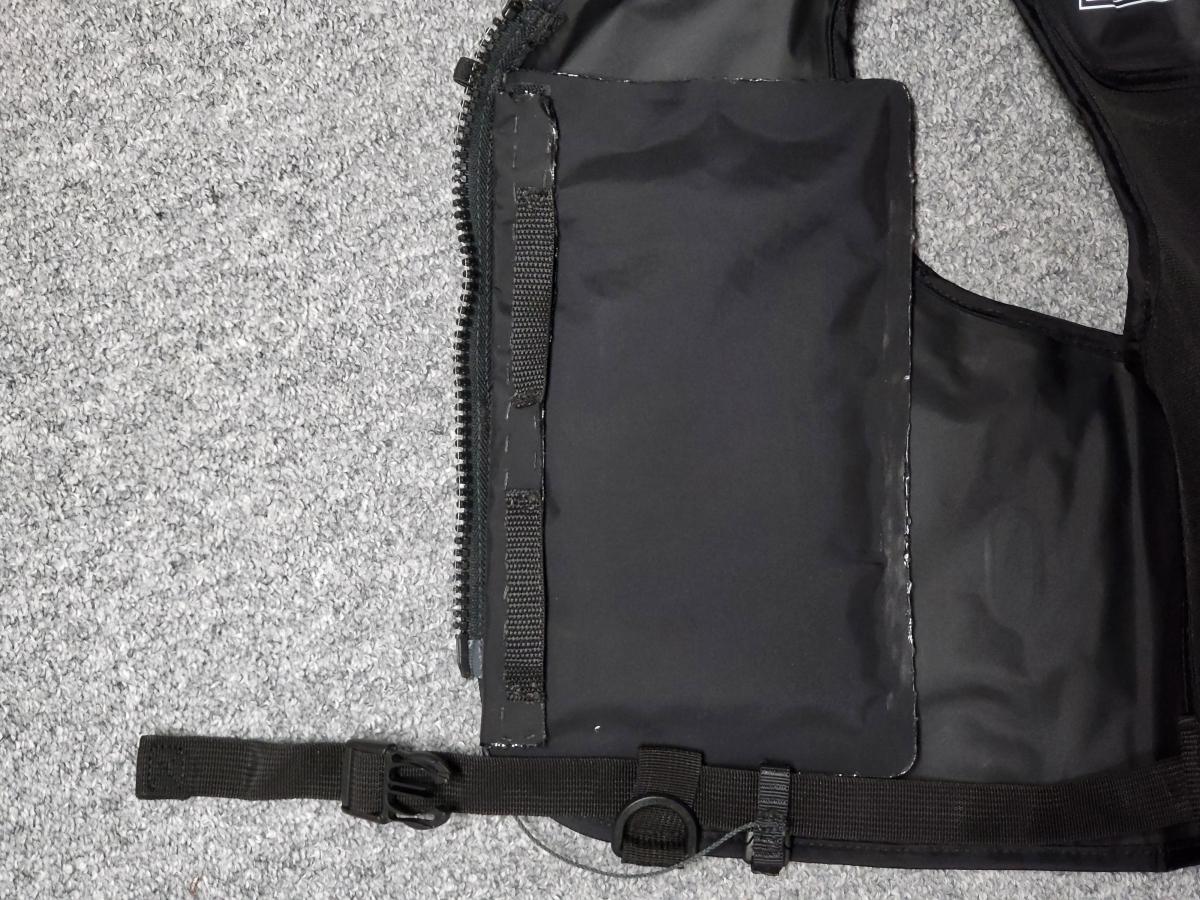
Simple new project for today. Used 250GSM fabric to make a phone pouch for an Anfibio inflatable lifejacket.
Sits inside the chest area, velcro closure with webbing pull handles.
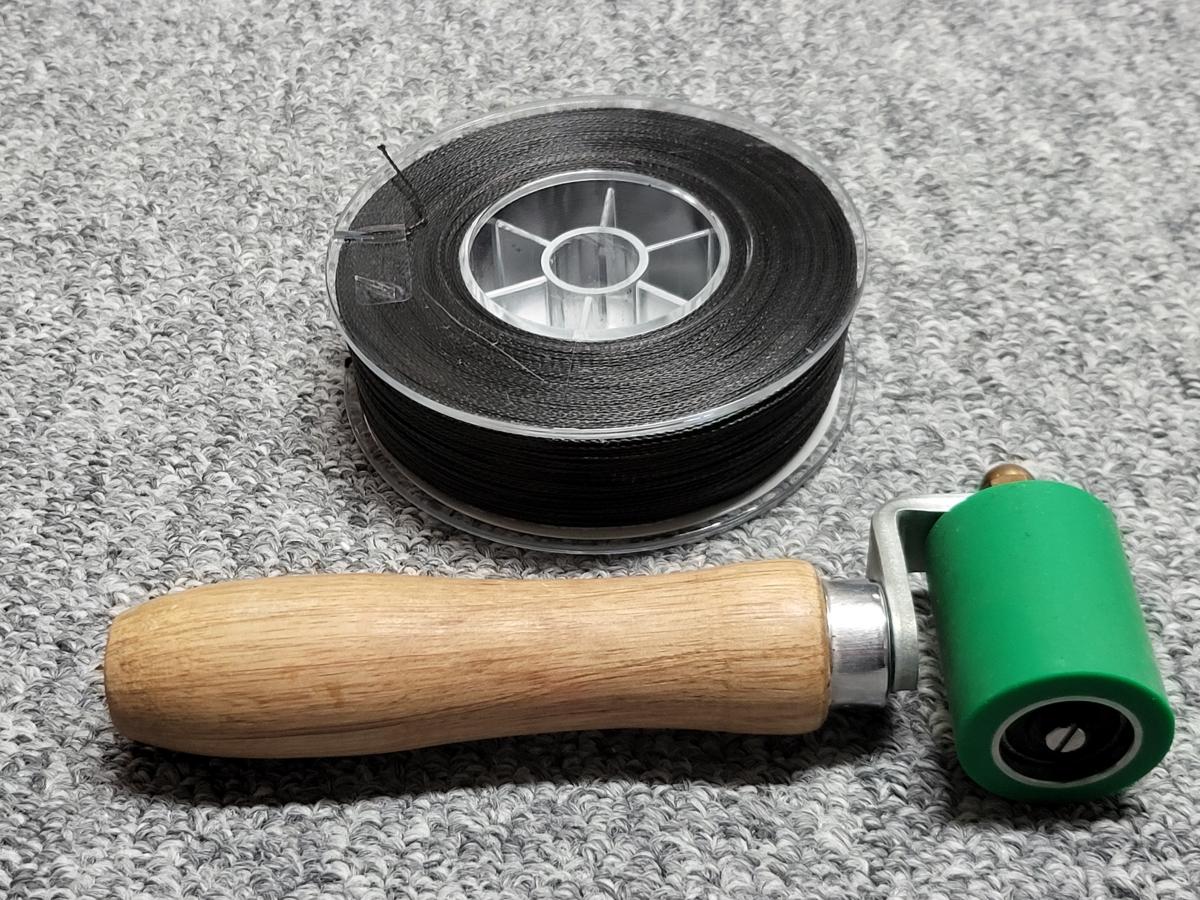
Above is a new roll of that UHMWPE thread I like.
-
Uncle Fred replied to the topic DIY Accessories in the forum DIY Packrafts 1 year, 8 months ago
Nice. Have you tried to see if your adapter will friction fit tight enough to leave it until it’s full? How pressured can you get the boat?
-
krafter replied to the topic DIY Accessories in the forum DIY Packrafts 1 year, 8 months ago
Surprisingly that’s not it – this is the one:
-
jstan became a registered member 1 year, 8 months ago
-
Uncle Fred replied to the topic DIY Accessories in the forum DIY Packrafts 1 year, 8 months ago
Yup, that adapter that tapers right? lol
Maybe I need to take the rubber off. I find that it stays in for a little bit, but once the pressure becomes higher, it pops out. I still have to fill it for another 30 seconds by breathing into it.
-
Matt (Admin) replied to the topic Fabric measurements for Telkwa and extremetextil.de in the forum DIY Packrafts 1 year, 8 months ago
I’m really glad you’re enjoying your Telkwa, and it looks like you did great work, but using my design to make another packraft without asking for permission is really not cool.
-
Matt (Admin) replied to the topic Reinforcing Strips bulging in the forum DIY Packrafts 1 year, 8 months ago
That looked like a fun paddle! I’m glad everything is coming together.
-
Matt (Admin) wrote a new post 1 year, 8 months ago
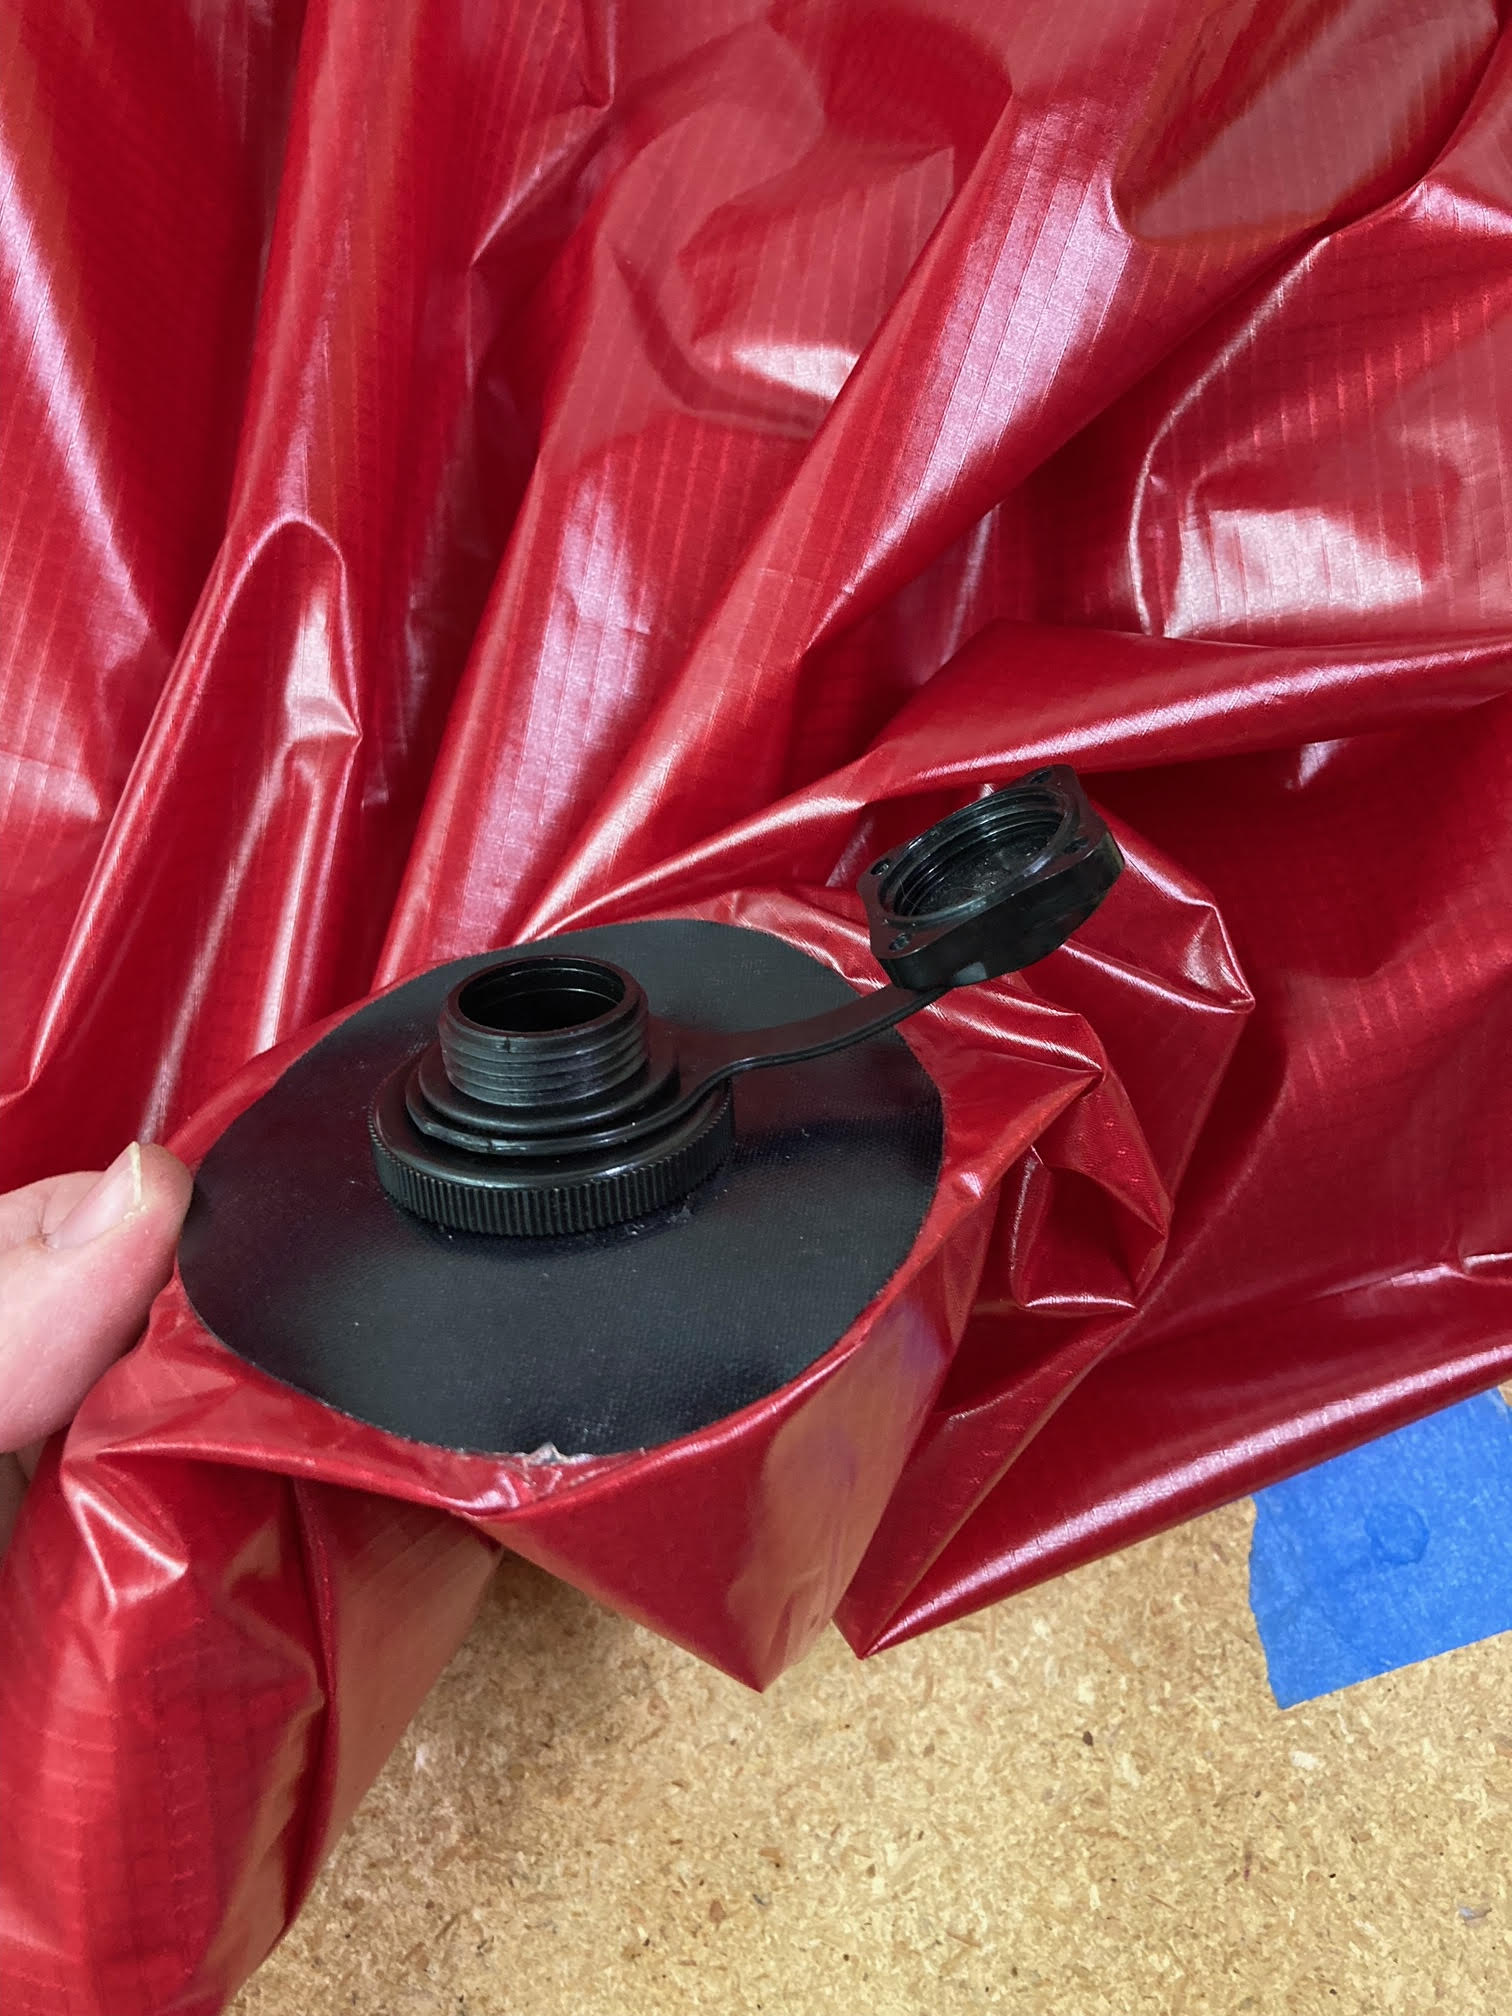
Inflation Bag Boston Valve Adapter
Evan Rodgers emailed to show me this simple and ingenious method of using a second Boston valve to create an inflation bag adapter that screws into […]-
That’s really cool. I need to come up with an adapter that functions the same way for my pump but also supports the top-up valve.
-
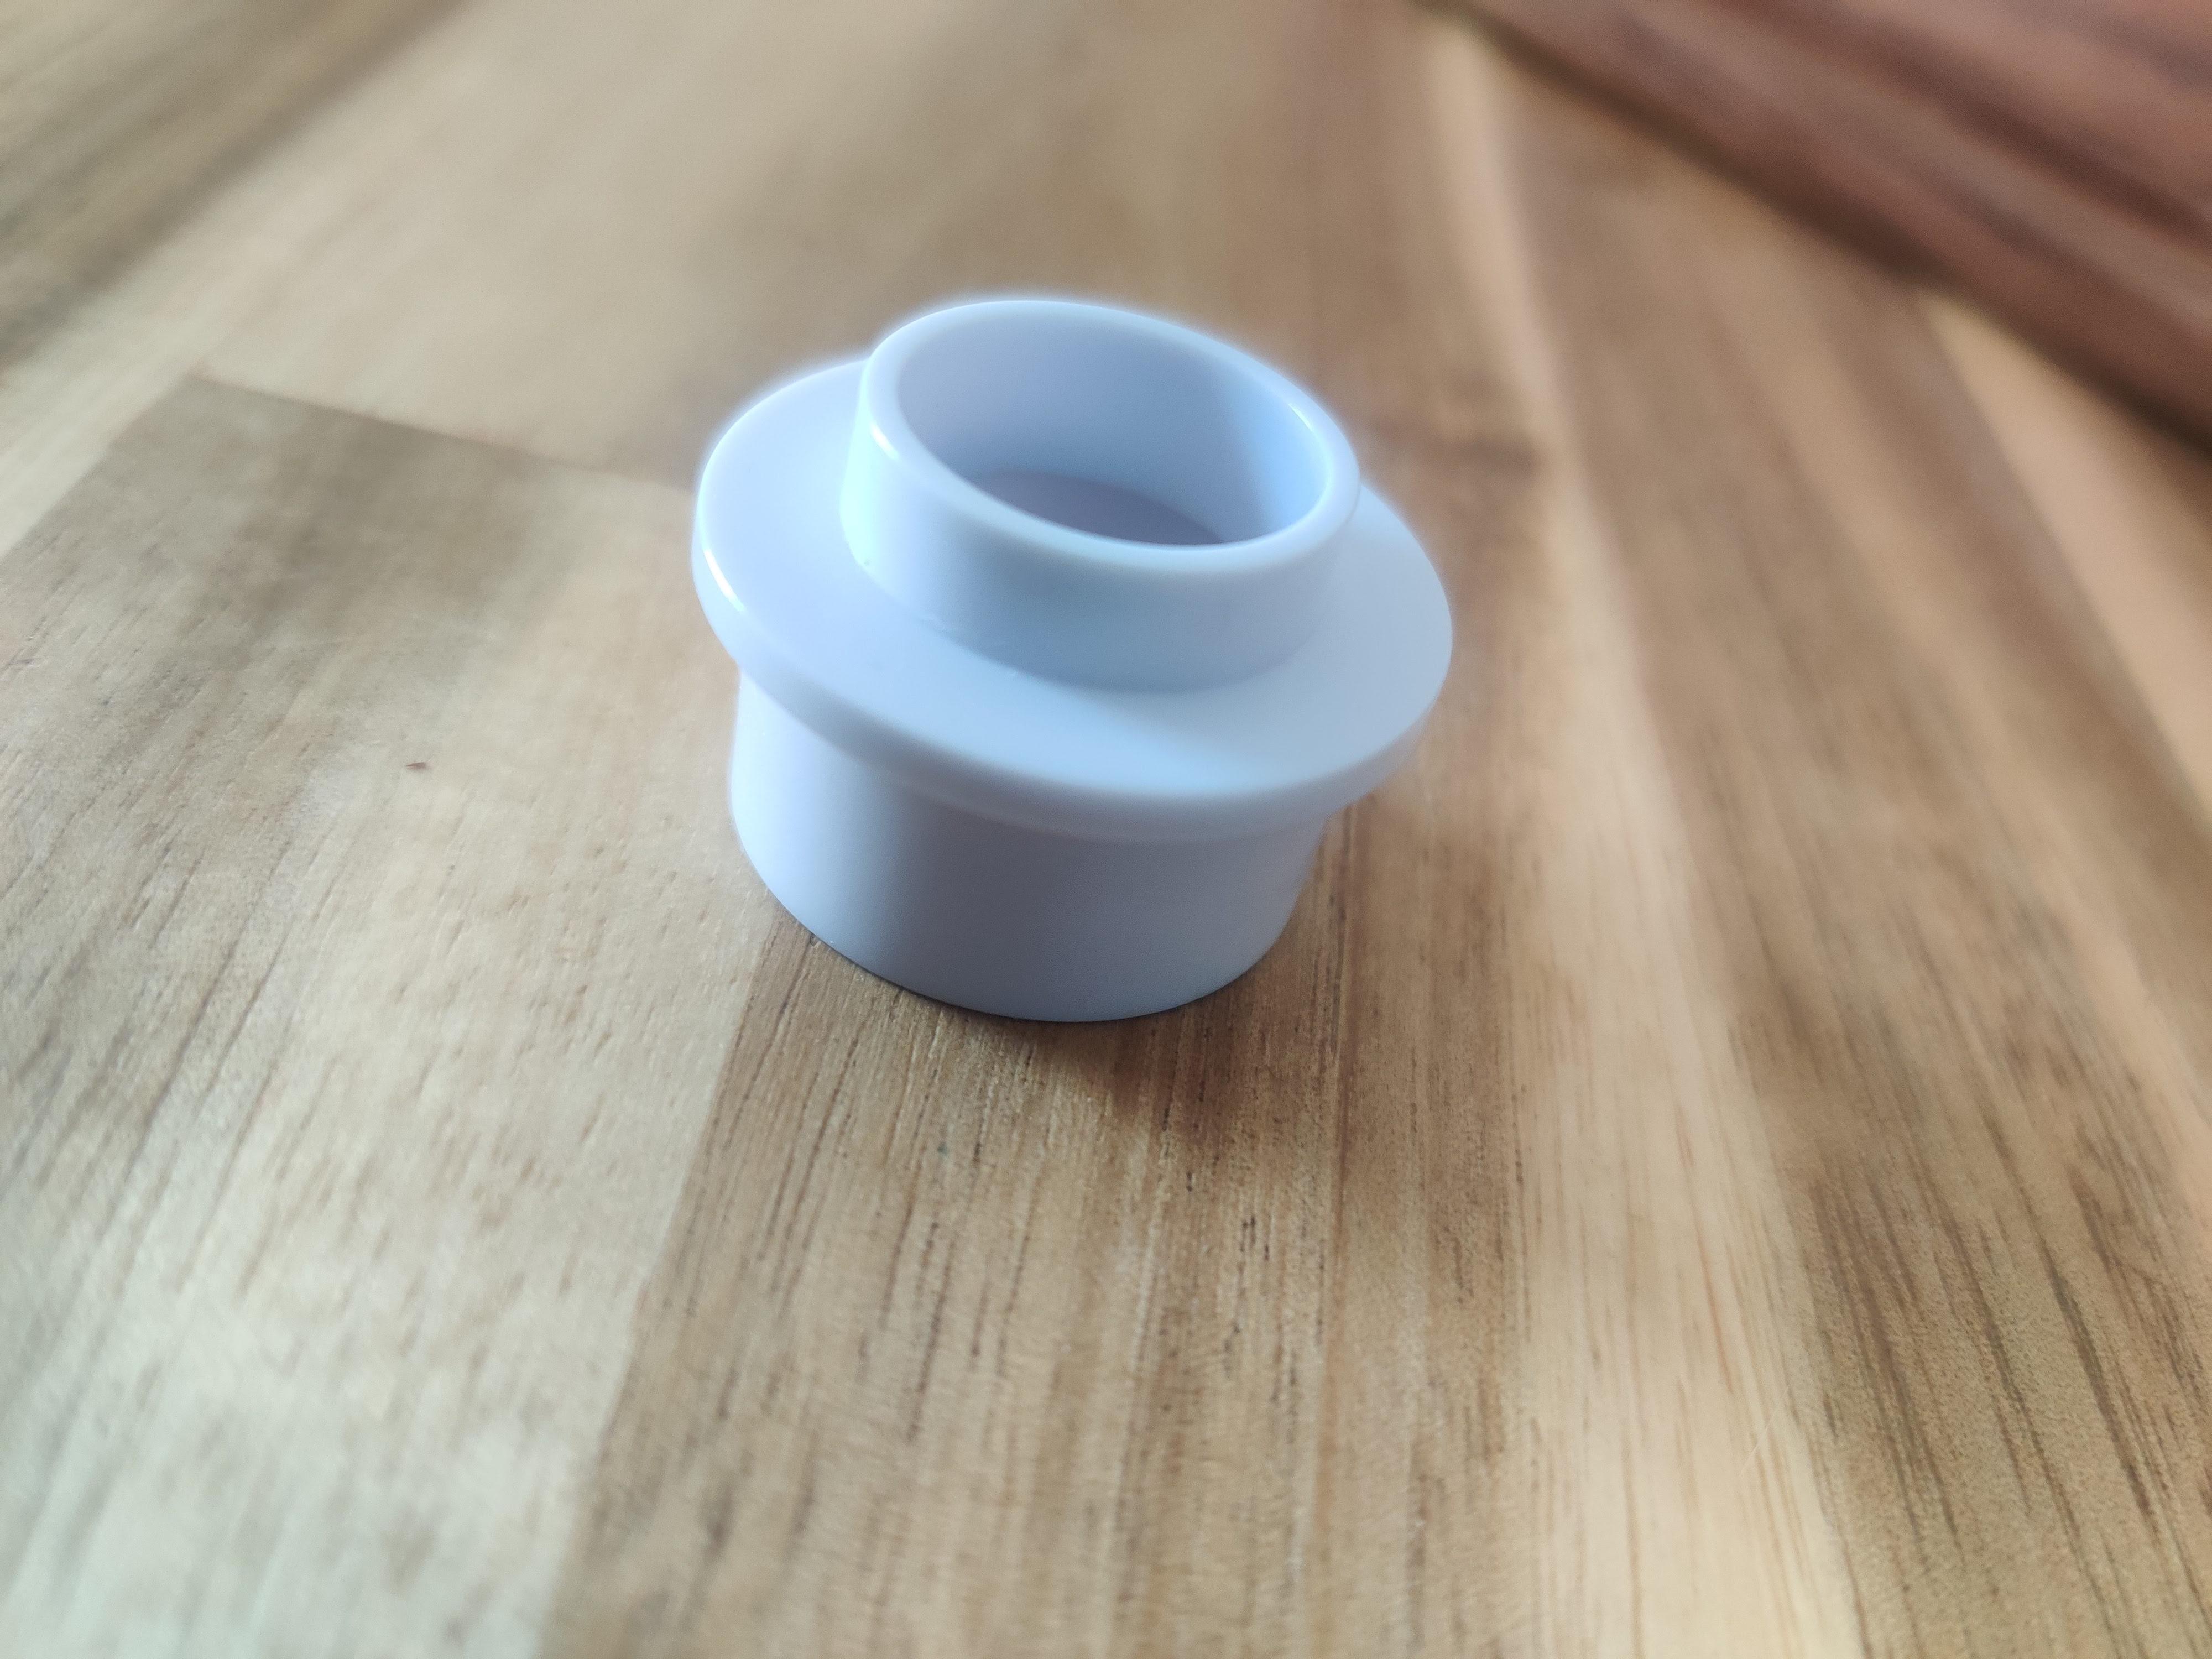
I found this 3d printed adapter posted on Printables.com. It is a perfect fit for the boston valve and, with a slight internal diameter adjustment, will fit snugly over the top-up inflation stems for the backrest and seat.
https://www.printables.com/model/809119-inflation-bag-adapter-for-packraft-boston-valve
-
If I understand correctly, cutting the Boston valve isn’t necessary. You just need a flange on the inflation bag and put a valve piece between the inflation bag flange and the packraft flange. This should work because I think flanges can be screwed to both ends of the value (with the cap open obviously). You can use a valve with the rubber bit removed to quickly inflate the packraft then switch to a valve with the rubber bit still there to top up the with the inflation bag (no longer needing to top off with your lungs). Is this correct? Is that how you have been using it? I’m considering getting another Boston valve for my inflation bag to try it out. Does it work well?
-
Haha, I never thought of that, but you’re absolutely right – you could just iron the flange to the bag.
You might be able to screw the inflation bag flange onto the boat’s check valve after it’s screwed in for the final top-up… yes, I do think that would work. The downside is that screwing the bag on and off would almost certainly take longer than using your mouth for those last five or six breaths. It’s possible you could get a higher air pressure in the packraft using the bag, but because the threads aren’t a perfect match between the flange and the top side of the check valve, I’d be careful to avoid damaging them by trying to force a lot of air in.
I actually haven’t tried the valve-in-the-bag method myself, so if you test this before I get to it, please let us know how it works out!
-
-
-
zachschiada started the topic DIY Inflatable Kayak in the forum DIY Packrafts 1 year, 8 months ago
I’m kind of new to the inflatables world, but just finished a Telkwa recently. It was a fun experience, but I decided I probably won’t build another kit anytime soon due to the time it takes and attention away from my wife and kids. I recently discovered online, however, that NRS used to build a whitewater inflatable kayak out of TPU in the Bandit…[Read more]
-
krafter replied to the topic DIY Accessories in the forum DIY Packrafts 1 year, 8 months ago
That’s the solution I proposed in my previous post, but that’s what I’m saying – if you split this into two pieces you might as well carry the adapter that came with the pump, which will be lighter in total
-
krafter replied to the topic DIY Accessories in the forum DIY Packrafts 1 year, 8 months ago
I see this, but the tightness of the fit should already work for hands free operation. I based the dimensions off the flextail adapter for Boston valves, which is the one with the the little rubber attachment – if you pull that off you’ll find that the little plastic piece left over fits perfectly onto the valve.
I’m still building my packraft -…[Read more]
-
Uncle Fred replied to the topic DIY Accessories in the forum DIY Packrafts 1 year, 8 months ago
Hey Krafter, have you seen the screw-on adapter shown here? Merging your design with the Boston Valve screw-on on threads would allow hands-free operation.
-
zachschiada replied to the topic Top-up valve adapter for boston valve in the forum DIY Packrafts 1 year, 8 months ago
I was initially thinking about trying to figure this out, but I was a little DIYed out and just bought one from MRS. Not sure how well it’ll work, but I’ll report back. I’ve found almost all of my leaks and fixed them but I’m still finding I need about 5-10 breaths per hour. If something like this ends up on the store, I bet it’d be pretty…[Read more]
-
Matt (Admin) wrote a new post 1 year, 8 months ago
Web Store MaintenaceSome of the software I use to run the DIY Packraft Shop has recently been updated to enhance security and functionality, so if you encounter any […]
-
Jim Wolverton changed their profile picture 1 year, 8 months ago
-
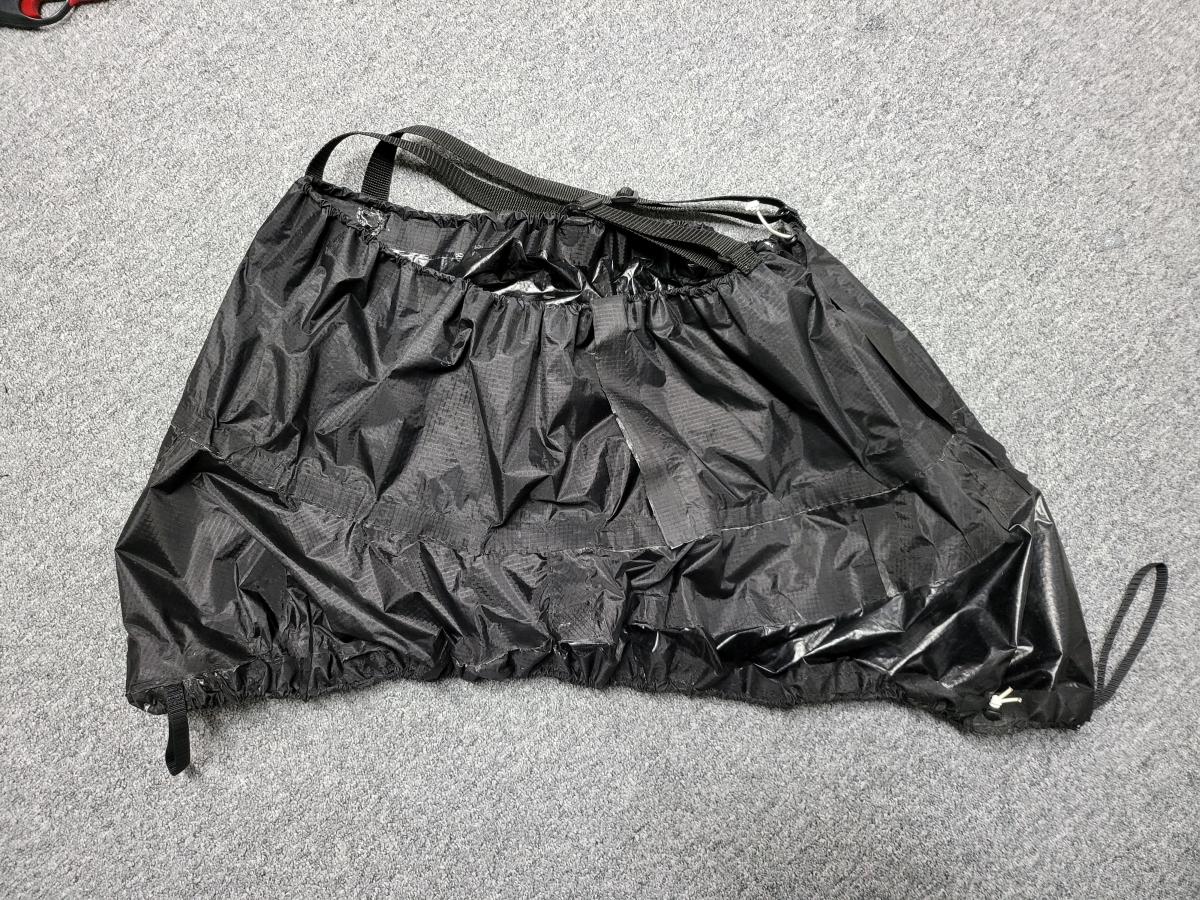
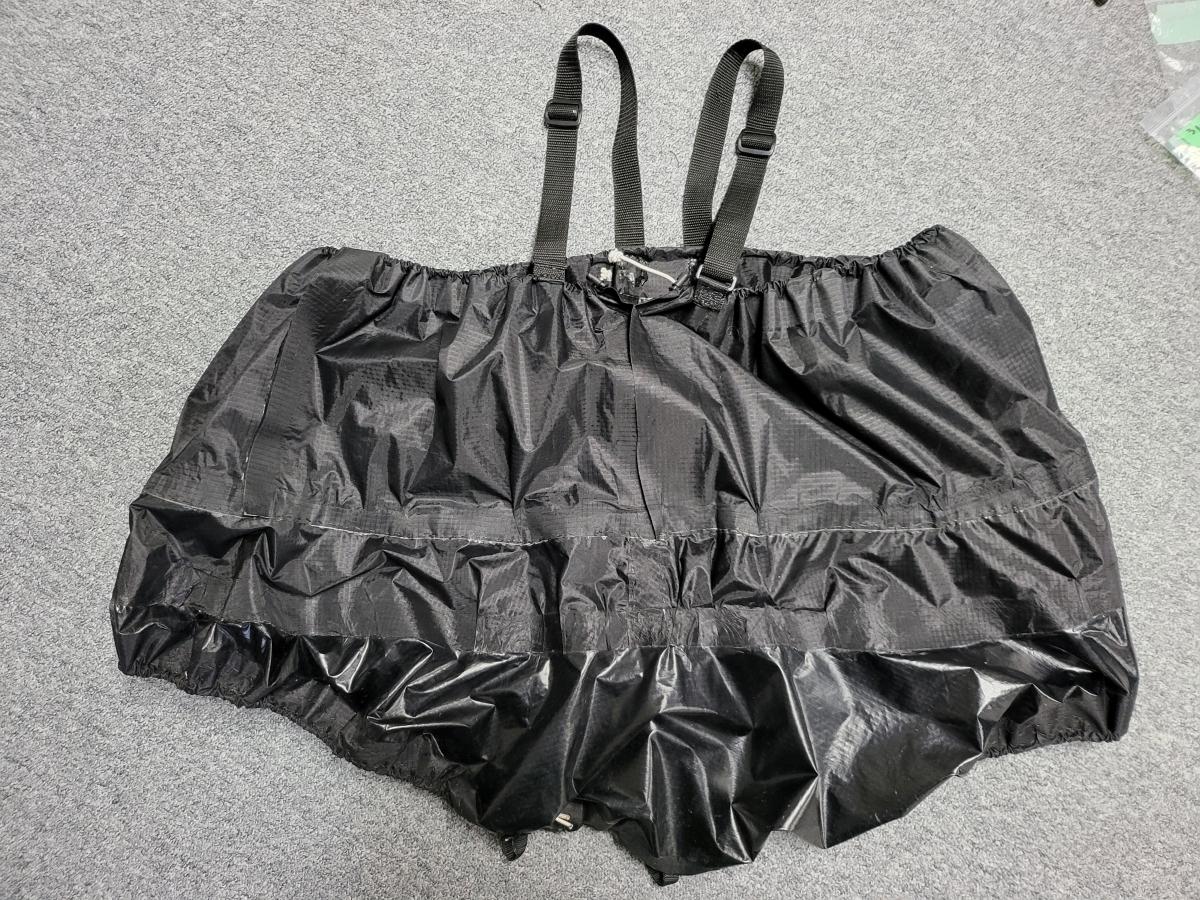
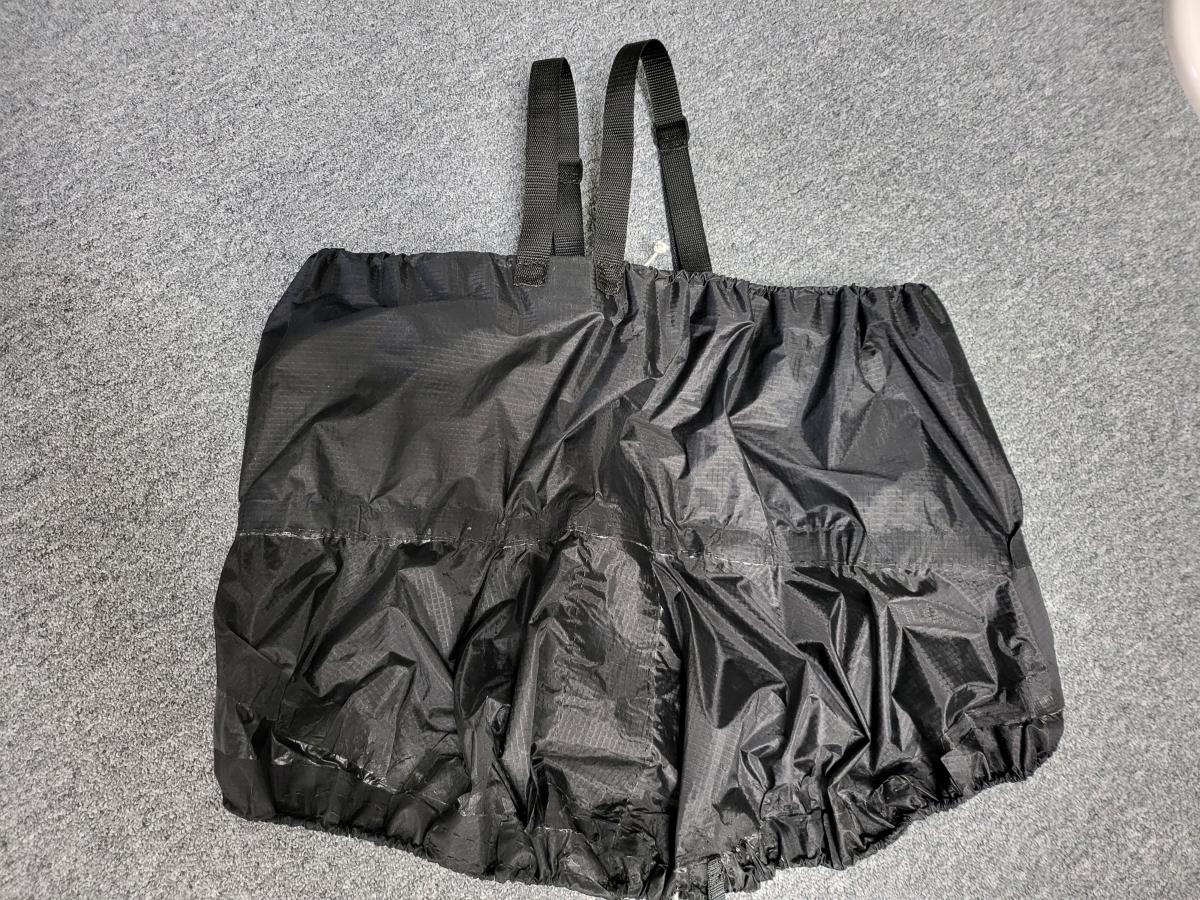
Uncle Fred replied to the topic DIY Accessories in the forum DIY Packrafts 1 year, 9 months ago
Here is one of my modified spray skirts, as requested.
(Above) Side profile.
(Above) Front profile.
(Above) Rear profile.
I had an issue where my more forward seating position made the spray skirt too tight around the waist. To address this, the torso funnel was cut off and four additional 150GSM fabric panels were cut from the fill…[Read more]
- Load More