Important: If you take good care of your packraft it can have a long lifespan and withstand hundreds of cycles of packing and unpacking; however, this repeated stress will cause the seams to separate if they’re not properly welded in the first place. Good heat sealing technique is the foundation that every DIY Packraft is built on, so it’s essential to familiarize yourself with the video below and to practice heat sealing yourself before you begin assembling your packraft.
The above video has several chapters, which you can navigate using the progress bar at the bottom of the frame, or via the time stamps below:
- Intro: 0:00
- How Heat Sealing Works: 0:21
- Heat Sealing Irons: 2:24
- Work Surface: 3:53
- Ironing Technique: 5:11
- Finding the Best Temperature: 6:45
- Effects of Timing: 14:01
- Effects of Fabric Thickness: 16:47
- Peel Test vs. Actual Seams: 17:45
- Color Change: 19:23
- Fabrics with TPU on Both Sides: 20:18
- Welding Long Seams: 22:50
- Undoing a Weld: 23:28
- Welding Curved Seams Over a Form with a Seam Strip: 25:11
- Check Your Work: 28:17
- Fixing Damaged TPU: 29:13
Quick Reference (details in the video above and text below):
- A strong weld between two layers of TPU coated fabric requires two things: heat and pressure. Heat is the obvious one, but don’t forget to apply pressure as the fabric cools.
- Hold the iron in one place and count out about eight seconds (for the standard weight DIY Packraft fabrics – less time for the Ultralight fabrics). This is the technique I use when constructing packrafts, not just for setting the temperature.
- Set the iron’s temperature by trial and error. Weld scraps of fabric together and then pull the welds apart to see if the TPU coatings have fused into a single layer.
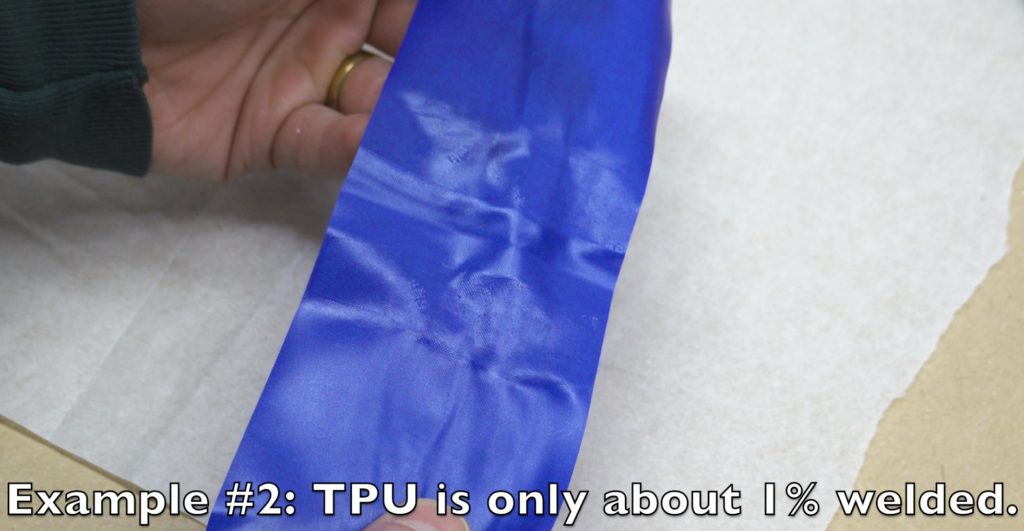
- If the iron is too cold, the TPU layers will not fuse together fully.
- If the iron is barely hot enough, you can make a good weld, but it will take a longer than necessary.
- If the iron is the correct temperature, it will make a strong weld in about five to ten seconds, and after the weld is allowed to cool and then pulled apart, the TPU sticks strongly to both pieces of fabric.
- If the iron is too hot, the TPU will completely liquify and the fabric will wrinkle and shrink excessively. You may find that the TPU will peel preferentially away from the top piece of fabric because the excess heat can damage the bond between the TPU and the woven fabric.
- If the iron is much too hot, it will visibly damage the woven fabric, or even melt it.
How Heat Sealing Works
The DIY Packraft fabrics are coated with a layer of thermoplastic polyurethane, or TPU, which is a type of airtight and waterproof plastic that will fuse to itself when heated above a particular temperature and pressed together. When done right, these welds are actually stronger than the woven fabric that the TPU is bonded to, so there’s no need for additional sewing or gluing.
The simplest way to apply heat and pressure is to press the fabric with an iron until the TPU layers begin to melt, and then to remove the iron and continue to press the fabric with a rag or a roller for several seconds to ensure that the fabric pieces don’t move apart before the melted TPU cools and fuses into a single layer.
When I describe this process I use different words like “heat seal,” “weld,” “join,” and “bond,” but the meaning is always the same: to apply heat and pressure to the fabric so the TPU coatings fuse together, as I’ve just described.
Because the TPU is a plastic that melts when it’s heated, touching the TPU directly with an iron will cause the TPU to melt and stick to the iron, creating a mess and damaging the airtight, waterproof coating, so we can’t iron the TPU directly; instead, we press the iron on the woven side of the fabric and let the heat transfer through the fabric into the TPU layers below.
The fabrics can only be welded together when they are oriented so the TPU layers face each other – TPU to TPU. You can always tell which side is which, because the un-coated side is a woven fabric, while the TPU-coated side is a smooth plastic. If you try to weld a TPU coated fabric to a non-TPU surface, it will stick, but it only makes a weak bond that will come apart over time, so don’t try to assemble something that way.
Note: here I’m only talking about the proprietary fabrics I use to make the DIY Packraft kits – other fabrics might be different enough that these methods won’t work.
Heat Sealing Irons
By “heat sealing iron” I just mean any iron that you can use for welding TPU coated fabrics together. For some projects you can get away with using a regular clothes iron or a model airplane covering iron, but for most of the DIY Packraft projects, those irons are too large to use without accidentally touching the fabric in areas where you don’t want the TPU to melt.
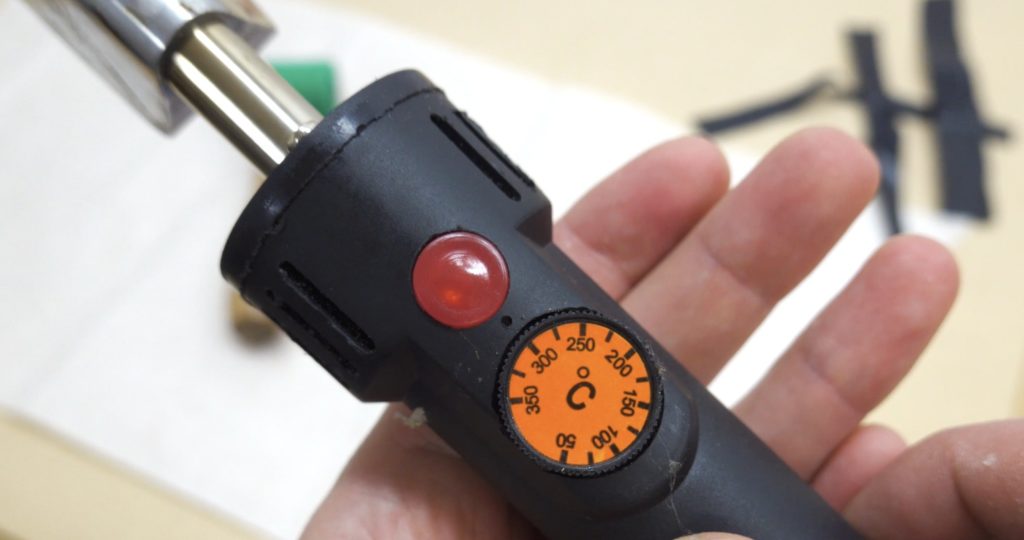
My preferred heat sealing irons are “leather irons,” which you can find on www.aliexpress.com, and sometimes on eBay or Amazon. They’re sold under various brand names, but many of them look like they came out of the same factory. To purchase one, just type “leather iron” into the Aliexpress search bar and pick one that looks similar to the one pictured below, and make sure it has a dial or some other way to adjust the temperature.
These leather irons require a few simple modifications before they’re useful for heat sealing, and I have made a video showing how to do that:
These irons don’t turn off by themselves, so I’ve made myself a little “Iron On” flag that I hang on the doorknob of my workshop whenever I plug in my iron so I won’t forget about it and leave it unattended. I highly recommend that you do the same thing.
I also find it helpful to clamp the power cord to the edge of my table so the weight of the cord won’t pull the iron off the table when I set it down.
Work Surface
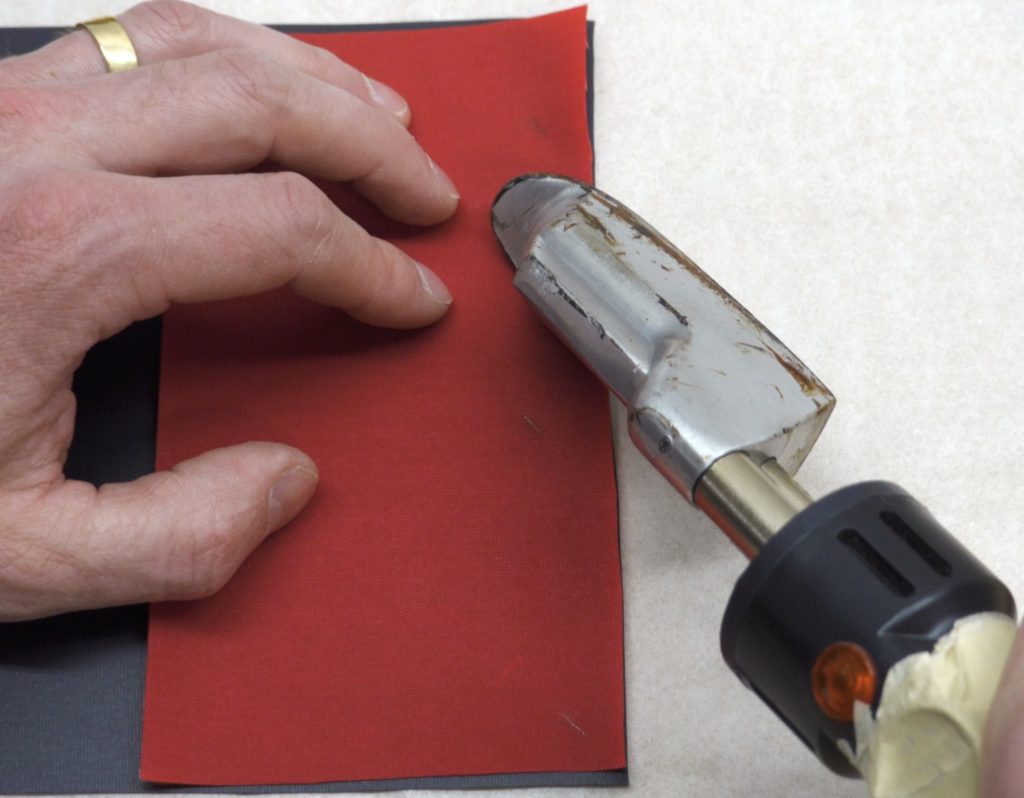
Any smooth, heat resistant surface will make an adequate workspace. I usually iron over unpainted wood or MDF (medium density fiberboard), and I cover it with parchment paper (silicone coated baking paper, available in any grocery store). The parchment paper prevents the fabric from sticking to the wood if I accidentally melt some TPU in an area I didn’t intend to.
If you’re making something as large as a packraft then ideally you’ll have a dining-room-table-sized area to work on. Some people do their heat sealing while sitting on the floor.
If you’re using something like a dining room table that has a surface you don’t want to damage, you don’t have to cover the entire thing with heat resistant material, just the area where you’ll be ironing. You can find a small sheet of MDF at a lumber yard or hardware store, and that will be ideal. I also use pieces of dimensional lumber for some things:
Avoid heat sealing on rough or uneven surfaces because if you press a flat iron against an uneven surface then the heat and pressure applied to the fabric will be uneven as well. Corrugated cardboard is a good insulator, but because of the corrugations inside, it’s not very good for heat sealing over because most of the pressure will be focused over the ridges and not over the valleys. If you want to use cardboard to insulate your table, use something like a cereal box that isn’t corrugated.
Ironing Technique
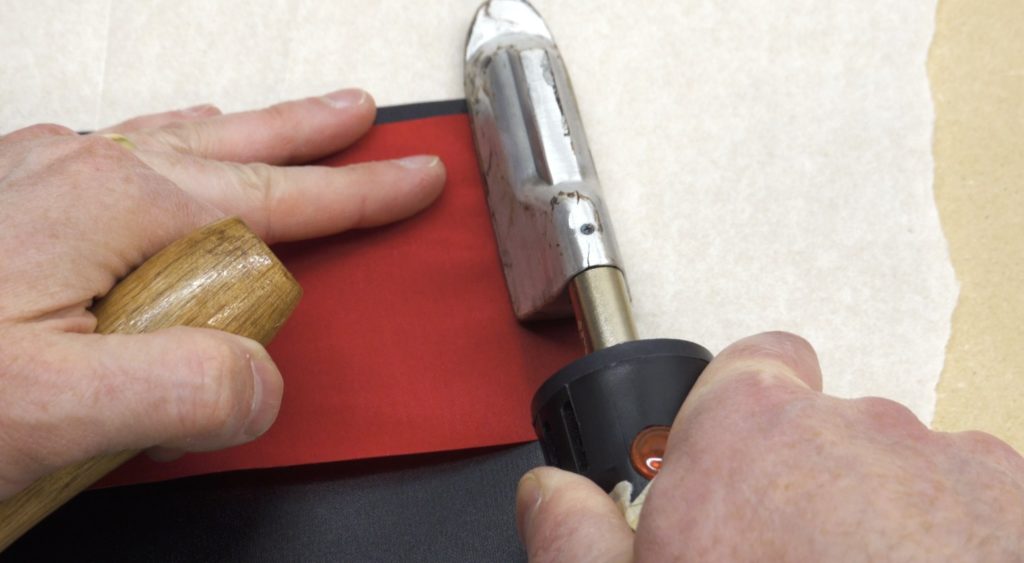
In some of my older videos you’ll see that I used to move the iron back and forth a lot while I was making welds, trying to press hard at the same time as I heated the fabric, but I’ve found that it’s easier and more precise to hold the iron in one spot and count out roughly eight to ten seconds while pressing just hard enough to make sure the heat will flow easily from the iron into the fabric. Then I remove the iron and quickly press hard on that area with a rag or roller for five to ten seconds until the TPU solidifies, and then I move the iron to press the adjacent section of the seam.
The hottest part of the iron is in the middle, so as I iron the next little bit, I always overlap the edge of the new weld over the area that is already welded by about one centimeter or half an inch – that way I’m sure there won’t be any gaps in the weld, and I should get a good weld all the way along the seam.
When pressing on the weld with my rag or roller, I try to push any air bubbles out to the edges, so the first push with the roller is always rolling away from the area that’s already welded. Sometimes if there’s a large bubble trapped in a weld I’ll reheat that area and press the bubble out to the side of the seam and then re-seal the area.
Iron Temperature
The fabrics in the DIY Packraft kits weld at approximately 200 °C which is around 400 °F, but I only mention that because so many people ask. Knowing that number doesn’t really help you at all because you can’t rely on the numbers on your iron’s adjustment dial to set the temperature.
To illustrate this point, one of my irons works best when it’s set to 350 degrees Celsius, but if that was the actual temperature at the surface of the metal then the iron would melt right through the fabric – it’s literally off by a hundred and fifty degrees! So my iron is much cooler than it indicates. Some of my customers say that the irons they’ve received are much hotter than the dial indicates, so the errors aren’t consistent.
You also can’t rely on one of those infrared temperature measuring guns because they don’t work on reflective metal surfaces – you just get crazy readings that don’t make any sense – so don’t even bother.
Fortunately, knowing the actual temperature isn’t really necessary, because it’s really easy to find the right setting, and once you’ve found it, you can just put a piece of tape over the dial so it won’t move.
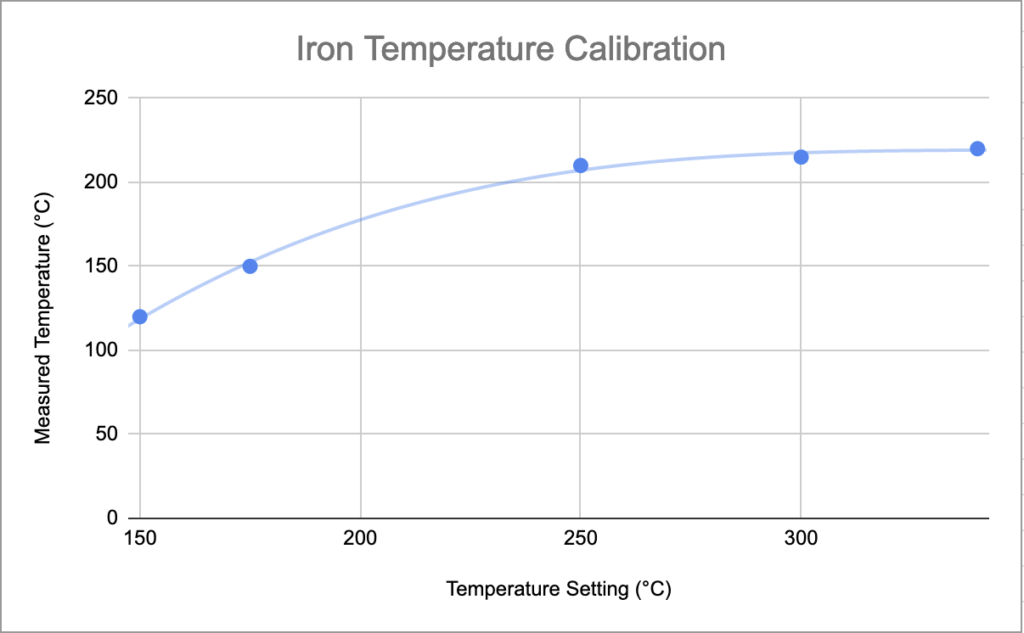
It’s also worth mentioning that even though the temperature selection dials on the irons have a linear scale (i.e. if you turn it some amount then it’s supposed to increase the temperature by a certain number of degrees, and then if you turn it by that same amount again then it’s supposed to increase the temperature by the same number of degrees), in reality that is not what happens; it’s not a linear response. As you can see in this graph I made (below) based on actual temperature measurements at different temperature settings, the dial has much less effect at the hotter end of the range than at the cooler end. Keep in mind that while the temperature response curve of your iron might have this same shape, the numbers are likely to be different, so don’t use this graph as a guide to setting your temperature.
A better way of thinking about the temperature adjustment dial is that it’s cooler at one end of the range and hotter at the other, and you should probably ignore the numbers completely.
Finding the Right Temperature
To find a suitable temperature setting for heat sealing, first set the temperature selection dial to the middle of the range and let the iron sit for about ten minutes so the temperature settles down. These irons take a long time to heat up, so don’t rush this.
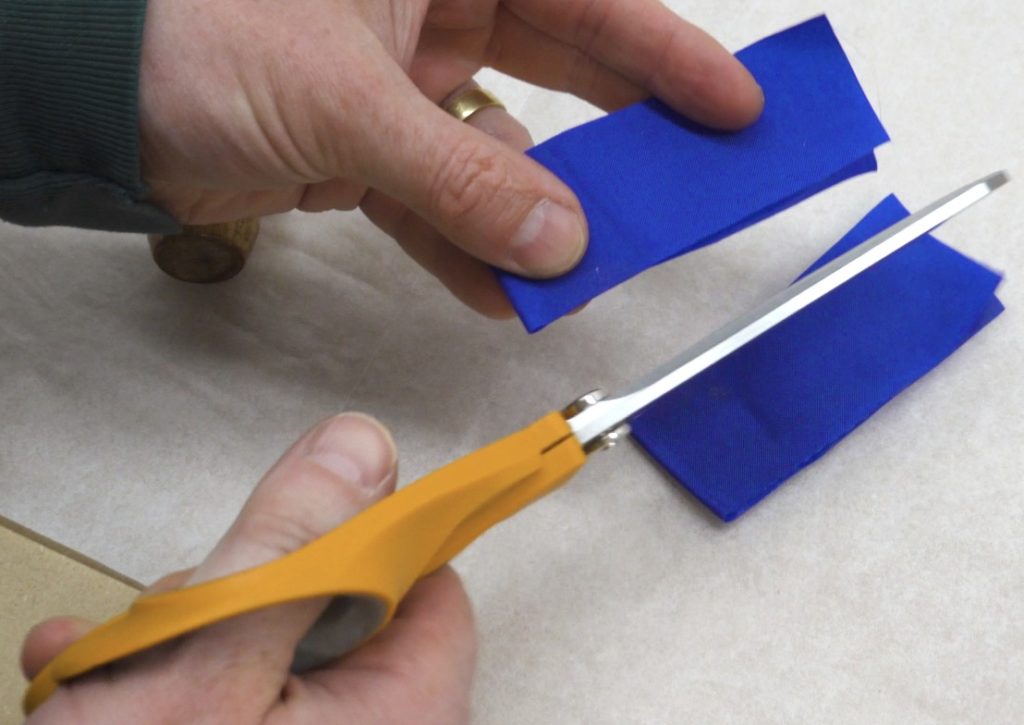
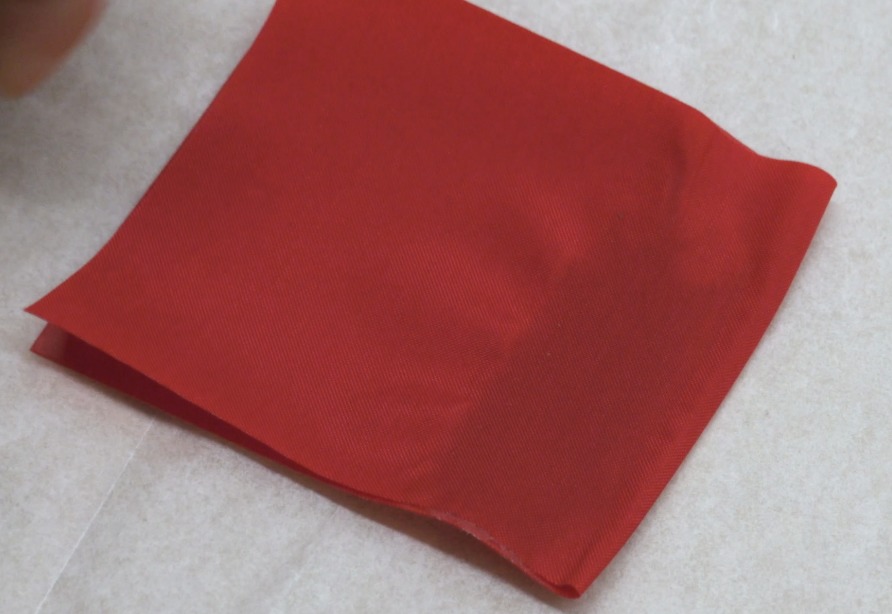
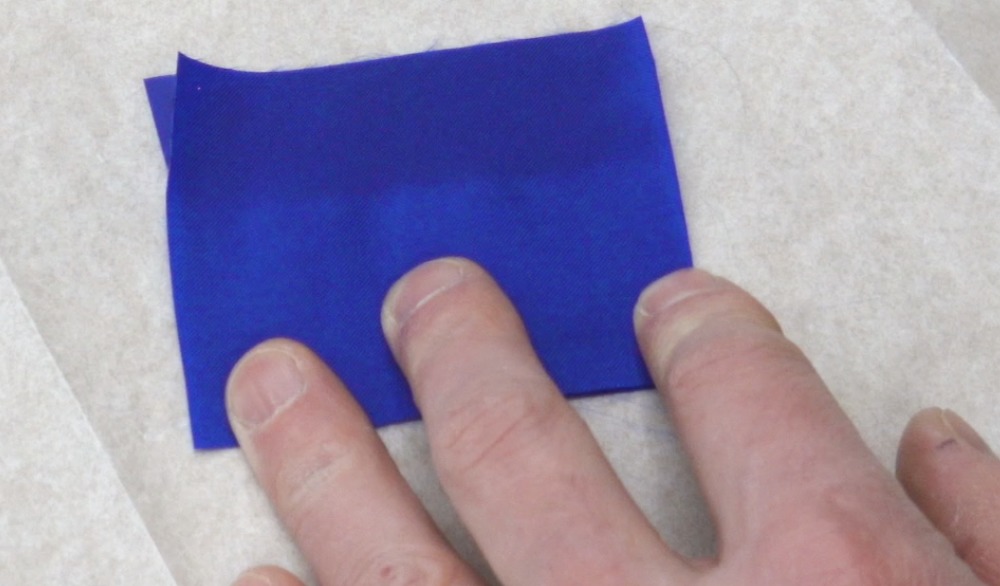
Then grab a couple scraps of fabric, about hand size or a bit smaller, and try ironing them together. For now, use two pieces of the same type of fabric, or a single piece folded in half with the TPU layers facing each other.
For this test, we only need to make short seams – maybe two iron lengths long – just long enough so we can be sure that it’s not just the area under the center of the iron that is being welded.
After the seam is done, we’re going to pull it apart, but first we need to wait for it to cool. If the TPU is still hot, it’ll be easy to pull the pieces apart even if your iron is set to the right temperature and you are doing everything else correctly, so wait for it to cool until it’s no more than warm to the touch.
So allow it to cool, and then try to peel the fabric pieces apart.

When the TPU layers can still be separated after ironing for 5-10 seconds, that means we need to raise the iron’s temperature. Whenever you change the setting, you need to wait for the temperature to stabilize. I always give it at least ten minutes to settle down because if the temperature is still changing when you do these tests, you’ll just be chasing it up and down and you’ll never find a good setting. So after you move the dial, go do something else for a bit.
Then do the same thing as before, ironing for eight or ten seconds and then pressing the fabric with a silicone roller before ironing the adjacent area. If you don’t have a roller, you can use a rag or even your sleeve, but the roller is nice because it allows the fabric to cool down faster than it would if you covered it with a rag, and rollers are pretty cheap.
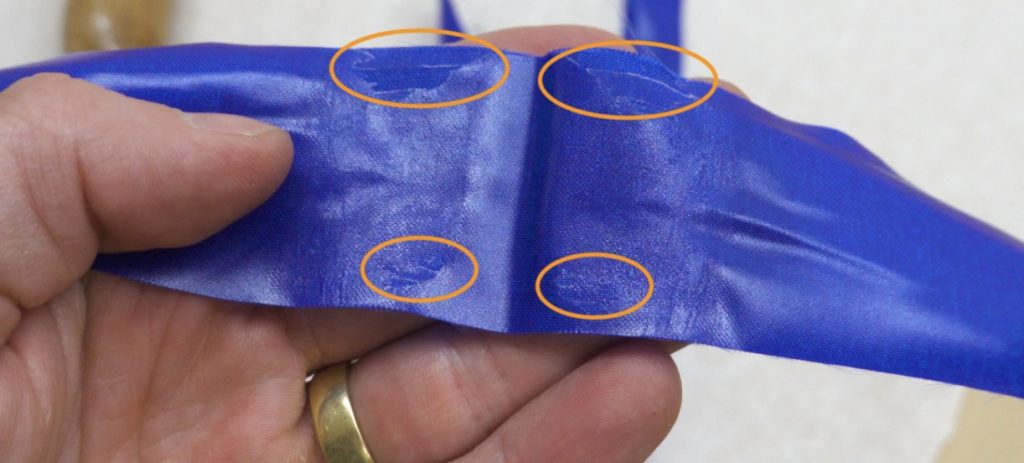
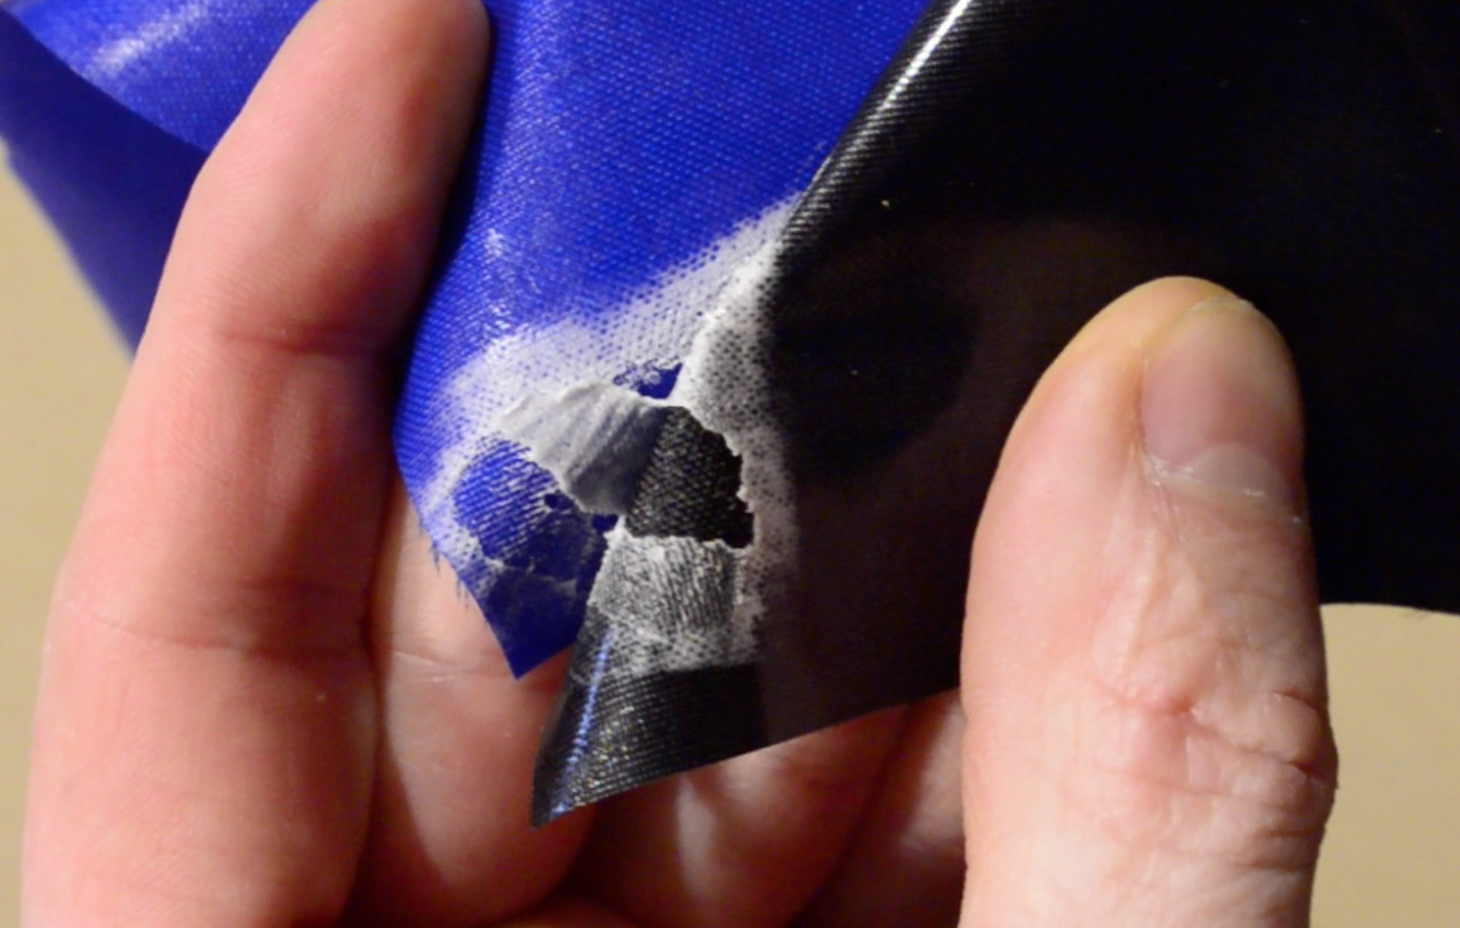
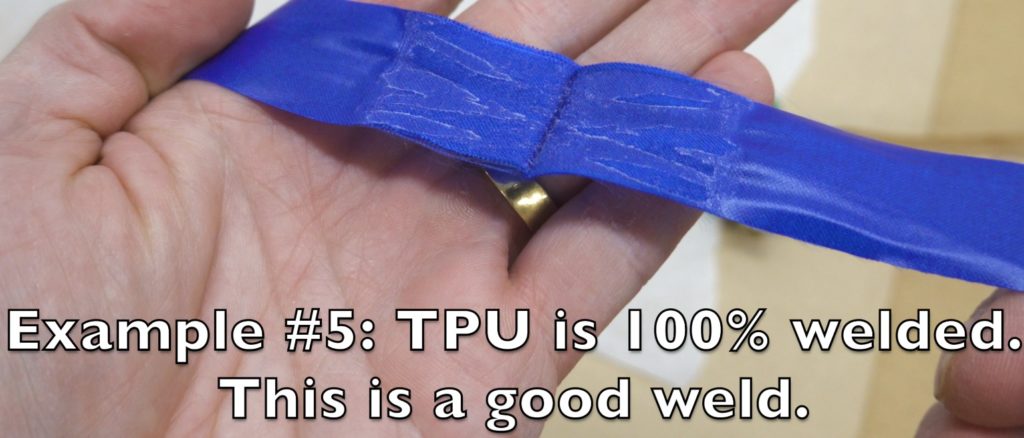
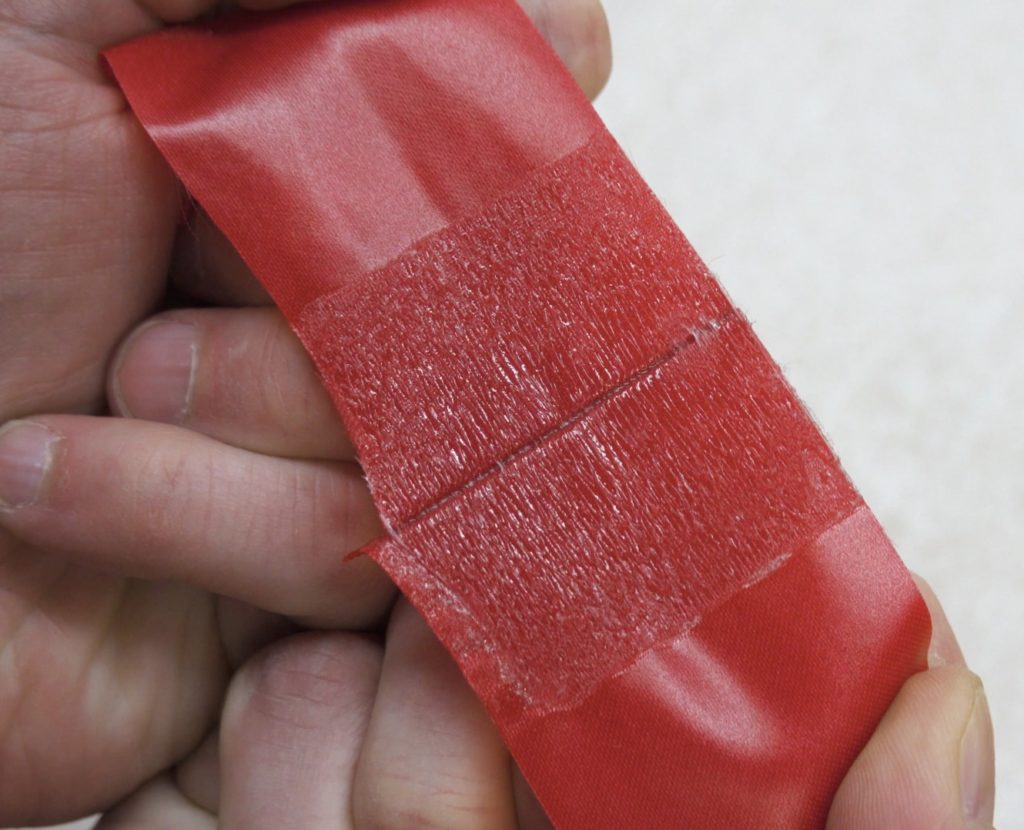
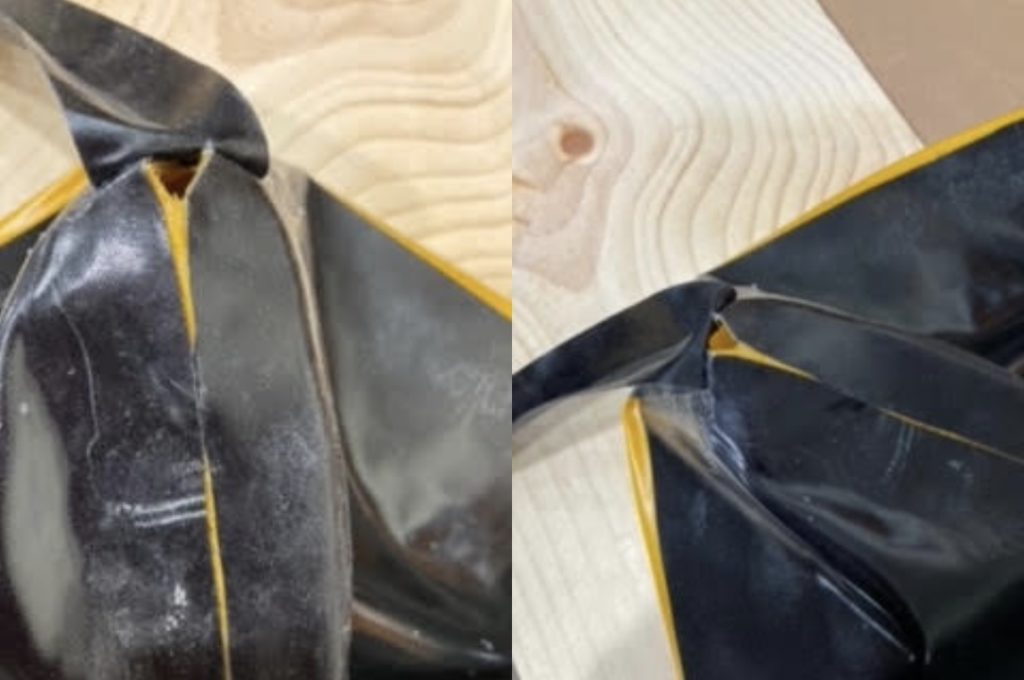
When you’re welding two pieces of the same type of fabric together, when you pull them apart, ideally you want to see the TPU coming off in patches that are stuck to both surfaces. That indicates that the TPU coatings have fused into a single layer that is still strongly bonded to both pieces of fabric. This doesn’t always happen though, so if everything else looks good but the TPU is peeling off from only one of the fabric pieces, you could try reducing the temperature a bit, but as long as it’s difficult to pull the welds apart, it’s probably okay. (Excessively high iron temperatures can damage the bond between the TPU and the woven fabric, causing the TPU to peel more easily from the fabric that the iron touched directly.)
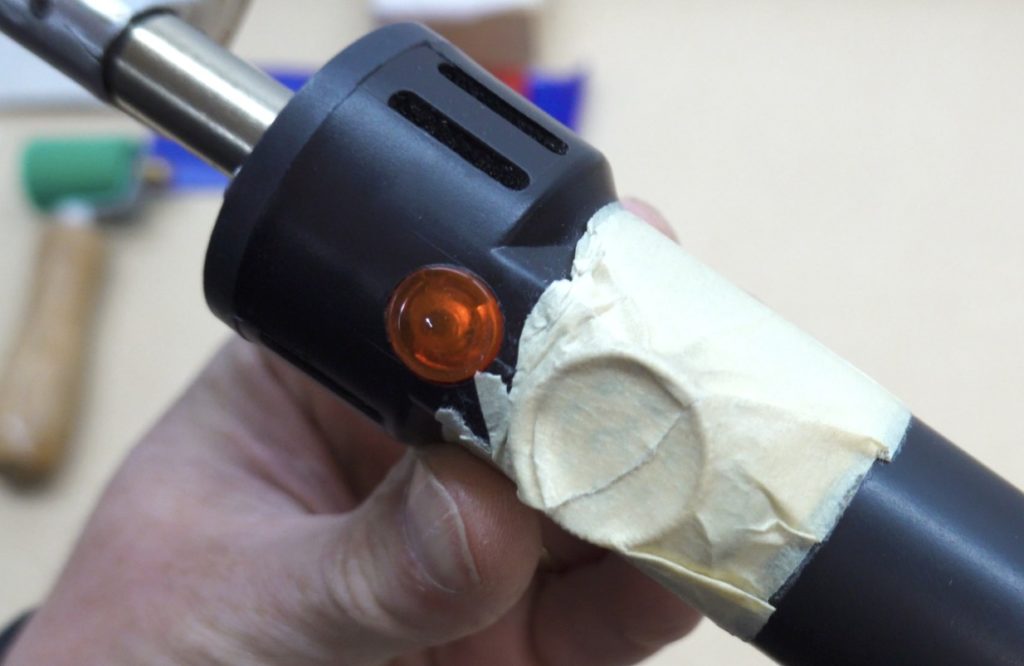
Once you’ve found the right setting, place a piece of tape over the adjustment dial so you won’t turn it accidentally.
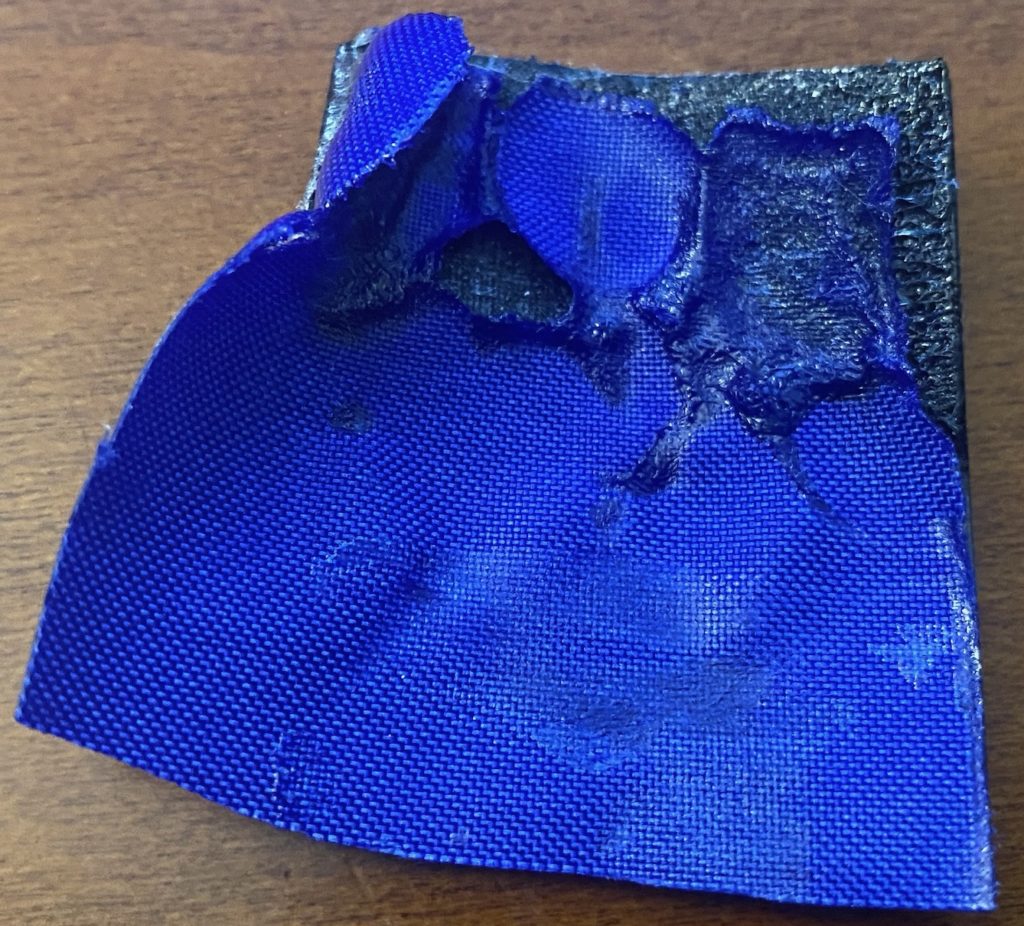
Too Hot?
My experiments have shown that there is a pretty wide range of iron temperatures that will produce good welds. As the temperature increases above the optimal range, the fabric tends to wrinkle and shrink more noticeably when the iron is applied, and the TPU will fully liquefy instead of just partially melting, which you can notice because the fabric tends to slide sideways more easily when you apply any sideways pressure.
Subjecting the fabric to excessively high temperatures will start to break down the bond between the woven fabric and the TPU layers, and it will also break down the polymers that make up the individual strands of yarn, so higher than optimal iron temperatures will weaken both the individual pieces of fabric, and also the bonds between them. When the temperature is increased further, the woven fabric can melt:
The Effects of Timing
After the temperature is dialed in and you get the hang of this technique, you might start to develop a feel for the timing so you won’t actually have to count out the seconds in your head anymore, but until you reach that point, I do recommend counting because it ensures your welds will be consistent.
Removing the heat too early will have the same effect as an iron that is too cold – weak welds that might fail. Ironing in one place for much longer than necessary will start to break down the chemical bonds in the fabric, weakening it unnecessarily.
Inferior Fabrics
If you’re using fabrics that aren’t from DIY Packraft, you may find that the melting temperature of the woven fabric is very close to the welding temperature of the TPU, so you may not be able to create a strong weld without damaging the woven fabric. In that case, you may have to use a different assembly method for your project.
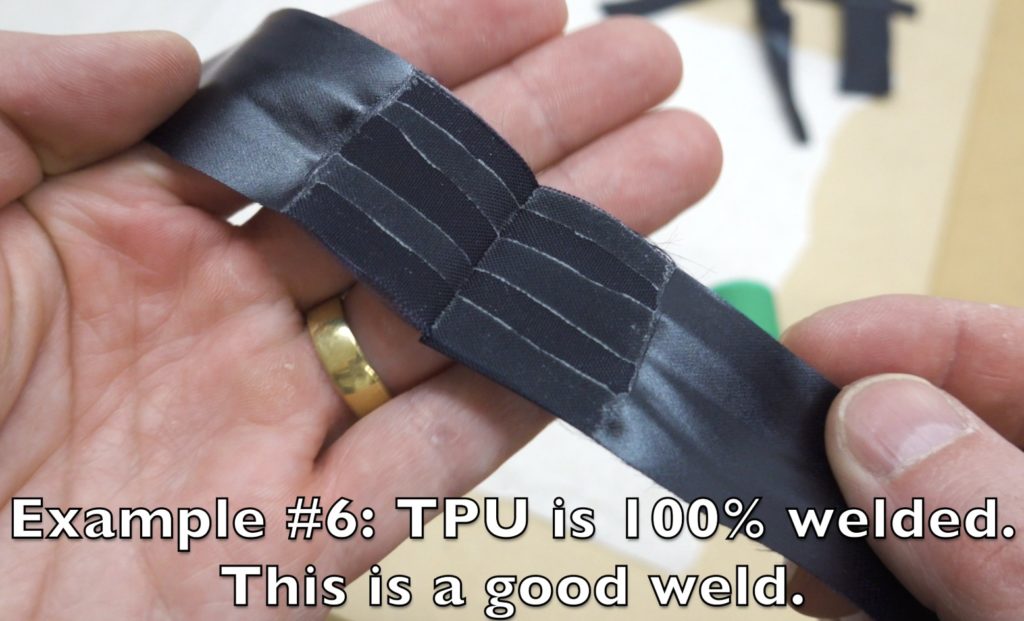
Peel Test vs. Actual Seams
You might have noticed above I said that the welded seams are actually stronger than the woven fabric, but here we are able to pull the welds apart without ripping the fabric and I’m claiming that these are good welds, so what’s up with that?
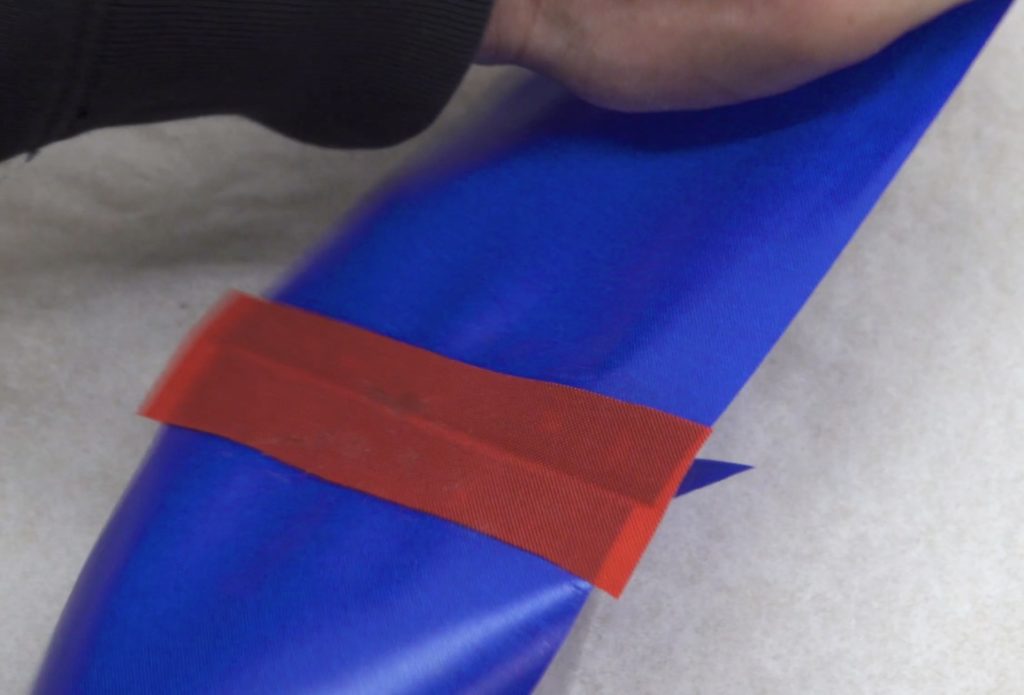
Well, none of the seams in a DIY Packraft are actually made in a way where a peeling force is applied to the edge of the seam. Any time there’s an area with a peeling force, the seam is reinforced with an additional piece of fabric across the seam, converting the peeling force into a shear force, and that prevents the weld from peeling apart:
Other seams are simply overlapped, so there’s no peeling force applied:
In one of my old videos I demonstrated how I could hang my whole body weight from a one inch strip of fabric with a simple overlap weld (a shear force), and when it broke, it was the woven fabric that ripped, not the weld. That’s why I can confidently say that additional sewing or gluing wouldn’t make these seams any stronger – the seams aren’t the weakest point.
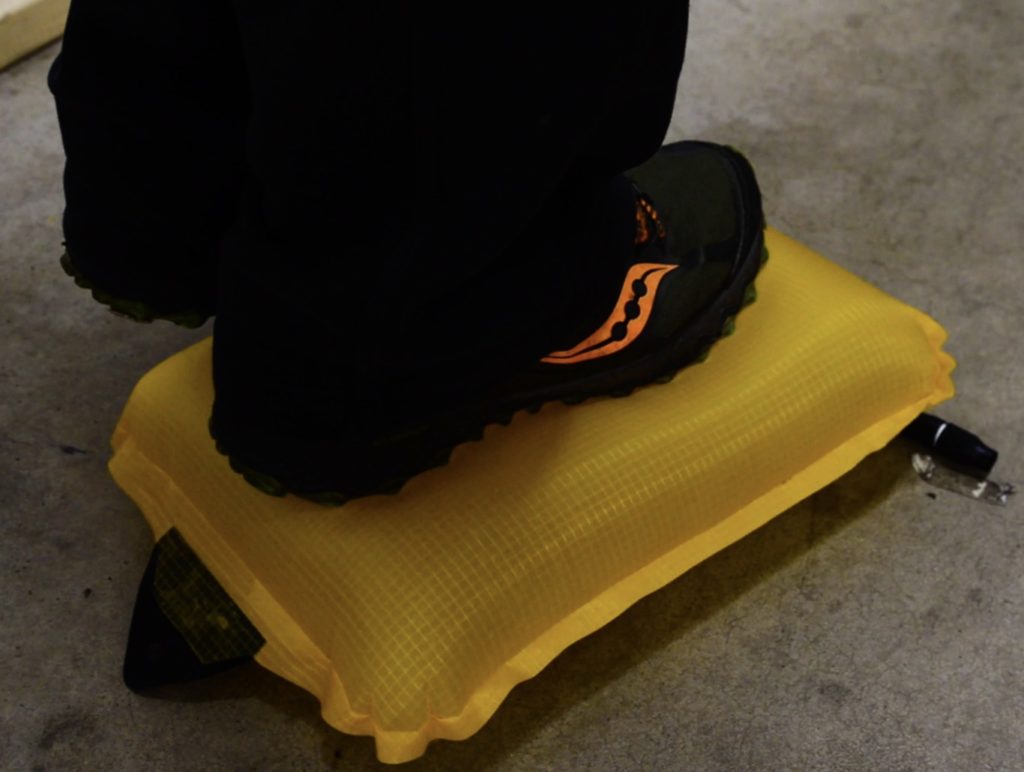
In less critical areas, such as the DIY Packraft seats and backrests, there are some seams that do experience peeling forces, but they’re still more than strong enough in those applications. For example, I can stand on an inflated backrest with one foot and bounce up and down a bit. When the welds are done properly, the seams hold up just fine:
If you’re designing something for yourself, it’s important to take into account the geometry of the seams and all the forces that will be applied, because it’s easy to unintentionally introduce weak points into your design, or to focus all the forces on a single point, both of which can have bad consequences.
Effects of Fabric Thickness
It’s important to understand that the thicker a fabric is, the longer it will take for a weld to form properly, because the heat has to transfer through the woven fabric and into the TPU layers below, and the thicker the fabric is, the farther the heat has to travel. So if you’re making something with very lightweight fabrics like an Ultralight DIY Packraft, you won’t have to press as long as you would if you’re making one of the standard weight DIY Packrafts – perhaps two seconds instead of eight seconds as you might on the standard weight DIY Packraft fabrics (for example).
Thinner fabrics also cool down faster than thicker fabrics, so in general, heat sealing goes faster when you’re welding thinner fabrics and slower when you’re welding thicker fabrics.
Effects of Ambient Temperature
I do my heat sealing in my garage, and the temperature in there fluctuates with the seasons. I find that heat sealing takes a bit longer in the winter because even though the iron is set to the same temperature, the fabric, the air, and the work surface are significantly colder, so it takes longer for the TPU to reach the right temperature when heat is applied. On the other hand, when the air is cooler, the fabric cools down faster after you remove the iron, so overall things probably take about the same amount of time.
Effects of Extensions Cords
The cords on the leather irons are fairly short, so I usually end up plugging mine into an extension cord, and depending on how the iron’s temperature control circuit is designed, changing the length of the cord might change its temperature, so if you switch to a different cord, it’s a good idea to do a couple practice welds and pull them apart to make sure the iron is still working the way it was before.
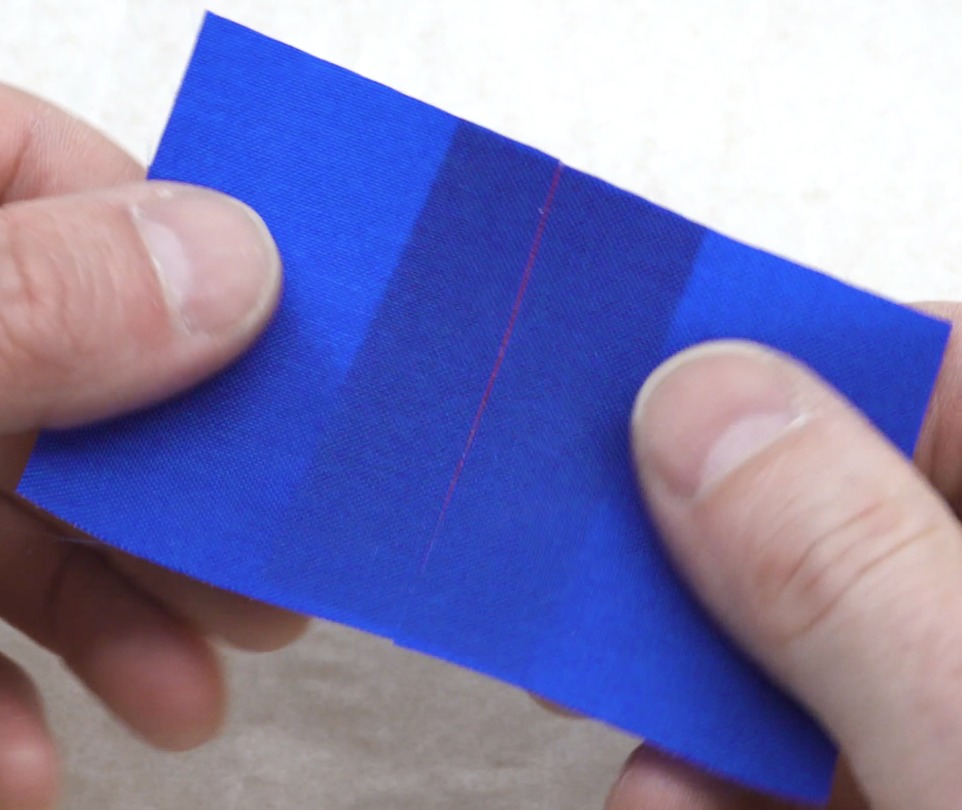
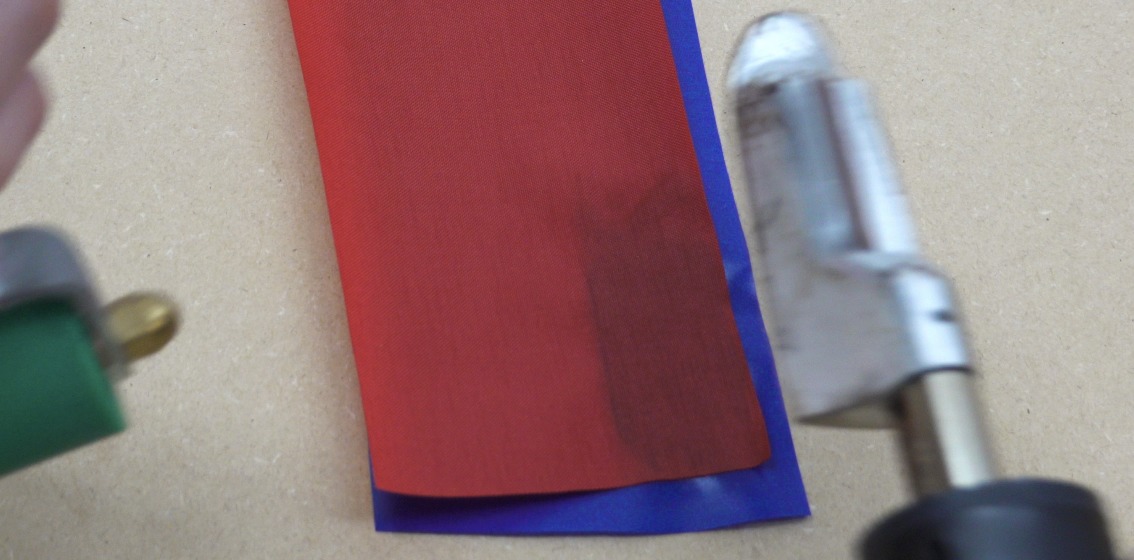
Color Change (caution!)
You might notice that there’s a slight color change or darkening as you weld the fabric pieces together, and the lighter colored fabrics especially start to look wet when they’re welded. I want to caution you not to use this color change as a sign that you’re making good welds, because the color change also happens when the fabric pieces are barely stuck together and there’s no weld at all. So at best, you can sometimes use a lack of color change as a sign that there’s no weld, but it doesn’t follow that if you do see a color change then there is a good weld. When you’re using darker fabrics, this wet look isn’t as apparent, and some people have concluded that it’s easier to work with lighter colored fabrics because it’s easier to see the color change, but given the fact that the color change isn’t a reliable indicator of good welds, that shouldn’t be a reason for you to choose lighter colored fabrics, and it could actually lead you into falsely believing that your welds are good when they’re not.

Fabrics with TPU on Both Sides
The DIY Packraft projects incorporate a mix of fabrics – some that are coated with TPU on only one side, and others that are coated on both sides.
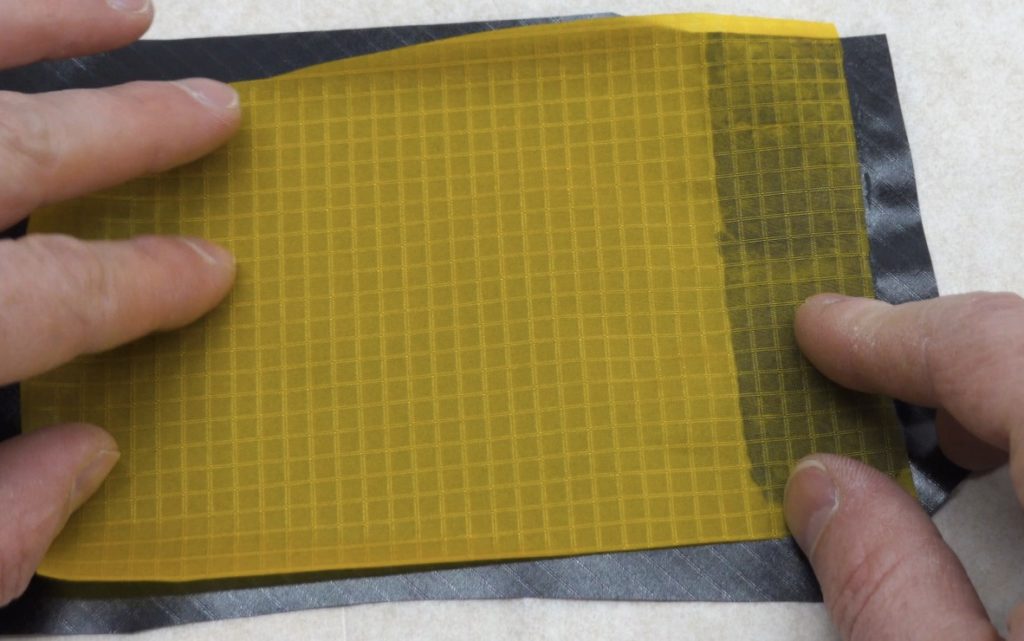
Note that the TPU’s finish might be a little bit different on each side, with one side being glossier than the other; don’t let that confuse you – they’re both TPU coatings:
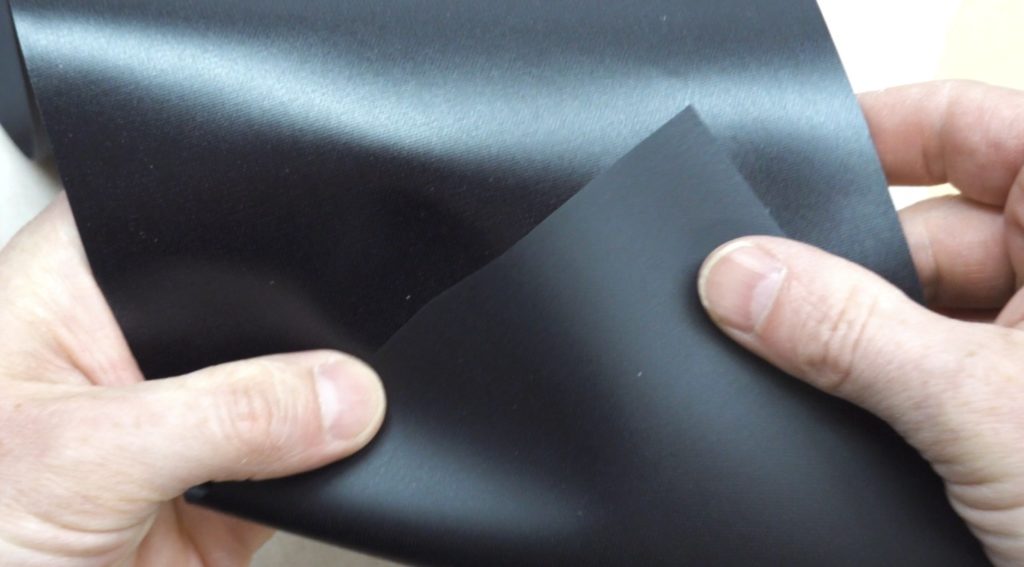
As I’ve already mentioned, we can’t iron directly on the TPU, so any time we are working with a fabric that is coated on both sides, we also have to incorporate a fabric that is only coated on one side, and that’s the fabric that we press with the iron.
Whenever you’re ironing something to a fabric that is coated on both sides, remember to place a piece of parchment paper beneath it, in case you accidentally iron in one place for too long and the TPU on the underside starts to melt.
The way to avoid that is to only iron in one place long enough to weld the upper TPU layers together, and then remove the iron before the heat transfers through to the bottom TPU layer.
This iron (above) is hot enough to make good welds on the standard weight DIY Packraft fabrics in about eight seconds, and I can actually hold it in one spot for more than 15 seconds before it starts to melt the TPU on the underside of this double coated fabric, so there’s plenty of margin for error. Practice on scraps of fabric and pull the welds apart to determine the minimum time it takes to make a complete weld, as I demonstrated with the single sided fabrics, and also determine the maximum amount of time you can hold the iron in one place without melting the TPU on the underside of the double coated fabric, and keep that in mind as you’re constructing your project.
On the thinner Ultralight fabrics, the margin between a good weld and melting the bottom layer of TPU is narrower, but it’s still not difficult to do. (Note that it’s normal for the TPU on the Ultralight fabric to change texture somewhat, but it shouldn’t melt.)
If you’re having trouble making welds without melting the TPU on the underside of a fabric, then your iron is probably too hot.
It also helps to avoid always ironing over the same spot on your table, because if you do that, eventually the table will get quite hot and in effect you’ll be heating the fabric from below as well as from the iron.
Long Seams
When you apply heat to the fabric, it can shrink a tiny bit – not enough to mess up the design of your project, but enough that if you start welding a seam at both ends and then try to work towards the middle, there’s a good chance you’ll end up with a fold or a wrinkle there, so always iron outwards from a single point – either starting at one end of the seam and working towards the other end, or starting in the middle and working out from there.
On a straight, flat seam, where the position of the fabric is important, I usually tack it down in several spots with the edge of my iron so it can’t move around as I’m ironing. For the most part, this seems to prevent that shrinkage from happening, and if necessary, I can reheat those tacked areas and gently pull the fabric apart and reposition it.
Curved Seams
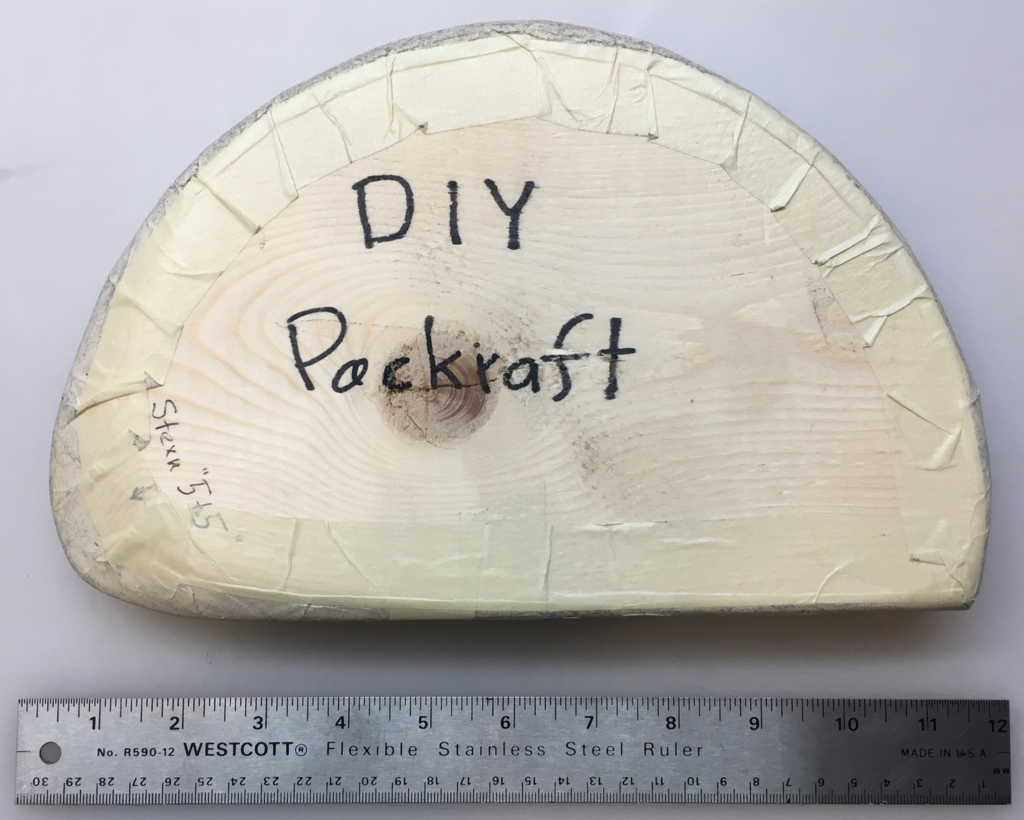
When you start ironing curved edges together, like the tube-to-tube seams in a packraft, you’ll find that the fabric won’t lie flat on your table and you’ll need to drape it over something like an overturned bowl or a curved wooden form.
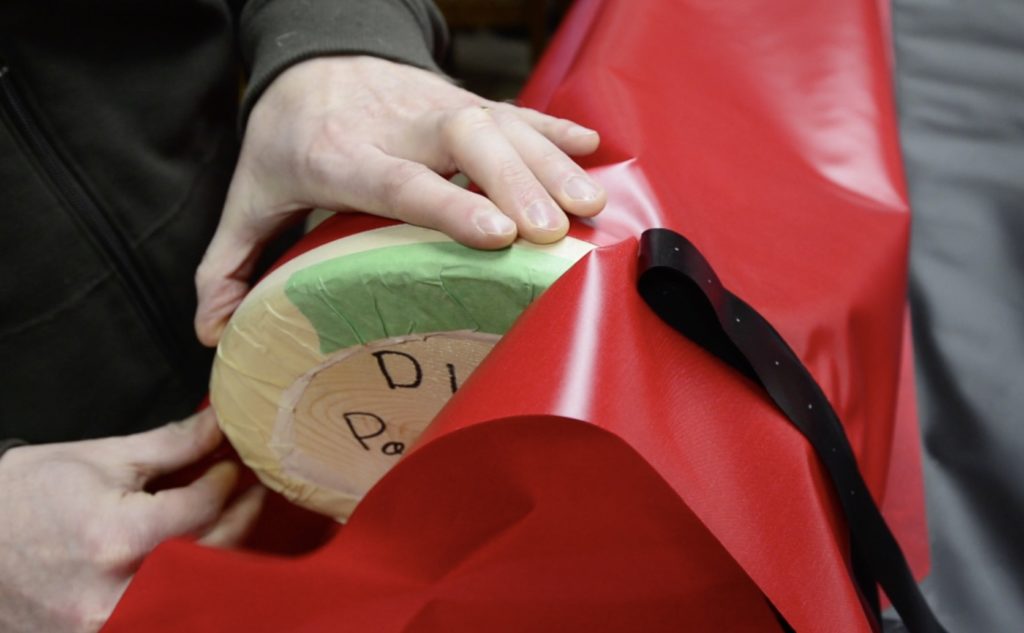
If you plan to use a bowl, choose one that doesn’t have a lip around the bottom so you can press the iron flat against it.
Draw a centerline on your form, and to hold the fabric in place while you work, wrap some masking tape around it, sticky side out. Then you can line up the two fabric edges with the centerline and join them together with a seam strip. This is covered in more detail in the actual instructions, so I won’t go into it further here.
If you’re using a wide iron, such as a model airplane covering iron, it’ll be easiest if you use a curved form that is about the same width as the seam strip – any wider than that and the sides of the iron are likely to accidentally touch the exposed TPU.
Whenever you’re using masking tape to hold the fabric in place as you iron, make sure you allow the fabric to cool down before peeling it off of the tape, because if the TPU is still hot, the weld might separate due to that peeling force as you pull against the tape. It doesn’t have to be cold, just cool enough that you can hold your hand on it without it hurting.
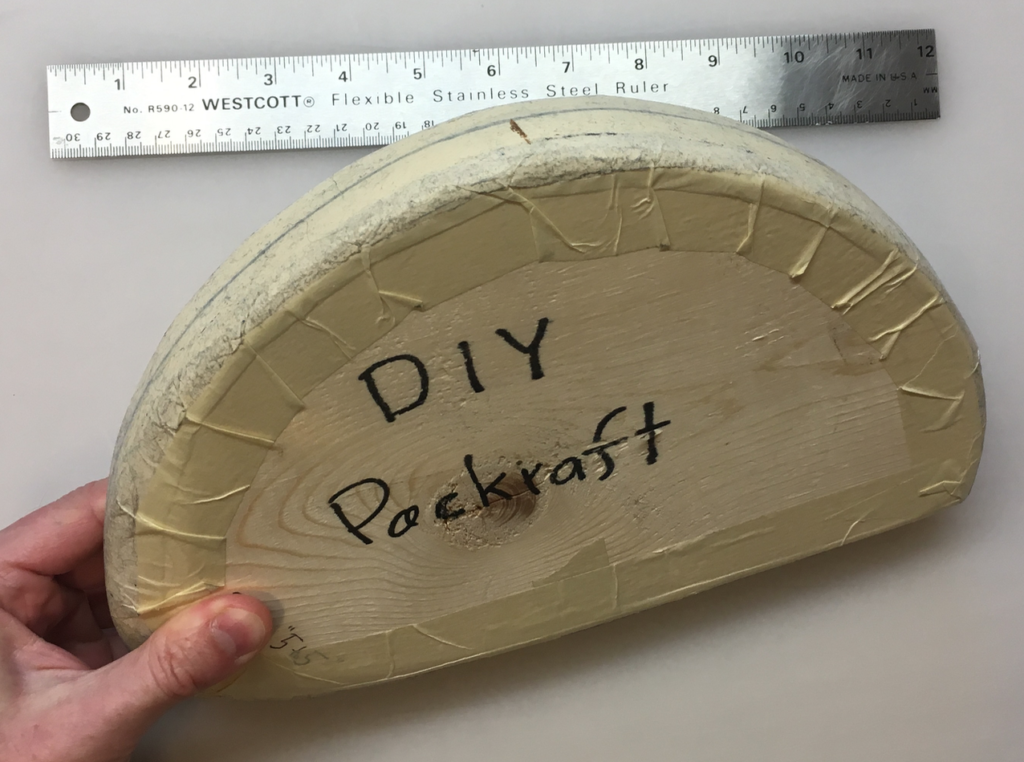
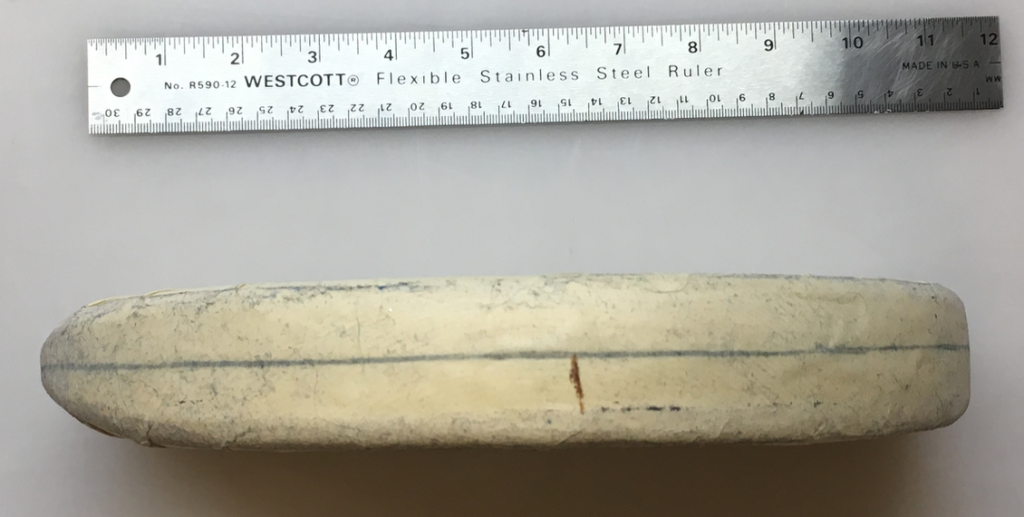
When you’re welding a curved seam with a particularly tight radius, you may need to switch to a form that is smaller and/or pointy.
I sell forms in the DIY Packraft shop, but you can easily make your own if you have some basic woodworking tools, or you can get creative and use other items you have available. Some things that customers have used to make heat sealing forms are:
- a disc of flower arrangement foam shaped with a bread knife and sandpaper and then covered with a strip of silicone place mat (to insulate the foam from the heat of the iron) – these items are available at Wal-Mart, Amazon, etc.
- a lacrosse ball
- a colander
- a tightly balled-up bathroom towel
Smaller Radius Curves:

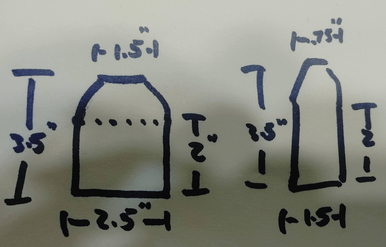
If you can’t make a wooden form, or if a form is just not working for you, another option is to lay the packraft on its side so the edges of the two tube pieces line up, one on top of the other, then fold the seam strip around the edge and iron it from each side, being careful to make sure that the seam strip is evenly placed over each side of the tube fabric.
Alternatively, if you wear a thick leather glove (to avoid burning your fingers), you can actually hold the fabric in place without using a form, pinching the tubes between the folded seam strip. Then your thumb (or fingers, depending on which side you’re working on) becomes the form. Careful though – you can only do this for a short time before the glove gets too hot. Once you get the seam strip tacked in place, it becomes easier to weld. Be very careful to avoid burning yourself, and don’t try this with a synthetic glove or you may end up with molten plastic stuck to your skin!
If you’re still finding it too difficult to seal around the point, you can reduce the curvature of the tubes’ edges by trimming some fabric off of both tubes in the area where the curve is tightest. This will change the shape of the packraft’s bow, however, making it more rounded and less pointy.
Avoiding Misaligned Curved Seams
As you work your way along a curved seam, keep the finished portion draped as straight as possible (aligned with the part you are sealing) to prevent biasing the curve to one side. If you allow the finished part of the seam to pile up consistently in one direction, the corners of the tube pieces will not line up properly when your reach the end of the seam even though the edges are the same length. Watch this video for a demonstration of how this happens:
Check Your Work
Your packraft or other inflatable will be rolled and folded many times throughout its lifetime, so it’s important to make sure your welds hold up to those forces. It’s much easier to check this as you work than to finish your project and then realize you have to go back and re-weld everything.
After heat sealing a seam, follow these steps to check your work:
- First, wait for the seam to cool. If you start deforming a weld while it’s still hot, the layers might separate.
- After it’s cool, bend and fold the seam while looking for areas where the fabric layers come apart.
- Also run a fingernail along the edge of the fabric to make sure it’s welded all the way to the edge.
- Iron again over any spots that aren’t permanently welded together.
- Then do the checks again, and repeat these steps until the whole seam is welded.
Do These Methods Work with Other Fabrics?
You might be wondering if you can use these heat sealing techniques with other materials besides TPU-coated fabrics. As far as I’m aware, the answer is no, but if you find a different type of fabric that has some sort of heat weldable coating, then it might be possible. Be careful with PVC coated fabrics though, because PVC gives off toxic fumes when it’s heated.
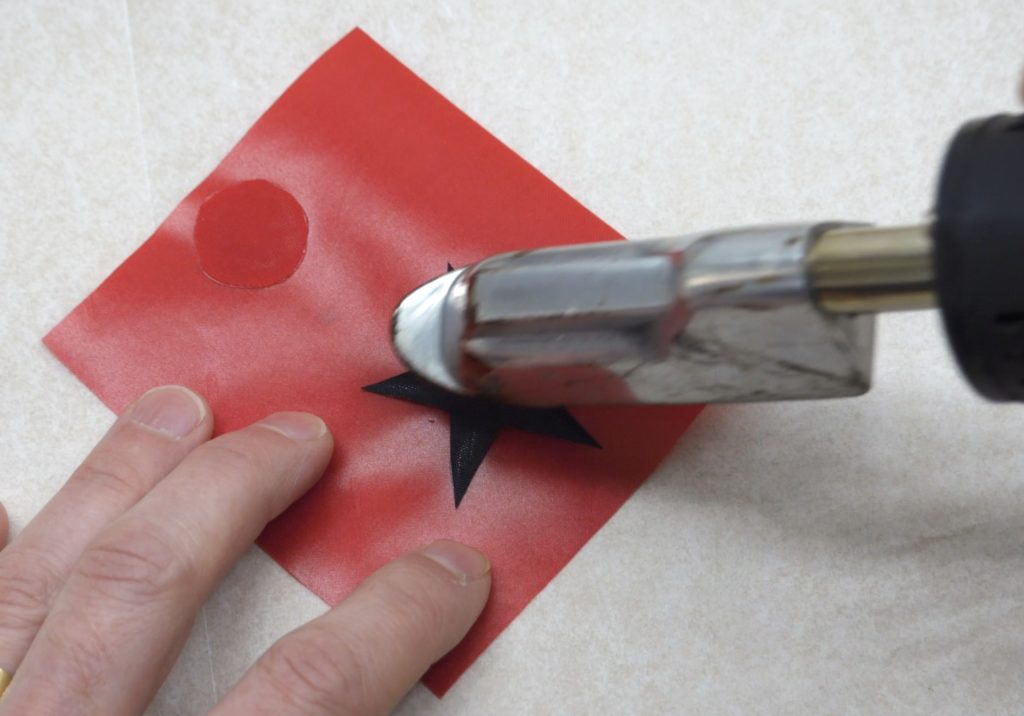
Fixing Damaged TPU
If you accidentally touch the TPU with your iron and you suspect that the airtight/waterproof membrane may be perforated, the easiest way to fix it is to weld a scrap of fabric over the melted area. If you use a matching color, it isn’t really noticeable, or you can use a contrasting color and cut the patch into an interesting shape so it looks like an intentional decoration. Some people have also repaired small areas of damaged TPU by scraping bits of TPU off of scrap fabric and then ironing them over the damaged area with a piece of parchment paper between the TPU and the iron. Another option is to coat the damaged area with Seam Grip+WP or Aquaseal.
Undoing a Weld
If after welding a seam you realize you’ve made a mistake and welded something in the wrong place, it’s often possible to reheat the fabric with your iron and carefully peel the pieces apart, starting at one end of the seam and slowly working along it, heating as you gently peel. If the fabric pieces come apart such that there’s still TPU covering both pieces of fabric, then it’s possible to re-use those pieces, but if there are significant areas where the TPU has completely peeled off from one of the fabrics, then it’s better to get a replacement part, because the TPU isn’t like a glue that will bond to fabric that isn’t already coated with TPU; once the TPU comes off of the woven fabric, you can’t just heat it up and stick it back on. The TPU has to be bonded to the fabric during the manufacturing process.
That’s also why you can’t weld TPU coated fabrics to fabrics that don’t have a TPU coating, and why you can’t weld the TPU coated side of the fabric to the non-TPU coated side – it will form a weak bond, but it’s not strong enough to be useful for anything.
I tend to design things with seams that are much wider than necessary, so if you have to un-weld a seam and you end up with some small areas where the TPU is missing, there’s a good chance the piece will still be usable. If you’re unsure about something like this, just send me a picture and I’ll tell you whether or not I think it’s safe to use it or if you should start with a new piece.
If you have questions or tips, please leave a comment below.
73 Comments
Adam P · December 30, 2020 at 1:02 am
Hi, i am trying to find right sealing temperature. I have issue when i seal tube fabric to double sided TPU floor fabric. Floor fabric from bottom side (opposite side to where it is sealed) becomes shiny. After cool down, actually nothing bad happens, it is only little bit more matt. Is temperature too hight or is it too low and i am staying too long on fabric? Thanks
Matt (Admin) · December 30, 2020 at 10:57 am
It could be too hot, or it could be the right temperature and you’re pressing it a bit too long… but if there’s no damage to the fabric, it sounds like it’s okay.
Tuukka · June 2, 2021 at 1:37 pm
I’m having similar issues. I’ve tried a dozen different temperatures and pressing times and either the bottom side of the floor fabric turns slightly shiny/rough, or the weld isn’t quite as strong as it could be. I’m welding the fabrics on top of a piece of cardboard, which sticks to the bottom of the floor fabric just slightly when I get a strong weld. I don’t think this is a problem though, as I did a comparison where I let the bottom side TPU melt properly. Some of the TPU got stuck to the cardboard permanently, which doesn’t happen when the bottom side just turns slightly shiny.
Matt (Admin) · June 2, 2021 at 1:41 pm
Some slight change in the glossy surface is normal. Don’t forget to place parchment paper under the floor fabric.
Clinton · December 26, 2020 at 11:27 pm
Hi Matt, very informative. I’m looking to retrofit a spray deck onto a packraft that claims the tubes are made of double sided TPU. If sealing a spray deck onto the top of the tubes while the raft is deflated, how do I ensure the inside of the tubes don’t receive heat and bond to itself? Seems unlikely I could seal a spray deck on with it inflated. What do you advise? Thanks!
Matt (Admin) · December 27, 2020 at 8:52 am
I would seal it to the inflated packraft. I have done it before and it works fine.
Guy · September 10, 2020 at 8:29 am
A couple of points that might help others:
1) Roller – search for: +silicone +seam +roller as used for roofing etc. Silicone will resist both heat and sticking to the work piece.
2) For 220/240V wiring, the world-wide cable core colour standard is Red = Live, Blue = Neutral, Yellow & Green = Earth/Ground. A ‘double-insulated’ appliance, the two cores will be Red and Blue.
Chris · November 14, 2020 at 4:15 pm
Hey, I’m working with some double sided TPU fabric. Do you have any tips on how to weld it together?
Lochie · July 15, 2020 at 12:09 am
Hi Guys
I had a bit of trouble finding a suitable heat sealing device that puts out the right heat but eventually came up with this solution…. a standard 40W soldering iron (the 80W was way to hot and 20W way to cold) brought for $15 at my local hardware store with a 5x25x60mm (roughly) off cut peice of me metal welded to the bottom. Appears to give a pretty good consistent heat. If you don’t have a welder an engineering shop will likely do the job in less than a minute free of charge.
John · July 10, 2019 at 3:17 pm
Matt, question for ya. I’m putting together a duffel bag and I’m hoping to make it into a box shape. Do you have any suggestions for how to seal the end pieces to the main section so that its a square shaped bag?
Matt (Admin) · July 10, 2019 at 4:54 pm
Hi John, I would approach it like this: https://www.diypackraft.com/construction/how-to/2-person-packraft-assembly/canoe-style-seat-assembly/ Cheers
Grant Bonney · June 19, 2019 at 8:58 am
Matt,
I’m building my first raft and if it floats I believe it will be a miracle. Please pray for some type of divine intervention. This is a world I knew nothing about, floating in one yes, but building one is a gamechanger. Seriously your website is excellent along with the knowledge base. I’m a tradesmen so I thank you for your hard work and sharing your wealth of knowledge and experience.
Buoyantly Yours,
Grant Bonney
Matt (Admin) · June 20, 2019 at 8:45 am
Thanks, Grant! Good luck!
Stefan Bradley · June 18, 2019 at 7:32 am
Thanks for mentioning that a silicone roller will typically yield the best results when applying pressure to a weld. I have a few items at home that I need heat sealed, but I am worried that I will damage something in the process. I think that it would be best for me to go to an expert to have the work done for me without the risk of my things being damaged.
Josh · March 28, 2019 at 2:01 pm
Hey Matt,
How much material do you seal off before you are comfortable with the bond in creating your raft? (IE: 1 inch of excess, 2 inches? etc.) Also asked, what material length do you bond before folding over on to create your raft?
Matt (Admin) · March 28, 2019 at 2:07 pm
Hi Josh, it depends on the orientation of the forces, but in general anything more than about 1 cm is just insurance. Cheers
Jessica Tucker Grubbs · December 21, 2018 at 9:17 am
Probably a stupid question, have you ever done an experiment with a mini hair straightener – these get up to 400F and seem like they could be handy due to the ability to “clamp” with it. Just curious.
Matt (Admin) · December 21, 2018 at 9:46 am
I haven’t tried that, but if you do please let us know how it goes! Cheers 🙂
linus1 · December 23, 2018 at 12:18 pm
I think it’s a great question 🙂 I’ve been using a mini hair straightener (https://www.amazon.com/gp/product/B074DLXD9X/ref=oh_aui_search_detailpage?ie=UTF8&psc=1) with the lightweight TPU/TPU materials (and thicker ones like the midweight TPU/TPU) with pretty good success. The iron definitely get’s hot enough, and when I’m trying to bond two pieces together, I make sure to use some wax paper (wax paper on the weld, then a crumpled piece on top of that that I use to rub back and forth while applying pressure to the weld) to apply some pressure immediately after bonding to smooth out the TPU and almost reapply it to the fabric and weld area. It’s worked really well, and I think being able to apply heat to both sides of the weld makes it a little easier and faster to get a strong weld.
Chris · September 4, 2018 at 7:19 pm
If you are having trouble with the temperature setting with the iron try this:
place a sheet of parchment paper on an oven thermometer and apply the iron to it. It’ll give you a pretty accurate temperature reading.
perform the test with the same electrical outlet and extension cord you will be using on your project. Using a different length cord can have a significant effect on the temperature output of the iron.
Matt (Admin) · September 5, 2018 at 1:28 pm
Thanks for the tip!
DAN · May 24, 2018 at 3:04 pm
My coverite black baron iron is not hot enough to do this job. Dial is turned all the way up. Seemed ok at the very beginning. Only a few hours into this project and I have to get a different iron.
Matt (Admin) · May 25, 2018 at 11:54 am
Hi Dan, a couple people have had this issue – have you seen Bruce’s post in the forum about adjusting the thermostat inside the iron? It’s here (scroll down): https://www.diypackraft.com/forums/topic/heat-sealing-tools/
Nele · April 10, 2018 at 1:04 pm
I was so happy to have found a mini iron, as I am not technically that well to make my own or adapting one.
But now it does not seem to work. I have a Clover mini iron, but it does not get hot enough.
Anyone from Belgium or close who can help? As I cannot find the Ming Yang for sale here.
dbeer167 · October 8, 2017 at 4:14 pm
Thanks Matt. Looking forward to the build.
David · October 8, 2017 at 2:05 pm
Hi Matt – I plan to build my packraft outside and am wonderingly if there are any temperature restrictions with the materials that one needs to be aware of?
Matt (Admin) · October 8, 2017 at 3:15 pm
Nope, the ambient temperature won’t matter as long as your iron is hot enough and has enough thermal mass to heat up the fabric – I would recommend using a model airplane covering iron instead of something like a Clover Mini Iron. I’ve take a Packraft out at minus 20 degrees and it worked fine (it just wasn’t as supple as at warmer temperatures).
waldlaeufer.5105 · October 8, 2017 at 1:26 pm
hf means high frequency welding with 27,5 mhz
waldlaeufer.5105 · October 8, 2017 at 1:24 pm
hello,
here in germany i can get hf tpu fabric.
do you have experience in welding fabric like this?
distributer is extremtextil.
regards
mike
Matt (Admin) · October 8, 2017 at 3:08 pm
Please check the forum for reviews of fabrics from extrimtextil – several people have tried it, but I have not.
Gerry · October 5, 2017 at 10:07 pm
Hi Matt
For Australian users, there’s a fair debate about getting hold of a suitable heating tool. The most popular seems to be the Clover Mini Iron but this doesn’t sound like it does a very good job and has a habit of breaking. After reading all the difficulties other Aussie users were experiencing I did a bit of research and found what seems to be a good product. It can heat to 200 Deg Celsius and so far, is strong enough to press firmly. It’s called the C.Y. Heat Sealing Iron – Computer Temperature Control and can be purchased from an Australian Provider. The website is https://www.hobbytools.com.au/heating-and-sealing-irons/. Price is $69.95 + postage. Despatch is prompt. We haven’t finished our rafts but it’s doing a good job so far.
Simon · April 24, 2018 at 3:58 pm
Hi Gerry,
I’m from New Zealand and just ordered my V3 diy packraft. Currently doing some research in to the best heat sealing tool available on this side of the world and wondering how you got on with the one you linked above? Did it hold up and finish the raft properly? Any advice would be much appreciated.
Cheers
Thomas · April 28, 2018 at 4:28 pm
Hi Simon, I ended up getting this iron from New Zealand and its been great. Really fast shipping too
https://pilotpetes.nz/product/turnigy-covering-film-iron/
I originally tried an American coverite black baron with a NZ plug adapter but it didn’t have a transformer so our higher voltage fried the heating element. The turnigy one is great though, just file the edges flat and its good to go.
Cheers
Simon Robinson · May 9, 2018 at 3:25 pm
Hi Thomas,
Thanks for the advice. Just ordered the Turnigy so hopefully I can get building soon.
Cheers
Joseph · July 10, 2017 at 1:30 pm
Matt,
Can you heat weld all/any TPU coated fabrics? Does it just take more time and pressure with the iron if you’re using thicker material from different projects, for instance 600 to 800 d TPU coated material?
Thanks,
Joseph
Matt (Admin) · July 10, 2017 at 2:29 pm
Yep, that’s right. Some fabrics melt at a temperature close to the TPU activation temperature, however, which makes them unsuitable for heat welding. Always test samples first if you’re buying elsewhere. Cheers 🙂
Paul · May 4, 2017 at 7:00 pm
Hello!
Curious if you have found that un-bonding the fabric is as easy as bonding the fabric? Did some research on this TPU coplymer in general and found that it is unique in that the TPU can be bonded and un-bonded apparently endlessly and still remain as original due to the unique and strong way the crosslinks form, deform on heat, and then reform just as strong, supposedly. Excellent website and community knowledge! this awesome!!!!!
Matt (Admin) · May 5, 2017 at 10:23 am
Thanks, Paul! Yep, I’ve found that I can reheat and unseal/reseal the TPU without much difficulty. The only issue is that when you separate the previously sealed pieces the TPU isn’t distributed evenly over the two pieces anymore – not a problem if you just need to reposition it slightly, but it wouldn’t look good and might not remain airtight if you wanted to totally remove something that had been sealed down without covering the spot again with a new piece of fabric. Cheers!
Quincy · January 6, 2017 at 10:58 am
It is a bit difficult to tell from the stop motion in your videos and I couldn’t tell from reading this section so I thought I’d ask here. Is the heat sealing a press-pause-move, press-pause move, type process or more of a continuously pressing and sliding the iron back and forth along a short section of the seam as you move along the seam? Thanks
Matt (Admin) · January 6, 2017 at 2:25 pm
Hi Quincy, that’s a good question. I never really thought about it, but you’re right – speeded up in the videos it’s hard to tell exactly what I’m doing.
I usually press and slide back and forth over a short section of the seam (especially on curved seams, where I need to re-position the fabric after sealing a short section). This works well for me because, with most of the colours of fabric that I offer, the fabric darkens slightly as the TPU begins to fuse (it almost looks wet), and sliding back and forth allows me to see exactly when this happens and to what extent, so I don’t overheat it. The darkening is temporary – as the TPU cools it goes back to its original appearance – unless your iron is so hot it melts the nylon!
If your iron is only slightly too hot, you can slide it faster and for a shorter period of time, and if it’s on the cooler side you can slide it back and forth over a shorter distance to concentrate the heat output into a smaller area.
In some of the videos, especially when working on curved seams, you’ll see me heat a section with the iron and then set the iron aside and press on it briefly while it cools to below the TPU fusing temperature. This keeps the fabric from moving while the TPU is hot and ensures a good strong bond.