Back to Step 2 – Joining Side Pieces
Bonding curved seams is similar to bonding straight seams, but slightly more difficult because once we start joining curved edges together, the fabric will no longer lie flat on the work surface.
For this step, you will need a heat resistant work surface, your heat sealing tool, some parchment paper, a ceramic bowl or other heat-resistant round object, and the fabric shapes you joined in the previous step (see the Tools and Fabrics pages). You will also need some long scraps of your heat sealable fabric.
Start by laying out the fabric for one side of your packraft with the heat sealable side facing down. Position the fabric so the seam you will be working on is easily accessible and the wedge-shaped gap in the fabric points towards you.
I recommend starting with one of the straighter seams first because the tighter curves can be more challenging to work on and you may have better results if you work up to them. If you like, you can practice on some bits of scrap before starting on your packraft.
Cut a strip of fabric approximately 2 cm wide and somewhat longer than the seam you are going to join. Round off the end of the strip with your scissors so that there are no corners, and lay the strip under the end of the seam with the heat sealable side facing up. Tack the end of the strip in place with your iron, and then set aside the fabric for a moment.
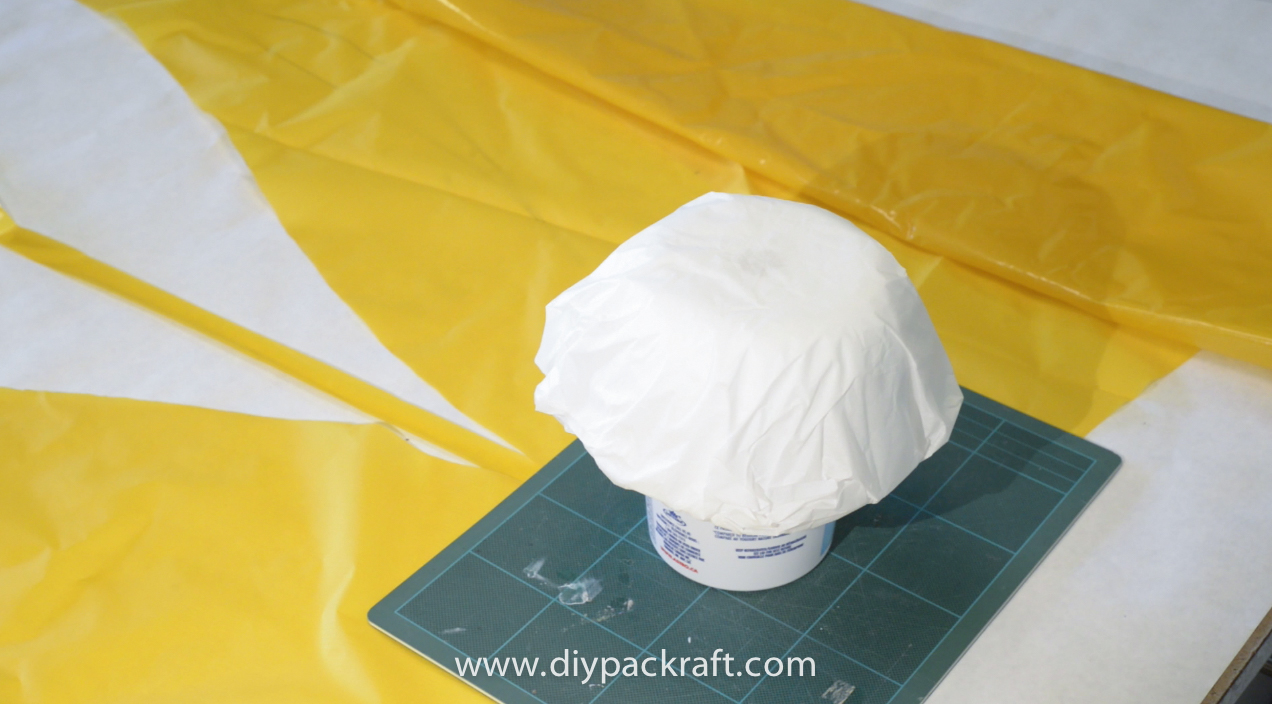
Wrap a medium-sized ceramic or wooden bowl in parchment paper and place it on your work surface upside down. If you like, you can elevate it by placing it on top of something, such as a plastic yogurt container or something else that will fit under the bowl.
Fabric is laid out with the wedge-shaped gap pointing towards the bowl and a thin strip of fabric lies in the middle of the gap. The two edges will be brought together and sealed with the thin strip, closing the gap.
Drape your fabric over the bowl such that the end of the seam is on the bowl and the thin strip of fabric trails away from you. With the fabric draped over this rounded surface you will be able to bring the curved edges together overtop of the thin strip. Center the first few centimetres of the seam over the thin strip and then use your sealing iron to bond the fabric together. When that short section is done, slide the fabric toward you a few centimetres, align the pieces over the thin strip again, and seal them in place. Repeat this procedure, a few centimetres at a time.
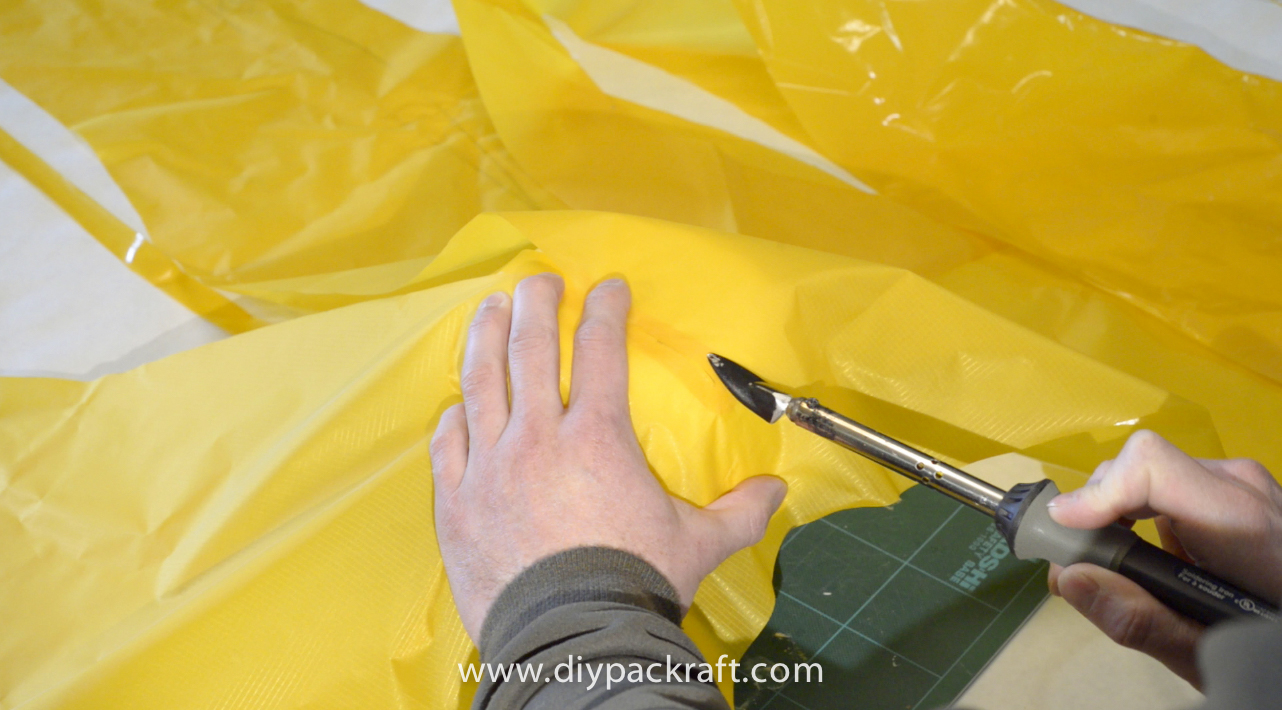
Here the fabric has been draped over the bowl and the two edges are being sealed together with the thin strip.
At the end of the seam, leave a small amount of the seam (at least 1 cm) un-sealed; we’ll come back to this in a later step. For now, cut another 2 cm strip and move on to the next curved seam, following the same procedure. There are four seams on each side of your packraft, not including the center seams, so take your time and don’t try to finish everything in one sitting.
4 Comments
Jared · November 17, 2016 at 7:30 pm
Thanks for making all the materials and plans available. When bonding the curved seems, I had better luck tacking the strip to one side (my material wasn’t see through) and then bonding the pieces together. This helped ensure that the strip was fairly even throughout the entire seam and didn’t need a third hand. I also found a new one gallon paint can from the hardware store worked great for most of the curves and I didn’t have to use parchment paper on it. I only had to use the bowl/cup for the really radical bend. It helps if you can clamp the paint can down to a table or work surface.
Matt (Admin) · November 18, 2016 at 8:54 am
Thanks, Jared – good ideas!
Ken Wong · October 5, 2016 at 4:45 pm
Hello
Question on what edges to bond together?
I have pieces G to G’ with edges G to G” and piece A to A’ with edges A to A’
I have bonded Edge E to F tube section and D’ to E
What are the other edges to bond
There are four seas on each side
E’ to F?
X to Z?
Matt (Admin) · October 5, 2016 at 11:13 pm
Hi Ken,
In the previous step we bonded the straight seams A-A’ and B-B’, so now when the fabric lies flat each side of the packraft is shaped somewhat like a hand, with five “fingers” radiating out from the “palm” (floor) in the center. The goal in this step is to close the gaps between the fingers, working outwards from the palm, bonding the sides of adjacent fingers together. In other words,
Edge C’-C’ joins to edge D-D
Edge D’-D’ joins to edge E-E
Edge E’-E’ joins to edge F-F
and edge F’-F’ joins to edge G-G
Because of the way the seams are curved, the “hand” will curl up into a “fist” as you bring the fingers together. Nothing should be bonded to the floor polygon at this time; only the curved edges of the limbs should be brought together.
I hope this explanation makes sense… if you have further questions, don’t hesitate to ask!