Introduction
The following is based on my considered opinions and you may have a different perspective – if so, please leave a comment below! – Matt
There are some obvious things to consider when choosing a packraft, such as price, size, and weight, but what else should you look at?
Below, I’ll address the factors that I think are important when evaluating a packraft (in no particular order). If you want to get into packrafting but you don’t know which brand or model is best for your needs and budget, read on.
Assessing Your Needs
People tend to make gear purchasing decisions based on fear or thoughts of the most extreme conditions they might encounter on their trips – do not fall into this trap!
The type of packraft you purchase should be dictated by the type of trips you intend to do regularly, and not by the conditions you will only encounter rarely, if ever. You may aspire to be a Class V whitewater packrafter one day, but if 95% of your paddling will be on lakes, you’ll curse yourself if you buy that heavy and expensive whitewater packraft.
Packrafts are pretty tough to begin with and they’re quite easy to repair, so don’t let fear make you spend more money than necessary on a heavier boat than you need. A regular packraft plus a repair kit weighs less and costs much less than a bomb-proof packraft.
Before choosing a packraft, it’s important to establish what you intend to do with it. When you daydream about trips that include a packrafting component, what do you envision?
- Overnight backpacking trips that are mainly hiking, with occasional water crossings and/or exploring lakes by packraft along the way?
- Fishing in alpine lakes or similarly calm waters?
- Driving or day-hiking to rivers in order to go whitewater paddling?
- Using a packraft as a dinghy for your sailboat or powerboat?
- Expeditions that include lots of hiking and paddling on lakes, large and small rivers, seas and oceans, and/or crossing ice and snow?
- Car camping at lakeside campgrounds?
- Paddling with a child, dog, or someone significantly weaker or stronger than you?
- Some combination of the above?
- Something else entirely?
For some people, it may make sense to own two or more packrafts (such as an ultralight model and a whitewater model, or a single-person model and a two-person model, etc.). Whether or not this is feasible for you will depend on how much disposable income you have and whether or not you’re considering the DIY approach (you can make several different DIY Packrafts for the price of one manufactured whitewater packraft).
On-the-Water Handling
By “handling,” I mean the way a packraft responds to your paddle strokes. Handling will depend to some extent on your individual body type and how much gear you pack in your packraft, so keep that in mind when weighing other people’s advice. Advice from someone who is about the same size and weight as you and who does the sort of paddling you intend to do will be more relevant than advice from someone whose body type and paddling goals are drastically different from yours.
The only way to really get a feel for how a packraft handles on the water is to paddle it yourself, but that usually isn’t possible before making a purchase, so you’re limited to reading the manufacturer’s ad copy, user reviews, blogs, and watching videos online.
Advertisements and manufacturers’ website copy is obviously biased. Even if you trust a brand, you should try to verify their claims.
Beware of reviews and blog posts by “brand ambassadors” and anyone else who benefits from the company they’re reviewing. Unless you know that the reviewer paid full price for the product and the company wasn’t aware that the product was going to be reviewed before they shipped it, the review is of limited value. It’s not that you shouldn’t trust anything the reviewer says, but you should try to maintain a bit of skepticism when evaluating their claims. (If you’re interested in taking a peek behind the curtain, check out the post I wrote about the sad state of the online review economy.)
If you’re already a reasonably skilled paddler, you’ll be able to look at pictures and videos of people paddling the packrafts you’re interested in, and based on your experience you’ll be able to evaluate their performance to some degree.
To a first approximation, I think you’ll find that most modern* packrafts handle relatively similarly – in other words, the different brands and models will feel more similar to each other than to hard shell kayaks or any other type of boat – so don’t expect to find a packraft that feels and performs the same as your favorite kayak.
*By “modern packrafts” I mean elongated packrafts with segmented tubes. Simpler boats, such as models by Sevylor and Klymit might paddle more like a Wal-Mart special.
Flatwater, Whitewater, or Something in Between
A few packrafts, like the ones from Sevylor and Klymit, are only really suitable for paddling in still waters. They’re very short and their tubes are so low that even wind waves can swamp them. That’s totally fine if flatwater paddling is all you intend to do, and speed isn’t a big priority for you.
At least one packraft, the “Alpackalypse”, was designed only for whitewater packrafting and is so heavy it’s not much good for anything else.
Most packrafts are somewhere in between.
Weight
There’s a good chance your packraft will be the heaviest item in your backpack, so weight should be a prime consideration if you plan to carry it long distances.
The weight of packrafts has been creeping up over the years as they’ve become longer (for better fore-aft balance, speed, and tracking), and as companies add more features to their boats, such as spray decks, thigh straps, etc.
This isn’t necessarily a bad thing, because the improved on-the-water performance may be worth the extra weight on your back, but if all you need is a way to get across an occasional body of fairly calm water to complete your hikes, resist the temptation to purchase a high performance packraft when a cheaper and significantly lighter option will work just as well.
Materials
Serious packrafts can be distinguished from pool toys and big-box store specials by the materials they are made from. Packrafts are constructed from a strong woven fabric that has an airtight membrane bonded to it, while cheap pool toy-type inflatables are typically made from just a plastic membrane without any woven fabric, so they are much weaker than a true packraft.
Nearly all serious packrafts (including the DIY Packrafts) are made from thermoplastic polyurethane (TPU) coated nylon fabric. TPU is a durable and airtight plastic, and nylon is a strong synthetic material that stretches a tremendous amount before it breaks, so it absorbs impacts very well.
A few packrafts are made from polyvinyl chloride (PVC) coated fabrics. Personally, I would avoid packrafts made with PVC, as it’s worse than TPU in pretty much every way except price. (PVC is heavier, weaker, brittle when cold, and bad for the environment.)
A few extremely expensive packrafts are made from TPU-coated Vectran fabric, which has a higher breaking strength than nylon. Vectran doesn’t stretch much before it breaks, so it makes for a stiffer boat that can be inflated to a higher air pressure. Personally, I think this would only be worthwhile for someone who has a lot of disposable income and intends to focus on extreme whitewater paddling.
At least one packraft boasts a Kevlar reinforced floor, but in my opinion this is just a gimmick (see the section on bottom protection, below).
I have tested some TPU-coated aramid (Kevlar) fabrics, but I haven’t found them to be worth their exorbitant prices.
Fabric thread weights are usually given in terms of “denier” (D), with 1D being the weight of a single strand of silk. You can learn more about packraft fabrics here, but the important point is that fabric denier does not correlate linearly with strength, so while you should take note of fabric deniers when comparing packrafts, it’s not necessarily a good guide to fabric strength.
Capacity
By “capacity,” I mean how much weight a packraft can safely carry. Standard packrafts are designed to have more than enough capacity to carry a person plus a full load of camping gear.
Capacity can be calculated in several different ways, and there are more things to consider than a simple weight rating when evaluating packraft capacity (I wrote a whole article about it here), but basically the bigger the packraft, the more weight it can carry. Packraft manufacturers do not all calculate capacity in the same way, so comparing the numbers on their websites is not especially useful. To compare capacity in real-world conditions, you can look up packraft lengths, widths, and tube diameters to get a sense of how one packraft stacks up against another.
Capacity is something to consider if you are very heavy compared to the average person or if you plan to:
- Paddle with a partner, child, or dog in your packraft
- Transport very large amounts of gear (more than a typical backpacker would carry)
- Hunt big game
If one or more of the above applies, choose a packraft designed to fit two people; otherwise, you shouldn’t worry too much about capacity unless you’re considering a very small packraft such as a Sevylor, Klymit, etc., in which case you should add up the weight of your self and gear and make sure you’ll be okay in the wave conditions you expect to encounter.
Thigh Straps & Foot Braces
Thigh straps and foot braces allow you to use your whole body to manoeuvre your packraft with greater precision and power. Whitewater paddlers – especially those with a kayaking background – will appreciate these features. Other paddlers may find they’re not worth the added weight, complexity, and increased risk of entrapment.
Some packrafts are available with an inflatable foot brace (foot rest). An inflatable foot brace can also be made using the DIY techniques by folding a circle (or ellipse) of fabric in half and sealing the edges together – add an inflation valve and an attachment point, and voila.
Lightweight thigh straps can be made from the extra floor fabric and attachment points included with each DIY Packraft kit. This fabric, when cut into strips about 25 mm (1″) wide, makes more comfortable thigh straps than regular webbing because it doesn’t soak up any water (thanks to Bruce from Fairbanks for this tip!).
Bottom Protection
Much is made of the different packraft floor fabrics, but for the most part I think people focus on the wrong things here.
In my opinion the floor is actually the least important part of a packraft – you could blast away at it with a shotgun and the packraft would still float just fine as long as you didn’t puncture a tube.
So look at the bottom of the packraft – how far does the floor extend outwards to the sides, front, and rear? This is the important part of the floor – the part that protects the tubes from punctures (or not, as the case may be).
One of the top brand-name packrafts boasts a Kevlar-reinforced floor, but the floor barely protects any of the tube fabric, so what’s the point?
For comparison, the figure below shows the bottom of a DIY Packraft “Skeena”. Notice how the floor extends out to the sides, front, and especially the rear to protect the tubes below the waterline. Aside from the part of the floor that is directly under your seat, the bottom of the rear tubes sits deepest under water, so that’s the area that’s most likely to get scraped up, yet other packraft manufacturers don’t extend the floor fabric back to protect it. (Compare the Skeena below to pictures of the bottoms of other packrafts).
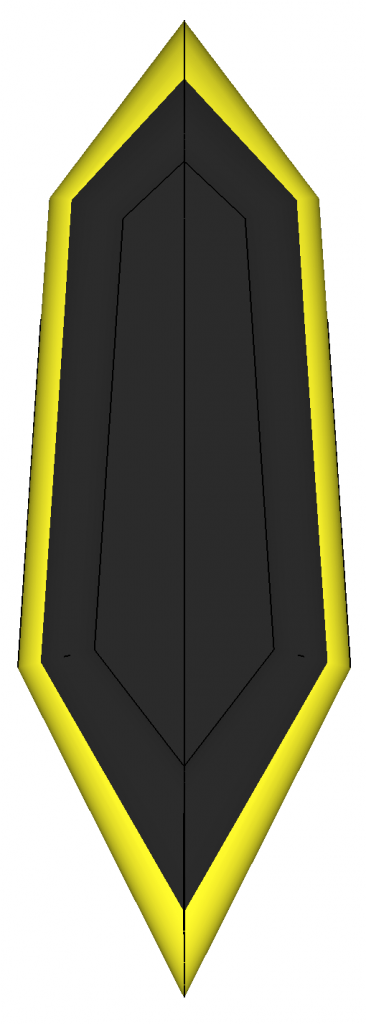
I could reduce the packraft weight and cost if I designed the floor pieces to be as small as possible, but I believe that the added tube protection is worth the extra weight and cost. (The DIY Packraft “Telkwa” takes this approach to a whole new level, with a floor that wraps up around the tubes high above the waterline, so all you see from the bottom is floor fabric.)
Comfort, Seats & Size
Important: Do not try to judge a packraft’s comfort by sitting in it on land! It will feel very different in water because the floor will sag with your weight, lowering your body significantly.
Seat Height:
Personally, I find it very uncomfortable to paddle a packraft without a raised seat and good back support, except for short crossings (no more than 10-15 minutes of paddling).
If the seat is too thin, you’ll sit too low in the packraft and you’ll be forced to do a sort of chicken dance paddle stroke with your elbows held out over the side tubes instead of where they should be, which is down at your sides. The chicken dance paddle stroke is okay for a short time, but the small muscles in your shoulders that raise your elbows tire quickly and you’ll soon be looking around for something thicker to sit on.
When you’re examining pictures or videos of people paddling a packraft that you’re considering for purchase, make sure they’re paddling naturally with their elbows down – if their elbows are way out to the sides, it indicates an uncomfortable paddling position. Once you know what to look for, you’ll be surprised to see people doing the chicken dance paddle stroke even in advertising pictures on the websites of major packraft brands!
Back Support:
In addition to a raised seat, good back support is crucial for most people.
There are two ways to achieve back support in a packraft: recline against the rear tubes, or have a dedicated back rest.
Paddling in a reclined position is not very efficient. It’s okay for short water crossings or for drifting down a river or for a leisurely day at the lake, but if you need to make significant headway it’s not very practical. The only advantage to not having a back rest is that it makes your packraft lighter and more compact.
Most packrafts come with an inflatable back rest or a kayak-style back band, or some hybrid between the two. Figuring out which one will be most comfortable for you without actually trying them out in the water is difficult – probably the best thing you can do is to ask people who have paddled several different packrafts which one they found most comfortable.
Internal Length:
Unless packraft weight is more important to you than comfort, or you’re strictly a whitewater paddler, I recommend choosing a packraft that is long enough to accommodate your fully extended legs in the cockpit (this page explains how to measure yourself to figure out what size packraft will fit you best).
Whitewater paddlers may prefer a shorter boat because they’ll be paddling with thigh straps around bent knees.
Cockpit Width & Tube Diameter:
Packraft tube diameter combined with cockpit width (and seat height) affects the geometry of your paddle stroke by determining how far out to the side you must reach to dip your paddle blade into the water. A wider cockpit or a wider tube diameter both force the paddler to reach farther sideways for each paddle stroke, and the farther out you have to reach, the less efficient your paddle stroke will be, both biomechanically (it takes more effort to reach farther sideways) and geometrically (with the paddle blade farther out to the side, there’s more torque on the boat during each stroke, so more of your energy goes into turning the packraft instead of propelling it forward).
As packrafters, we’re usually not racing to get anywhere, but to illustrate this point you can watch a video of a kayak race. Notice how narrow the boats are and how the competitors’ paddles are nearly vertical during the power phase of each paddle stroke – they’re not reaching way out to the sides to achieve those speeds.
A packraft cockpit should be just wide enough to fit your hips and thighs, or even a bit smaller so it hugs them snugly. The perfect side tube diameter is debatable, but 25-30 cm (10-12″) seems to be about right for single-person packrafts. Larger tubes will let in fewer splashes and give you more buoyancy and weight carrying capacity, but larger tubes are also heavier and they force you to reach farther sideways to get your paddle blades into the water.
Speed
There isn’t much information available about packraft speeds.
If I had infinite funds I would purchase every single packraft on the market and create a database of speed tests (by paddling them at various levels of effort with various loads), and also drag tests (by measuring how much force is required to pull them through the water at a given speed). Sadly, my funds are limited. I have posted a few speed tests elsewhere on this site, and you can find some information about packraft speeds on at least one other blog.
Basically the findings are that longer, narrower packrafts with pointy sterns are faster than short, fat packrafts with rounded or flat sterns that curve upwards.
This makes sense – the cross-section of every airplane wing is basically an elongated teardrop shape, with a rounded leading edge and a thin, wedge-shaped trailing edge. This allows it to slip smoothly through the air, creating minimal drag.
For the same reason, every* boat with a non-planing** hull has a pointy stern (it requires less energy to move it through the water). A wide stern causes a lot of turbulence to form in its wake because the flow of water can’t separate smoothly from the boat; instead, it forms little boils, eddies, and whirlpools. It takes energy to churn up the water like that, and energy that goes into churning up the water is energy that isn’t propelling you forward. That means you have to work harder to paddle a fat-sterned packraft through the water at a given speed, and it’ll be slower than a comparable packraft with a pointy stern (all else being equal). That’s not really a big problem for a whitewater boat, but it’s not ideal for an expedition boat. Even if it’s only 5% or 10% less efficient in the water, that adds up over the course of a day.
Personally, I think Alpacka’s fat, flat sterns on their newer designs are a step in the wrong direction. They look cool and new, but I wouldn’t adopt that design even if they didn’t have a patent pending on it. (I don’t have any quantitative drag measurements of these packrafts, but anecdotal evidence from people paddling side-by-side in different packrafts supports this argument.)
“Rocker” is the amount of up-turn at the front and back of a boat’s profile. The more rocker there is at the stern of a boat, the slower it will be (all else being equal). Rocker at the stern lifts the flow of water behind the boat higher than the natural water level, resulting in a turbulent wake (a clear indication of drag). The rocker at the bow of a packraft has little effect on speed.
*Things like tugboats and fishing trawlers (which have powerful, high torque motors and are designed to move slowly) are the exception. Many non-planing sailboats and cargo ships have sterns that are squared-off above the waterline, but below the waterline (where it matters) they’re basically canoe-shaped.
**Planing is skimming over the surface of the water like a speedboat, rather than slipping through the water like a canoe. A planing boat moves fast enough that the flow of water separates from the hull below the natural waterline, so it doesn’t need a streamlined hull behind the point where the separation occurs. A non-planing hull slices through the water even at top speed, so it needs a streamlined shape along its entire length. A packraft will only plane when surfing down a wave or being towed behind a powerboat, so it should be considered a non-planing hull.
Esthetics
I would never recommend purchasing a packraft based on esthetics, but if you’re going to spend hundreds or even thousands of dollars on a packraft, it should at least look decent.
Do you prefer the look of a particular packraft? If so, please leave a comment below, because as a packraft designer I’m genuinely curious about what people like. My first priority is to make my designs function well, but I try to make them look good too. I only know what esthetics I like, however, and my tastes may be in the minority. My tastes change over time, too – I used to think the classic ten-tube Alpacka was beautiful and the eight-tube Kokopelli was ugly, but as I’ve learned to appreciate the benefits of the eight-tube design, I’ve grown to appreciate its appearance.
Color preferences are pretty personal, and when it comes to packraft colors the options are limited because it’s extremely expensive to have a new color of fabric manufactured. Hopefully the packraft that best suits your needs also comes in a color you like.
Price
Depending on your budget, price may be a major factor in your choice of packraft.
Remember that the price of a packraft is only part of the cost of packrafting. You’ll also need a PFD (life jacket), paddle, and maybe a wetsuit or drysuit, depending on your paddling goals. The prices (and quality) of these things vary widely ($20 to $500 for a paddle; $25 to $300 for a PFD; $500 to over $1500 for a drysuit, etc.). Some styles of paddle/PFD/wetsuit/drysuit are better for packrafting than others, being lighter or more compact, but if you’re willing to carry more weight you can generally pay less.
Unless you live someplace where you can walk into a store and buy a packraft, you’ll also have to factor in shipping costs (and possibly import taxes). Depending on where you live, these can be significant.
You may be able to save some money by buying a used packraft and other used gear, but your options will probably be limited. You could also wait for one of the year-end sales that some brands have.
In an ideal world, price would be perfectly correlated with the quality of a product and we would be able to judge a product’s quality by its price. Sadly, we do not live in that world, and many other factors affect price.
Some brands (e.g. Kokopelli) offer packrafts at a lower (though still high) price by utilizing overseas labor and selling large volumes of product in a limited number of models, sizes and colors. This lower price isn’t necessarily an indication of lower quality – it’s just a different business model than that of a boutique brand like Alpacka that offers tons of different options made to order in the USA and sold at a premium price point.
The following may be a controversial point, but I’m fairly well-traveled and in my experience American workers aren’t more conscientious than workers in other countries, and the products they produce aren’t necessarily better. This is only true to a certain extent, of course – some offshore brands simply copy the industry leader’s designs and substitute inferior materials and unskilled labor so they can sell their products at a lower price.
Personally, I would stay away from cheap knock-off products in any industry, because the quality difference is usually quite noticeable.
Spray Deck & Spray Skirt or Self-Bailing
I’ve never heard of anyone who was sorry they chose a packraft with a spray deck, but that doesn’t mean you need one. Spray decks add weight and bulk to your packraft, and if you’re not interested in whitewater paddling and you paddle in a reasonably warm climate, a spray deck and the associated skirt are simply unnecessary.
Unless you are already familiar with self-bailing boats and you understand the sacrifices involved, do not buy a self-bailing packraft. Self-bailing boats have holes in the bottom, so there is always some water in the boat even if you’re not paddling in whitewater. I have had one person ask me if I know of a way to plug the holes in the bottom of their self-bailer because they found paddling it to be too cold and wet.
I would only recommend a self-bailing packraft to someone who plans to paddle whitewater in a warm climate, or to someone who will always wear a wetsuit or drysuit when paddling.
Repair & Upgrade Services
If you purchase a manufactured packraft and then want to add a zipper or spray deck to it later, in general you’re out of luck unless you do the upgrades yourself (ditto for repairs).
Alpacka is the only brand I’m aware of that offers a repair and upgrade service for their packrafts (Kokopelli does not). They charge a lot of money for these services and you’ll also pay for shipping both ways, so it won’t make sense for everyone even if you can afford an Alpacka in the first place.
Fortunately the DIY techniques work just as well on the fabrics used by other brands, so even if your packraft isn’t a DIY Packraft, you can still upgrade and repair it yourself using the techniques shown on this site.
Part of the beauty of the DIY Packrafts (if I may say so) is that after you’ve made a packraft yourself, upgrading it is easy because you already have all the skills you need to make modifications.
Brand Reputation
This is a tough one, because like price, brand reputation doesn’t necessarily correlate with the qualities you need in a packraft.
Alpacka has always been at the forefront of innovation, and they deserve a lot of credit for bringing packrafting to where it is now. You pay a premium for their brand image and for having a product made in the USA… but a quick web search shows that they have had the same quality control issues and production delays as anyone else.
Once again, if you’re interested in reading more about how brand reputations are created, check out my post on the online review economy.
DIY Packraft never solicits reviews, nor do I offer discounts or free stuff in exchange for reviews (but I am interested in your feedback, of course).
The DIY Packrafts
The packraft industry isn’t big in the first place, and the DIY niche is a tiny fraction of that already small market. All of the DIY Packraft models available in the shop are my latest designs, so there aren’t many people who have paddled them, and the fraction of people that post about it online is smaller still, so finding third-party information about the current lineup of DIY Packrafts will be a challenge.
Sometimes I’m asked how a specific DIY Packraft model compares to a particular brand-name packraft, and to be honest, I haven’t paddled all of the other packrafts that are available, so usually I can only make an educated guess. It would be great if I could afford to purchase every new packraft that the big brands release each year, but if that were the case I never would have started this website in the first place.
Conclusion
There’s a lot to consider when trying to decide which packraft to spend your money on. Hopefully this article has given you the tools to make an educated purchase, but if there’s something I got wrong or forgot to mention, please leave a comment below!
12 Comments
Ivy · June 21, 2024 at 7:00 am
Hi, do you know anything about Vortex brand packraft? Seems high quality but can’t find anything online. Almost like they never existed.
Considering purchase if a used one. Thanks
Matt (Admin) · June 21, 2024 at 9:14 am
Hmm, nope, I’ve never heard of it.
Nick J · April 5, 2023 at 10:33 pm
I have done some pack rafting in the past, but have always had to borrow or rent one. I am in college so I unfortunately do not have a lot of funds, so when I found this site it peaked my interest. At this point most of my paddling will be somewhere between class ll to lV water. The Tellwa of the one I would go with but I was wondering if there are any reviews on how it does in this rougher water.
My second question convers building the pack raft. I am an avid skier and have a waxing iron that gets to a very precise temp, but it would be generally larger in every direction vs. The examples given on your site. Do you know of this would work?
I am forgetting the exact temp that you recommend but the iron does get hotter if I wish it too.
Matt (Admin) · April 6, 2023 at 8:24 am
Hi Nick, a waxing iron will be too big for some areas on a packraft. I don’t know of any independent reviews, and I don’t give the packraft models whitewater class ratings (for reasons explained on the Whitewater Capabilities of DIY Packrafts page) but for what it’s worth I’ve heard from people who paddled DIY Packrafts through the Grand Canyon and other similar whitewater and they’ve had positive things to say. Maybe someone will see your comment and respond. Forum member Aaron posted some great whitewater pictures in the Customer Pictures gallery.
Orrtuppen · January 15, 2021 at 11:04 am
Hi, I´m getting really interested in trying to build my own pacraft for upcoming summer adventures in nothern sweden. I´ve read what you think about the Vectran (400d) fabric. But if you build a Diy-pacraft with fabric protecting up on the sides of the tubes, would´nt it be even better if it was made of a fabric as tuff as possible when you are nervous of ripping it towards sharp stones in a river? Is it possible to get that fabric in a kit from DIY-Pacrafts? How myck expensive wolund it be and is it more difficult to build from?
Matt (Admin) · January 15, 2021 at 4:16 pm
Hi, yes, that would be even stronger. I do not have any Vectran fabric and I probably will not offer it any time soon because the price is very high.
Sarah Hughes · December 1, 2020 at 9:33 am
Hi Matt,
Glad I found your site! Looking into packrafts for the new year. Which one of yours would you recommend for bikerafting? I’d like to believe any of the rafts you sell are durable enough to support a mountain bike at the front of them, without the risk of a puncture. But if you have a specific type suited to this, or a suggestion for making it so, I’d love your advice!
Thanks, Sarah
Matt (Admin) · December 1, 2020 at 12:35 pm
Hi Sarah – any of the DIY Packrafts except the Ultralight would be suitable for bikerafting (though I wouldn’t really recommend the 2-Person model). A bike takes up all the prime real estate on the bow, so if you plan to camp while bikerafting, add an airtight zipper to your packraft so you can store your camping gear inside the tubes. Also check out my page about bikerafting: https://www.diypackraft.com/faq/bikerafting/
Barbara · January 24, 2021 at 11:46 am
I’ve been spending some time reading the blog posts and this one is great and full of information, so thank you! One piece of info I haven’t found yet is the internal width of the Skeena at the seat. Also, what is the total length? (For the 51″ internal).
Matt (Admin) · January 24, 2021 at 5:55 pm
You’ll find those measurements on the product page in the Shop – look for “internal width” and “overall length”.
unnamedpeaks · December 17, 2019 at 12:52 pm
How big a difference is there between the rocker on the Telkwa and Skeena, and how much of a difference does this make in rapids?
Matt (Admin) · December 17, 2019 at 2:19 pm
At the bow the Telkwa has about 5 degrees more rocker than the Skeena, but the rocker is the same at the stern. The Telkwa can ride over steep waves a bit better, but otherwise they feel pretty much the same.